
This series shows you the various ways you can use Python within Snowflake.
Snowpark for Python is the name for the new Python functionality integration that Snowflake has recently developed. At the Snowflake Summit in June 2022, Snowpark for Python was officially released into Public Preview, which means anybody is able to get started using Python in their own Snowflake environment.
I would understand if you wanted to skip this post and cut directly to the Snowflake’s monolithic documentation page; however, I would strongly recommend reading through this post first as it will give you an introduction to both the possibilities and the limitations of this new functionality. We will also walk through the steps you can take to create your own Python stored procedure from within Snowflake itself. There’s no need to set up anything on your local machine for this; all you need is a Snowflake account and the relevant privileges, most notably the CREATE PROCEDURE privilege at the schema level.
If you are interested in finding out about Python UDFs instead of stored procedures, be sure to check out my matching post, “A Definitive Guide to Creating Python UDFs Directly with the Snowflake User Interface.”
Why Use a Python Stored Procedure Instead of SQL Scripting?
Most Snowflake users are far more comfortable with SQL than they are with Python or other advanced programming languages, simply because SQL is the core language required to leverage the Snowflake platform. With that in mind, it is easy to consider using SQL-based stored procedures instead of other languages; such as Python. However, there are several strong reasons to leverage a non-SQL language instead, especially when compared to Python:
- Anything you can achieve with a SQL stored procedure can also be achieved with a Python stored procedure.
- A SQL stored procedure would have a harder time defining and executing functions within itself, especially when this is paired with looping. SQL is fantastic, but I would not argue for it to be a first class programming language like JavaScript and Python.
- Python is a high-level language capable of far more than standard SQL, including the ability to import and leverage functionality from a wide number of modules.
To summarise, Python is simply more versatile than SQL and unlocks a wider range of functionality. Here are a few examples of powerful functionality that is possible with Python and not with SQL:
- Construct and execute SQL queries with greater ease and flexibility than with SQL scripting
- Access supporting files in cloud storage and read their contents to contribute to the overall Python script
- Perform powerful data transformations built out of multiple components using Pandas
- Leverage the map() function or list comprehension to apply a function to each value of a list; a simple way to support looping and iteration
- Apply machine learning models to generate new forecasts using libraries such as PyTorch or scikit-learn
- Generate authentication key pairs and apply them to users
A Warning Regarding Staged Files and Libraries
It is important to note at this time that stored procedures do not have access to the “outside world.” This is a security restriction put in place by Snowflake intentionally. If you wish to create a stored procedure that accesses the outside world, for example to hit an API using the requests library, then it is recommended to use external functions instead.
How to Create Your Own Python Stored Procedure from a Snowflake Worksheet
Snowflake have now integrated the ability to create Python stored procedures directly into the standard commands that can be executed from within a Snowflake worksheet. Whether you are using the classic UI or the new Snowsight UI, you can simply open a worksheet and use this code template to get started.
This template includes line regarding optional packages and imports that will be discussed after our simple examples.
CREATE OR REPLACE PROCEDURE <stored procedure name> (<arguments>)
  returns <data type> << optional: not null >>
  language python
  runtime_version = '3.8'
  packages=('snowflake-snowpark-python', <optional list of additional packages>)
  << optional: imports=(<list of files and directories to import from defined stages>) >>
  handler = '<name of main Python function>'
as
$$
def <name of main Python function>(snowpark_session, <arguments>):
  # Python code to determine the main
  # functionality of the stored procedure.
  # This ends with a return clause:
  return <function output>
$$
;
The main elements to understand here are:
- Everything within the set of
$$s on lines 9 and 15 must be Python code and forms the stored procedure itself. Meanwhile, everything outside of those$$s is Snowflake’s flavour of SQL and contains metadata for the stored procedure. - On row 7, we define what is known as a handler. This is the name of the main function within our Python code that the Snowflake stored procedure will execute. This handler must match a function within the Python code or the stored procedure will fail.
- On row 2, we define the data type that the stored procedure will return. I intend to explain this through the simple examples below.
- On row 5, we import the
snowflake-snowpark-pythonlibrary. This is the main library when the phrase “Snowpark for Python” is discussed and it allows Python to interact with Snowflake. - An additional argument called “snowpark_session” is also included on row 10 before the other arguments. This is the active Snowflake session being used by
snowflake-snowpark-pythonand is passed into our function so that we can directly interact with Snowflake objects within our stored procedure; for example to execute SQL queries. - On rows 5 and 6 are lines regarding optional additional packages and imports for the stored procedure. This will be discussed after our simple examples.
- The arguments passed to the stored procedure on row 1 are the same arguments that are passed to the handler function in Python on row 10; however. data types may need to be changed from Snowflake’s flavour of SQL into Python equivalents. This is discussed more in the note below.
A Note on Stored Procedures and Function Arguments
An important thing to keep in mind when creating Python stored procedures is the data types that are permitted.
When defining the metadata of your stored procedure, all data types are viewed from the perspective of Snowflake’s flavour of SQL. Specifically, I am referring to the arguments on line 1 and the returned data type on line 2.
When defining variables within your Python code, any input arguments in the handler function (line 10) or returned values (row 14) must be one of the data types specified in the Python Data Type column of Snowflake’s SQL-Python Type Mappings table.
It is also important to note that the number of arguments passed to the Stored Procedure on row 1 is the same number of arguments passed to the handler Python function on row 10 and must be in the same intended order, with the exception of the snowpark_session variable. Though I would recommend naming the variables similarly for ease of understanding, the names of these variables do not need strictly need to align as long as they are in the same order, leverage similar data types and come after the snowpark_session.
Simple Examples
Let’s break this down and provide a few simple examples to explain what is happening more clearly. Each of these three examples don’t really have any business being a stored procedure instead of a UDF; however, I want to clearly explain how these procedures work in the simplest terms before we move on to the useful examples.
Please note that these examples are deliberately minimalistic in their design, and thus do not include any error handling or similar concepts. Best practices would be to prepare functions with error handling capabilities to prevent unnecessary execution and provide useful error outputs to the end user.
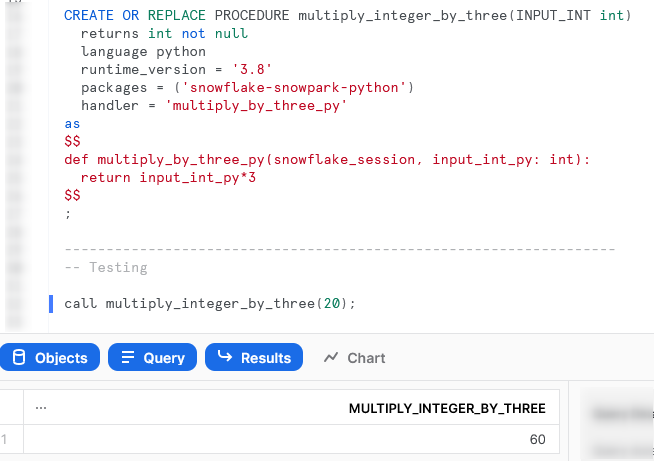
Multiply Input Integer by Three
Our first example is a very simple stored procedure that takes an integer and multiples it by three. First, let’s see the code:
CREATE OR REPLACE PROCEDURE multiply_integer_by_three(INPUT_INT int)
  returns int not null
  language python
  runtime_version = '3.8'
  packages = ('snowflake-snowpark-python')
  handler = 'multiply_by_three_py'
as
$$
def multiply_by_three_py(snowpark_session, input_int_py: int):
  return input_int_py*3
$$
;
There are a few things to break down here to confirm our understanding:
- On rows 9 and 10, we have defined a very simple function in Python which multiples an input number by three.
- The name of our handler function on row 6 matches that of our Python function defined on row 9.
- On row 2, we can see that our function will return an integer and that the integer will not be NULL.
- The INPUT_INT argument passed to the stored procedure on row 1 will be the integer that is passed to the input_int_py argument when executing the handler function in Python on row 9.
If we execute this code in a Snowflake worksheet, we can then call the stored procedure, in the same way that we would any other stored procedure, to see the result.
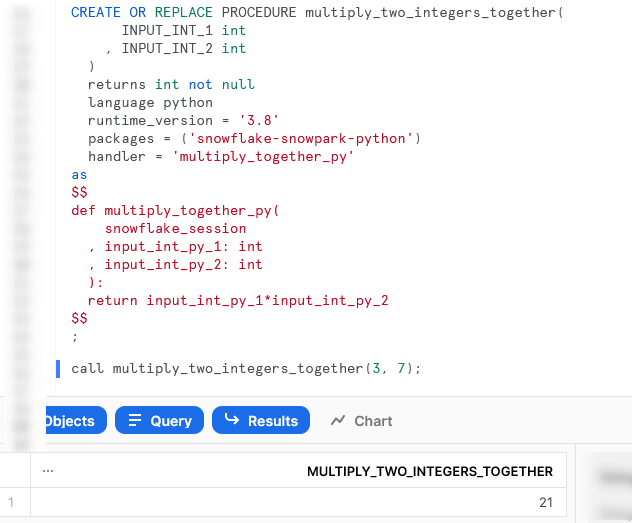
Multiply Two Input Integers Together
Our second example is another simple function, this time taking two input integers and multiplying them together. Let’s see the code:
CREATE OR REPLACE PROCEDURE multiply_two_integers_together(
      INPUT_INT_1 int
    , INPUT_INT_2 int
  )
  returns int not null
  language python
  runtime_version = '3.8'
  packages = ('snowflake-snowpark-python')
  handler = 'multiply_together_py'
as
$$
def multiply_together_py(
    snowpark_session
  , input_int_py_1: int
  , input_int_py_2: int
  ):
  return input_int_py_1*input_int_py_2
$$
;
There are a lot of similarities between this and our previous function; however, this time we have multiple inputs.
Again, if we execute this code in a Snowflake worksheet, we can then call the stored procedure, in the same way that we would any other stored procedure, to see the result.
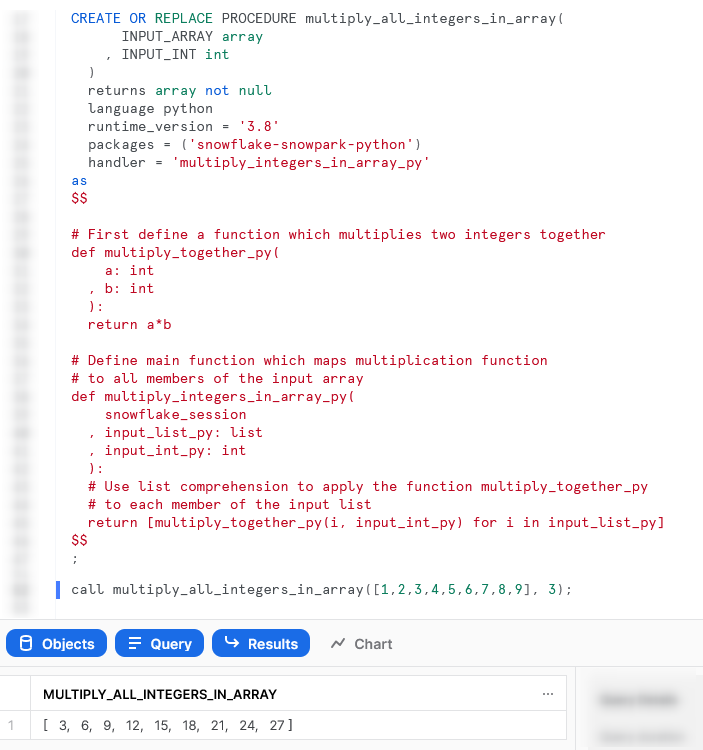
Multiply All Integers in an Input Array by Another Integer
The last of our simple examples takes things one step further, so that we can introduce an additional Python function in our script and demonstrate the power of list comprehension. This stored procedure will accept an array of integers as an input, along with a second input of a single integer. The stored procedure will multiply all members of the array by that second integer.
Let’s see the code:
There are several things to note here:
- On row 5, we can see that we are now expecting an array as an output instead of an integer.
- On rows 13-18, we are defining a second Python function within our script. This function is called
multiply_together_py. This is not strictly needed as we could use a lambda function; however, I have included it to demonstrate the functionality. - On row 29, we use the concept of list comprehension to apply our
multiply_together_pyfunction to every member of our input array.
Again, if we execute this code in a Snowflake worksheet, we can then call the stored procedure in the same way that we would any other stored procedure to see the result.
Interacting with Snowflake within a Stored Procedure
We have now covered the basics around stored procedure creation; however, we haven’t constructed anything particularly useful since our examples so far would all be better suited as UDFs. It is now time to change that as we investigate some examples that directly interact with Snowflake.
Simple Examples that Interact with Snowflake
Here are some simple examples that interact with Snowflake. Each will introduce another concept to demonstrate different functionality.
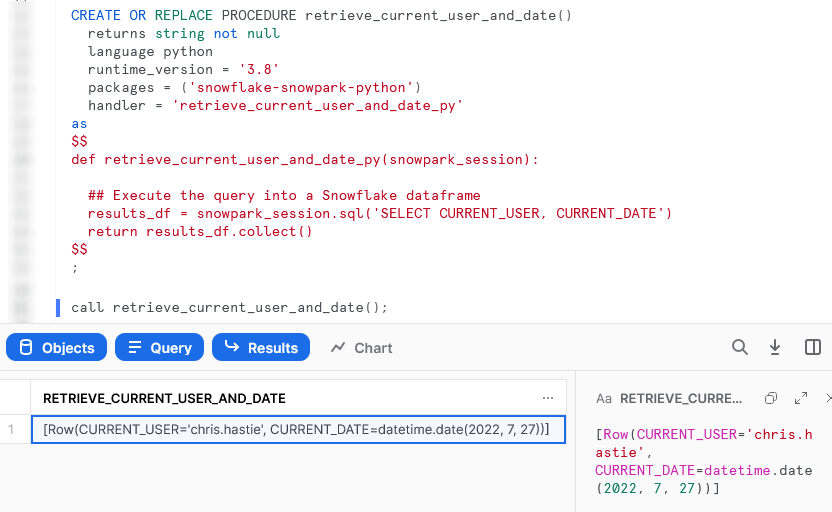
Retrieve Current User and Date
Our first example to interact with Snowflake is a very simple stored procedure that executes a SQL statement to retrieve the current user and date. Let’s see the code:
CREATE OR REPLACE PROCEDURE retrieve_current_user_and_date()
  returns string not null
  language python
  runtime_version = '3.8'
  packages = ('snowflake-snowpark-python')
  handler = 'retrieve_current_user_and_date_py'
as
$$
def retrieve_current_user_and_date_py(snowpark_session):

  ## Execute the query into a Snowflake dataframe
  results_df = snowpark_session.sql('SELECT CURRENT_USER, CURRENT_DATE')
  return results_df.collect()
$$
;
There are a few things to break down here to confirm our understanding:
- On row 12, we use the
.sql()method of oursnowpark_sessionconnection to execute our SQL statement and store the results in a Snowflake dataframe, calledresults_df. - On row 13, we use the
.collect()method to convert our dataframe object into a string that we can output. This output is actually a list of Snowflake Row objects, but it appears nicely as a list for our requirements. This isn’t a very clean output in this format; however, this is just a simple example to demonstrate the functionality.
Again, if we execute this code in a Snowflake worksheet, we can then call the stored procedure, in the same way that we would any other stored procedure, to see the result.
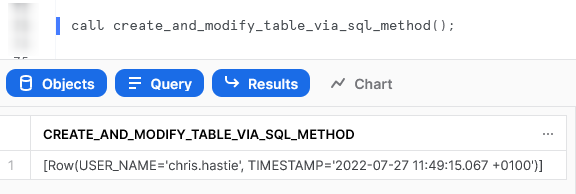
Create and Modify a Table in Snowflake Using the .sql() Method
This example expands on our example usage of the .sql() method by demonstrating creating a very simple table and making some changes to it. There is nothing overly complex about this example compared to the last; however, it looks more complex upon first sight due to its length. This allows us to demonstrate chaining multiple statements and executing both DDL and DML commands.
Let’s see the code:
The important differences to understand within this examples are:
- The script executes multiple SQL statements in order to create a table, drop a field, add a new field, insert a record, select all records and finally drop the table. This is a simple demonstration of how SQL commands can be executed in order through a Python stored procedure
- On rows 19, 27, 35, 43, 46 and 53, we use the
.collect()to actually execute our SQL command in Snowflake. Without this.collect()method, we are only defining a SQL command and not executing it. We do not have to use.collect()specifically to execute SQL commands as any of the action methods will do the same; however,.collect()is the simplest to apply for our requirement
Again, if we execute this code in a Snowflake worksheet, we can then call the stored procedure, in the same way that we would any other stored procedure, to see the result. Again, due to the length of the stored procedure, I will only screenshot the output.
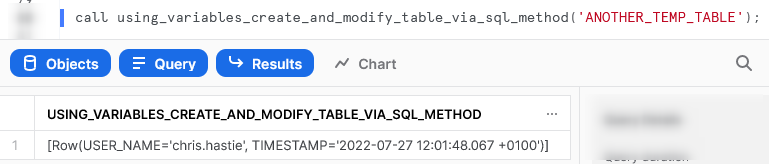
Create and Modify a Table with a Variable Input Name in Snowflake Using the .sql() Method
This example is very similar to our last example; however, it allows us to demonstrate using variables as part of strings and SQL commands. Let’s see the code:
CREATE OR REPLACE PROCEDURE using_variables_create_and_modify_table_via_sql_method(INPUT_TABLE_NAME STRING)
  returns string not null
  language python
  runtime_version = '3.8'
  packages = ('snowflake-snowpark-python')
  handler = 'using_variables_create_and_modify_table_via_sql_method_py'
as
$$
def using_variables_create_and_modify_table_via_sql_method_py(snowpark_session, table_name: str):

  # This procedure uses standard python
  # string manipulation to leverage variables
  # within strings. For example, we can
  # insert table_name into a string as follows:
  example_string = f'My table name is {table_name}'

  ## Execute the query to create the table
  ## using ''' for a multi-line string input
  ## and .collect() to ensure execution on Snowflake
  snowpark_session.sql(f'''
    CREATE OR REPLACE TABLE {table_name} (
        RECORD_ID INT IDENTITY
      , USER_NAME STRING
    )
  ''').collect()

  ## Execute the query to drop the RECORD_ID field
  ## using ''' for a multi-line string input
  ## and .collect() to ensure execution on Snowflake
  snowpark_session.sql(f'''
    ALTER TABLE {table_name}
    DROP COLUMN RECORD_ID
  ''').collect()

  ## Execute the query to add the TIMESTAMP field
  ## using ''' for a multi-line string input
  ## and .collect() to ensure execution on Snowflake
  snowpark_session.sql(f'''
    ALTER TABLE {table_name}
    ADD COLUMN TIMESTAMP STRING
  ''').collect()

  ## Execute the query to insert a new record
  ## using ''' for a multi-line string input
  ## and .collect() to ensure execution on Snowflake
  snowpark_session.sql(f'''
    INSERT INTO {table_name} (USER_NAME, TIMESTAMP)
    SELECT CURRENT_USER, CURRENT_TIMESTAMP
  ''').collect()

  ## Execute a star select query into a Snowflake dataframe
  results = snowpark_session.sql(f'SELECT * FROM {table_name}').collect()

  ## Execute the query to drop the table again
  ## using ''' for a multi-line string input
  ## and .collect() to ensure execution on Snowflake
  snowpark_session.sql(f'''
    DROP TABLE IF EXISTS {table_name}
  ''').collect()

  return results
$$
;
The only difference between this example and the previous one is how we use formatted string literals to leverage a variable within each of our SQL commands.
Again, if we execute this code in a Snowflake worksheet, we can then call the stored procedure, in the same way that we would any other stored procedure, to see the result. Again, due to the length of the stored procedure, I will only screenshot the output.
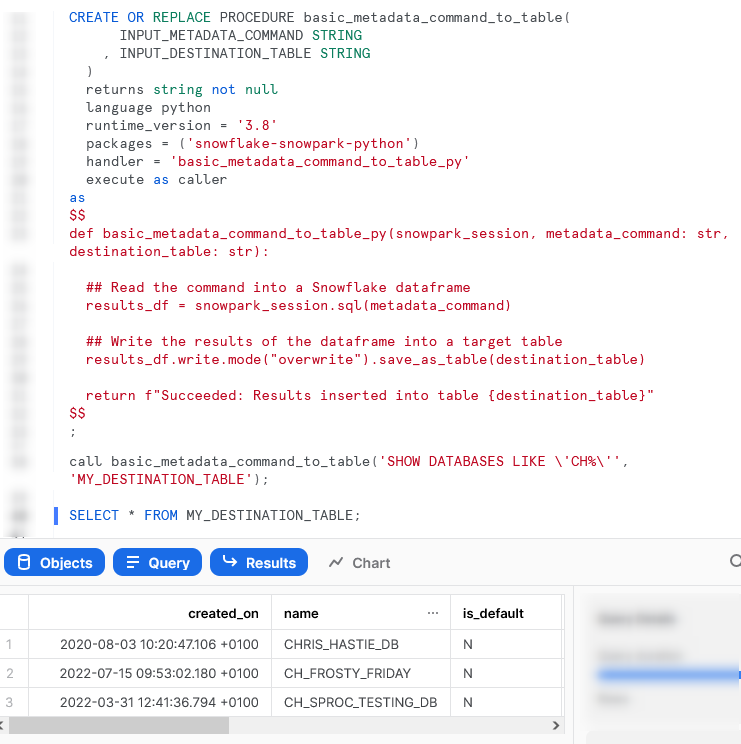
Execute a Metadata Command (SHOW/LIST/DESCRIBE) into a Table
This example is a lot more interesting than the previous ones, in my opinion. Within this example, we take a metadata command and a destination table as inputs, then execute the metadata command and write the results to the destination table.
Let’s see the code:
CREATE OR REPLACE PROCEDURE basic_metadata_command_to_table(
      INPUT_METADATA_COMMAND STRING
    , INPUT_DESTINATION_TABLE STRING
  )
  returns string not null
  language python
  runtime_version = '3.8'
  packages = ('snowflake-snowpark-python')
  handler = 'basic_metadata_command_to_table_py'
  execute as caller
as
$$
def basic_metadata_command_to_table_py(snowpark_session, metadata_command: str, destination_table: str):

  ## Read the command into a Snowflake dataframe
  results_df = snowpark_session.sql(metadata_command)

  ## Write the results of the dataframe into a target table
  results_df.write.mode("overwrite").save_as_table(destination_table)

  return f"Succeeded: Results inserted into table {destination_table}"
$$
;
There are a few things to unpack here:
- On row 10, we have added a clause that forces the stored procedure to execute as the caller. By default, stored procedures are executing by the owner instead. We must execute as the caller so that our SHOW command works, as SHOW commands can only be executed as caller
- On row 19, we use the
save_as_table()method of the write property to directly store our results into the destination table. - You may have noticed that we do not use the
.collect()method in this example. We do not need to as thesave_as_table()method of the write property is also on of the action methods
Again, if we execute this code in a Snowflake worksheet, we can then call the stored procedure, in the same way that we would any other stored procedure, to see the result.
Importing Additional Libraries from Anaconda
Even though our examples so far have all been fairly basic, we can already start to see how powerful Python stored procedures could be. Not only are we able to receive inputs and use them to produce outputs, we can also define our own functionality within the Python script and perform more complex logical steps when executing our function, storing the results in tables in Snowflake.
What about if we wish to use Python libraries that are not part of the standard inbuilt set? For example, what if we wish to leverage Pandas, PyTorch or a wide range of other popular libraries? The good news here is that Snowflake have partnered with Anaconda, and you already have everything you need to leverage any of the libraries listed in Anaconda’s Snowflake channel.
If you wish to leverage any libraries that are not included in Anaconda’s Snowflake channel, including any libraries you have developed in-house, then you will need to import them separately. This will be discussed in the next section.
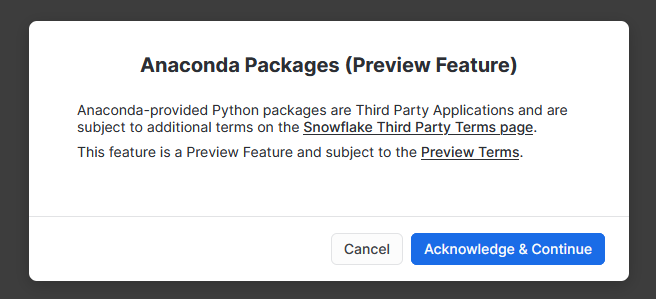
Accepting the Terms of Usage to Enable Third-Party Packages
To leverage third party packages from Anaconda within Snowflake, an ORGADMIN must first accept the third-party terms of usage. I walk through the process now; however, more details can be found here for those who desire it. This step must only be completed once for the entire organisation.
- Using the ORGADMIN role in the SnowSight UI, navigate to Admin > Billing to accept the third-party terms of usage
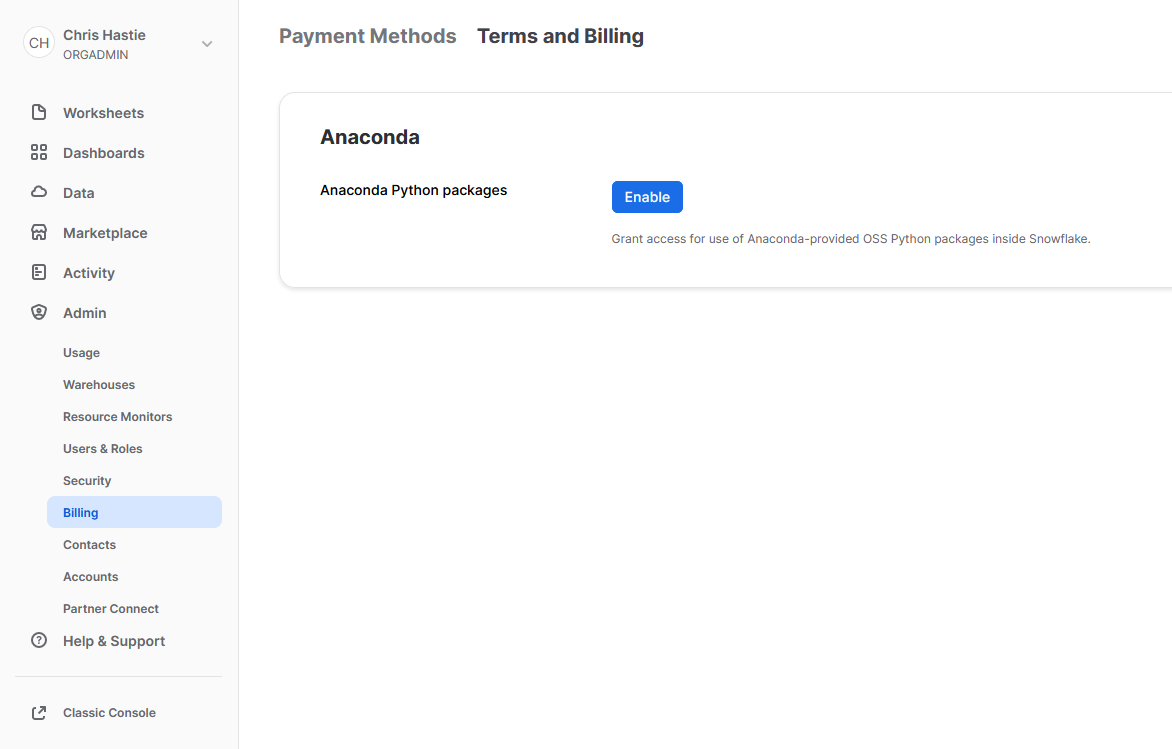
- Confirm acknowledgement
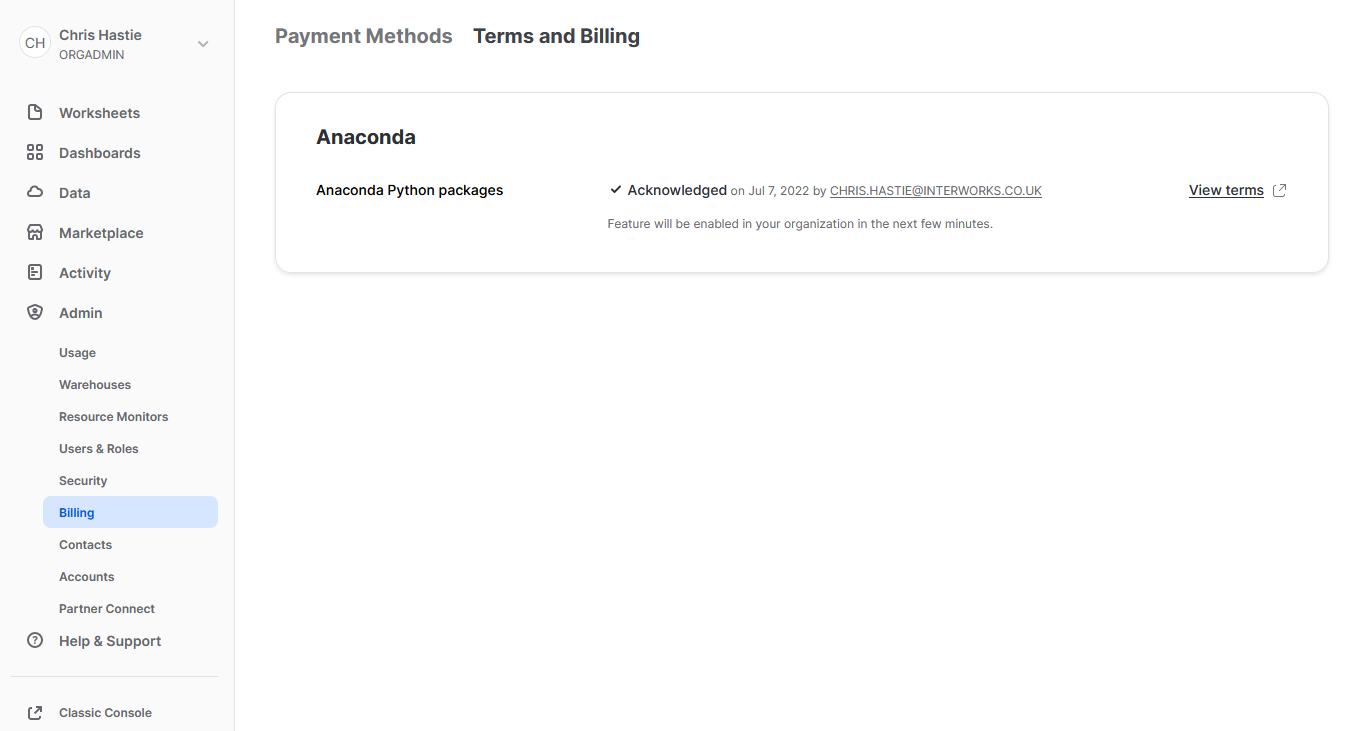
- The screen will then update to reflect the accepted terms
Examples Using Supported Third-Party Libraries
Manipulate Data in Snowflake Using Pandas
This stored procedure demonstrates using Pandas to manipulate data from a table. Specifically, we will use Pandas on the contents of a table to make some minor modifications (a filter) before writing the result to another table.
Let’s see the code:
CREATE OR REPLACE PROCEDURE manipulate_data_with_pandas(
      INPUT_ORIGIN_TABLE STRING
    , INPUT_DESTINATION_TABLE STRING
    , INPUT_FILTER_FIELD STRING
    , INPUT_FILTER_VALUE STRING
  )
  returns string not null
  language python
  runtime_version = '3.8'
  packages = ('snowflake-snowpark-python', 'pandas')
  handler = 'manipulate_data_with_pandas_py'
as
$$

import pandas

def manipulate_data_with_pandas_py(snowpark_session, origin_table: str, destination_table: str, filter_field: str, filter_value: str):

  # Read the origin table into a Snowflake dataframe
  results_df_sf = snowpark_session.table(origin_table)

  # Convert the Snowflake dataframe into a Pandas dataframe
  results_df_pd = results_df_sf.to_pandas()

  # Filter the Pandas dataframe to databases where the field matches the value
  results_df_pd_filtered = results_df_pd[results_df_pd[filter_field] == filter_value]

  # Convert the filtered Pandas dataframe into a Snowflake dataframe
  results_df_sf_filtered = snowpark_session.create_dataframe(results_df_pd_filtered)

  # Write the results of the dataframe into a target table
  results_df_sf_filtered.write.mode("overwrite").save_as_table(destination_table)

  return f"Succeeded: Results inserted into table {destination_table}"
$$
;
The core difference between this stored procedure and our previous examples are:
- On row 10, we have now included the
pandaslibrary in the “packages” clause. - On row 15, we use standard Python functionality to import the required tools from the
pandaslibrary, which are then leveraged in our Python function. - On row 20, we use the
.table()method to read the contents of a Snowflake table into a Snowflake dataframe. - On row 23, we convert a Snowflake dataframe into a Pandas dataframe.
- On row 29, we convert a Pandas dataframe into a Snowflake dataframe.
It is important to note the following according to Snowflake’s own documentation, which prevents us from directly sending results from metadata commands such as SHOW into Pandas:
If you use
Session.sql()with this method, the input query ofSession.sql()can only be a SELECT statement.
Again, if we execute this code in a Snowflake worksheet, we can then call the stored procedure, in the same way that we would any other stored procedure, to see the result.

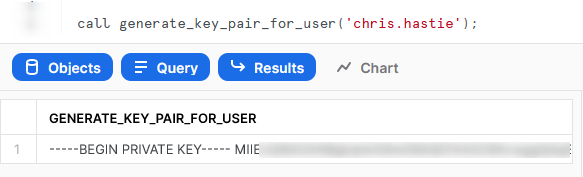
Generate a Snowflake-Compliant Key Pair and Rotate the Keys for a User
This function imports the cryptography library to generate an authentication key pair that is compliant with Snowflake. I have discussed the benefits of this in a previous blog; however, this new Python functionality renders the technical side of this blog redundant!
It is important to note that this specific approach is not best practice as unintended users may be able to access the private key from Snowflake’s history, however I will resolve this in an upcoming blog post.
Let’s see the code:
Similar to our last example, the core difference between this stored procedure and our previous examples are:
- On row 5, we have now included a line to include the
cryptographylibrary in the metadata for the stored procedure. - On rows 12 and 13, we use standard Python functionality to import the required tools from the
cryptographylibrary, which are then leveraged in our Python function.
This is a much longer stored procedure than any of our previous examples and I will not dive into specifics of the Python script itself. My hope is that this is enough to give readers an idea of importing a package (crytopgraphy) and leveraging it within a stored procedure.
Again, if we execute this code in a Snowflake worksheet, we can then call the stored procedure, in the same way that we would any other stored procedure, to see the result. Again, due to the length of the stored procedure, I will only screenshot the output.
Importing Files and Libraries via a Stage
So far, we have demonstrated quite a lot in our miniature crash course into Python stored procedures in Snowflake. Before we wrap up, I’d like to cover one last piece, which is how to import libraries that are not covered by the Anaconda Snowflake channel and how to import other external files.
Warning Regarding Staged Files and Libraries
It is important to note at this time that these external files are fixed in time. Stored procedures do not have access to the “outside world” and each file must exist within the stage at the time the stored procedure is created, as the file is actually copied into Snowflake’s underlying storage location for the stored procedure. If you update your files in your external stage, your Snowflake stored procedure will not undergo these changes unless you recreate the stored procedure, as well.
Unfortunately, files must be imported into stored procedures individually and specifically. If you wish to import five files within a directory, you must list all five files individually. You cannot simply specificy a parent directory or leverage a wildcard.
Examples Using External Files and Libraries
For these examples, we will be uploading all of our required files to the stage “STG_FILES_FOR_STORED_PROCEDURES.”
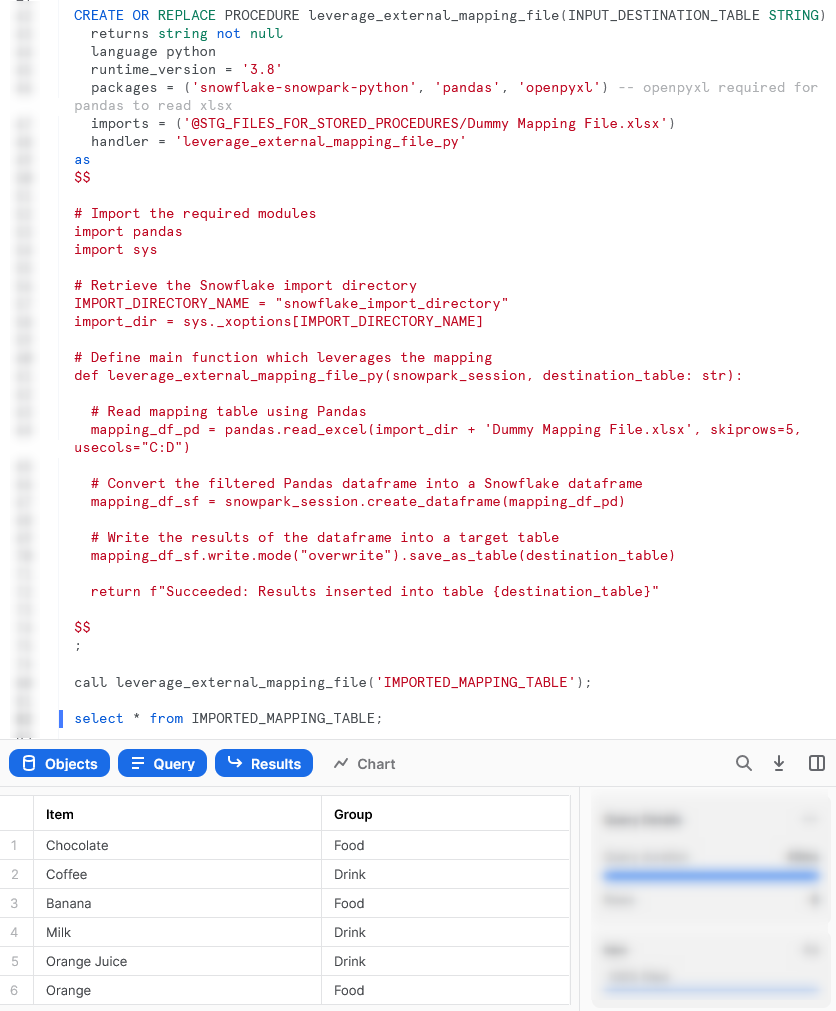
Import an External Excel xlsx File
This example reads an Excel xlsx file into a pandas dataframe, then writes the dataframe into a destination table in Snowflake.
The file we will be leveraging is a very simple mapping file that looks like this:
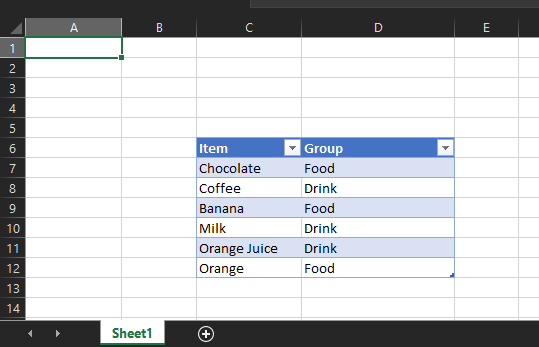
The file is called “Dummy Mapping File.xlsx” and I have uploaded it to the stage “STG_FILES_FOR_STORED_PROCEDURES.”
Here is the code for the stored procedure itself:
CREATE OR REPLACE PROCEDURE leverage_external_mapping_file(INPUT_DESTINATION_TABLE STRING)
  returns string not null
  language python
  runtime_version = '3.8'
  packages = ('snowflake-snowpark-python', 'pandas', 'openpyxl') -- openpyxl required for pandas to read xlsx
  imports = ('@STG_FILES_FOR_STORED_PROCEDURES/Dummy Mapping File.xlsx')
  handler = 'leverage_external_mapping_file_py'
as
$$

# Import the required modules
import pandas
import sys

# Retrieve the Snowflake import directory
IMPORT_DIRECTORY_NAME = "snowflake_import_directory"
import_dir = sys._xoptions[IMPORT_DIRECTORY_NAME]

# Define main function which leverages the mapping
def leverage_external_mapping_file_py(snowpark_session, destination_table: str):

  # Read mapping table using Pandas
  mapping_df_pd = pandas.read_excel(import_dir + 'Dummy Mapping File.xlsx', skiprows=5, usecols="C:D")

  # Convert the filtered Pandas dataframe into a Snowflake dataframe
  mapping_df_sf = snowpark_session.create_dataframe(mapping_df_pd)

  # Write the results of the dataframe into a target table
  mapping_df_sf.write.mode("overwrite").save_as_table(destination_table)

  return f"Succeeded: Results inserted into table {destination_table}"

$$
;
The unique differences for this example are:
- Row 6 includes a line to import the file from a stage. This is a critical component for our Python function to be able to access the file during the
pandas.from_excel()function. - Mirroring this is the code on lines 16 and 17 that leverages the
syslibrary to access the location where Snowflake stores files that have been imported into the stored procedure.
The rest of the code in this script is specific Python code to download the Excel file into a Pandas dataframe, convert it to a Snowflake dataframe and write it to the destination table.
Again, if we execute this code in a Snowflake worksheet, we can then call the stored procedure, in the same way that we would any other stored procedure, to see the result.
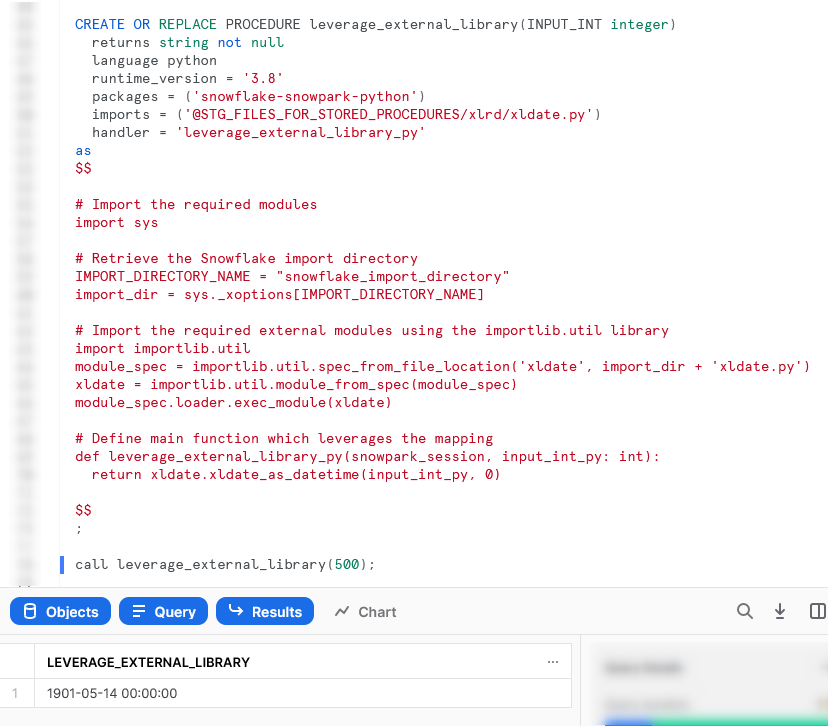
Import an Non-Standard External Library
This example is designed to leverage the xldate function of the xlrd library. This library is not included in the standard set of supported libraries, so it must be imported specifically.
Let’s see the code:
CREATE OR REPLACE PROCEDURE leverage_external_library(INPUT_INT integer)
  returns string not null
  language python
  runtime_version = '3.8'
  packages = ('snowflake-snowpark-python')
  imports = ('@STG_FILES_FOR_STORED_PROCEDURES/xlrd/xldate.py')
  handler = 'leverage_external_library_py'
as
$$

# Import the required modules
import sys

# Retrieve the Snowflake import directory
IMPORT_DIRECTORY_NAME = "snowflake_import_directory"
import_dir = sys._xoptions[IMPORT_DIRECTORY_NAME]

# Import the required external modules using the importlib.util library
import importlib.util
module_spec = importlib.util.spec_from_file_location('xldate', import_dir + 'xldate.py')
xldate = importlib.util.module_from_spec(module_spec)
module_spec.loader.exec_module(xldate)

# Define main function which leverages the mapping
def leverage_external_library_py(snowpark_session, input_int_py: int):
  return xldate.xldate_as_datetime(input_int_py, 0)

$$
;
The unique differences for this example are:
- Row 6 includes a line to import the
xldate.pyfile from a stage. This is critical and would match the file found in yourenv/Lib/site-packages/xlrddirectory that is created during apip installin a virtual environment (or your default environment). - As with the previous example, lines 15 and 16 leverage the
syslibrary to access the location where Snowflake stores files that have been imported into the stored procedure. - The block of lines 19-22 leverage the
importlib.utillibrary to import the specific module from the imported directory.
Again, if we execute this code in a Snowflake worksheet, we can then call the stored procedure, in the same way that we would any other stored procedure, to see the result.
Wrap Up
So there we have it. We have covered a lot of content in this post and some of these stored procedures could potentially have their own blog post all on their own! My goal is to demonstrate how to create stored procedures for different scenarios and provide that in a single post so that it is easy for readers to find and refer back to if needed.
I hope this helps you get started on your own journey with Python stored procedures in Snowflake. Let us know what cool things you come up; it’s always great to see new functionality lead to productive and useful innovation.
If you wish to see the code for all of this and other content that we have, you can find it on the InterWorks GitHub.
If you are interested in finding out about Python UDFs, be sure to check out my matching “A Definitive Guide to Creating Python UDFs Directly with the Snowflake User Interface.”