
This series shows you the various ways you can use Python within Snowflake.
Snowpark for Python is the name for the new Python functionality integration that Snowflake has recently developed. At the Snowflake Summit in June 2022, Snowpark for Python was officially released into Public Preview, which means anybody is able to get started using Python in their own Snowflake environment.
I would understand if you wanted to skip this post and cut directly to the Snowflake’s monolithic documentation page; however, I would strongly recommend reading through this post series as it will give you an introduction to both the possibilities and the limitations of this new functionality. We will also walk through the steps you can take to create your own Python User Defined Table Function, or Python UDTF for short, from within Snowflake itself.
This article is a precursor to the next two Definitive Guides for Snowflake with Python, which will focus on creating Python UDTFs either from within Snowflake via the UI or by using the Snowpark for Python package. This article specifically targets the required background around UDTFs that will then be relevant for the two definitive guides.
What Is the Difference Between a UDTF and a UDF?
In short, a UDTF is a specific type of UDF that yields a tabular output. A standard UDF is expected to take a set of scalar variables and output a scalar result. For example, you could have a UDF designed to take two numbers as inputs and return their sum. If you wish to execute this function on all rows of an input table, you would call the UDF specifically at the row level as part of your SELECT statement. This may look something like the following code:
SELECT
    VALUE_A
  , VALUE_B
  , MY_UDF(VALUE_A, VALUE_B) AS VALUE_SUM
FROM MY_TABLE
;
This would yield the following example output:
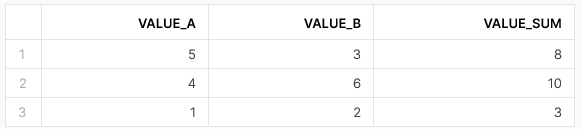
As you can see, the UDF in this example returns a value that simply sits within a column of the output. This is alternatively described as being a scalar output, as the output is returned as a single value. Even though we have multiple rows in our final result, the UDF is only returning values within a single column and the SQL to call the UDF has taken place in the same area as you would select any other fields. Under the hood, Snowflake executes each calculation of the UDF in isolation, calculating the value for row 1 separately from the value from row 2, etc. Naturally, there are plenty of performance optimisations being undertaken by Snowflake at the same time, but the general rough principle remains that each row is treated separately.
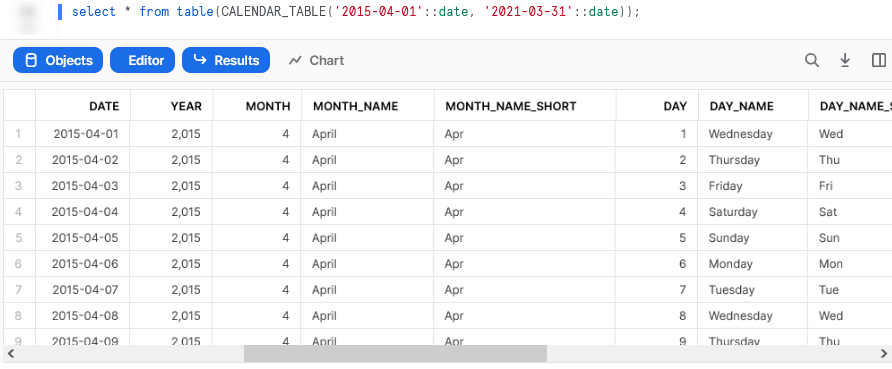
On the other hand, a UDTF is intended to return a table of values instead if a scalar value. In other words, a UDTF expects to return multiple columns in the output and is capable of outputting an entire table. A simple example would be a UDTF that outputs a calendar table covering all dates between an input start and end date. A standard UDF would not be able to return such a result whilst a UDTF can. We will cover this example fully further on in this guide. Here is a screenshot of the output to whet your appetite.
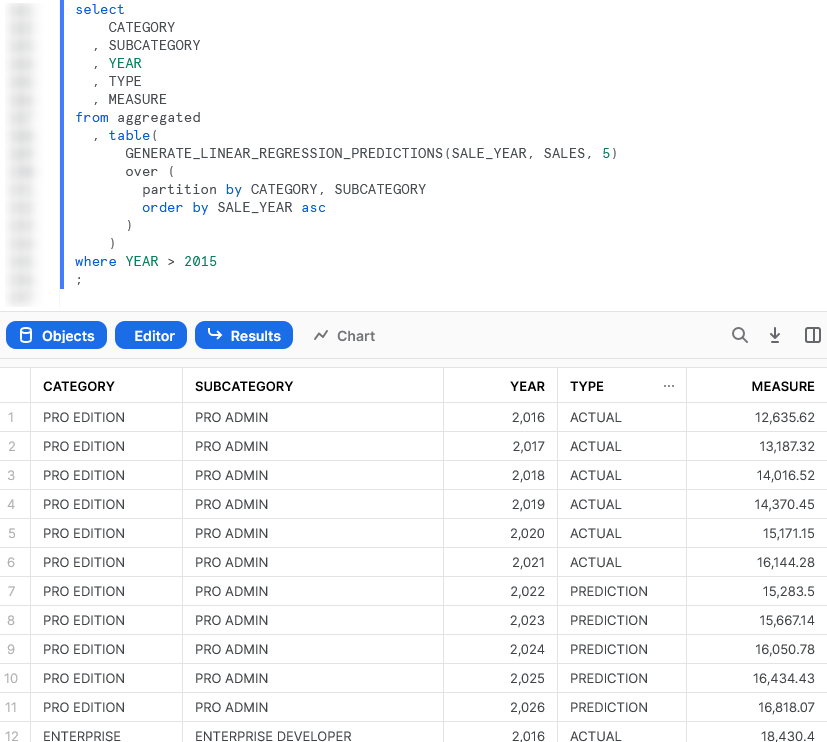
Another great feature of a UDTF is that it can accept multiple rows of data as an input. This goes as far as being able to accept an entire table of values as an input and process them together in batches known as partitions. Therefore, the logic inside the UDTF can act on full sets of data if required. A great example of this is leveraging a UDTF to train a machine learning model on a set of input data and output a set of predicted values. You can even choose how the data is partitioned to ensure the model is trained on the correct batches of data.
Again, here is a screenshot of the output to whet your appetite and we will cover this example fully further on in this guide.
Why Use a Python UDTF Instead of a SQL UDTF?
Most Snowflake users are far more comfortable with SQL than they are with Python or other advanced programming languages, simply because SQL is the core language required to leverage the Snowflake platform. With that in mind, it is easy to consider using SQL-based UDTFs instead of other languages; such as Python. However, there are several strong reasons to leverage a non-SQL language instead, especially when compared to Python:
- Python is a high-level language capable of far more than standard SQL, including the ability to import and leverage functionality from a wide number of modules.
- SQL UDTFs can only leverage a single SQL statement. This is stated within Snowflake’s documentation as follows:
You can include only one query expression. The expression can include UNION [ALL].
To summarise, Python is simply more versatile than SQL and unlocks a wider range of functionality. Here are a few examples of powerful functionality that is possible with Python and not with SQL:
- Chain multiple commands instead of restricting to a single SQL statement
- Access supporting files in cloud storage and read their contents to contribute to the overall Python script
- Perform powerful data transformations built out of multiple components using Pandas
- Leverage the map() function or list comprehension to apply a function to each value of a list; a simple way to support looping and iteration
- Apply machine learning models to generate new forecasts using libraries such as PyTorch or scikit-learn
Why NOT Use a Python UDTF?
Python UDTFs have no way of interacting with Snowflake objects directly. In other words, a Python UDTF is incapable of executing a SQL statement. This is because UDTFs do not have access to the “outside world,” and a Snowflake Snowpark Session object would be required to interact with Snowflake using Python. Unlike a Stored Procedure, a UDTF is not passed a Snowflake Snowpark Session as an argument and thus cannot query Snowflake objects.
Warning Regarding Staged Files and Libraries
As mentioned above, it is important to note at this time that UDTFs do not have access to the “outside world.” This is a security restriction put in place by Snowflake intentionally. If you wish to create a UDTF that accesses the outside world, for example to hit an API using the requests library, then it is recommended to use external functions instead.
Components of a Python UDTF in Snowflake
Before we cover the actual code to create a Python UDTF in Snowflake, it is important to first discuss the structure of a UDTF and the various components that are involved. It is vital to understand these components if you are passing large datasets to your UDTF as inputs; however, this may be overkill if you are simply looking to return a table based on a single set of input values instead of a table of values. If you are looking to keep to the simpler case, it may be easier to skip down to the earlier examples and build your own UDTF from there.
Output Metadata
A UDTF is specifically intended to return a table of values. When creating a UDTF, the metadata for the returned table, specifically the field names and data types, must be declared explicitly. Due to this, you cannot create UDTFs that yield a variable set of fields.
Personally, I hope this changes in the future as I would love to be able to use a UDTF to dynamically execute PIVOT and UNPIVOT commands.
Tuples
Snowflake expects each row of the Python output to be provided as a tuple, as this is what Snowflake is able to convert into the output metadata.
For example, assume you wish to output data for two fields, using variable_a and variable_b. You can create a tuple of these values as follows:
(variable_a, variable_b)
If you are only outputting a single field, you still must convert it into a tuple. For example, assume you wish to output a value in the variable my_variable. You can create a tuple out of this single value as in the following statement. The important thing to note here is the comma near the end that instructs Python to treat the result as a tuple.
(my_variable,)
Of course, there will be examples of this included in this guide.
Partitions
Earlier in this post, it was stated that a UDTF is able to accept an entire table of values as an input and process them together in batches known as partitions. Each partition is executed in isolation by Snowflake, with different partitions often running in parallel. There is no sharing of information between partitions so any variable in your UDTF cannot be written by one partition and read by another.
Partitioning takes place in two scenarios:
- Partitioning can be a deliberate decision by the user calling the UDTF. This is the recommended approach when your UDTF is intended to leverage multiple input rows to create a relevant output. This is similar to how you may define partitions when using window functions. A simple example would be if your UDTF returns the average of all of the input values in a column. By manually deciding the partitions, a user can determine how the average is calculated. This approach will be demonstrated in further examples.
- If the user has not defined the partitioning manually, Snowflake may perform implicit partitioning automatically to optimise the performance of the UDTF execution. Naturally, this is only desirable when the partitions do not matter, otherwise the user should define the partitions manually.
Handler Class
The handler class acts as the main controller for how your UDTF executes. When the UDTF is executed, the methods within the handler class are leveraged to execute code either at the partition level or the individual row level.
An important thing to note at this point is that the partition-level code within the handler is only executed once per partition, and the row-level code is executed once per row within the partition. This means you must be cautious to avoid accidentally outputting the same values multiple times or unnecessarily repeating code. It also means that partition-level variables cannot be leveraged by other partitions.
If you wish to execute any code at the UDTF level instead of the partition level, that code should be executed before defining the handler class.
process method
The process method is the only method which must be included in the handler class. This is the main method and will contain the code that executes for each input row. If your UDTF is not concerned with leveraging partitions, it is sufficient to only include the process method. This method returns tuples which matches the intended structure of the output table of the UDTF.
__init__ method
The __init__ method is an optional method that contains partition-level code that is executed before individual rows are processed by the process method. This method cannot produce any output rows.
end_partition method
The end_partition method is an optional method that contains partition-level code that is executed after individual rows are processed by the process method. This method can produce multiple output rows and is the final step executed for a partition.
Returning Outputs
It is important to note that only the process and end_partition methods can return outputs. Outputs can be returned using either of the following approaches:
- The
yieldfunction can be used to output individual tuples, one at a time. If you wish to output multiple records within a single method, you must enter the command multiple times.
yield (<field_1_value_1>, <field_2_value_1>, ...)
yield (<field_1_value_2>, <field_2_value_2>, ...)
- The
returnfunction can be used to output all records for the partition at once. If you wish to output multiple records within a single method, you must include them all in the same command.
return [
    (<field_1_value_1>, <field_2_value_1>, ...)
  , (<field_1_value_2>, <field_2_value_2>, ...)
]
An important detail here is that you cannot mix and match between using yield and return. It is recommended that your UDTF only leverages one of these, though it is your choice which as your use case may be more suited to one or the other.
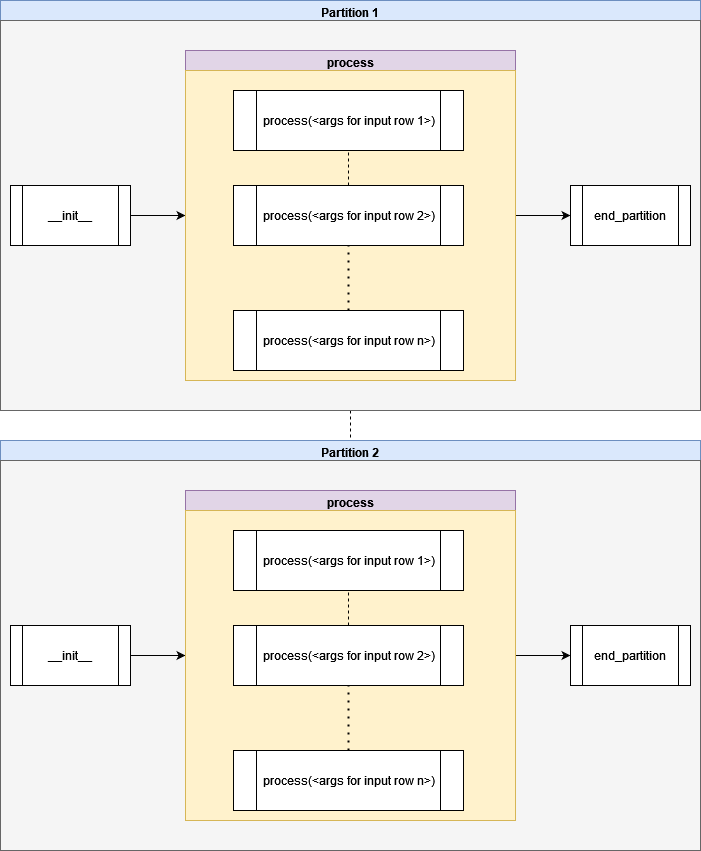
Component Diagram
The following diagram demonstrates how the components of the handler class are processed within a partition. As you can see, each partition is executed in parallel. Snowflake will execute each partition in isolation and the partition-level results are only combined when the final result is output.
Wrap Up
And thus concludes this introductory article on Python UDTFs in Snowflake. As mentioned above, this article is a precursor to the next two Definitive Guides for Snowflake with Python, which will focus on creating Python UDTFs either from within Snowflake via the UI or by using the Snowpark for Python package. These posts will both be released in the near future.
Whilst you wait, be sure to check out my other Definitive Guides for Snowflake with Python. There, you can learn about Python UDFs and Stored Procedures, including how to create them either from within Snowflake via the UI or by using the Snowpark for Python package. All supporting code can be found on the InterWorks GitHub.