
This series shows you the various ways you can use Python within Snowflake.
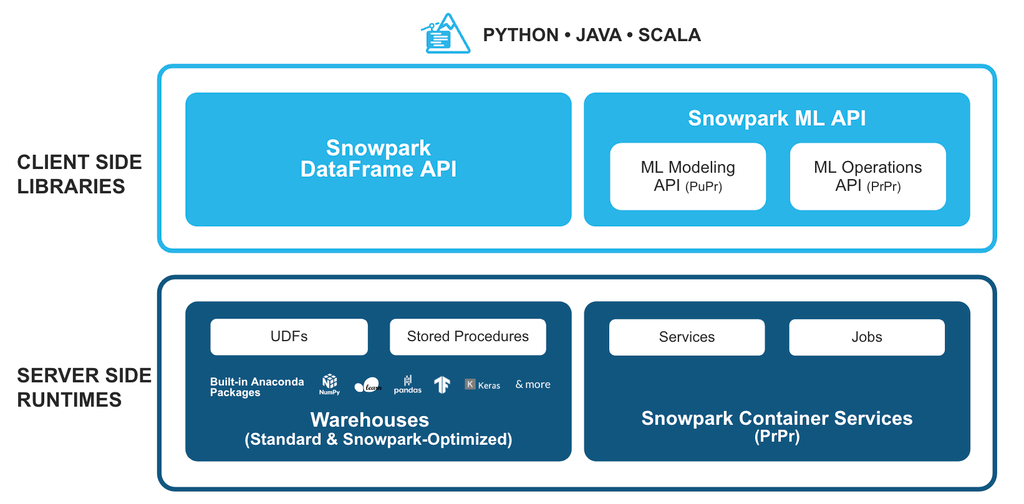
Earlier this year, Snowflake announced the availability of Snowpark ML during its Snowflake Summit. Snowpark ML is a set of tools, including SDKs and underlying infrastructure, to build and deploy machine learning models; all within Snowflake. It works with Snowpark for Python, so you can use the Snowpark DataFrames to hold the data, manipulate it and receive your prediction results.
It has been a hot topic and for a good reason! For one you can now transform your data and train your models without your data ever leaving Snowflake. Also, as they are based on familiar packages such as scikit-learn, it is pretty easy to start using them as it is stuff we’re already familiar with. And of course the advantage of being able to leverage Snowflake’s performance and scalability; with this we don’t need any more “ramping up our VM so that this thing can run” (yes, I’ve been there).
Of course, I couldn’t wait to get my hands on it and test some of its features. I loved the clear and easy steps to go from data to predictions, all using Snowflake power.
Snowpark ML has two key components:
1. Snowpark ML Development (Currently in Public Preview)
The package snowflake.ml.modeling provides different libraries for data processing, feature engineering and model training. These libraries are based on familiar ML libraries such as scikit-learn, xgboost and lightgbm. This package also includes a pre-processing module with libraries that can use compute resources provided by Snowflake’s Snowpark-Optimised Warehouses. These allow scalable data transformations.
What Is a Snowpark-Optimised Warehouse?
These type of warehouses provide 16x memory per node compared to the standard Snowflake virtual warehouses. This is recommended for workloads with large memory requirements, such as ML training use cases.
To create one of these, you need to specify the attribute WAREHOUSE_TYPE. The minimum size supported for these type of warehouses is MEDIUM
CREATE OR REPLACE WAREHOUSE snowpark_opt_wh WITH
  WAREHOUSE_SIZE = 'MEDIUM'
  WAREHOUSE_TYPE = 'SNOWPARK-OPTIMIZED';
To learn more about these warehouses and look at credit consumption, you can check out this article.
2. Snowpark ML OPS (Currently in Private Preview)
These series of components provide model management capabilities and integrated deployment in Snowflake. It includes a FileSet API that provides fsspec objects, which moves machine learning data seamlessly from a Snowflake table to the stage, then feeds the data to PyTorch or Tensorflow. It also includes a model registry which is a Python API to manage models within Snowflake and deploy them as vectorized user-defined functions.
What Is a fsspec Object?
Fsspec stands for filesystem specification, and the fsspec for Python is a project which aims to provide a unified pythonic interface to local, remote and embedded file systems and bytes storage. The need for this raise, as there are many ways to store bytes: in memory, to local disk, in a cluster distributed storage, to the cloud. To add complexity to this, many files also contain internal mappings of names to bytes, for example in a hierarchical directory-oriented tree. To manage all this complexity can become quiet cumbersome, so the fsspec project exists to provide a familiar API that will work the same way whatever the storage backend. You can read more about this project here.
I decided to try out Snowpark’s ML Development functionalities and used a familiar and easily accessible dataset of Scooby Doo episodes from kaggle. This is a great dataset to test several techniques as it contains all kind of features to play with: categorical, numerical, boolean.
The architecture of this solution involves the client side libraries: Snowpark, Snowpark ML and the server-side runtimes as we deploy the model as a user-defined function.
Copyright 2023 Snowflake Inc. All Rights Reserved.
Are You Ready to Dive in?
To deeply understand the code, there is nothing better than to play with it, modify some stuff and try your own ideas. So, if you want to follow along, you can download the project code in Github Repo
Let’s overview the steps that I completed for this project:
1. Set Up Python Environment
You have several ways to setup your python environment, for a full explanation of these options please visit our “Definitive Guide to Snowflake Sessions with Snowpark for Python.”
If you are familiar with conda environment and are ready to dive in, you can create your conda environment using the conda_env.yml that contains the list of all the necessary packages.
name: snowpark-ml-scooby
channels:
  - https://repo.anaconda.com/pkgs/snowflake
dependencies:
  - python==3.9
  - snowflake-snowpark-python==1.6.1
  - snowflake-ml-python==1.0.2
  - pandas==1.5.3
  - xgboost==1.7.3
  - notebook==6.5.4
  - scikit-learn==1.2.2
  - cachetools==4.2.2
  - seaborn==0.12.2
  - matplotlib==3.7.1
If you already have conda installed, you can create the environment using:
conda env create -f conda_env.yml
2. Set Up Snowflake Environment
In this SQL script, I create all the necessary objects in Snowflake: databases, schemas, stages, roles, etc.
/*-----------------------------------------------------------------------------
Blogpost code: Predicting IMDB with Snowpark ML
Script:       01_setup_snowflake.sql
Author:       Azucena Coronel
Last Updated: 2023/08/22
-----------------------------------------------------------------------------*/


-- ----------------------------------------------------------------------------
-- Step #1: Create the account level objects
-- ----------------------------------------------------------------------------
---Database Objects
USE ROLE SYSADMIN;
CREATE OR REPLACE WAREHOUSE "LAB001_WH"
  WITH WAREHOUSE_SIZE = 'X-SMALL'
  AUTO_SUSPEND = 60
  AUTO_RESUME = TRUE
  MIN_CLUSTER_COUNT = 1
  MAX_CLUSTER_COUNT = 1
  STATEMENT_TIMEOUT_IN_SECONDS = 60
  SCALING_POLICY = 'STANDARD'
  INITIALLY_SUSPENDED = TRUE;

CREATE OR REPLACE DATABASE LAB001_DB;
CREATE OR REPLACE SCHEMA SCOOBY_SCHEMA;
CREATE OR REPLACE STAGE SCOOBY_ASSETS; --to store model assets


-- ----------------------------------------------------------------------------
-- Step #2: Create role for the project and assign the objects
-- ----------------------------------------------------------------------------
USE ROLE SECURITYADMIN;
-- Roles
SET MY_USER = CURRENT_USER();
CREATE OR REPLACE ROLE LAB001_ROLE;
GRANT ROLE LAB001_ROLE TO ROLE SYSADMIN;
GRANT ALL ON WAREHOUSE LAB001_WH TO ROLE LAB001_ROLE;

USE ROLE ACCOUNTADMIN;
GRANT EXECUTE TASK ON ACCOUNT TO ROLE LAB001_ROLE;
GRANT MONITOR EXECUTION ON ACCOUNT TO ROLE LAB001_ROLE;

USE ROLE SECURITYADMIN;
GRANT IMPORTED PRIVILEGES ON DATABASE SNOWFLAKE TO ROLE LAB001_ROLE;

--Database
GRANT USAGE ON DATABASE LAB001_DB TO ROLE LAB001_ROLE;
--Schema
GRANT USAGE, MONITOR, CREATE TABLE, CREATE FUNCTION, CREATE PROCEDURE ON ALL SCHEMAS IN DATABASE LAB001_DB TO ROLE LAB001_ROLE;
GRANT USAGE, MONITOR, CREATE TABLE, CREATE FUNCTION, CREATE PROCEDURE ON FUTURE SCHEMAS IN DATABASE LAB001_DB TO ROLE LAB001_ROLE;
--Tables
GRANT ALL ON ALL TABLES IN DATABASE LAB001_DB TO ROLE LAB001_ROLE;
GRANT ALL ON FUTURE TABLES IN DATABASE LAB001_DB TO ROLE LAB001_ROLE;
--File Formats
GRANT ALL ON STAGE LAB001_DB.SCOOBY_SCHEMA.SCOOBY_ASSETS TO ROLE LAB001_ROLE;
GRANT ALL ON FILE FORMAT LAB001_DB.SCOOBY_SCHEMA.CSVFORMAT  TO ROLE LAB001_ROLE;

-- Grant role to user
GRANT ROLE LAB001_ROLE TO USER IDENTIFIER($MY_USER);
3. Snowpark ML Data Ingest
- Stage. In this step, I first create the Snowpark session; and for easier access later on, I create creds.json in my project to save these credentials. Remember that this is a hack only for this pet project, with a trial account, as well as credentials that are saved as plain text not meant for serious use cases!
- Read into dataframe. Next it was time to ingest my data into snowflake from a local csv file. I first staged it with Snowpark’s session.file.put into the stage we created in the first step. Then, I defined a StructType object with the schema to be able to read from the stage into a Snowpark dataframe with session.read.options. Finally, I cast the data types as everything was originally ingested as String. I decided to use the TRY_CAST function. It was straightforward to create quick for loops and utilise Snowpark functions to perform type casting to various data types.
int_array = ["ENGAGEMENT","RUN_TIME","MONSTER_AMOUNT", "SUSPECTS_AMOUNT","CULPRIT_AMOUNT","SPLIT_UP", "ANOTHER_MYSTERY","SET_A_TRAP","JEEPERS","JINKIES", "MY_GLASSES","JUST_ABOUT_WRAPPED_UP","ZOINKS", "GROOVY","SCOOBY_DOO_WHERE_ARE_YOU", "ROOBY_ROOBY_ROO"] for col in int_array : scooby_df = scooby_df.with_column( col, F.try_cast(col,IntegerType())) - Explore and clean data. The data is ingested and it is time to start the famous EDA (exploratory data analysis). This step involves diving deep into the data to understand what we have. It’s where we discover if there are any values that require cleaning before we can dive into the machine learning fun. With the Scooby Doo dataset, there are several categorical values that definitely need cleaning. For example, few episodes have more than one monster; hence we had arrays of values in some of the features like MONSTER_TYPE. For example: Super-Villain, Sea-Monster, Possessed Object, Super-Villain.In order to simplify the data and be able to better encode it for machine learning, I did some data cleaning that transformed the previous into: POSSESSEDOBJECT_SEAMONSTER_SUPERVILLAIN.Remember that Snowpark’s dataframe behaviour is similar to pandas’ dataframe, and something I really like from these is the ability to chain method calls when I need to apply several transformations. This took me to the following statement:
def unique_array(column):
    ar = F.array_to_string(
        F.array_sort(F.array_distinct(F.strtok_to_array(
            F.regexp_replace(F.rtrim(F.upper(F.col(column)),F.lit(",")), '[^a-zA-Z0-9|,]+', '')
            ,F.lit(","))))
        ,F.lit(","))
    return F.iff(F.col(column) != 'NULL', ar , None)
This basically takes the value of the column, applies an upper case to it, right trims it to get rid of “,” at the end of the value and then applies a regexp_replace to get rid of non numerical or letter characters. This is all done in that order in line 4 of the code above. On top of that, we apply a strtok_to_array to convert the comma separated string into an array. We can then do an array_distinct to get rid of duplicated values and sort them. Finally, we convert all this clean array into an string separated by commas.
Ok maybe this is a bit too much (just maybe), but it is to demonstrate the capabilities and usefulness of chain method calls.
- Write to Snowflake. Once we are happy with the data cleaning, it is time to write the data to a snowflake table and get ready for the next step where the ML fun begins.
Snowpark ML Feature Transformations
We have done our exploratory data analysis, we have identified what needed cleaning and we have prepared our data, it is time to start experimenting with the Snowpark ML feature transformations capabilities and set everything for training our model:
- Data loading. First of all, we created our Snowpark session. Remember that creds.json file we hacked-created above? Time to use it and avoid retyping our account, user and password information. We read from the table in Snowflake and get again our Snowpark dataframe ready.
- Feature transformations. It is time to test the first Snowpark ML library that will help us with the transformations: snowflake.ml.modeling.preprocessing In here I tried mainly two methods:
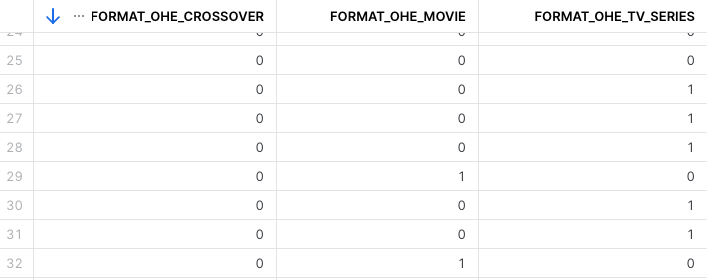
- For the categorical values I used OneHotEncoder, this library transforms each categorical feature as a one-hot numeric array. For example, for a category such as ‘FORMAT’ that might have three values: TV_SERIES, MOVIE, CROSSOVER the OneHotEncoder will create 3 features with a boolean array of 1 if the episode is that format or 0 if the episode is not that format.
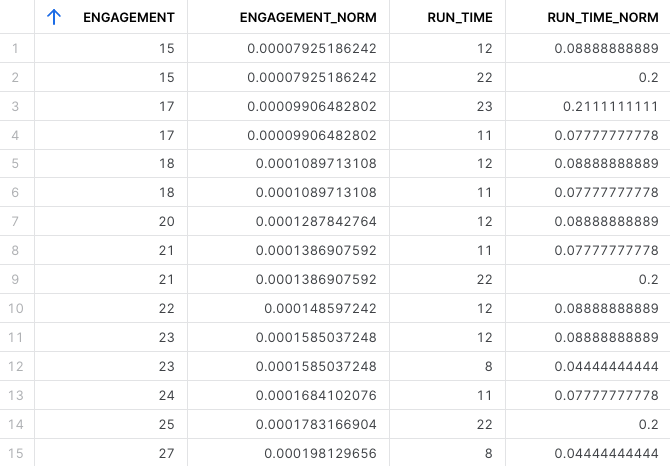
- For the numerical values I used MinMaxScaler, which scales each feature to a given range (in this case between 0 and 1). By using this scaling method we ensure that the values are within a fixed range and that they contribute equally to the analysis. We also prevent numerical instability that can occur when dealing with extreme small or large numbers and it also helps with the performance optimisation of the algorithm.
- For the categorical values I used OneHotEncoder, this library transforms each categorical feature as a one-hot numeric array. For example, for a category such as ‘FORMAT’ that might have three values: TV_SERIES, MOVIE, CROSSOVER the OneHotEncoder will create 3 features with a boolean array of 1 if the episode is that format or 0 if the episode is not that format.
- Preprocessing pipeline. Once I identified the features I want to use and the preprocessing techniques I want to apply to each of them, it is time to build the preprocessing pipeline using Snowpark’s ML Pipeline object from snowflake.ml.modeling.pipeline We will use this pipeline later on when we build our ML model.
CATEGORICAL_COLUMNS = ["FORMAT","NETWORK","SETTING_TERRAIN",
                       "MOTIVE","MONSTER_GENDER",
                       "CULPRIT_GENDER"]
CATEGORICAL_COLUMNS_OE = ["FORMAT_OHE","NETWORK_OHE",
                          "SETTING_TERRAIN_OHE","MOTIVE_OHE",
                          "MONSTER_GENDER_OHE",
                          "CULPRIT_GENDER_OHE"]

NUMERICAL_COLUMNS = ["ENGAGEMENT","RUN_TIME","ZOINKS","GROOVY",
                     "SCOOBY_DOO_WHERE_ARE_YOU",
                     "ROOBY_ROOBY_ROO"]
NUMERICAL_COLUMNS_NORM = ["ENGAGEMENT_NORM","RUN_TIME_NORM",
                          "ZOINKS_NORM","GROOVY_NORM",
                          "SCOOBY_DOO_WHERE_ARE_YOU_NORM",
                          "ROOBY_ROOBY_ROO_NORM"]

# Build the pipeline
preprocessing_pipeline = Pipeline(
    steps=[
            (
                "OHE",
                snowml.OneHotEncoder(
                    input_cols=CATEGORICAL_COLUMNS,
                    output_cols=CATEGORICAL_COLUMNS_OE
                )
            ),
            (
                "MMS",
                snowml.MinMaxScaler(
                    clip=True,
                    input_cols=NUMERICAL_COLUMNS,
                    output_cols=NUMERICAL_COLUMNS_NORM,
                )
            )
    ]
)

PIPELINE_FILE = 'preprocessing_pipeline.joblib'
joblib.dump(preprocessing_pipeline, PIPELINE_FILE)
Snowpark ML Model Training
In this last step of the project, we train our model and identify the hyperparameters that deliver the best model performance. Once we are happy with the model, we will deploy it into a Snowflake user-defined function (UDF) so it is readily available to be used for predictions.
- Data Loading. Similar to our previous steps, we use the creds.json file to start our session and read the cleaned data from Snowflake into a Snowpark dataframe. We also load the preprocessing pipeline object that we created in the last step. We also create arrays with the names of the features that we are going to use in the model. Remember that in our preprocessing pipeline we give different treatment to different data types: categorical features = one hot encoding, numerical features = min max scaling.For this reason, we create two arrays per data type that will hold the input and output features in each of the steps of the preprocessing pipeline. We also identify our label feature and the output column:
CATEGORICAL_COLUMNS = ["FORMAT","NETWORK","SETTING_TERRAIN", "MOTIVE","MONSTER_GENDER", "CULPRIT_GENDER"] CATEGORICAL_COLUMNS_OE = ["FORMAT_OHE","NETWORK_OHE", "SETTING_TERRAIN_OHE","MOTIVE_OHE", "MONSTER_GENDER_OHE", "CULPRIT_GENDER_OHE"] NUMERICAL_COLUMNS = ["ENGAGEMENT","RUN_TIME","ZOINKS","GROOVY", "SCOOBY_DOO_WHERE_ARE_YOU","ROOBY_ROOBY_ROO"] NUMERICAL_COLUMNS_NORM = ["ENGAGEMENT_NORM","RUN_TIME_NORM", "ZOINKS_NORM","GROOVY_NORM", "SCOOBY_DOO_WHERE_ARE_YOU_NORM", "ROOBY_ROOBY_ROO_NORM"] LABEL_COLUMNS = ['IMDB'] OUTPUT_COLUMNS = ['IMDB_PRICE'] scooby_ml_df = scooby_df.select(LABEL_COLUMNS + CATEGORICAL_COLUMNS + NUMERICAL_COLUMNS) scooby_ml_df.show() - Build Base Model. In this step is where we create the baseline model. We are going to use an XGBoost regression model. XGBoost is an algorithm that uses gradient boosted decision trees. The name XGBoost stands for eXtreme Gradient Boosting. This algorithm uses an ensemble learning method, which basically means that it runs an “ensemble” or group of decision trees and combine its results. There are two ways to use ensemble methods: bagging (which runs the decision trees in parallel and averages the results for the final prediction), and boosting (which run sequentially where the next decision tree uses as a base the output of the previous decision tree and the algorithm aims to reduce the errors in each iteration). The first step of this step is to divide our dataset in train and test datasets, in this case we will take 90% of the rows for training and the remaining for testing:
# Split the data into train and test sets
scooby_train_df, scooby_test_df = scooby_ml_df.random_split(weights=[0.9, 0.1], seed=0)

# Run the train and test sets through the Pipeline object we defined earlier
train_df = preprocessing_pipeline.fit(scooby_train_df).transform(scooby_train_df)
test_df = preprocessing_pipeline.transform(scooby_test_df)
Then we prepare the column names of the features we are going to use in the regressor: one hot encoded for the categorical variables and normalised for the numerical values. We build the regressor using from XGBRegressor from snowflake.ml.modeling.xgboost:
# Obtain the column names of the dataset for the Regressor, we are going to exclude the None values
CAT_COLS = [k for k in train_df.columns if ('_NORM' in k) & ('None' not in k)]
NUM_COLS = [k for k in train_df.columns if ('_OHE' in k) & ('None' not in k)]

# Define the XGBRegressor
regressor = XGBRegressor(
    input_cols=CAT_COLS + NUM_COLS,
    label_cols=LABEL_COLUMNS,
    output_cols=OUTPUT_COLUMNS
)

# Train
regressor.fit(train_df)

# Predict
result = regressor.predict(test_df)
We can analyse the result using the Snowpark ML mean_absolute_percentage_error from snowflake.ml.modeling.metrics:
# We can analyse the results using Snowpark ML's MAPE mape = mean_absolute_percentage_error(df=result, y_true_col_names="IMDB", y_pred_col_names="IMDB_PRICE") result.select("IMDB", "IMDB_PRICE").show() print(f"Mean absolute percentage error: {mape}") - Find optimal model parameters. Once we build the initial base model and obtained a metric to measure its performance (in this case the mean absolute percentage error), it is time to find the best parameters for that model that gives us the best performance. For this, we use the native Snowpark ML GridSearchCV from snowflake.ml.modeling.model_selection:
grid_search = GridSearchCV(
    estimator=XGBRegressor(),
    param_grid={
        "n_estimators":[100, 200, 300, 400, 500],
        "learning_rate":[0.1, 0.2, 0.3, 0.4, 0.5],
    },
    n_jobs = -1,
    scoring="neg_mean_absolute_percentage_error",
    input_cols= CAT_COLS + NUM_COLS,
    label_cols=LABEL_COLUMNS,
    output_cols=OUTPUT_COLUMNS
)

# Train
grid_search.fit(train_df)

# Use to_sklearn to access the estimator object
grid_search.to_sklearn().best_estimator_
We obtained that the best estimator is at n_estimators = 100 and learning_rate = 0.1. The previous mape was: 0.05170313160722504. With the best estimator it is: 0.050110345648975284
- Deploy the model using vectorised UDF. The Snowpark ML’s function model.predict() creates a temporary UDF. In order to persist this and make it available within Snowflake, we need to define our own UDF. Once Snowpark ML’s native registry model is available, this will be the most streamlined approach to deploy the model. For now, we need to save the model as an sklearn object so it can be used externally. First we save our model and father all the feature names:
# Let's save our optimal model first
optimal_model = grid_search.to_sklearn()
MODEL_FILE = 'model.joblib'
joblib.dump(optimal_model, MODEL_FILE) # we are just pickling it locally first

# You can also save the pickled object into the stage we created earlier
session.file.put(MODEL_FILE, "@SCOOBY_ASSETS", overwrite=True)

# Get all relevant column names to pass into the UDF call
feature_cols = test_df[CAT_COLS + NUM_COLS].columns
Then we create the vectorised User Defined Function (UDF):
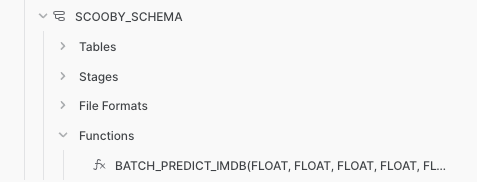
# Cache the model load to optimize inference
@cachetools.cached(cache={})
def load_model(filename):
    import joblib
    import sys
    import os

    IMPORT_DIRECTORY_NAME = "snowflake_import_directory"
    import_dir = sys._xoptions[IMPORT_DIRECTORY_NAME]

    if import_dir:
        with open(os.path.join(import_dir, filename), 'rb') as file:
            m = joblib.load(file)
            return m

# Register the UDF via decorator
@udf(name='batch_predict_imdb',
     session=session,
     replace=True,
     is_permanent=True,
     stage_location='@SCOOBY_ASSETS',
     input_types=[F.FloatType()]*len(feature_cols),
     return_type=F.FloatType(),
     imports=['@SCOOBY_ASSETS/model.joblib.gz'],
     packages=['pandas','joblib','cachetools','xgboost'])
def batch_predict_imdb(test_df: pd.DataFrame) -> pd.Series:
    # Need to name the columns because column names aren't passed in to this function
    test_df.columns = CAT_COLS + NUM_COLS
    model = load_model('model.joblib.gz')
    return model.predict(test_df) # This is using the XGBoost library's model.predict(), not Snowpark ML's
Finally we can call our UDF to predict the IMDB in our test data.
test_df_w_preds = test_df.with_column('PREDICTED_IMDB', batch_predict_imdb(*feature_cols))
test_df_w_preds.show()
This is deployed now in Snowflake, ready for use!
Closing
In few clear steps, we went from data in a .csv, to predictions using Snowflake power. I really enjoyed working with familiar structures such as Snowpark dataframes, scikit libraries for data transformation and model building. I was pleasantly surprised by the neat way of putting together the preprocessing pipeline: identify your features, the treatment you are going to give to them and build the pipeline! In regards of deployment, at the moment we needed to go through the step of transforming into a sklearn object; but as mentioned, the Snowflake model registry will make things easier. Looking forward to it!
I hope that you find this walk through useful and that you are ready to test this workflow in your own data. Nothing beats to test new features with your own projects and see how can you best harness the Snowflake power. Happy experimenting!
Research
- https://quickstarts.snowflake.com/guide/data_engineering_pipelines_with_snowpark_python/#0
- https://www.youtube.com/watch?v=yTUneS1WXao
- https://quickstarts.snowflake.com/guide/getting_started_snowpark_machine_learning/index.html?index=..%2F..index#9
- https://www.kaggle.com/datasets/williamschooleman/scoobydoo-complete