
This series shows you the various ways you can use Python within Snowflake.
Snowpark for Python is the name for the new Python functionality integration that Snowflake has recently developed. At the Snowflake Summit in June 2022, Snowpark for Python was officially released into Public Preview, which means anybody is able to get started using Python in their own Snowflake environment.
I would understand if you wanted to skip this post and cut directly to the Snowflake’s monolithic documentation page. However, I would strongly recommend reading through this post first as it will give you a strong introduction into setting up a Snowpark environment to connect to Snowflake and provide you with a few shortcuts in the form of code snippets.
This post is intended to walk you through how to set up your local machine to connect to Snowflake using the new Snowpark for Python package, and pairs well with our bespoke Snowpark package on our GitHub, which contains much of the code I will be using in this post. This bespoke package is what qualifies this blog post to be the inaugural post in our new Monthly Monday Deep Dive series, as the package can be used to streamline your own development and is entirely open-source so you can download and modify it as you please!
If you are not interested in connecting to Snowflake and instead wish to simply dive into creating Python UDFs and Stored Procedures from within the Snowflake User Interface, then I would recommend these posts instead:
- A Definitive Guide to Python UDFs in the Snowflake UI
- A Definitive Guide to Python Stored Procedures in the Snowflake UI
Before we dive into the technical aspects of this blog post, we will first discuss what the new functionality is and why this post is useful.
What Is the Snowpark for Python Package?
The new Snowpark for Python package is a Python package that has been built to enable connectivity to Snowflake in a more advanced manner than the old Snowflake Connector for Python. The old connector allowed you to execute SQL commands in Snowflake and achieve a few other things, but it did not really stretch beyond this. In addition to building SQL statements and executing them on your Snowflake environment, similar to the old connector, the new Snowpark for Python package allows us to achieve a far greater volume of results, including the following:
- Directly read data from tables, views and SELECT statements as new Snowflake dataframes that can be converted into Pandas dataframes.
- Directly convert Pandas dataframes into Snowflake dataframes and/or write the data into Snowflake
- Create and modify User Defined Functions (UDFs) that leverage Python, using Python scripts and packages that are not stored within Snowflake already.
- Create and modify Stored Procedures that leverage Python, using Python scripts and packages that are not stored within Snowflake already.
- Call UDFs and Stored Procedures directly as part of a wider Python script.
Why Is This Post Useful?
The purpose of this post is to achieve the following key objectives:
- Explain installing and configuring the required components:
- Explain the requirements that must be met to leverage the Snowpark for Python package.
- Discuss the Anaconda distribution channel and its benefits over a standard Python installation when testing functionality locally.
- Walk through installing the required packages to a Python virtual environment on a local machine using
pipfor standard Python andCondafor Anaconda deployments. - Walk through installing the required packages to a Python Anaconda virtual environment on a local machine using
Conda. - Optional aside to walk through configuring Visual Studio Code to leverage a Python Anaconda virtual environment when executing code.
- Explain creating and using a Snowflake Snowpark session:
- Discuss the core parameters required to create a Snowflake Snowpark session and the different methods of authentication.
- Demonstrate creating a Snowflake Snowpark session and using it to execute some simple queries locally.
- Introduce InterWorks’ bespoke Snowpark package on our GitHub, which contains a series of Python functions to simplify creating Snowflake Snowpark sessions leveraging any of the following configurations:
- A locally-stored JSON file containing the required connection parameters.
- Environment variables containing the required connection parameters.
- A Streamlit secrets file containing the required connection parameters.
This post is not intended to demonstrate the creation of UDFs and Stored Procedures using Snowpark for Python. However, it does serve as a prerequisite. I will be releasing further posts to tackle these challenges in a similar format to my previous “definitive guides” to achieve the same within the Snowflake UI.
And so ends our preamble as we dive into the meat of the post!
Installing and Configuring Snowpark for Python
Before we can use create Snowpark sessions that interact with Snowflake, we must install and configure the package in our environment.
Requirements to Leverage the Snowpark for Python Package
At its core, the Snowpark for Python package is a Python package called snowflake-snowpark-python that is available for install through the standard approach for Python packages:
pip install snowflake-snowpark-python
To leverage this package, you must have Python 3.8 as a minimum.
(At time of writing, Snowflake uses Python 3.8 whenever it executes UDFs and stored procedures. To match this and avoid potential errors, I would recommend using Python 3.8 when using Snowpark for Python locally.)
Whilst this is sufficient for getting started, best practice would always be to have a dedicated Python/Conda virtual environment for your Snowpark scripts instead of mixing different projects/packages/etc in your default Python environment.
Anaconda’s Snowflake Snowpark for Python Channel
As you may already be aware, Snowflake have partnered with Anaconda when developing this new Snowpark for Python functionality. A key benefit to this partnership is Anaconda’s Snowflake Snowpark for Python channel which fully details the third-party packages that are openly available for use in Snowflake Python scripts, including their versions.
To make full use of this benefit, an installation of Anaconda or Miniconda is required on your machine. Anaconda and Miniconda are both Python distribution packages that can be used to configure Python environments on your local machine. Anaconda is the full distribution package that is capable of far more, whilst Miniconda is the small version of Anaconda that contains a much smaller set of functionality. Most importantly, both of these distribution packages include Conda, which is the command line tool that allows us to create and modify Python virtual environments with additional functionality such as the capability to leverage specific package channels.
The above paragraph says a lot, but arguably also does not really tell you anything in this context. You are likely still wondering what the key advantage is to leveraging Anaconda instead of standard Python when setting up a Snowpark for Python environment. The answer is that Anaconda can create/modify your virtual environment using Anaconda’s Snowflake Snowpark for Python channel and can thus ensure every package you install on your local machine matches the packages natively available to Snowflake. This means we can test our code far more reliably as locally-executed tests are using the same package versions as Snowflake will use, and thus should execute/operate the same locally as they will within Snowflake UDFs/Stored Procedures.
In short, I would strongly recommend setting up any Snowpark environments using Anaconda as this makes it far easier to keep your local environment aligned with Snowflake.
(It is important to note that Anaconda’s Snowflake Snowpark for Python channel may not include all of the packages you require for your script, especially if you have developed your own packages internally. In this case, it is strongly recommended that you leverage the same package versions locally as you deploy to Snowflake when leveraging such packages. This will be discussed further in my follow-up blog posts regarding creating Snowflake UDFs/Stored Procedures using Snowpark for Python.)
Installing the Required Packages for Standard Python Using Pip
Skip this section if you intend to use Anaconda to configure your environment, which I would recommend.
As stated before, the Snowpark for Python package is a Python package called snowflake-snowpark-python that is available for install through the standard approach for Python packages. If desired, here is the specific PyPI project.
First, install Python 3.8.10, which is the latest full release for Python 3.8.
Before we can install the package, it is recommended to set up a virtual environment for our project. We can do so with the following commands in a shell/bash/cmd/PowerShell terminal:
python -m venv /path/to/new/virtual/environment
Once we have created our environment, we can activate it in the same terminal. The command here differs slightly depending on your terminal. The following command can activate the virtual environment in PowerShell:
/path/to/new/virtual/environment/Scripts/Activate.ps1
After activating the environment, you should see the environment name to the left of your current location:

If using another terminal, I would recommend checking the specific script in the Python venv documentation.
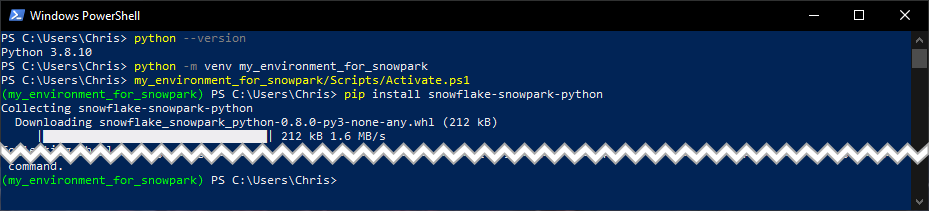
Now that you have created and activated a virtual environment, you can install the Snowpark for Python package:
pip install snowflake-snowpark-python
Here is a screenshot showing the full journey in PowerShell, in which I have cut out the full installation log:
Installing the Required Packages Using Anaconda
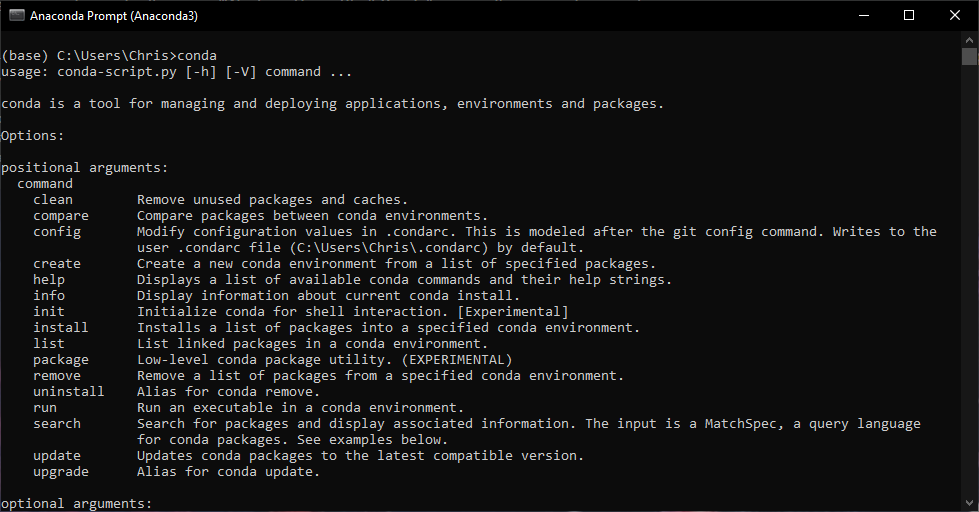
First, install Anaconda or Miniconda so that you can execute Conda commands from an Anaconda terminal on your local machine. Executing conda from your Anaconda terminal should yield similar results to the following screenshot:
Once this is established, a new Python Anaconda virtual environment can be created with the following command:
conda create --name env_name --channel https://repo.anaconda.com/pkgs/channel_name python=3.8
conda create --name snowpark --channel https://repo.anaconda.com/pkgs/snowflake python=3.8
Notice how we leverage a specific channel to ensure installed packages match those in Snowflake.
Once you have created your environment, you can install additional packages by adapting the following example code:
conda install --name snowpark --channel https://repo.anaconda.com/pkgs/snowflake package-to-install
Most criticically, we wish to install the snowflake-snowpark-python package:
conda install --name snowpark --channel https://repo.anaconda.com/pkgs/snowflake snowflake-snowpark-python
At this stage, I would like to note that most projects will require further packages such as Pandas. Whilst you can go down the route of installing each package individually, you may find it easier to list all of your packages in a requirements.txt file and install them with the following command:
conda create --name snowpark --file path/to/requirements.txt --channel https://repo.anaconda.com/pkgs/snowflake python=3.8
Configuring Visual Studio Code to Leverage a Python Anaconda Virtual Environment
This section discusses how to configure VSCode so that you can execute Python commands line-by-line using a Python Anaconda virtual environment. If you are not using VSCode then this section will not be relevant for you and I would advise finding out how you can achieve a similar result for your IDE of choice.
Configuring Conda to work with Python through VSCode requires you to set up a bespoke terminal profile within your VSCode settings. You can do so by following these steps within VSCode:
- Open the commands shortcut (
CTRL+SHIFT+P) and selectTerminal: Select Default Profile

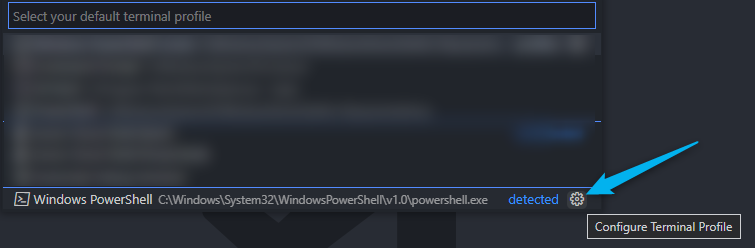
- Select the small settings cog to the right of one of the existing PowerShell profiles
- In the naming window, enter the name “Windows PowerShell Conda” or any other name if you prefer

- Use the same commands shortcut (
CTRL+SHIFT+P) and selectPreferences: Open Settings (JSON)

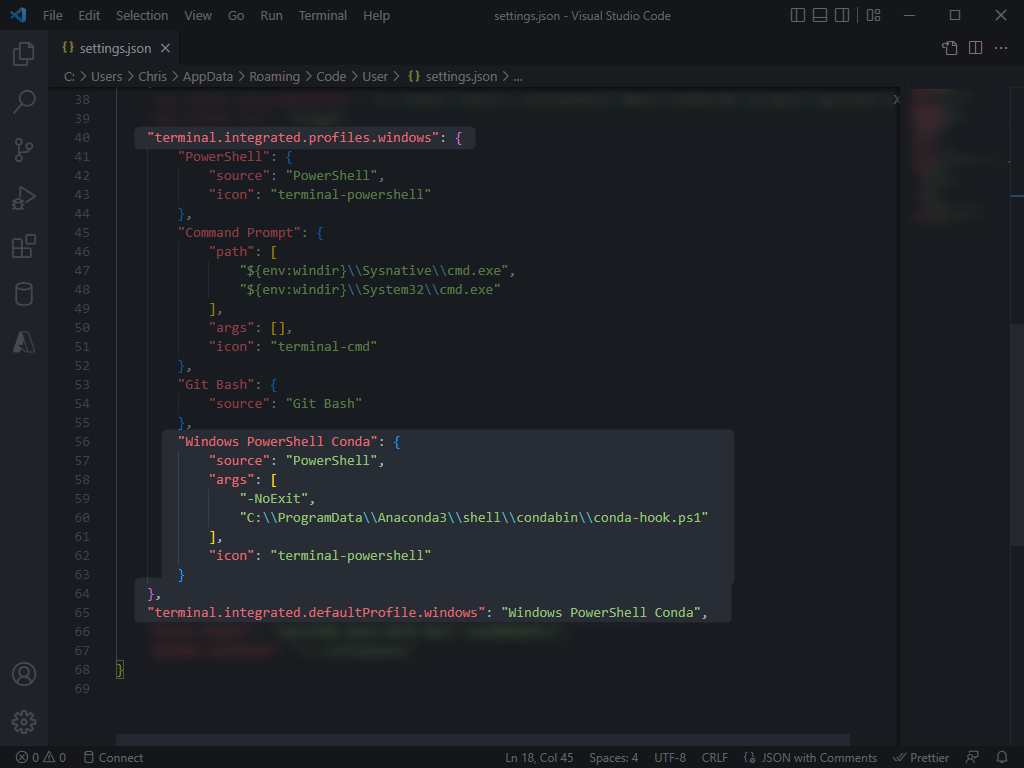
- Steps 1-3 will have added a new key to your
settings.jsonfile calledterminal.integrated.profiles.windows, which lists a set of different terminal profiles. The final entry on this list should be your new profile, which we called “Windows PowerShell Conda”. Modify this profile to match the following settings:"Windows PowerShell Conda": { "source": "PowerShell", "args": [ "-NoExit", "Path\\to\\conda-hook.ps1" ], "icon": "terminal-powershell" }The desired path to `conda-hook.ps1` depends on where you installed Conda. Usually this will be one of the following two options:
- When Conda was installed to the C drive for all users:
"C:\\ProgramData\\Anaconda3\\shell\\condabin\\conda-hook.ps1"
- When Conda was installed for a single user, where %USERPROFILE% should be expanded out to the full path:
"%USERPROFILE%\\Anaconda3\\shell\\condabin\\conda-hook.ps1"
- When Conda was installed to the C drive for all users:
- Finally, open the commands shortcut (
CTRL+SHIFT+P) and selectTerminal: Select Default Profile, then select the new profile as the default. For our example, we would select “Windows PowerShell Conda”


- If we now review our settings.json file again, we should see the new terminal profile along with the key “” that denotes the default terminal profile.
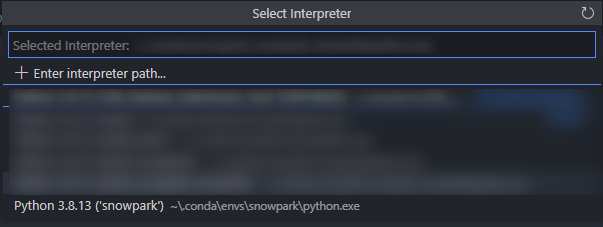
- If we open a new Python file, we should also see our list of Anaconda Python environments when selecting an interpreter.
Creating and Using a Snowflake Snowpark Session
At this point, we have set up a Python (Anaconda) virtual environment on our local machine that has access to the snowflake-snowpark-python package. An argument could have been made for this to be the end of the blog post and for the next session to be a separate post, however I would much prefer to have all of this in one place to form the singular “definitive guide”.
Core Parameters Required for Authentication
To create a Snowflake Snowpark session, we must provide Snowflake with several parameters for authentication. The full list of parameters can be found in Snowflake’s documentation, however I have provided a condensed list below that is grouped for clarity:
- Critical parameters that must be included
- account – The Snowflake account to create a session for. This is of the form
<account>.<region>.<cloud provider>and matches your Classic UI login URL before the.snowflakecomputing.comsuffix - user – The name of the user to authenticate to Snowflake with
- account – The Snowflake account to create a session for. This is of the form
- Optional parameters for context in the session, which define the Snowflake object of the same name that will be used by the session. This is similar to a typical worksheet in the Snowflake UI and can be changed after authentication by using
Session.sql()to execute SQL commands of the formUSE... <object_type> <object_name>- role – If left blank, the user’s default will be used until a SQL statement of the form
USE...is leveraged - warehouse – If left blank, the user’s default will be used until a SQL statement of the form
USE...is leveraged - database – If left blank, the user’s default will be used until a SQL statement of the form
USE...is leveraged - schema – If left blank, the user’s default will be used until a SQL statement of the form
USE...is leveraged
- role – If left blank, the user’s default will be used until a SQL statement of the form
- Authentication parameters, of which at least one must be populated
- password – The password used to authenticate the user
- private_key – The private key used to authenticate the user. This must be serialised and cannot be stored as plain text, which is a challenge solved both in an example below and in InterWorks’ bespoke Snowpark package on our GitHub. Notice how we are not asking for the private key passphrase here too, as this will already have been leveraged when serializing the private key.
- When using password authentication instead of private_key, it is also worth considering the MFA implications and potentially providing the optional
authenticatorparameter as follows:- Set
authenticatortoexternalbrowserto authenticate in a web browser with Okta, ADFS, or similar SAML identity providers - Set
authenticatortousername_password_mfato authenticate with the provided password and cache the MFA response, minimising the requirement for further MFA prompts as the session continues
- Set
If configuring Snowpark with the intent of automated script execution or similar, I would strongly recommend configuring key pair authentication for the service user. I have already released a blog post that details how to set up key pair authentication for a user in Snowflake, and in the near future I will be releasing a blog post that achieves a similar result using a Python UDF within Snowflake itself.
If required, you can find more information on authentication in Snowflake’s documentation.
Creating a Snowflake Snowpark Session
Now that we have outlined the elements required to create a Snowflake Snowpark session, let’s connect and execute some example SQL code.
Example Credentials
For the purposes of our examples, we will consider a fictional Snowflake account and user. Assume we have a Snowflake account hosted on AWS US West called DummyCorp. When logging into Snowflake, we visit the following URL:
https://dummycorp.us-west-2.snowflakecomputing.com
Our user is called my_admin_user and uses the password P@55w0rd
If you are actually using a password such as P@55w0rd then I seriously recommend changing it to something more secure and harder to guess
Our user’s default role is SYSADMIN but they also have access to SECURITYADMIN.
Our user has also been configured with the following private key, provided in plain text:
-----BEGIN PRIVATE KEY-----
MIIEthiswouldbeamassivestringthatformstheprivatekey
-----END PRIVATE KEY-----
The private key passphrase is P@55phr@5e
Creating a Snowflake Snowpark Session with a Password
Now that we have our example credentials, we can provide these as an object to the Session.builder.configs() method in a simple Python script:
# Example code to create a Snowflake Snowpark session with a password
## Import the Session class from the snowflake.snowpark package
from snowflake.snowpark import Session
## Define connection parameters
snowflake_connection_parameters = {
"account" : "dummycorp.us-west-2"
, "user" : "my_admin_user"
, "password" : "P@55w0rd"
}
## Create session to connect to Snowflake
### Remember to check your phone for an MFA request!
snowpark_session = Session.builder.configs(snowflake_connection_parameters).create()
As you can see, the actual code here is very short and sweet, resulting in a Snowflake Snowpark Session object that we will shortly use to query Snowflake.
Creating a Snowflake Snowpark Session with a Private Key
Leveraging a private key is a little bit more tricky as we must serialize it for transmission to Snowflake. Here is a Python script in which we serialize the private key and pass it to a Snowflake connection parameter:
# Example code to create a Snowflake Snowpark session with a private key
## Import the Session class from the snowflake.snowpark package
from snowflake.snowpark import Session
## Import packages with which to parse the private key
from cryptography.hazmat.backends import default_backend
from cryptography.hazmat.primitives import serialization
## Define our plain-text private key and passphrase
## which in reality would have been ingested from somewhere
private_key_plain_text = '''-----BEGIN PRIVATE KEY-----
MIIEthiswouldbeamassivestringthatformstheprivatekey
-----END PRIVATE KEY-----'''
private_key_passphrase = 'P@55phr@5e'
## Encode private key
private_key_encoded = private_key_plain_text.encode()
## Encode private key passphrase
private_key_passphrase_encoded = private_key_passphrase.encode()
## Load the private key, leveraging passphrase if needed
private_key_loaded = serialization.load_pem_private_key(
private_key_encoded
, password = private_key_passphrase_encoded
, backend = default_backend()
)
## Serialize loaded private key
private_key_serialized = private_key_loaded.private_bytes(
encoding = serialization.Encoding.DER
, format = serialization.PrivateFormat.PKCS8
, encryption_algorithm = serialization.NoEncryption()
)
## Define connection parameters
snowflake_connection_parameters = {
"account" : "dummycorp.us-west-2"
, "user" : "my_admin_user"
, "private_key" : private_key_serialized
}
## Create session to connect to Snowflake
snowpark_session = Session.builder.configs(snowflake_connection_parameters).create()
This is definitely a more lengthy code due to all of the work involved in loading and serializing the private key, however it is far more robust for a service user as it will not rely on MFA and should be more secure due to the combination of a lengthy private key and a private key passphrase.
Using a Snowflake Snowpark Session to Execute Queries and Test Our Connection
Whether we have leveraged a password or a private key, at this stage we should have created a Snowflake Snowpark Session that connects to our Snowflake environment. In our example, we have called this snowpark_session.
The following example shows just how easy it is to execute SQL commands in Snowflake. Look out for our upcoming Technical Tuesday blog posts to see far more interesting examples in which we will be creating Python UDFs and Stored Procedures using Snowpark for Python:
snowpark_session.sql('''
SELECT 'Connected!' as STATUS
''').collect()
snowpark_session.sql('''
USE ROLE PUBLIC
''').collect()
snowpark_session.sql('''
SHOW DATABASES
''').collect()
As you can see from each of these very basic examples, we can leverage the Session.sql() method combined with the .collect() method to execute SQL commands in our Snowflake environment using our Snowflake Snowpark session.
InterWorks’ Bespoke Snowpark Package
Our bespoke Snowpark package is available on our GitHub and has been built to simplify the process of creating connections to Snowflake using Snowpark for Python. If you visit the link, you can download the snowpark folder in its entirety and test your connection using one of the connection tests.
The following information is also provided in the README of the GitHub repository.
Connection Parameters
The Python scripts in the package are configured to ingest a snowflake_connection_parameters dictionary and use it to establish connections to Snowflake.
The dictionary may either be provided as a locally stored .json file, as environment variables, or as part of a Streamlit secrets .toml file.
Connection Parameters in a Local JSON File
If using a locally stored .json file, this file should be created in the root directory as this repository and should match the format below. This is not synced with git (currently in `.gitignore` to avoid security breaches).
{
  "account": "<account>[.<region>][.<cloud provider>]",
  "user": "<username>",
  "default_role" : "<default role>", // Enter "None" if not required
  "default_warehouse" : "<default warehouse>", // Enter "None" if not required
  "default_database" : "<default database>", // Enter "None" if not required
  "default_schema" : "<default schema>", // Enter "None" if not required
  "private_key_path" : "path\\to\\private\\key", // Enter "None" if not required, in which case private key plain text or password will be used
  "private_key_plain_text" : "-----BEGIN PRIVATE KEY-----\nprivate\nkey\nas\nplain\ntext\n-----END PRIVATE KEY-----", // Not best practice but may be required in some cases. Ignored if private key path is provided
  "private_key_passphrase" : "<passphrase>", // Enter "None" if not required
  "password" : "<password>" // Enter "None" if not required, ignored if private key path or private key plain text is provided
}
Connection Parameters via Streamlit Secrets
If using a streamlit secrets file, this file should be created in a subdirectory called .streamlit within the root directory as this repository and should match the format below. This is not synced with git (currently in `.gitignore` to avoid security breaches). Alternatively if deploying Streamlit remotely, the secrets should be entered in the Streamlit development interface.
[snowflake_connection_parameters]
account = "<account>[.<region>][.<cloud provider>]"
user = "<username>"
default_role = "<default role>" ## Enter "None" if not required
default_warehouse = "<default warehouse>" ## Enter "None" if not required
default_database = "<default database>" ## Enter "None" if not required
default_schema = "<default schema>" ## Enter "None" if not required
private_key_path =  "path\\to\\private\\key" ## Enter "None" if not required, in which case private key plain text or password will be used
private_key_plain_text =  "-----BEGIN PRIVATE KEY-----\nprivate\nkey\nas\nplain\ntext\n-----END PRIVATE KEY-----" ## Not best practice but may be required in some cases. Ignored if private key path is provided
private_key_passphrase = "<passphrase>" ## Enter "None" if not required
password = "<password>" ## Enter "None" if not required, ignored if private key path or private key plain text is provided
Connection Parameters via Environment Variables
If using environment variables, they should match the format below.
SNOWFLAKE_ACCOUNT : "<account>[.<region>][.<cloud provider>]"
SNOWFLAKE_USER : "<username>"
SNOWFLAKE_DEFAULT_ROLE : "<default role>" ## Enter "None" if not required
SNOWFLAKE_DEFAULT_WAREHOUSE : "<default warehouse>" ## Enter "None" if not required
SNOWFLAKE_DEFAULT_DATABASE : "<default database>" ## Enter "None" if not required
SNOWFLAKE_DEFAULT_SCHEMA : "<default schema>" ## Enter "None" if not required
SNOWFLAKE_PRIVATE_KEY_PATH :  "path\\to\\private\\key" ## Enter "None" if not required, in which case private key plain text or password will be used
SNOWFLAKE_PRIVATE_KEY_PLAIN_TEXT :  "-----BEGIN PRIVATE KEY-----\nprivate\nkey\nas\nplain\ntext\n-----END PRIVATE KEY-----" ## Not best practice but may be required in some cases. Ignored if private key path is provided
SNOWFLAKE_PRIVATE_KEY_PASSPHRASE : "<passphrase>" ## Enter "None" if not required
SNOWFLAKE_PASSWORD : "<password>" ## Enter "None" if not required, ignored if private key path or private key plain text is provided
Testing Your Snowpark Connection
This section contains steps to simplify testing of your Snowpark connection. Naturally, these tests will only be successful if you have configured the corresponding parameters as detailed above.
Testing Your Snowpark Connection with a Parameters JSON File
Execute the following steps in an Anaconda terminal, or directly run the connection_tests/test_snowpark_connection_via_parameters_json.py file step by step through VSCode or similar.
conda activate py38_snowpark
cd path/to/this/repo
python run "connection_tests/test_snowpark_connection_via_parameters_json.py"
Testing Your Snowpark Connection with Streamlit Secrets
Please note that this will not work by default as we have not included streamlit in the requirements.txt file by default. You will need to add this to the requirements file and install it into your environment, or you can install it manually with the following command.
conda install --name py38_snowpark streamlit
Execute the following steps in an Anaconda terminal, or directly run the connection_tests/test_snowpark_connection_via_streamlit_secrets.py file step by step through VSCode or similar.
conda activate py38_snowpark
cd path/to/this/repo
python run "connection_tests/test_snowpark_connection_via_streamlit_secrets.py"
Testing your Snowpark Connection with Environment Variables
Execute the following steps in an Anaconda terminal, or directly run the connection_tests/test_snowpark_connection_via_environment_variables.py file step by step through VSCode or similar.
conda activate py38_snowpark
cd path/to/this/repo
python run "connection_tests/test_snowpark_connection_via_environment_variables.py"
Summary
And so concludes our blog post about connecting to Snowflake from a local machine using Snowpark for Python. Now that we have a clear guide to creating Snowflake Snowpark sessions in Python, I will be releasing further posts to walk through how to use these Snowflake Snowpark sessions to create and call Python UDFs and Stored Procedures.
I hope you’ve found this post useful and look forward to any comments or constructive criticism on the InterWorks’ bespoke Snowpark package on our GitHub.