
This series shows you the various ways you can use Python within Snowflake.
Snowflake itself is really strong at reporting task schedules and history. If you ever use the TASK_HISTORY table function, you can even view the NEXT_SCHEDULED_TIME for each scheduled task. However, it is common to be in a situation where you are leveraging another tool for your pipeline orchestration, such as Matillion, and may have set up a monitoring process that ingests the scheduling metadata from that tool into Snowflake to feed analytics and reporting processes.
In this scenario, you may not have a handy field to tell you when the job is next scheduled to run. You could, of course, read the CRON directly and mentally parse it like a CRON expert, however it is far easier to use a Python library such as croniter to leverage your CRON schedule string and a potential reference date to determine the timestamp of the next event.
To solve this, we leverage a Python User Defined Function, or UDF for short. This post contains everything you need to know for this specific Python UDF in Snowflake. However, you can find far more detailed information on Python UDFs in my pair of Definitive Guides to creating Python UDFs in Snowflake, found within our Snowflake with Python series.
The Python Code Itself
The Python code for our UDF is relatively simple:
Creating the UDF from the Snowflake UI
To create this UDF directly within the Snowflake user interface, the following code can be executed in a worksheet:
Once this has been set up, we can test the process with a few simple examples:
Executing this test results in the following output:
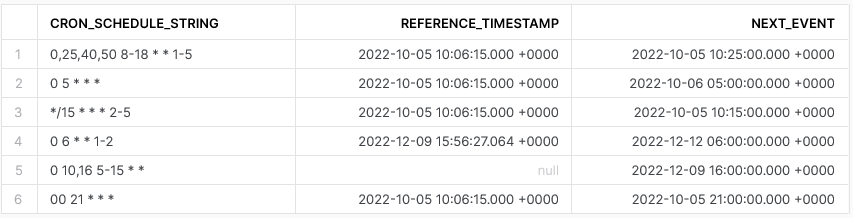
As you can see, our process is running successfully and we can easily call our UDF as part of a view or other query when performing reporting and analysis.
Creating the UDF using Snowpark
If you prefer, you can also create this UDF using Snowpark for Python. After creating a Snowflake Snowpark Session object, the following code can be executed to create the UDF:
Once this has been set up, we can test the process with a few simple examples:
##################################################################
## Define the function for the UDF

### Import the required modules
from croniter import croniter
from datetime import datetime

def determine_next_event_from_cron(
      cron_schedule_string: str
    , reference_timestamp: datetime
  ):
  if reference_timestamp is None :
    reference_timestamp = datetime.now()
  try :
    cron_schedule = croniter(cron_schedule_string, reference_timestamp)
    next_run = cron_schedule.get_next(datetime)
    return next_run
  except Exception as e:
    return None

##################################################################
## Register UDF in Snowflake

### Add packages and data types
from snowflake.snowpark.types import StringType, TimestampType
snowpark_session.add_packages('croniter')

### Upload UDF to Snowflake
snowpark_session.udf.register(
    func = determine_next_event_from_cron
  , return_type = TimestampType()
  , input_types = [StringType(), TimestampType()]
  , is_permanent = True
  , name = 'SNOWPARK_DETERMINE_NEXT_EVENT_FROM_CRON'
  , replace = True
  , stage_location = '@UDF_STAGE'
)
If we execute the above code as part of a Python script, we can then call the function using the snowpark_session.sql().show() method to see the result.
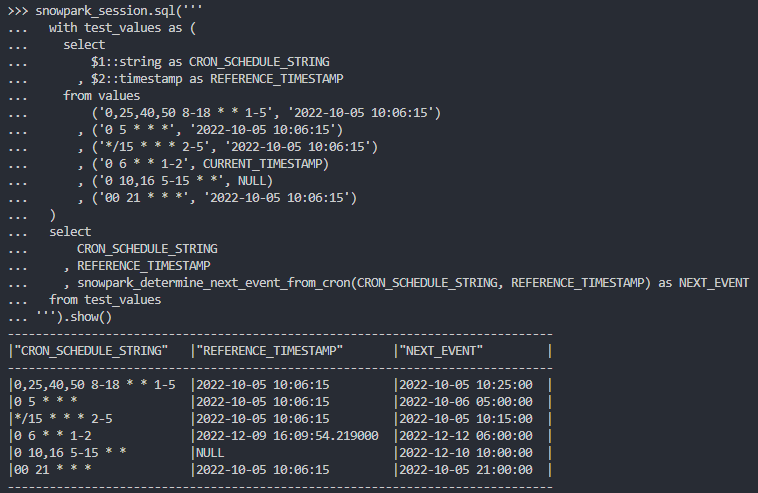
Of course, we can also execute this test from within a standard SQL query in Snowflake and call the UDF as we would any other function:
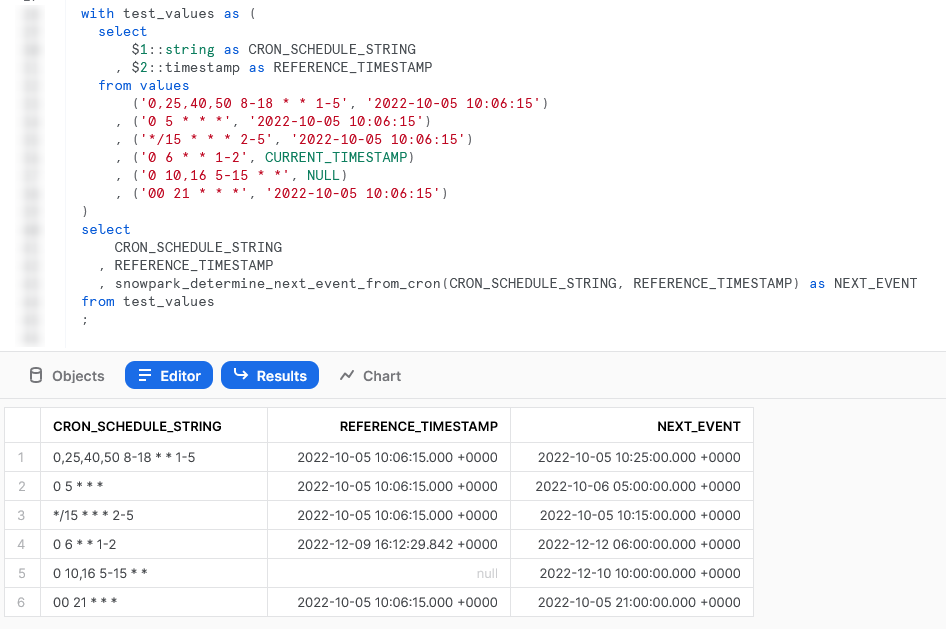
As you can see, regardless of whether we create our UDF in the UI or with Snowpark, our process is running successfully and we can easily call our UDF as part of a view or other query when performing reporting and analysis.
Wrap Up
This article was a short but sweet post to solve a specific issue in a simple way. You can find the full code for this solution and others in our public GitHub repository. I hope you’ve found this useful. Please reach out if you have any requests for future posts or any feedback or thoughts for this one.