
This series shows you the various ways you can use Python within Snowflake.
I’ve been a huge fan of Streamlit for years as it enables analysts and data scientists to easily create interactive web apps without the hassle of managing a backend development. I was always happy to read the announcements of new Streamlit features being released and start to imagine what I could build next. But, there was one announcement in March 2022 that got my imagination racing: Snowflake had acquired Streamlit. Then, earlier this year, the Snowflake Native App Framework was made available for developers on AWS with the possibility of adding a Streamlit app experience. Since then, we’ve exploring the native app capabilities, streamlining our development process and testing functionality. Below is our recommended workflow for developing native apps in your organisation.
People and Permissions: Teaming Up for Success
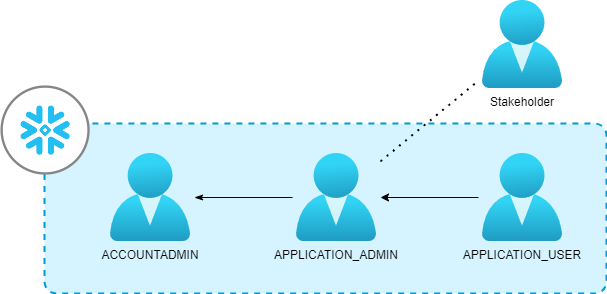
Before diving into the technical aspect, let’s focus on who is involved in the development and testing of a native app. These are the four roles that we identified:
- The ACCOUNTADMIN role is needed to grant the app developers the necessary permissions to create the apps. Thos permissions are CREATE APPLICATION and CREATE APPLICATION PACKAGE.
- For the app developers, we created a role called APPLICATION_ADMIN. People with this role are meant to develop and stage app files, create application packages from staged files and create apps from application packages.
- For testing and feedback purposes, we created an APPLICATION_USER role. For people with this role to access the native app, they needed to be granted an application role that’s defined in the setup.sql file of the app. To do so, the APPLICATION_ADMIN can run the command GRANT APPLICATION ROLE <your_app.app_role> TO ROLE <app_user>.
- Though its not a Snowflake role, somebody should assume the role of the stakeholder. Conducting a scoping session with the stakeholder – whether internal or external – will help ensure we develop a product that our target audience will find useful.
With these four roles, we were able to develop, test, iterate and validate our app seamlessly. However, if your app lists permission requirements in the manifest.yml file, you’ll need the ACCOUNTADMIN to grant these permissions upon first install in Snowflake.
Tools and Environment Setup: Streamlining Development with VS Code
The tutorial for the Native Apps Framework provides an example of developing application files on a local machine and then uploading them to a development stage. For an IDE, we chose Visual Studio Code (VS Code) due to its familiarity and seamless integration with Snowflake. The Snowflake extension for VS Code proved to be a game-changer, enabling code execution directly against our Snowflake instance. This extension also provided a Snowflake SQL Language Mode, enhancing code formatting and providing clickable IDE functions for smoother development. This meant that we never had to leave VS Code to develop, deploy and update our app!
Environment and Dependencies
As you may recall from the tutorial, native apps leverage the following basic file structure:
- /code_artifacts – Any bespoke code or libraries you may with to import
- environment.yml – List additional decencies that aren’t standard in native apps
- streamlit_app.py – If you intend on your application having a streamlit UI, it is recommended to create a file like this one at the same level as your environments.yml
- /scripts
- setup.sql – Builds the structure of the app (set Language Mode to Snowflake SQL)
- manifest.yml – Provides a listing of files and permission requests required by the app
- readme.md – Provides a description of the app to the end user
Note the /code_artifacts/environment.yml here. A nice feature about developing native apps in Snowflake is that Snowflake’s runtime environment has many pre-installed libraries, meaning that you don’t have to worry about too much about managing dependencies and their versions. However, we did receive an error when trying to use the plotly library – along with a few others. Luckily, this is easily fixed by declaring these libraries as a dependencies in the /code_artifacts/environment.yml file of your app.
name: sf_env
channels:
- snowflake
dependencies:
- snowflake-native-apps-permission
- plotly
- scikit-image
As mentioned above, it is critical that this environment.yml file be in the same folder and at the same level as your streamlit_app.py file if your application has a UI, which means it’s simplest to put your main streamlit_app.py directly inside the code_artifacts subdirectory.
Local Python Environment via Anaconda
If you want to execute your Python code locally but still have it execute similarly to the Snowflake environment, we would recommend using Anaconda paired with Snowflake’s Snowpark for Python channel. This is discussed in more detail our Definitive Guide to Snowflake Sessions with Snowpark for Python. A great benefit to this approach is that you can then generate your environments.yml file with the following command:
conda env export -f environment.yml
You can also use this environments.yml file to quickly deploy a local environment for developing your code!
Requirements: pipreqs for the Win
However, you may not be using Anaconda for your local environment and still want a quick way to both populate the environments.yml file and deploy a local Python environment for developing your code. This is where fantastic tools like pipreqs come in.
Though Snowflake doesn’t require a dedicated requirements.txt file, its good practice to create one anyway if your local Python environment will not be using Anaconda, so that others can reproduce your environment and ensure the code works properly. For this task, we use pipreqs library to create and update the requirements.txt file. Now, anytime somebody wants to reproduce our environment, they just need to create a new environment with pip and run pip install -r requirements.txt
You can easily copy paste entries from requirements.txt to the environments.yml file as appropriate, too. Just be careful about versions and what is available through Anaconda’s Snowflake channel.
Development Workflow: Snowflake SQL in Action
Organizing our development structure was crucial for a seamless workflow. We created a local folder structure that mirrored the structure Snowflake required for some files, and then add our own bespoke folders and files where it made sense. Once we had our structure set up, we created a snowflake_worksheet file, which was set to the Snowflake SQL Language Mode in VS Code, to directly interact with our Snowflake instance to move files to the development stage in Snowflake.
We split the worksheet into several sections with the following logical flow for creating data objects, moving files updating the app:
-- Creating the development stage in Snowflake
CREATE DATABASE <YOUR_APP_DEV>;
CREATE OR REPLACE SCHEMA <YOUR_APP_DEV.DEV_SCHEMA>;
CREATE OR REPLACE STAGE <YOUR_APP.DEV_SCHEMA.DEV_STAGE>;


-- Upload all script files that end with .sql to the development stage
PUT 'FILE://path/to/scripts/*.sql' '@"YOUR_APP_DEV"."DEV_SCHEMA"."DEV_STAGE"/scripts' overwrite=true auto_compress=false;
-- Upload the code artifacts files to the development stage
PUT 'FILE://path/to/code_artifacts.*' '@"YOUR_APP_DEV"."DEV_SCHEMA"."DEV_STAGE"/code_artifacts' overwrite=true auto_compress=false;
-- Upload the manifest file to the development stage
PUT 'FILE://path/to/manifest.yml' '@"YOUR_APP_DEV"."DEV_SCHEMA"."DEV_STAGE"' overwrite=true auto_compress=false;
-- Upload the readme file to the development stage
PUT 'FILE://path/to/README.md' '@"YOUR_APP_DEV"."DEV_SCHEMA"."DEV_STAGE"' overwrite=true auto_compress=false;


-- Creating application packages and apps
CREATE APPLICATION PACKAGE <YOUR_APP_PACKAGE>;
ALTER APPLICATION PACKAGE <YOUR_APP_PACKAGE> ADD VERSION V1 USING '@<YOUR_APP_DEV.DEV_SCHEMA.DEV_STAGE/V1>';
CREATE APPLICATION <YOUR_APP_APP> FROM APPLICATION PACKAGE <YOUR_APP_PACKAGE> USING VERSION V1 patch 0;
Finding Your Workflow
In this article, we delved into our own development workflow for creating a Snowflake Native App using Python and Streamlit. We highlighted the roles and permissions crucial for the development and testing phases, the efficient integration of Visual Studio Code with Snowflake, and few other best practices to ensure reproducibility. This of course is not the only way to develop for Native Apps, but we hope that it can provide some ideas about how you can create a workflow that meets your needs. Stay tuned for our upcoming article, where we’ll explore valuable tips and tricks learned when developing our Snowflake monitoring and optimisation app. Happy coding! 🚀