
This series takes you from zero to hero with the latest and greatest cloud data warehousing platform, Snowflake.
Recently, Snowflake implemented a new feature that allows its standard functionality to be extended through the use of external functions. Among several other capabilities is the ability to create AWS Lambda functions and call them within Snowflake. This has unlocked a whole new realm of possibility and flexibility for the Snowflake data platform and allows users to apply complex business functions to their data directly within Snowflake. This is because Snowflake’s standard functionality is supported by ANSI-SQL, which can perform incredible feats of data manipulation on its own; however, it cannot achieve the advanced functionality that is possible with languages such as Python.
Unlocking More Snowflake Potential with Python
For example, many data scientists regularly leverage the advanced capabilities of Python to create statistical models. Previously, Snowflake would have been used as the engine to feed data into another tool to allow these statistical models to be applied. Please note that this is not necessarily a bad thing, and Snowflake have formed strong partnerships with technologies such as Dataiku and DataRobot to provide a heap of powerful functionality and integration. However, not everybody has access to these fantastic tools, or they may have other reasons to want to apply the functionality directly within Snowflake itself. This is just one example of where an external function could be leveraged to meet the user’s goal. Their Python model can be set up in an AWS Lambda function and called directly by Snowflake with variables fed directly from Snowflake objects.
In this blog, we will walk through how to set up some simple Python functions in AWS Lambda to execute as external functions in Snowflake. This post assumes you already have an AWS environment and a basic understanding of how to navigate it. Be prepared—this process can take some time to set up, and this post is quite lengthy, so you may wish to approach it in stages instead of consuming it all at once. Enter at your own risk 🙂
API Knowledge Disclaimer: If you are unfamiliar with APIs and how they work, don’t worry. This post will neither explain APIs and how they work, nor will it expect any knowledge of this kind. So you should still be able to follow along and set up your own integrations.
Our Basic Sample Functions
Before we get started, let’s have a quick run-through of the different functions we are going to set up today.
Sum
We will begin by setting up a simple SUM function. It will retrieve one or more numbers as an input and then output the total sum of these numbers, like this:
SUM(4, 5, 6) = 4 + 5 + 6 = 15
This function is already possible in Snowflake using a different syntax, but this gives us a simple way to test that our integration is working correctly.
Product
Going slightly further, we will also set up a simple product function. Again, it will retrieve one or more numbers as an input, and the output will be the total product of these numbers, like so:
PRODUCT(4, 5, 6) = 4 * 5 * 6 = 120
Again, this function is already possible in Snowflake using a different syntax, but this gives us a simple way to test that our integration is working correctly for multiple functions.
UK Flood Warning Measurements
After setting up the two sample functions above in this post, a follow-up post will go through how to add new external functions to the framework that we have set up. This post will use a more complex example that leverages an API. Specifically, the UK government has a public-facing API that contains data on flood-monitoring measurements across various stations in the UK, documented here. We will set up an API call which retrieves the latest measurements for a given station and call this as a function within Snowflake to pull readings for a set of stations in Northern Manchester. Before we can do this, though, we need to go through this first post to set up a framework for integrating AWS Lambda functions with Snowflake.
Integration Between AWS Lambda and Snowflake
Before we can begin on our more complex flood warning measurements example, or even our two simpler examples, let us first consider the general data flow for an external function being called from Snowflake:
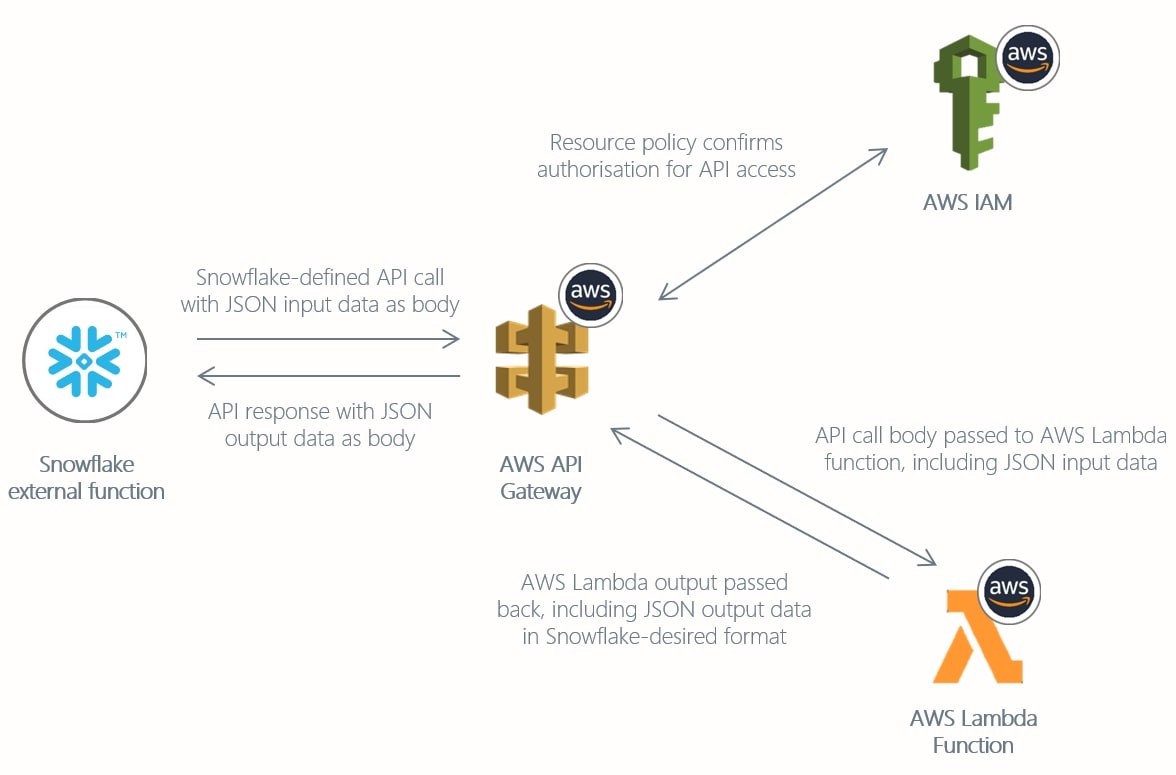
As we can see in this diagram, there are four key components to a Snowflake external function leveraging AWS Lambda:
- A Snowflake external function object
- An AWS API gateway which facilitates the integration by exposing the Lambda function to Snowflake (API stands for Application Programming Interface)
- Authorised AWS IAM roles – There are actually two here: one account role to access the API gateway from Snowflake and one service role to execute the Lambda function. (IAM stands for Identity and Access Management)
- An AWS Lambda function
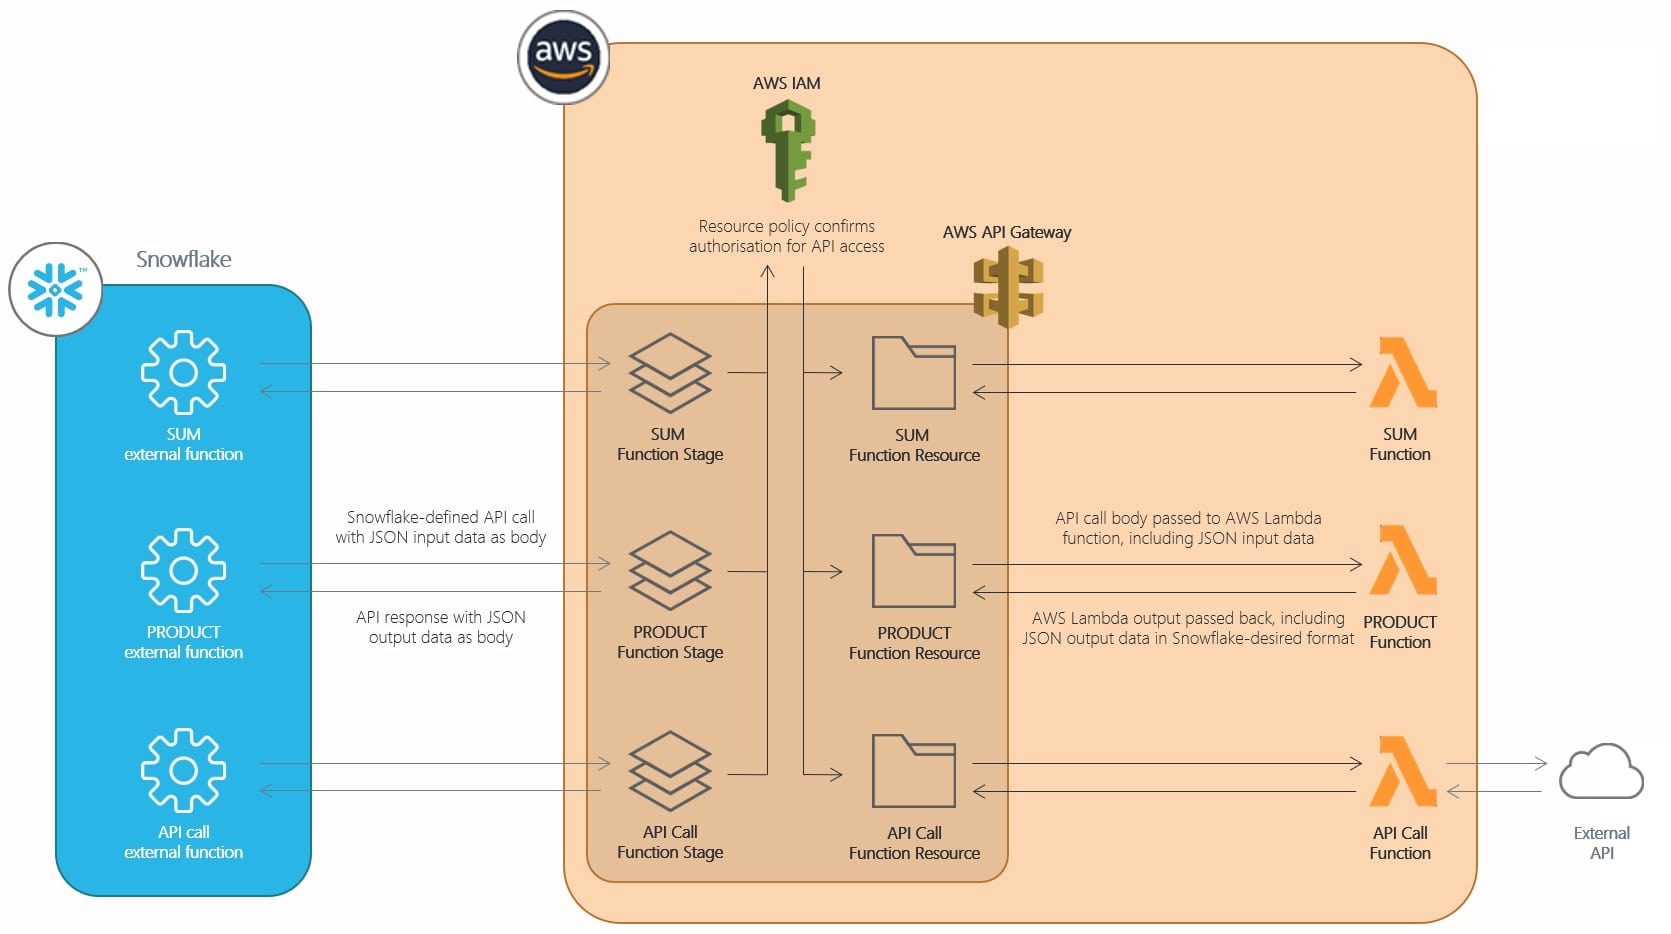
This is a high-level diagram for a single external function setup. Our goal today is to set up three external functions, which makes our diagram more complex:
To set up our examples as simply as possible, we are going to complete the following steps:
- Create an AWS IAM service role to execute all of the Lambda functions
- Create AWS Lambda functions for our examples
- Create an AWS API gateway to expose the Lambda functions to Snowflake
- Create an AWS IAM role to access the API gateway and configure it to access both the API gateway and a Snowflake API integration object
- Create and test some external function objects in Snowflake
I personally believe the setup is simplest when following this order, as it results in the least amount of back-and-forth whilst allowing us to set up all of our functions under a single service role, account role and API gateway. If you are more experienced with AWS, you are more than welcome to play around with this setup to make it fit your own requirements.
Step-by-Step Guide to Setting up Our Two Simple Example Functions
We will begin by setting up and configuring our two simple example functions: SUM and PRODUCT. Once we have these set up and working, adding new functions becomes much simpler and allows us to focus on the complexity of the function rather than the complexity of the underlying architecture.
1. Configuring Your AWS IAM Service Role to Execute Each Lambda Function
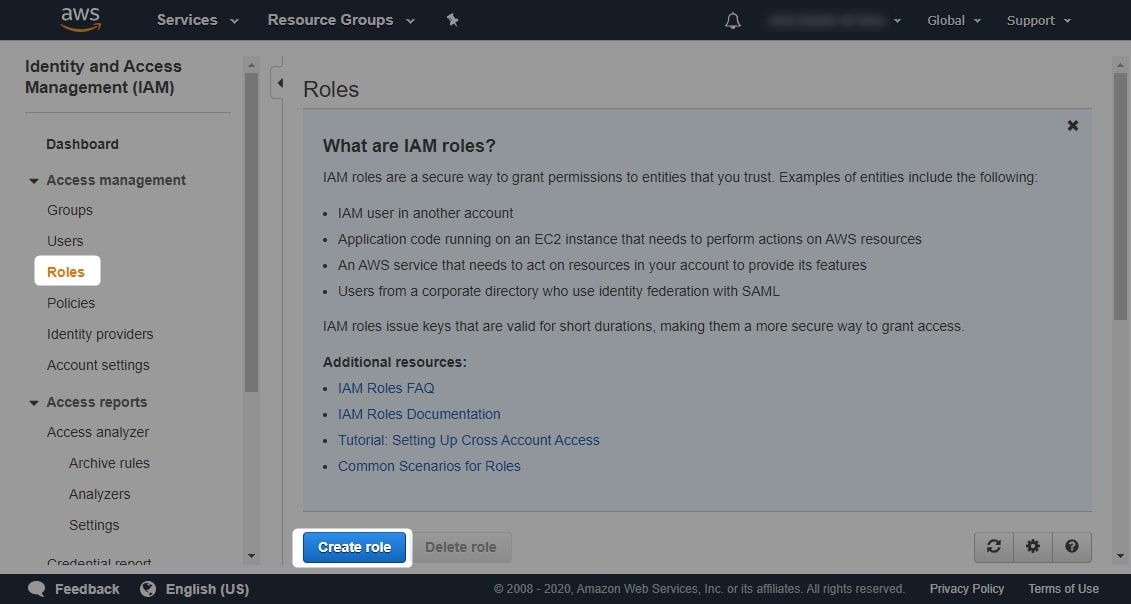
Navigate to the IAM area in AWS, and select Roles then Create Role:
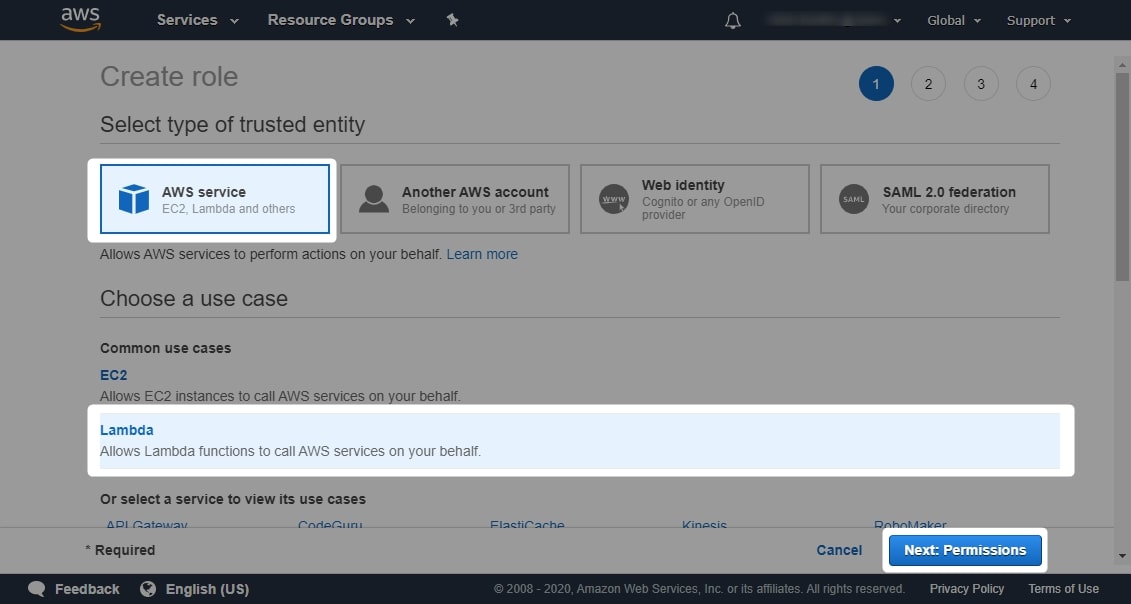
In this section, navigate to AWS service, select Lambda and Next: Permissions:
The following through menus are not required for this example, so click Next a few times until you reach the Review area. Once here, enter an appropriate name and description for your service role then click Create Role:
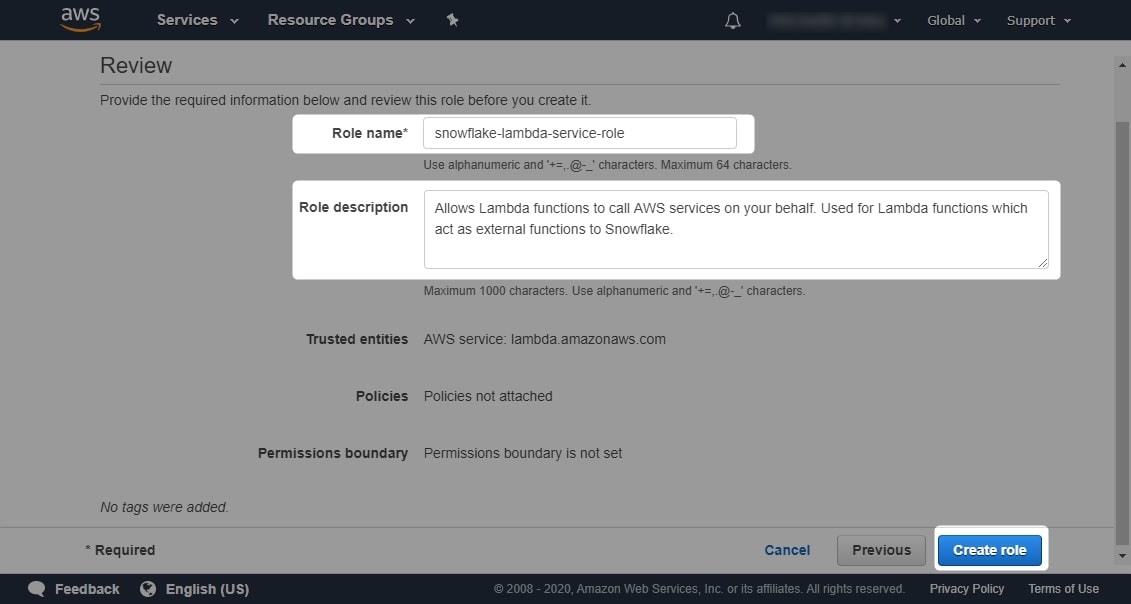
Take note of the name of your service role. In fact, it is good practice to keep a file tracking all the various IDs, ARNs and other elements used throughout this process, as I will start doing now:
Lambda Service Role: snowflake-lambda-service-role
2. Configuring Your AWS Lambda Functions
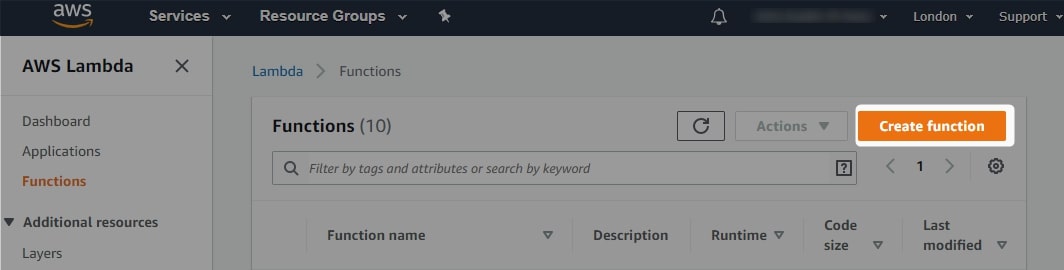
We will start by creating our simple SUM function. Navigate to the Lambda area in AWS and select Create Function:
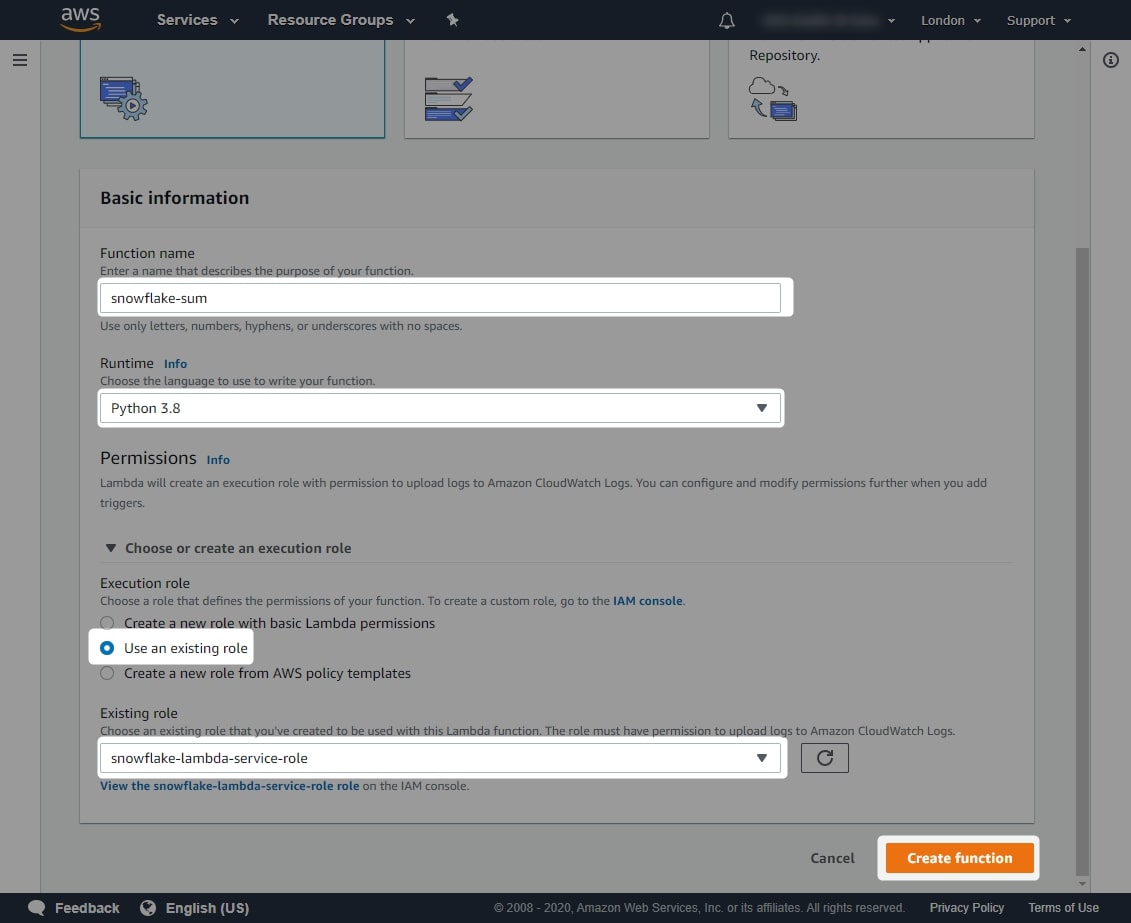
Leave the setting on Author from Scratch and populate the following fields:
- Function Name: Enter a descriptive name for the function. For our example, we use
snowflake-sum. - Runtime: Choose the language which the function is written in. For our example, we use
Python 3.8. - Execution Role: Choose
Use an Existing Roleand pick the service role you just created from the drop-down list.
Once these settings are entered, select Create Function:
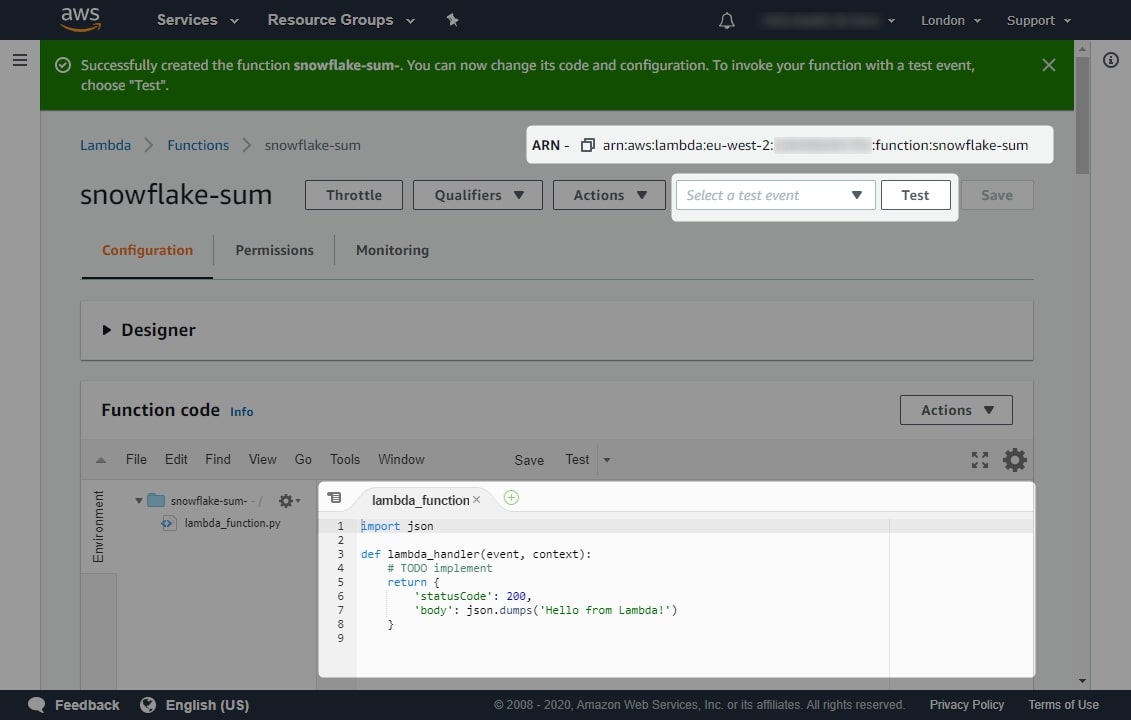
This opens up a fresh Python Lambda function for editing. Before we continue, let’s take a quick look at what we can see. I have highlighted three areas:
- The ARN, or Amazon Resource Name, of the function. This is a unique way of referencing the function and should be added to our list of important variables.
- The test event section, where we can define test data for our function
- The main editor window where the function itself is defined
2a. How Snowflake External Functions Transfer Data
Before we can define our Lambda function itself, we need to understand how the data is transferred between Snowflake and our function. This determines how the function should expect to retrieve any input variables. This is best understood by using an example, so consider the following query and resulting table from Snowflake:
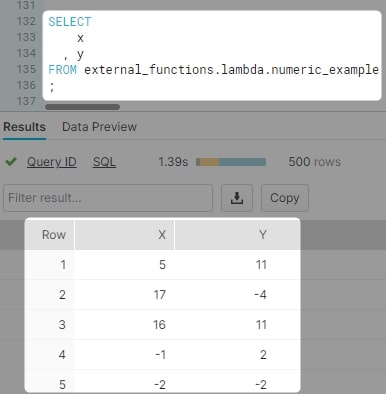
As we can see here, any SELECT query in Snowflake outputs not only the requested columns but also a row number. Our query selects two columns, X and Y, and outputs both of these along with a row number. Our full output is five rows, each comprised of three columns.
Before we continue, if you are not familiar with JSON data structures, please recall our Introduction to Semi-Structured JSON Data Formats.
Using arrays, we can right this tabular output a different way. Instead of outputting it as a table, we could break the rows into members of an array where each row is also its own array:
[
    [0, 5, 11]
  , [1, 17, -4]
  , [2, 16, 11]
  , [3, -1, 2]
  , [4, -2, -2]
]
There are a few things to understand here. We can see that the second two numbers in each row match our X and Y values in our table, so this makes sense. However, the first digit in each row is a bit more confusing. This is actually the row number. We can see that it increments by 1 with each row, beginning at 0 and ending at 4. This is in line with our five-row output; however, we start counting at 0 instead of at 1. This is a common practice in programming and data, but if you are seeing it for the first time, take a minute to absorb what is happening to ensure you understand this structure.
This JSON structure forms the basis of how Snowflake will transfer data within an API request to an API gateway. However, we are not done yet. Snowflake will wrap this JSON structure into a larger JSON requests object (which we will not go into), and it achieves this by making two changes.
First, the information is inserted into a "data" key as follows:
{
  "data" : [
      [0, 5, 11]
    , [1, 17, -4]
    , [2, 16, 11]
    , [3, -1, 2]
    , [4, -2, -2]
  ]
}
Second, this entire structure is converted into a string and inserted under another key called body:
{
  "body" : "{\\"data\\" : [ [0, 5, 11], [1, 17, -4], [2, 16, 11], [3, -1, 2], [4, -2, -2] ]}"
}
This is the same structure as we began with, but it has been:
- Collapsed into a single row
- Stored under a
"data"key - Converted to a string
- Stored under a
"body"key
This is the final format with which the data will be transferred from Snowflake to the API gateway.
Important Note: Keep in mind that this structure is used by Snowflake both when sending and receiving data. Any external function you build in AWS Lambda must return data in this same format and must return the same number of rows as the incoming request.
2b. Configuring a Test Event in AWS Lambda
Now that we understand how Snowflake will transmit the data to our function, we can set up a test event in AWS Lambda to mimic a Snowflake request. Begin by selecting the Select a test event dropdown and selecting Configure test events:
Enter a name for your event (in our example, we use snowflakeTestEvent), and enter the following sample data, which is the same set of five rows described above. Once done, select Create:
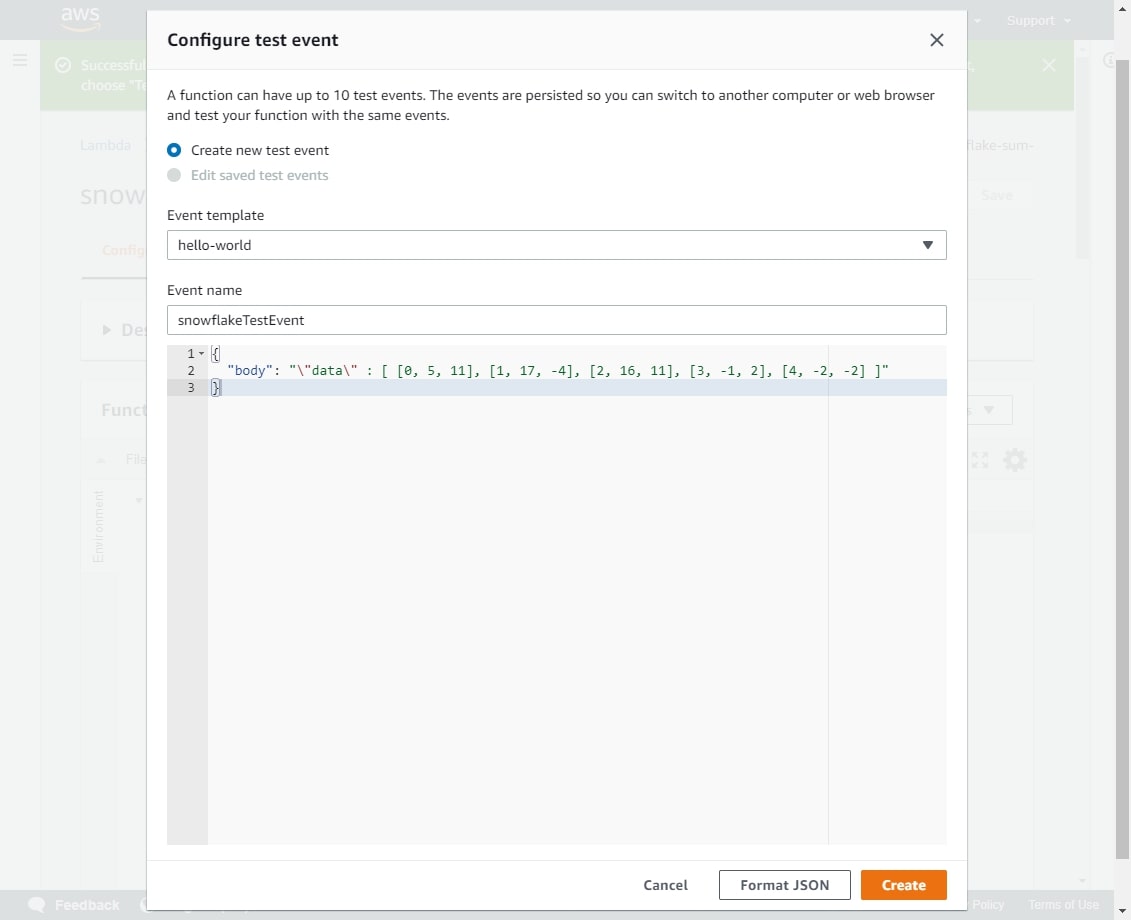
Notice that the dropdown in the top-right corner has already updated to select your test event.
2c. Building an AWS Lambda Function for Snowflake-Compatible Inputs and Outputs
The purpose of this post is not to run through Python itself or Lambda functions, so I will not go into significant detail here. The key things to understand about a function designed to work with Snowflake is that it must perform the following feats:
- Read the string
"body"value of the incoming event and convert it to a JSON object - Read the
"data"value from this JSON object to gain an array of data rows - Iterate through each of these rows, performing the desired functionality on the input variables. During this iteration, build a new
"data"JSON object which will be returned by the function. Ensure this new"data"object still contains row numbers and outputs the same number of rows as it receives in the input. - Convert the
"data"JSON object to a string - Output this string in the
"body"key of the response
AWS Lambda Function to Perform a SUM in a Snowflake-Friendly Way
Here is the Python code which creates a Snowflake-friendly SUM function. You should be able to copy and paste this directly into the editor area in your own Lambda function:
```python
# Import necessary modules for the function
import json
import functools

# The function itself, in which event is the full request sent to the API
def lambda_handler(event, context):

    # Declare return variables
    statusCode = 200

    # dataArray stores the resultset of the function which will be
    # returned by the function. This begins as an empty array and is added
    # to in the rows loop below
    dataArray = []

    # json_compatible_string_to_return is the json body returned by the
    # function, stored as a string. This empty value is replaced by the real
    # result when ready
    json_compatible_string_to_return = ''

    # try/except is used for error handling
    try:
        # Retrieve the body of the request as a JSON object
        body = json.loads(event['body'])

        # Retrieve the 'data' key of the request body
        # When the request comes from Snowflake, we expect data to be a
        # an array of each row in the Snowflake query resultset.
        # Each row is its own array, which begins with the row number,
        # for example [0, 2, 3] would be the 0th row, in which the
        # variables passed to the function are 2 and 3. In this case,
        # the function sum output would be 5.
        rows = body['data']

        # Loop through each row
        for row in rows:

            # Retrieve the row number from the start of the row array
            rowNumber = row[0]

            # Retrieve the array of numbers to sum
            numbersToSum = row[1:]

            # try/except is used for error handling
            try:
                # Calculate the rowSum
                rowSum = functools.reduce(lambda a,b : a+b, numbersToSum)
            except:
                rowSum = "Error"

            # Create a new array entry
            newArrayEntry = [rowNumber, rowSum]

            # Add the newArrayEntry to the main dataArray list
            dataArray.append(newArrayEntry)

        # Put dataArray into a dictionary, then convert it to a string
        dataArrayToReturn = {'data' : dataArray}
        json_compatible_string_to_return = json.dumps(dataArrayToReturn)

    except Exception as err:
        # Statuscode = 400 signifies an error
        statusCode = 400
        # Function will return the error
        json_compatible_string_to_return = json.dumps({"data":str(err)})

    return {
        'statusCode': statusCode
        ,   'headers': { 'Content-Type': 'application/json' }
        ,   'body' : json_compatible_string_to_return
        }
```
Once you have inserted this code, you should be able to test it straightaway. We have already configured a test event called snowflakeTestData, so go ahead and click “Test“. The following screenshot should match your test result:
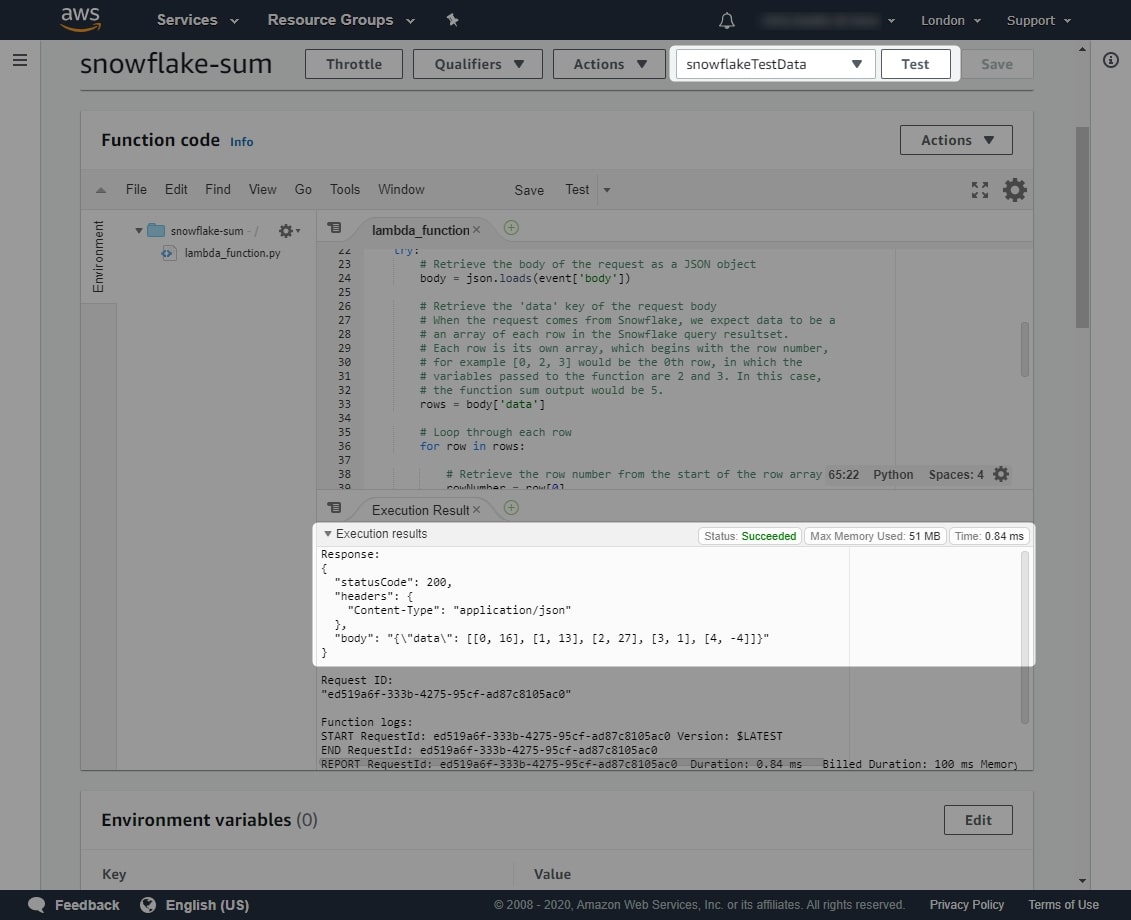
Specifically, the response we expect from our function is:
{
  "statusCode": 200,
  "headers": {
    "Content-Type": "application/json"
  },
  "body": "{\"data\": [[0, 16], [1, 13], [2, 27], [3, 1], [4, -4]]}"
}
Now that we have tested our function successfully, we must remember to add our function’s name and ARN to our list of important variables:
Lambda Service Role:  snowflake-lambda-service-role
SUM Function:         snowflake-sum
SUM Function ARN:     arn:aws:lambda:eu-west-2:012345678910:function:snowflake-sum
AWS Lambda Function to Perform a PRODUCT in a Snowflake-Friendly Way
Follow the above steps to create another AWS Lambda Python function, with the same sample data and owned by the same IAM service role. The code for the product function is:
# Import necessary modules for the function
import json
import functools

# The function itself, in which event is the full request sent to the API
def lambda_handler(event, context):

    # Declare return variables
    statusCode = 200

    # dataArray stores the resultset of the function which will be
    # returned by the function. This begins as an empty array and is added
    # to in the rows loop below
    dataArray = []

    # json_compatible_string_to_return is the json body returned by the
    # function, stored as a string. This empty value is replaced by the real
    # result when ready
    json_compatible_string_to_return = ''

    # try/except is used for error handling
    try:
        # Retrieve the body of the request as a JSON object
        body = json.loads(event['body'])

        # Retrieve the 'data' key of the request body
        # When the request comes from Snowflake, we expect data to be a
        # an array of each row in the Snowflake query resultset.
        # Each row is its own array, which begins with the row number,
        # for example [0, 2, 3] would be the 0th row, in which the
        # variables passed to the function are 2 and 3. In this case,
        # the function product output would be 6.
        rows = body['data']

        # Loop through each row
        for row in rows:

            # Retrieve the row number from the start of the row array
            rowNumber = row[0]

            # Retrieve the array of numbers to multiply
            numbersToMultiply = row[1:]

            # try/except is used for error handling
            try:
                # Calculate the rowProduct
                rowProduct = functools.reduce(lambda a,b : a*b, numbersToMultiply)
            except:
                rowProduct = "Error"

            # Create a new array entry
            newArrayEntry = [rowNumber, rowProduct]

            # Add the newArrayEntry to the main dataArray list
            dataArray.append(newArrayEntry)

        # Put dataArray into a dictionary, then convert it to a string
        dataArrayToReturn = {'data' : dataArray}
        json_compatible_string_to_return = json.dumps(dataArrayToReturn)

    except Exception as err:
        # Statuscode = 400 signifies an error
        statusCode = 400
        # Function will return the error
        json_compatible_string_to_return = json.dumps({"data":str(err)})

    return {
        'statusCode': statusCode
        ,   'headers': { 'Content-Type': 'application/json' }
        ,   'body' : json_compatible_string_to_return
        }
Once tested, the following result should be returned:
{
  "statusCode": 200,
  "headers": {
    "Content-Type": "application/json"
  },
  "body": "{\\"data\\": [[0, 55], [1, -68], [2, 176], [3, -2], [4, 4]]}"
}
Now that we have tested our function successfully, we must remember to add our function’s name and ARN to our list of important variables:
Lambda Service Role:  snowflake-lambda-service-role
SUM Function:         snowflake-sum
SUM Function ARN:     arn:aws:lambda:eu-west-2:012345678910:function:snowflake-sum
PRODUCT Function:     snowflake-product
PRODUCT Function ARN: arn:aws:lambda:eu-west-2:012345678910:function:snowflake-product
3. Configure an AWS API Gateway to Expose the Lambda Functions to Snowflake
There are several stages to creating an API gateway to expose lambda functions:
- Create the API gateway itself
- Create a resource and method for each function, which determines the possible functionality within the API
- Deploy the API to a stage, which exposes the resources and methods to authorised roles (by default, none are authorised)
3a. Create an AWS API Gateway
Navigate to the API Gateway area in AWS and select Create API:

Locate the API type called REST API and select Build:
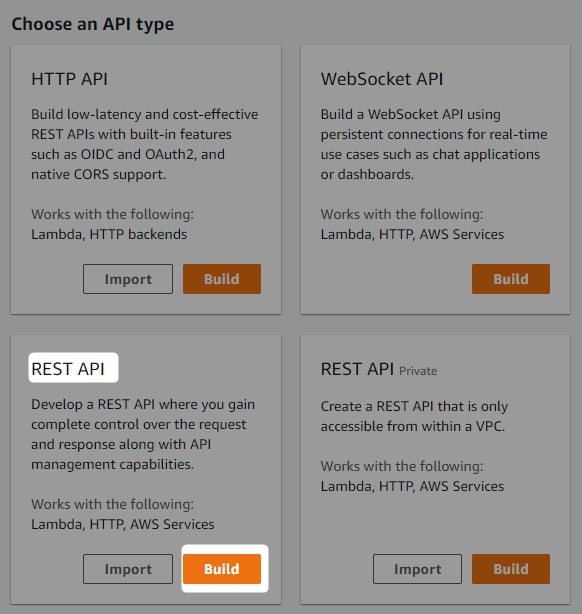
There are a few options on this next screen, though none of them need to be changed. We are creating a new REST API and will stick with a Regional endpoint type. For advanced readers who wish to experiment with other endpoint types, please note that the current version of External Functions in Snowflake only supports regional endpoint types.
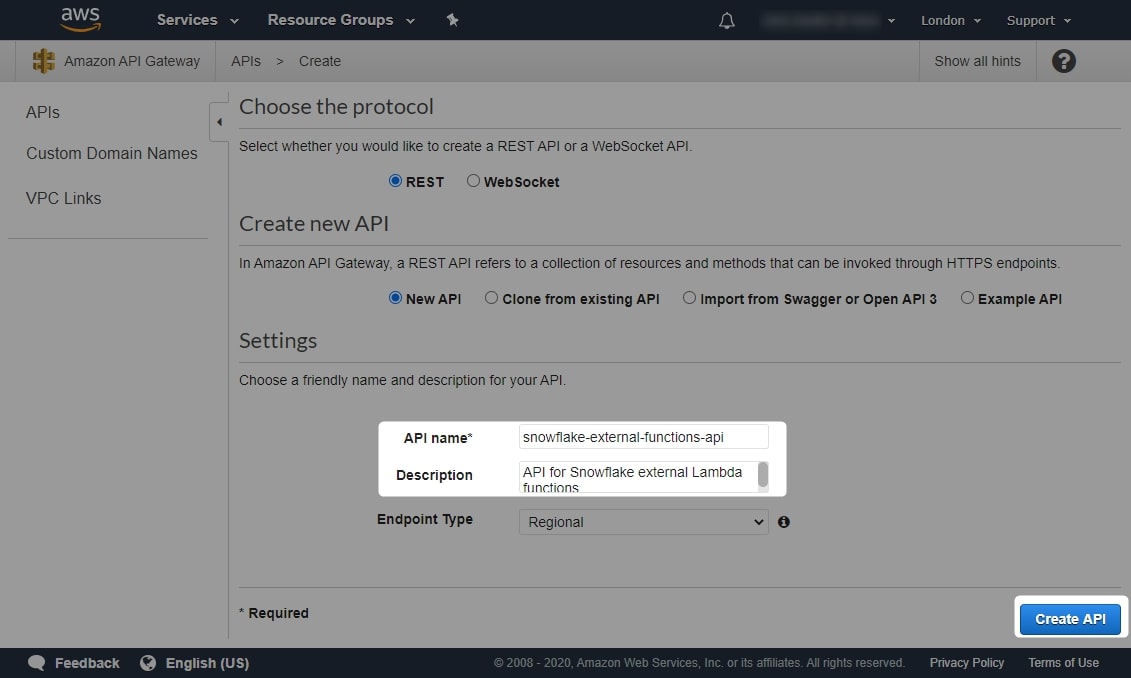
Give your API a name and description, then select Create API:
3b. Create a Resource and Method for Each Function
Once you have created your API gateway, open it up to see the following screen, which is empty as we have a fresh API gateway. Our next task is to create resources and methods for each function. By this stage, I imagine readers unfamiliar with APIs may start feeling a bit overwhelmed. This is completely understandable, and as long as you follow the steps we take, you shouldn’t have a problem. You do not need to understand how an API works to set one up, and the following setup has been tested successfully. However, if anything is not working, you may wish to find other material online to boost your knowledge on API gateways.
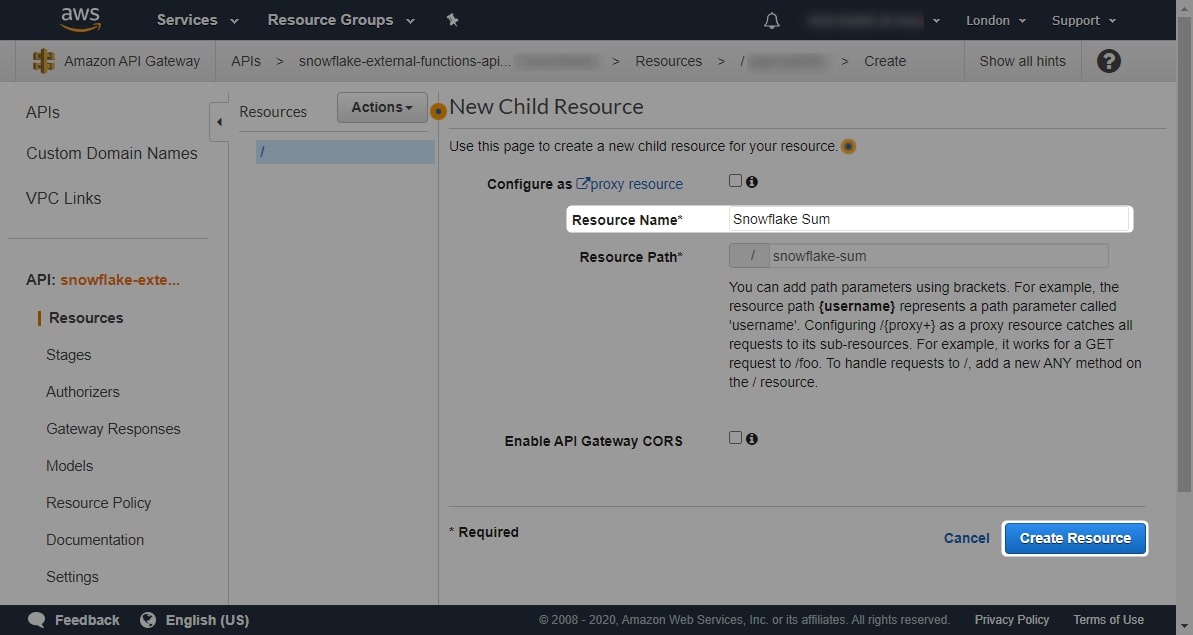
In short and simple terms, an API resource is like a folder that stores API methods. An API method is a function that can be called when something accesses the API. We start by creating a resource for our SUM function. Select Actions at the top and select Create Resource:

Populate the resource name. You should find that the resource path updates itself automatically, mimicking the resource name but replacing any white space with hyphens. Do not change any other settings, and select Create Resource:
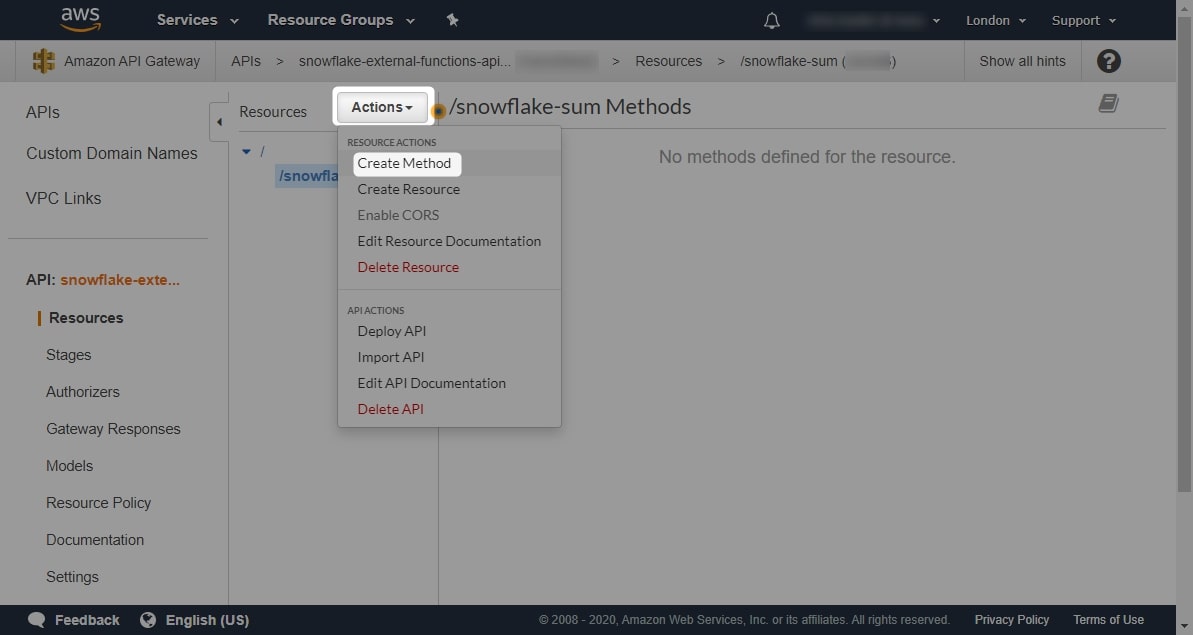
Once you have created the resource, select it so that it is highlighted. You can then create a method for this resource by selecting Actions, then Create Method:
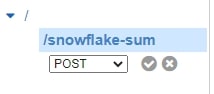
A small drop-down window will appear underneath your resource. Use this dropdown to select a POST resource then click the small tick icon:
You will then see a screen requesting various details for the new method. As our method is intended to call a Lambda function, select Lambda Function as the Integration Type, and select Use Lambda Proxy integration to allow the API to call the Lambda function automatically. Choose a region for your function—ideally the same region as your Snowflake environment or your Lambda functions just to keep things simple. Then select Save:
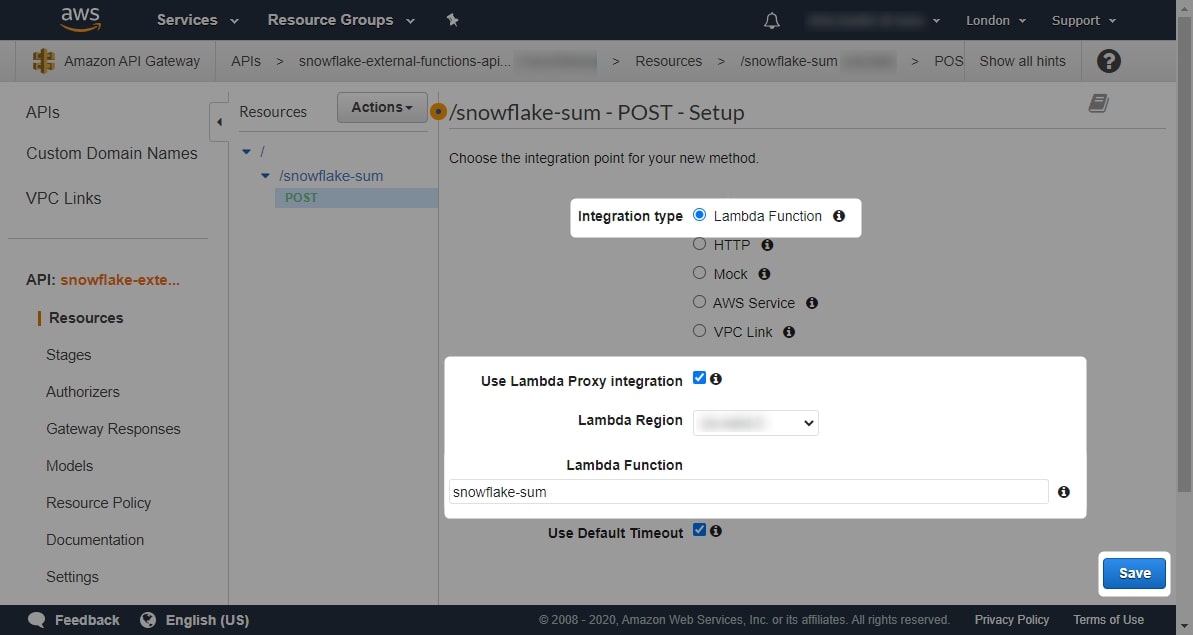
You will be greeted by a warning message that you are about to add permission to a Lambda function. This is expected, so click OK:

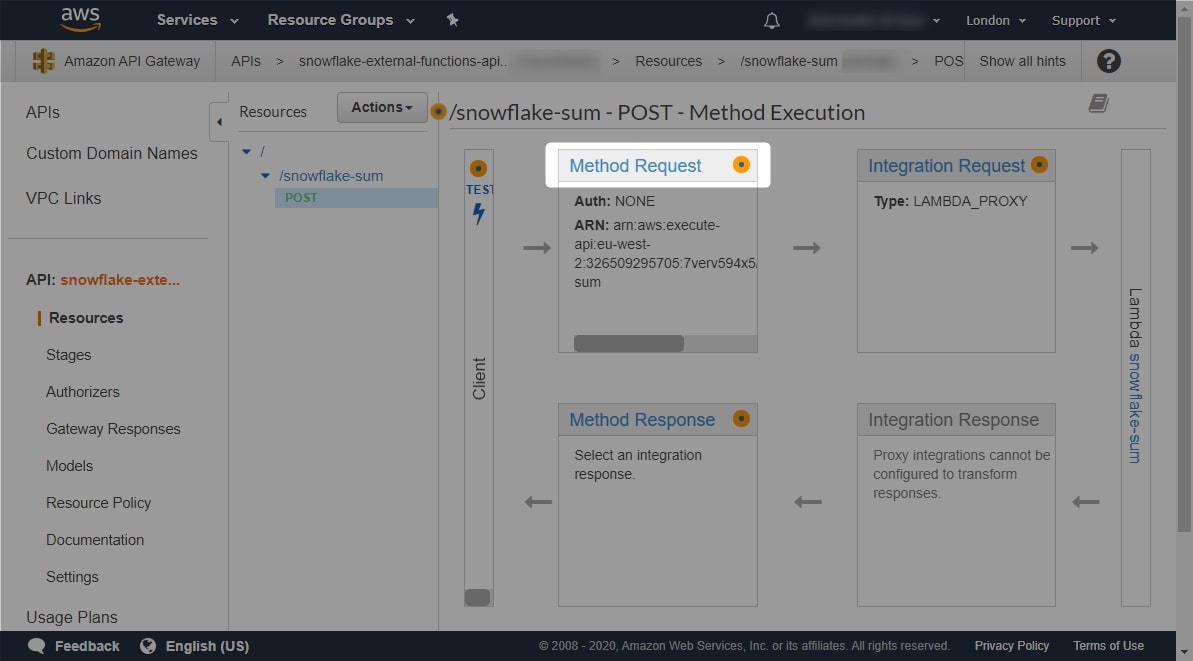
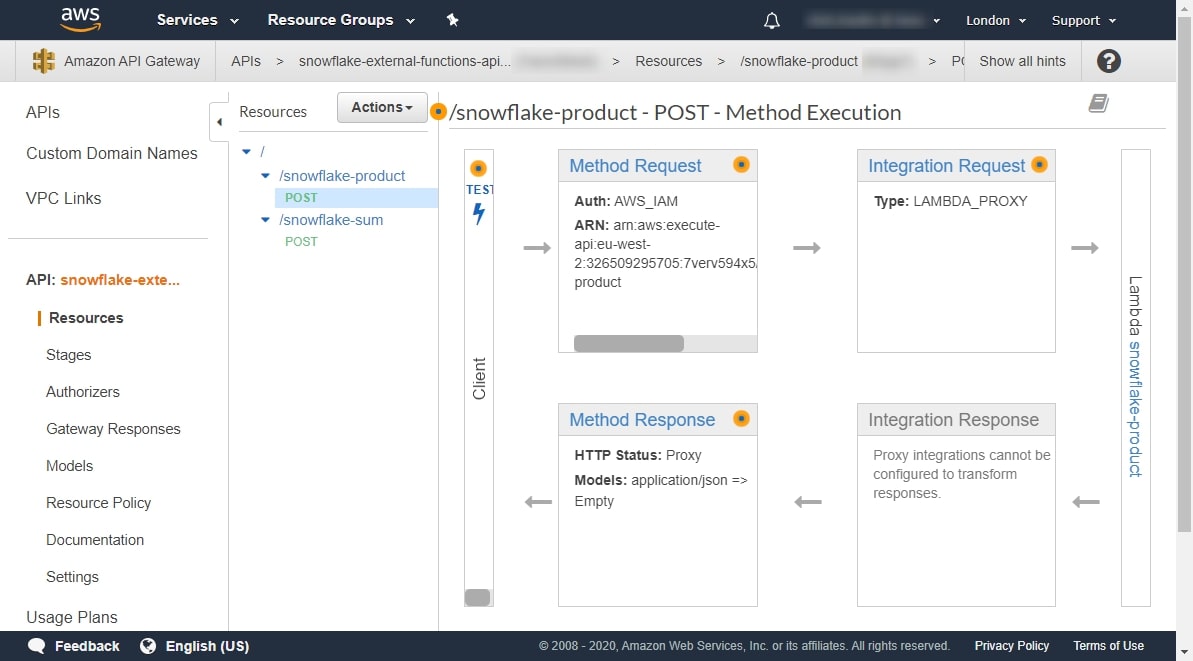
After a few moments, the settings will save and your view will refresh. You will now see a diagram displaying how traffic will be received and returned by your method. The key thing that requires attention here is that the method request authorisation is currently NONE. We need to fix that, so select the Method Request header:
Click the small pencil icon next to the Authorisation setting to edit. Change the selection to AWS_IAM, and click the small tick icon to save your new setting:
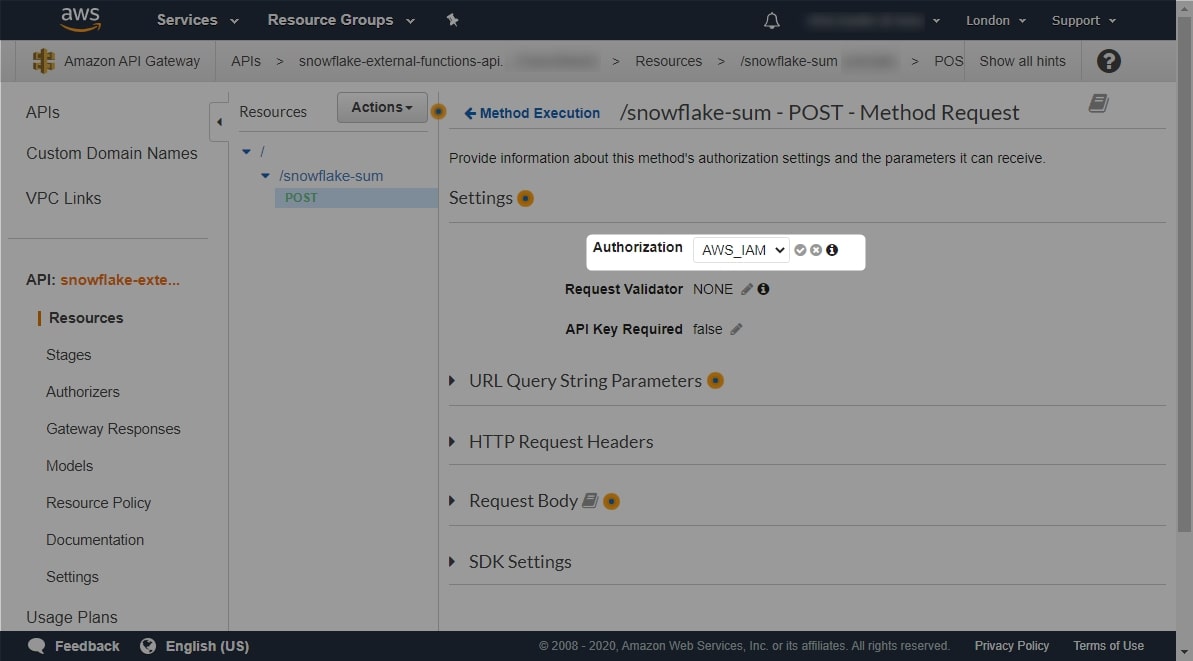
Once this change is made, return to the method overview. You will now see that the Method Request section is populated with both the Auth method and the method ARN:
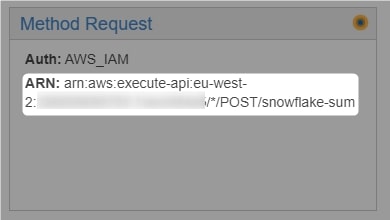
Add this method ARN to the list of important variables:
Lambda Service Role:  snowflake-lambda-service-role
SUM Function:         snowflake-sum
SUM Function ARN:     arn:aws:lambda:eu-west-2:012345678910:function:snowflake-sum
PRODUCT Function:     snowflake-product
PRODUCT Function ARN: arn:aws:lambda:eu-west-2:012345678910:function:snowflake-product
SUM Method ARN:       arn:aws:execute-api:eu-west-2:012345678910:xxxxxxxxxx/*/POST/snowflake-sum
Repeat the steps above to create a resource and method for our PRODUCT function. Be sure to select the root / when creating your resource so that it is created next to the snowflake-sum resource and not beneath it. When you are finished, you should see a screen like this:
Remember to add the method ARN to the list of important variables:
Lambda Service Role:  snowflake-lambda-service-role
SUM Function:         snowflake-sum
SUM Function ARN:     arn:aws:lambda:eu-west-2:012345678910:function:snowflake-sum
PRODUCT Function:     snowflake-product
PRODUCT Function ARN: arn:aws:lambda:eu-west-2:012345678910:function:snowflake-product
SUM Method ARN:       arn:aws:execute-api:eu-west-2:012345678910:xxxxxxxxxx/*/POST/snowflake-sum
PRODUCT Method ARN:   arn:aws:execute-api:eu-west-2:012345678910:xxxxxxxxxx/*/POST/snowflake-product
3c. Deploy the API to a Stage
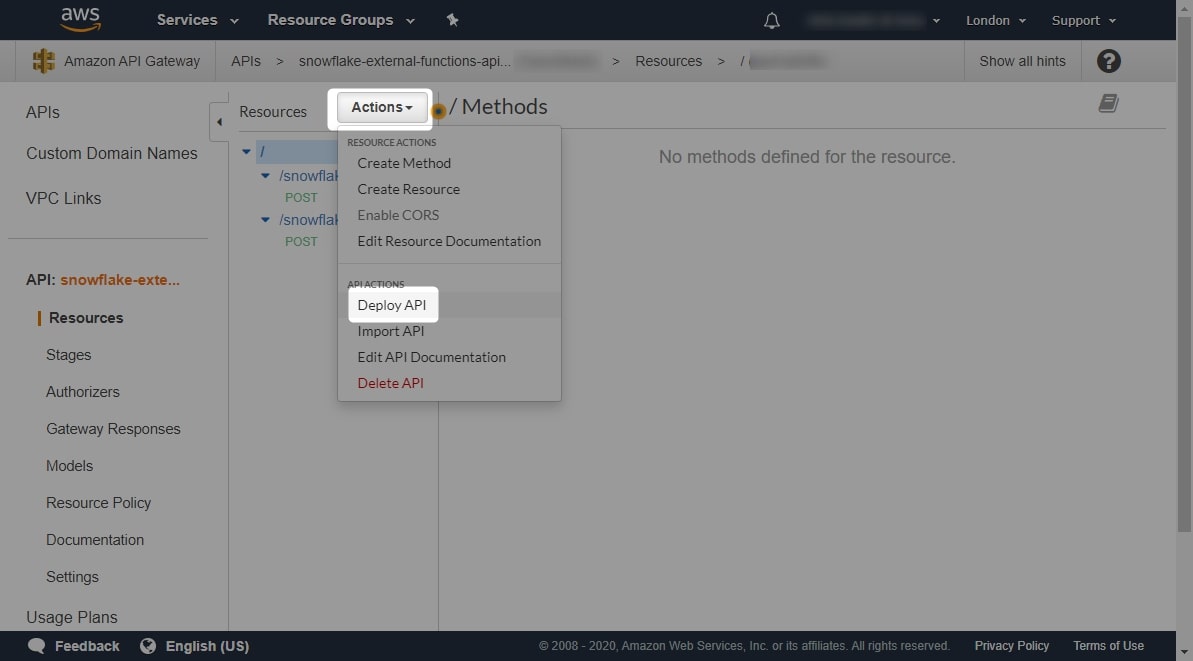
We are now ready to deploy our API to a stage, which exposes to to the outside world. Don’t worry—it will only expose the API to authorised roles, and right now we have not authorised any, so this is still fully secure. Still within the Resources area, select Actions and then Deploy API:
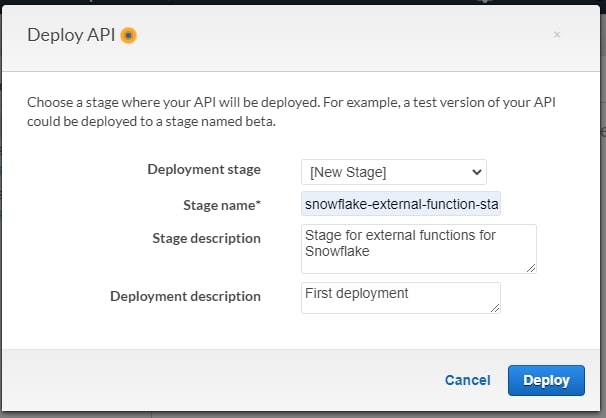
In the menu that appears, select [New Stage] from the drop-down menu and populate the name and description fields. For our example, we will use the name snowflake-external-function-stage. Once these details are entered, select Deploy:
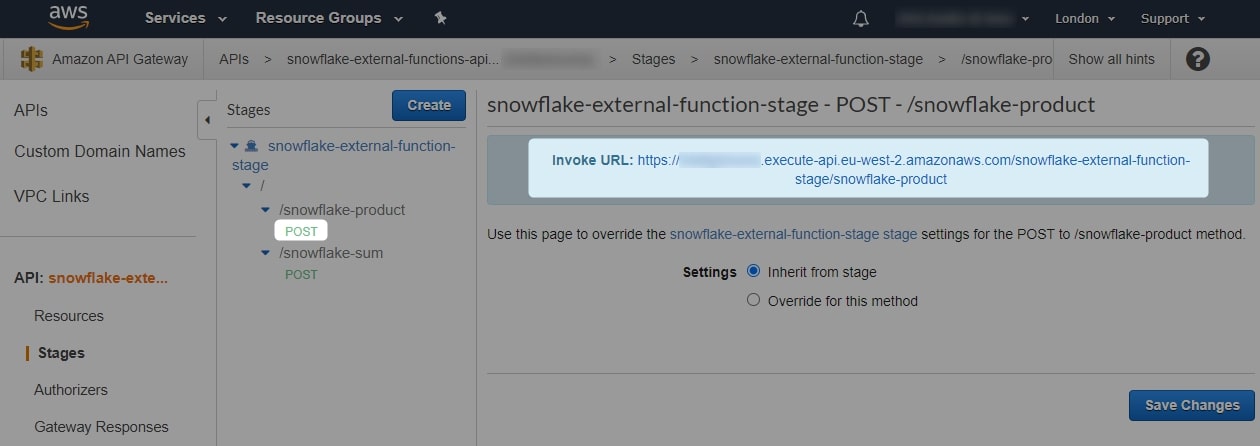
Once the stage has deployed, you will see a screen similar to the below. At the top of this screen is an invoke URL for your stage. This is the URL through which the API is accessed by authorised roles, and it is critical to setting up our API integration:

Add this stage Invoke URL to the list of important variables that we are using:
Lambda Service Role:  snowflake-lambda-service-role
SUM Function:         snowflake-sum
SUM Function ARN:     arn:aws:lambda:eu-west-2:012345678910:function:snowflake-sum
PRODUCT Function:     snowflake-product
PRODUCT Function ARN: arn:aws:lambda:eu-west-2:012345678910:function:snowflake-product
SUM Method ARN:       arn:aws:execute-api:eu-west-2:012345678910:xxxxxxxxxx/*/POST/snowflake-sum
PRODUCT Method ARN:   arn:aws:execute-api:eu-west-2:012345678910:xxxxxxxxxx/*/POST/snowflake-product
API Stage Invoke URL: <https://xxxxxxxxxx.execute-api.eu-west-2.amazonaws.com/snowflake-external-function-stage>
Selecting each method in turn allows us to see the Invoke URL for that method as well:
Add these to the list of important variables, too:
Lambda Service Role:  snowflake-lambda-service-role
SUM Function:         snowflake-sum
SUM Function ARN:     arn:aws:lambda:eu-west-2:012345678910:function:snowflake-sum
PRODUCT Function:     snowflake-product
PRODUCT Function ARN: arn:aws:lambda:eu-west-2:012345678910:function:snowflake-product
SUM Method ARN:       arn:aws:execute-api:eu-west-2:012345678910:xxxxxxxxxx/*/POST/snowflake-sum
PRODUCT Method ARN:   arn:aws:execute-api:eu-west-2:012345678910:xxxxxxxxxx/*/POST/snowflake-product
API Stage Invoke URL: <https://xxxxxxxxxx.execute-api.eu-west-2.amazonaws.com/snowflake-external-function-stage>
SUM Invoke URL:       <https://xxxxxxxxxx.execute-api.eu-west-2.amazonaws.com/snowflake-external-function-stage/snowflake-sum>
PRODUCT Invoke URL:   <https://xxxxxxxxxx.execute-api.eu-west-2.amazonaws.com/snowflake-external-function-stage/snowflake-product>
Our API gateway is now configured, apart from integration with Snowflake. The next step is to create a AWS IAM role for Snowflake and configure the various access and integrations.
4. Configuring an AWS IAM Role Which Will Facilitate the Integration Between Snowflake and the AWS API Gateway
So far, we have created two Lambda functions, a service role to execute them and an API gateway to expose them. We are nearer the end of our journey and will now set up the authorisation and integration to allow Snowflake to access these objects.
There are six steps to configuring an AWS IAM role to integrate an API with Snowflake:
- Retrieve your AWS Account ID
- Configure an AWS IAM role using this account ID
- Retrieve the role ARN
- Authorise this role ARN in the resource policy for the API gateway
- In Snowflake, create a Snowflake API Integration Object which leverages this role to access the API gateway
- In AWS, create a trust relationship between the AWS IAM role and the Snowflake API Integration object
4a. Retrieve Your AWS Account ID
Before we can create this role, we first must locate our AWS account ID. There are several ways to identify this ID, with the simplest being to extract it from the ARNs of your lambda functions. A Lambda function ARN is formed as follows:
arn:aws:lambda:<region>:<account ID>:function:<function name>
Looking back at our function ARNs on the list of important variables, we can see that our account ID is 012345678910. Note that 012345678910 is only an example value.
If you are taking these steps in a different order, usually the account ID is available in the My Security Credentials area, as in the screenshot below. Note that I have blurred out details on the specific instance in this screenshot:
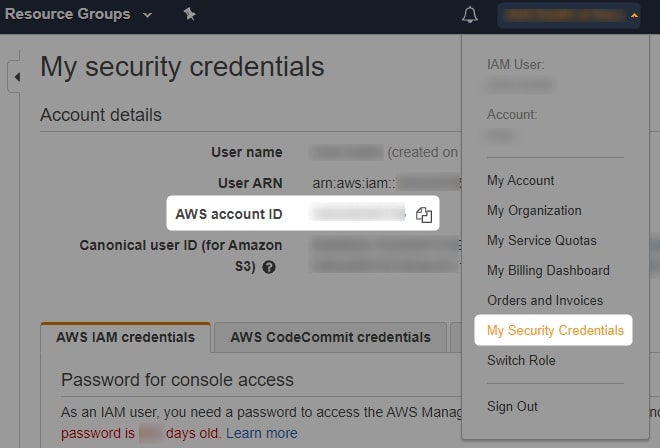
If this does not work, you can follow the AWS account identifiers documentation to find several ways of tracking down your account ID. Take note of your account ID by adding it to your list of important variables:
Lambda Service Role:  snowflake-lambda-service-role
SUM Function:         snowflake-sum
SUM Function ARN:     arn:aws:lambda:eu-west-2:012345678910:function:snowflake-sum
PRODUCT Function:     snowflake-product
PRODUCT Function ARN: arn:aws:lambda:eu-west-2:012345678910:function:snowflake-product
SUM Method ARN:       arn:aws:execute-api:eu-west-2:012345678910:xxxxxxxxxx/*/POST/snowflake-sum
PRODUCT Method ARN:   arn:aws:execute-api:eu-west-2:012345678910:xxxxxxxxxx/*/POST/snowflake-product
API Stage Invoke URL: <https://xxxxxxxxxx.execute-api.eu-west-2.amazonaws.com/snowflake-external-function-stage>
SUM Invoke URL:       <https://xxxxxxxxxx.execute-api.eu-west-2.amazonaws.com/snowflake-external-function-stage/snowflake-sum>
PRODUCT Invoke URL:   <https://xxxxxxxxxx.execute-api.eu-west-2.amazonaws.com/snowflake-external-function-stage/snowflake-product>
Account ID:           012345678910
4b. Configure an AWS IAM Role
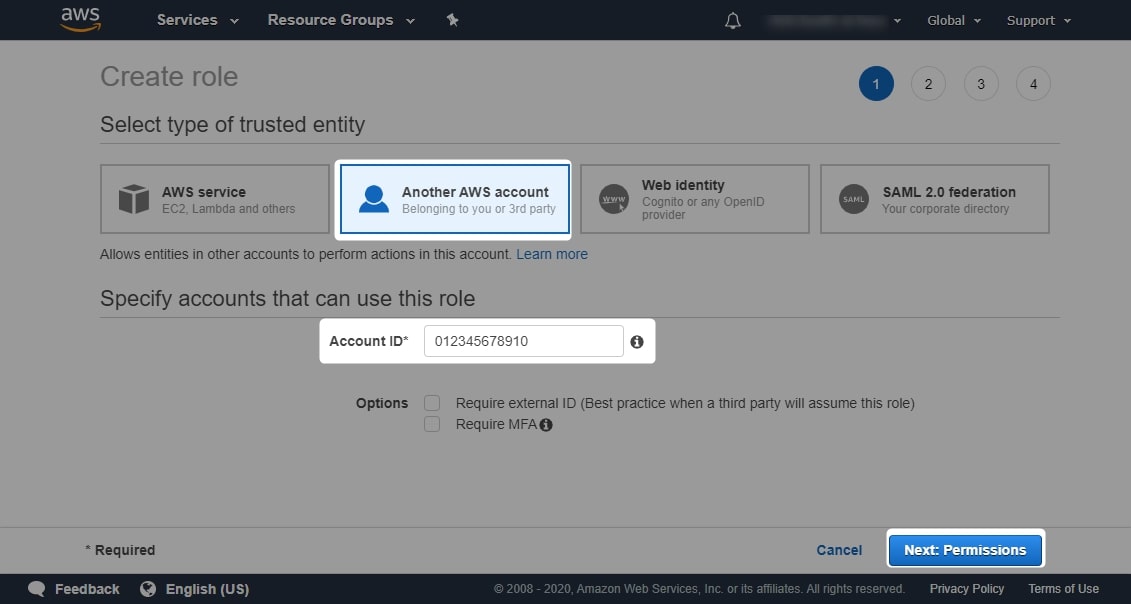
Navigate to the IAM area in AWS and select Roles then Create Role:

In this section, navigate to Another AWS Account and enter your account ID. For our example, our account ID is 012345678910. Leave the other options as they are, and select Next: Permissions:
The following through menus are not required for this example, so click Next a few times until you reach the review area. Once here, enter an appropriate name and description for your role, then click Create Role:
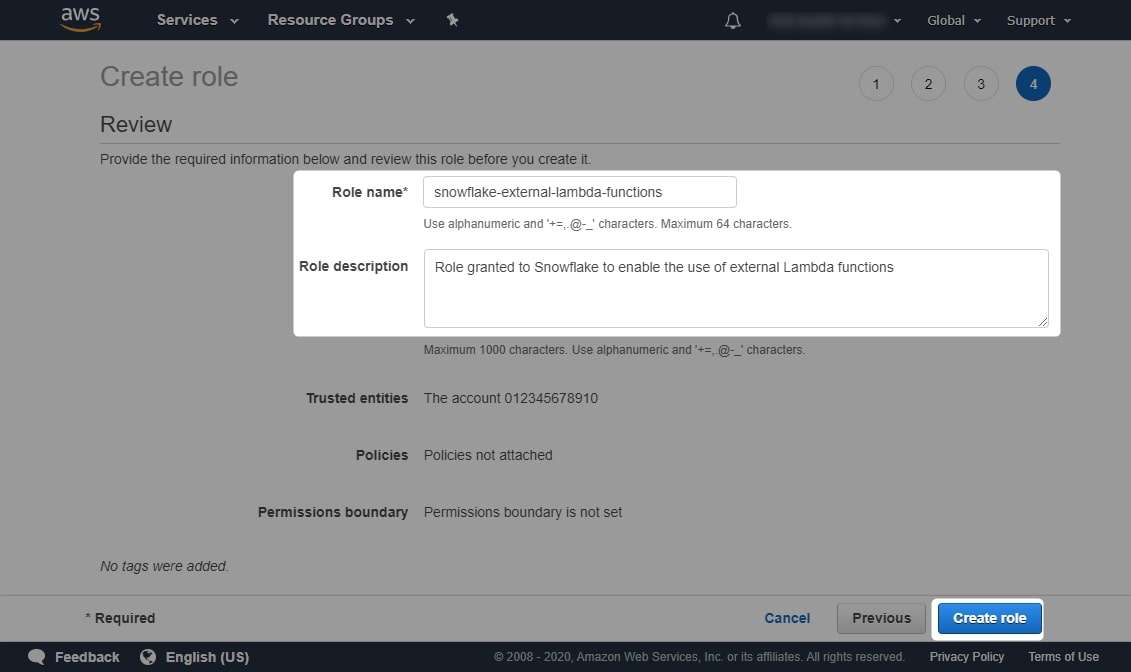
Take note of your new role name by adding it to your list of important variables:
Lambda Service Role:  snowflake-lambda-service-role
SUM Function:         snowflake-sum
SUM Function ARN:     arn:aws:lambda:eu-west-2:012345678910:function:snowflake-sum
PRODUCT Function:     snowflake-product
PRODUCT Function ARN: arn:aws:lambda:eu-west-2:012345678910:function:snowflake-product
SUM Method ARN:       arn:aws:execute-api:eu-west-2:012345678910:xxxxxxxxxx/*/POST/snowflake-sum
PRODUCT Method ARN:   arn:aws:execute-api:eu-west-2:012345678910:xxxxxxxxxx/*/POST/snowflake-product
API Stage Invoke URL: <https://xxxxxxxxxx.execute-api.eu-west-2.amazonaws.com/snowflake-external-function-stage>
SUM Invoke URL:       <https://xxxxxxxxxx.execute-api.eu-west-2.amazonaws.com/snowflake-external-function-stage/snowflake-sum>
PRODUCT Invoke URL:   <https://xxxxxxxxxx.execute-api.eu-west-2.amazonaws.com/snowflake-external-function-stage/snowflake-product>
Account ID:           012345678910
IAM Account Role:     snowflake-external-lambda-functions
4c. Retrieve the Role ARN
Once you have created your role, we need to open it and find its ARN. To do this, return to the main IAM area in AWS, search for your role and select it from the list:
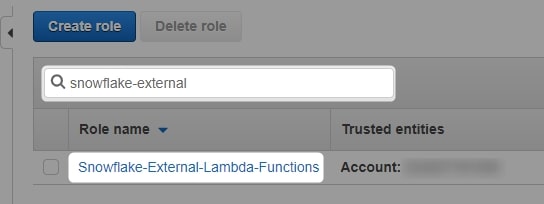
Once you have opened the role, you will see the following screen. At the top is your role ARN:

Take note of your new role ARN by adding it to your list of important variables:
Lambda Service Role:  snowflake-lambda-service-role
SUM Function:         snowflake-sum
SUM Function ARN:     arn:aws:lambda:eu-west-2:012345678910:function:snowflake-sum
PRODUCT Function:     snowflake-product
PRODUCT Function ARN: arn:aws:lambda:eu-west-2:012345678910:function:snowflake-product
SUM Method ARN:       arn:aws:execute-api:eu-west-2:012345678910:xxxxxxxxxx/*/POST/snowflake-sum
PRODUCT Method ARN:   arn:aws:execute-api:eu-west-2:012345678910:xxxxxxxxxx/*/POST/snowflake-product
API Stage Invoke URL: <https://xxxxxxxxxx.execute-api.eu-west-2.amazonaws.com/snowflake-external-function-stage>
SUM Invoke URL:       <https://xxxxxxxxxx.execute-api.eu-west-2.amazonaws.com/snowflake-external-function-stage/snowflake-sum>
PRODUCT Invoke URL:   <https://xxxxxxxxxx.execute-api.eu-west-2.amazonaws.com/snowflake-external-function-stage/snowflake-product>
Account ID:           012345678910
IAM Account Role:     snowflake-external-lambda-functions
IAM Account Role ARN: arn:aws:iam::012345678910:role/snowflake-external-lambda-functions
4d. Authorise This Role in the Resource Policy for the API Gateway
Return to the API Gateway area in AWS, and open the API gateway that we created earlier. Navigate to the Resource Policy section on the left-hand side to see the following empty resource policy area:
![]()
Resource policies are used to control authorisation within an object in AWS. Our goal is to enter a resource policy which grants our IAM Account role the capability to invoke the API methods for our two Lambda functions. We start with this empty template, which you will notice is in JSON format:
{
    "Version": "2012-10-17",
    "Statement":
    [
        {
        "Effect": "Allow",
        "Principal":
            {
            "AWS": "arn:aws:sts::<account ID>:assumed-role/<IAM Account Role>/snowflake"
            },
        "Action": "execute-api:Invoke",
        "Resource": "<Method ARN>"
        }
    ]
}
The above template allows us to grant an IAM account role the capability to invoke a single method. Don’t worry about changing the version. Using this as a template, we can create the following resource policy which grants our account role access to both of our methods:
{
    "Version": "2012-10-17",
    "Statement":
    [
        {
          "Effect": "Allow",
          "Principal":
              {
              "AWS": "arn:aws:sts::<account ID>:assumed-role/<IAM Account Role>/snowflake"
              },
          "Action": "execute-api:Invoke",
          "Resource": "<SUM Method ARN>"
        },
        {
          "Effect": "Allow",
          "Principal":
              {
              "AWS": "arn:aws:sts::<account ID>:assumed-role/<IAM Account Role>/snowflake"
              },
          "Action": "execute-api:Invoke",
          "Resource": "<PRODUCT Method ARN>"
        }
    ]
}
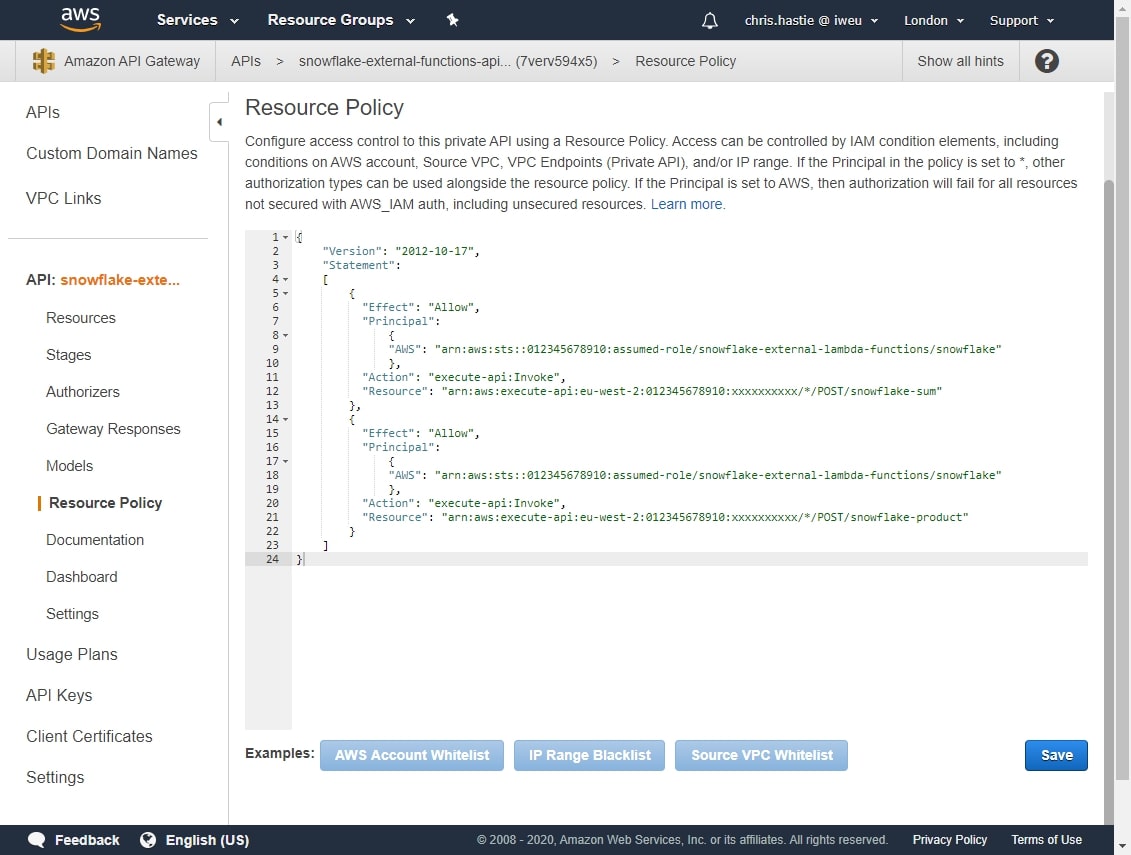
If we populate this resource policy template with our example values, we have the following:
{
    "Version": "2012-10-17",
    "Statement":
    [
        {
          "Effect": "Allow",
          "Principal":
              {
              "AWS": "arn:aws:sts::012345678910:assumed-role/snowflake-external-lambda-functions/snowflake"
              },
          "Action": "execute-api:Invoke",
          "Resource": "arn:aws:execute-api:eu-west-2:012345678910:xxxxxxxxxx/*/POST/snowflake-sum"
        },
        {
          "Effect": "Allow",
          "Principal":
              {
              "AWS": "arn:aws:sts::012345678910:assumed-role/snowflake-external-lambda-functions/snowflake"
              },
          "Action": "execute-api:Invoke",
          "Resource": "arn:aws:execute-api:eu-west-2:012345678910:xxxxxxxxxx/*/POST/snowflake-product"
        }
    ]
}
Note that there is a shortcut we could use to add multiple resources under the same list member by leveraging a * notation. However, I prefer avoiding this to ensure functions are not made available accidentally during development and testing. If you wish to do so, replace the resource name with a * as in the following example:
{
    "Version": "2012-10-17",
    "Statement":
    [
        {
          "Effect": "Allow",
          "Principal":
              {
              "AWS": "arn:aws:sts::012345678910:assumed-role/snowflake-external-lambda-functions/snowflake"
              },
          "Action": "execute-api:Invoke",
          "Resource": "arn:aws:execute-api:eu-west-2:012345678910:xxxxxxxxxx/*/POST/*"
        }
    ]
}
Whichever your preference, insert this into the resource policy and hit Save:
This concludes the setup for the API gateway. Now to integrate Snowflake!
4e. Create a Snowflake API Integration Object
Since this is a post about setting something up for Snowflake, it’s surprising how much goes on in AWS and how much progress we have made without even touching Snowflake. We are now at a stage, though, where we finally get to use Snowflake a little bit, so go ahead and log into your Snowflake environment.
Using a role that has account admin privileges, we can set up an API integration object with the following code:
CREATE OR REPLACE api integration <integration name>
  api_provider = aws_api_gateway
  api_aws_role_arn = '<IAM Account Role ARN>'
  enabled = true
  api_allowed_prefixes = ('<API Stage Invoke URL>')
;
For our example, we will call the integration aws_lambda, so our script would be:
CREATE OR REPLACE api integration aws_lambda
  api_provider = aws_api_gateway
  api_aws_role_arn = 'arn:aws:iam::012345678910:role/snowflake-external-lambda-functions'
  enabled = true
  api_allowed_prefixes = ('<https://xxxxxxxxxx.execute-api.eu-west-2.amazonaws.com/snowflake-external-function-stage>')
;
Once this completes, execute the following code to see the specific details of the integration:
DESCRIBE integration aws_lambda;
Snowflake will output the following table of values:
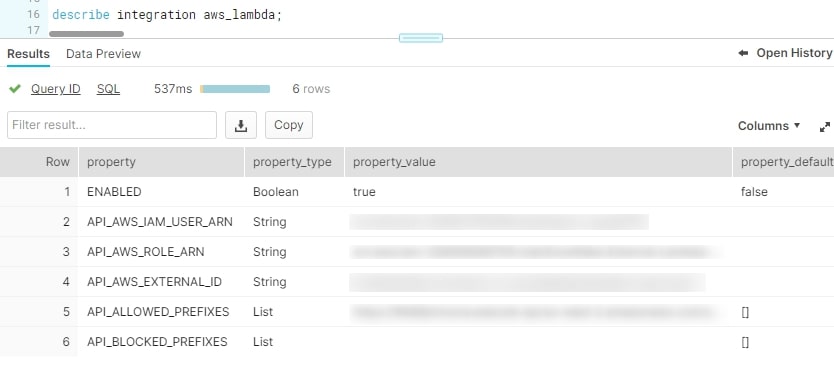
We are particularly interested in the API_AWS_IAM_USER_ARN and the API_AWS_EXTERNAL_ID fields, as these are the key indicators for how Snowflake is attempting to access AWS. Add the integration name, along with these two values to the list of important variables, being sure not to drop the = sign at the end of the external ID:
Lambda Service Role:  snowflake-lambda-service-role
SUM Function:         snowflake-sum
SUM Function ARN:     arn:aws:lambda:eu-west-2:012345678910:function:snowflake-sum
PRODUCT Function:     snowflake-product
PRODUCT Function ARN: arn:aws:lambda:eu-west-2:012345678910:function:snowflake-product
SUM Method ARN:       arn:aws:execute-api:eu-west-2:012345678910:xxxxxxxxxx/*/POST/snowflake-sum
PRODUCT Method ARN:   arn:aws:execute-api:eu-west-2:012345678910:xxxxxxxxxx/*/POST/snowflake-product
API Stage Invoke URL: <https://xxxxxxxxxx.execute-api.eu-west-2.amazonaws.com/snowflake-external-function-stage>
SUM Invoke URL:       <https://xxxxxxxxxx.execute-api.eu-west-2.amazonaws.com/snowflake-external-function-stage/snowflake-sum>
PRODUCT Invoke URL:   <https://xxxxxxxxxx.execute-api.eu-west-2.amazonaws.com/snowflake-external-function-stage/snowflake-product>
Account ID:           012345678910
IAM Account Role:     snowflake-external-lambda-functions
IAM Account Role ARN: arn:aws:iam::012345678910:role/snowflake-external-lambda-functions
API Integration Name: aws_lambda
api_aws_iam_user_arn: arn:aws:iam::109876543210:user/xxxx-x-xxxxxxxx
api_aws_external_id:  DEMO_SFCRole=0_x0xxxxxxxxxxxxxxx+xx0xx0xxx=
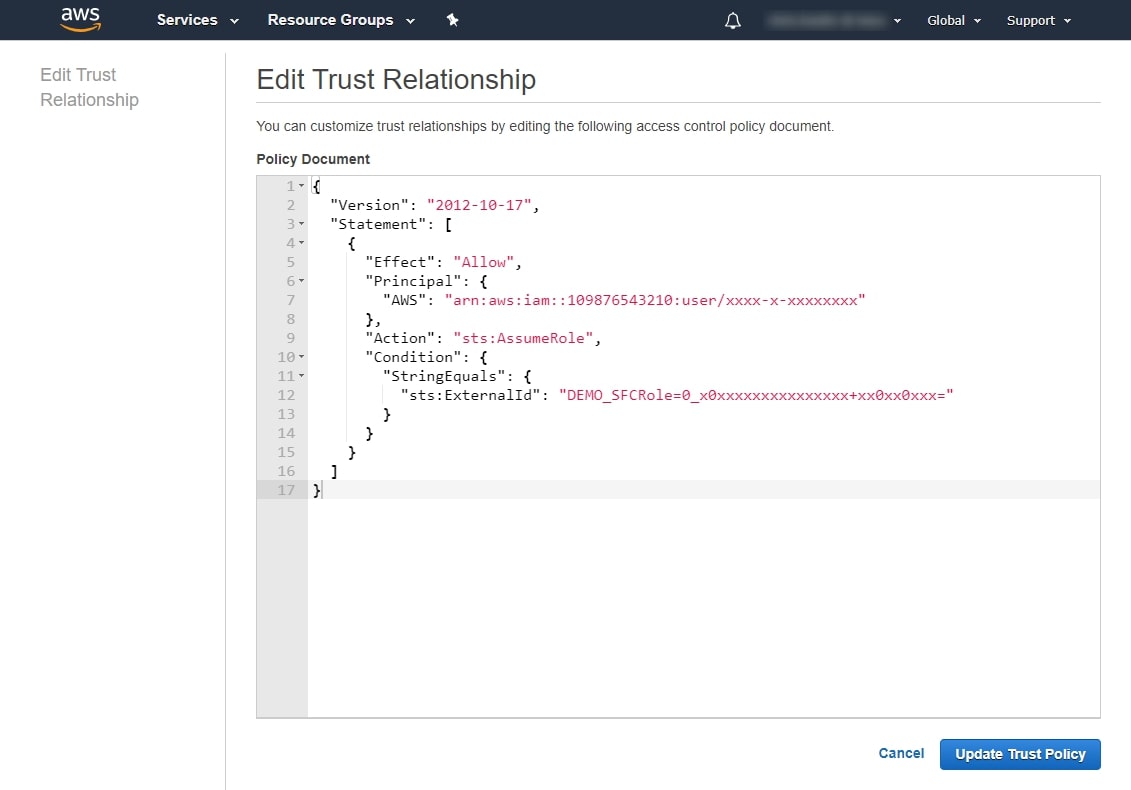
4f. Create a Trust Relationship
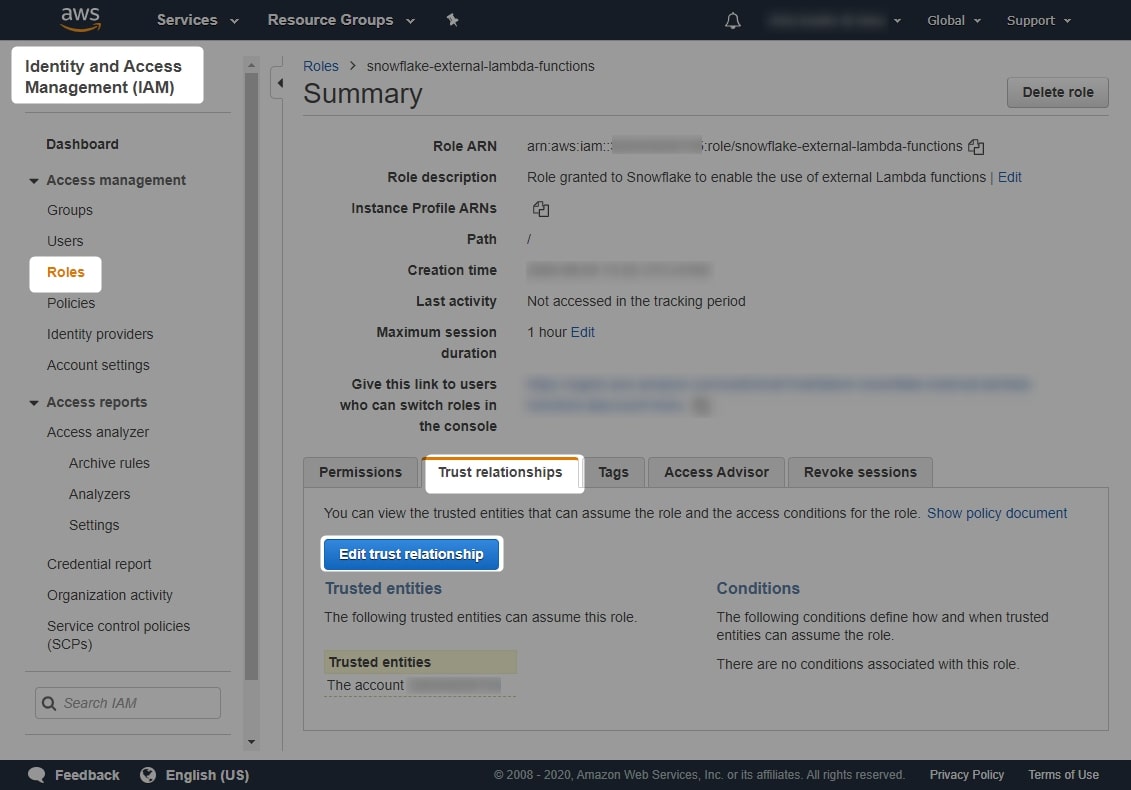
Return to the AWS IAM area, and open your IAM Account Role. Navigate to the Trust relationships tab and select Edit trust relationship:
Here you will find another JSON-structured policy document. By default, it appears as follows:
{
  "Version": "2012-10-17",
  "Statement": [
    {
      "Effect": "Allow",
      "Principal": {
        "AWS": "arn:aws:iam::<account ID>:root"
      },
      "Action": "sts:AssumeRole",
      "Condition": {}
    }
  ]
}
To allow Snowflake to leverage this role, modify the policy as follows:
{
  "Version": "2012-10-17",
  "Statement": [
    {
      "Effect": "Allow",
      "Principal": {
        "AWS": "<api_aws_iam_user_arn>"
      },
      "Action": "sts:AssumeRole",
      "Condition": {
        "StringEquals": {
          "sts:ExternalId": "<api_aws_external_id>"
        }
      }
    }
  ]
}
For our example, this would appear as follows:
{
  "Version": "2012-10-17",
  "Statement": [
    {
      "Effect": "Allow",
      "Principal": {
        "AWS": "arn:aws:iam::109876543210:user/xxxx-x-xxxxxxxx"
      },
      "Action": "sts:AssumeRole",
      "Condition": {
        "StringEquals": {
          "sts:ExternalId": "DEMO_SFCRole=0_x0xxxxxxxxxxxxxxx+xx0xx0xxx="
        }
      }
    }
  ]
}
Enter this into the policy document area and select Update Trust Relationship:
We have now finished the AWS portion of this guide and can focus on the final Snowflake steps.
5. Creating External Function Objects in Snowflake
The final steps are to build and test some external functions in Snowflake. Let’s return to Snowflake and begin by granting our new API integration to the SYSADMIN role. Of course, you can grant this to another role if you would like:
USE role securityadmin;

GRANT usage on integration aws_lambda to role sysadmin;
Using the SYSADMIN role, we can now create a database and schema to store our external functions:
USE role sysadmin;

CREATE OR REPLACE database external_functions;

CREATE OR REPLACE schema external_functions.lambda;
This gives us the basic framework to start creating our external functions. The template to create an external function is as follows:
CREATE [OR REPLACE] external function <database>.<schema>.<function name>(variables)
  returns variant
  api_integration = <api integration object>
  as '<method invoke url>'
Following this template, we can create both of our functions:
CREATE OR REPLACE external function external_functions.lambda.sum(x number, y number)
  returns variant
  api_integration = aws_lambda
  as '<https://xxxxxxxxxx.execute-api.eu-west-2.amazonaws.com/snowflake-external-function-stage/snowflake-sum>'

CREATE OR REPLACE external function external_functions.lambda.product(x number, y number)
  returns variant
  api_integration = aws_lambda
  as '<https://xxxxxxxxxx.execute-api.eu-west-2.amazonaws.com/snowflake-external-function-stage/snowflake-product>'
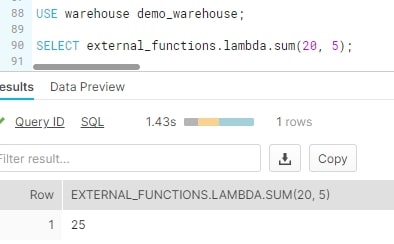
Now all we need to do is test our functions to make sure they work. The simplest way to test these is to execute them directly with manual inputs. First, we manually test the SUM function:
And then we manually test the PRODUCT function:
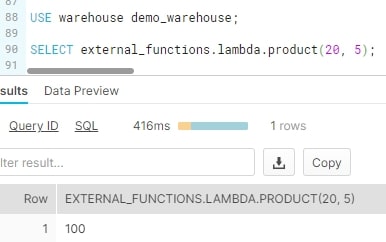
Both are working! Just for fun, let’s wrap up with a more comprehensive test. Use the following script to create a table of 500 rows, with randomly generated x and y values between -10 and 20:
CREATE OR REPLACE table external_functions.lambda.numeric_example(
    x number
  , y number
)
AS
select
    uniform(-10, 20, random()) as x
  , uniform(-10, 20, random()) as y
from table(generator(rowcount => 500))
;
The following screenshot demonstrates this test in action:
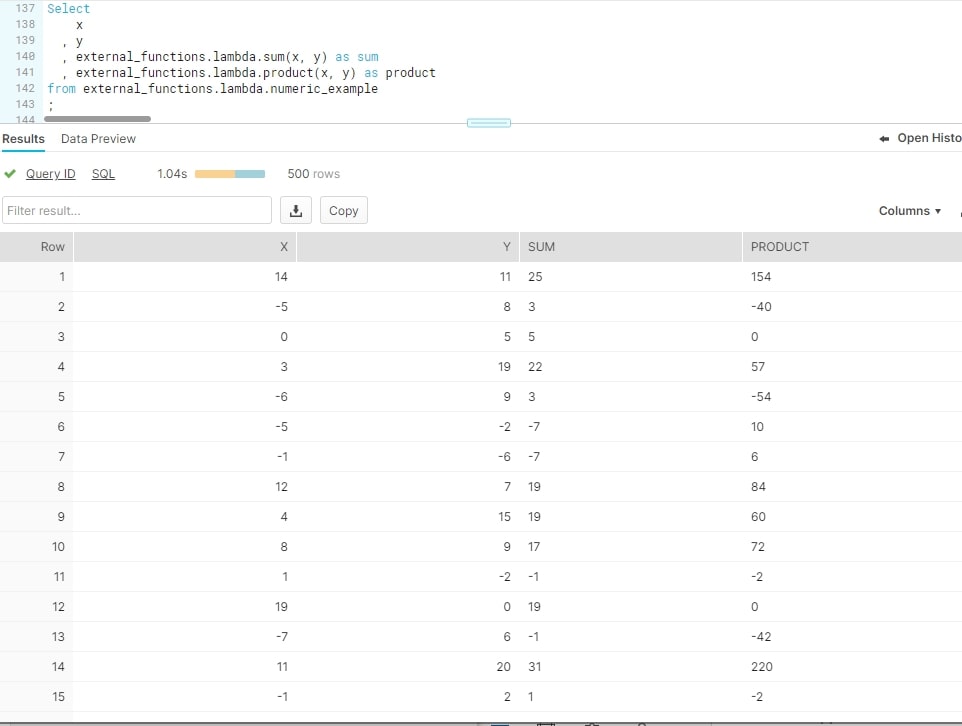
And there we have it: two external functions in Snowflake that leverage AWS Lambda functions and work as intended. It took a while to set up, but now that the framework is there, it is much easier to add new functions.
More Snowflake Help to Come
In the next post in this series, I will run through how to add new external functions to this framework using a more complex example that leverages the UK Flood Warning Measurements API.
I hope you found this guide helpful!