
This series takes you from zero to hero with the latest and greatest cloud data warehousing platform, Snowflake.
Network policies don’t exactly sound like a fun subject. Indeed, the phrase conjures an image of a big committee, a gavel being banged repeatedly and some very stern looking folks saying “No” a lot. Instead, I want to show that this function of Snowflake is vital to the security of your data and, at the same time, address some confusion about network policies’ purpose and how to use them.
So, what is a network policy? Well, in short, it’s your first and best line of defense for keeping your data secure. Snowflake includes many overlapping security protocols that, when combined, make Fort Knox look like a piggybank. However, the first line – the network policy – is often overlooked.
Common Perceptions of Network Policies
What most people learn and go on to implement about Snowflake network policies is that they enable you to define ranges of IP addresses that either are blocked or grant access to your Snowflake instance. If you sit with your cyber security team for even 15 minutes, they will be able to provide you with these ranges because every organization will have security standards. These will include proxy servers that direct all internet traffic to safeguard your organization. As a starter for ten, we can tell Snowflake to only receive requests from these IP ranges, and now any request for information issued to our Snowflake cloud platform can only originate from one of your own organization’s computers. This is a huge first step in securing your Snowflake instance. Here’s the process of how this can be done.
We are going to apply an account-level network policy. You will need to have been granted the Accountadmin role to do this. Log into the Snowflake UI, select the Accountadmin role, and click on the Account icon in the menu ribbon. Then select Policies from the secondary menu, and you’ll be presented with a screen like the following:
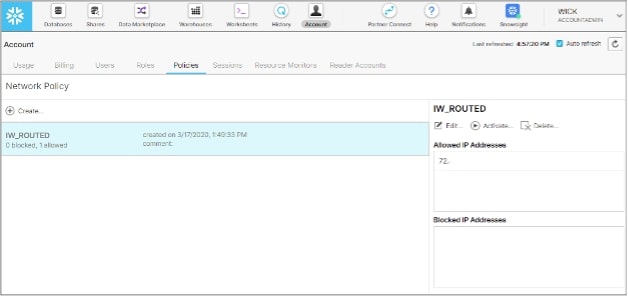
On this screen, we can create a new policy, give it a name and description and then start to assign IP addresses that we either want to grant or deny access to.
When you define the IP addresses, you can use a network naming standard called CIDR to stipulate a range of IPs to be included. For example, 192.168.1.0/24 represents all IP addresses in the range of 192.168.1.0 to 192.168.1.255.
Below are some important notes on setting up your network policies using the Snowflake UI:
- Snowflake does not allow setting a network policy that blocks your current IP address; this stops you from locking yourself out.
- A network policy is not activated until the activate button is pressed, at which point your current IP is checked.
- Multiple network policies can be stipulated in the Snowflake UI, but only one network policy can be applied at a Snowflake account at any time.
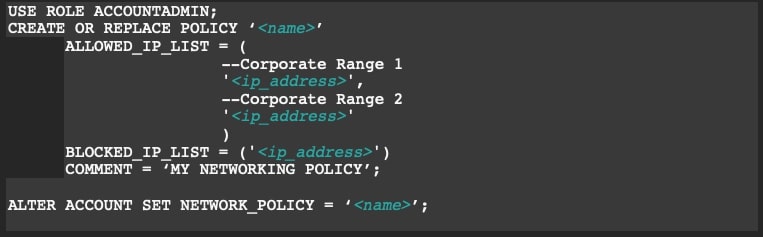
An alternative method to entering in all those IP ranges manually using the Snowflake UI is to use a SQL script to create and activate your policies. I’m a huge fan of this method because it allows me to annotate ranges and, more often than not, it’s quicker to establish. A user with the Accountadmin role can create a network policy and then an accountadmin or securityadmin role is required to activate the network policy at an account level in a Snowflake instance.
Federated Authentication on Top of Network Policies
Now that we have a network policy implemented at a Snowflake account level, we’ve basically put a rule in place that says requests for data must come from our approved IP ranges. What we often see as a next step is that clients want to implement federated authentication, which is a way of ensuring user logins use their network name and password and Single Sign-On, thereby centralizing authentication and simplifying the login process for our end users.
These articles discuss how to set up federated authentication against Azure AD or Okta, but what I don’t think these articles do a good enough job of explaining is that as part of these steps, you have to whitelist a whole bunch of public IP addresses to enable Azure AD or Okta to communicate with Snowflake.
The temptation is to simply add these public IP ranges required for federated authentication to your newly created account network policy. Don’t! Instead, create a new network policy and assign this to the security integration you create as part of enabling federated authentication. Now what you’ve done is ensure incoming data requests use your existing network ranges and authentication requests use a different policy for their fulfillment:

Multiple Snowflake Accounts or Data Sharing
We said in the previous section that a Snowflake account can only have one network policy active at a given time, BUT we can have multiple Snowflake accounts in our organization care of a feature new to Snowflake called Organizations.
The Organizations function is useful in larger corporate or international companies where everyone wants to leverage the power of Snowflake, and maybe we want to ringfence departments, countries or other operating divisions’ data from each other. In this scenario, we can create separate Snowflake accounts, each with its own network policy. Real-world examples of this might include:
- An international organization has three distinct theatres of operation: Americas, Europe and Asia Pacific. Each theatre needs its own data warehouse, and no theatre should be able to see the others’ data. In this scenario, each theatre might have its own Snowflake instance with a separate network policy associated, allowing only its own teams to have access.
- A company wants to share information with another. The external company doesn’t presently have Snowflake, so a Snowflake reader account is established, and separate network policies are applied to each account to ringfence access.
Personal & User-Specific Network Policies
Lastly, we come to the finite control that a network policy can have and that is often overlooked. An individual user, or specific users, can be associated with their own network policy. If a user is associated to both an account-level and a user-level network policy, the user-level policy takes precedence.
Where might this be useful? Well, our analytics platforms quite often use service accounts to connect and refresh extracts, and these platforms are increasingly also cloud-based. As an example, Tableau Online is a completely hosted and managed cloud analytics platform that could orchestrate to refresh an extract using a service account. In that instance, we might assign a distinct network policy to the service account, so traffic can only originate from Tableau Online.
The same might be true if you are supporting a remote workforce, and maybe you need to assign their fixed IP addresses from their personal internet service providers to their user accounts. Instead of cluttering our account-level network policy with IP addresses specific to an individual, we have now ringfenced the individual to using either their corporate or personal internet access:
![]()
And there you have it: Snowflake’s first and best line of defense explained! You can also find more information in the other posts in our Zero to Snowflake blog series. If you have specific questions or are looking for further support, please do reach out to our team!