
Earlier this month, my colleague Jason Hoehn published the following article:
Intro to Azure Functions and Snowpark: Populating Snowflake Control Tables
Jason’s article did a great job at building a foundation for building Azure Functions that leverage Snowpark for Python to interact with Snowflake. However, the focus of Jason’s post was not on security and thus the variables required for authentication were simply hard-coded for brevity. This article aims to resolve that by discussing how to leverage App Settings in your Azure Function to retrieve the required variables instead of hard-coding them.
What Are App Settings in Azure?
To begin, we will quickly discuss what an App Setting is in Azure and how it is relevant to us. In short, an App Setting is similar to an environment variable on a Windows machine, but it is held at the Azure Function App level. You can give each variable a name and store a value within it, and it can then be leveraged by any function within the Azure Function App in a similar fashion to an environment variable. Strictly speaking, it is called an application setting.
Some App Settings are created by default when you create a new Azure Function App, and I would not recommend modifying these unless you know what you are doing.
You can access the list of App Settings through the Configuration pane within an Azure Function App.
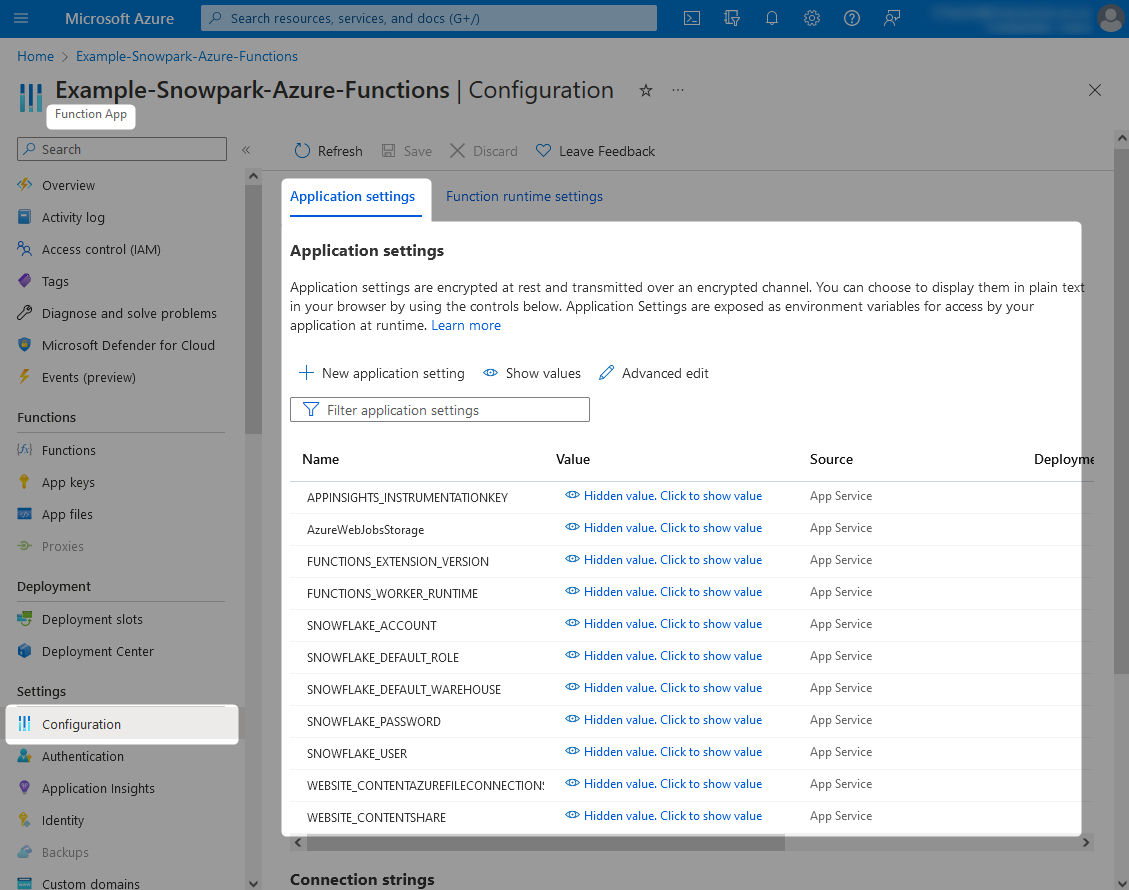
Leveraging App Settings to Connect to Snowflake
The above screenshot shows several App Settings that are leveraged by our example Azure Function App. Along with the default ones, we have the following additional ones:
- SNOWFLAKE_ACCOUNT
- SNOWFLAKE_DEFAULT_ROLE
- SNOWFLAKE_DEFAULT_WAREHOUSE
- SNOWFLAKE_USER
- SNOWFLAKE_PASSWORD
Each of these were added by simply selecting the New application setting button on the above screenshot and providing the values.
As you have likely assumed, these are the variables that we will use in our first demonstration to authenticate to Snowflake with Snowpark for Python inside an Azure Function. In Python, these variables can be accessed through the getenv() method of the os package, as demonstrated in the following code:
## Import Snowpark session module
from snowflake.snowpark import Session

## Import other packages
import os

### Retrieve connection parameters from app settings
snowflake_connection_parameters = {
    "account": os.getenv("SNOWFLAKE_ACCOUNT")
  , "user": os.getenv("SNOWFLAKE_USER")
  , "password": os.getenv("SNOWFLAKE_PASSWORD")
  , "role": os.getenv("SNOWFLAKE_ROLE")
  , "warehouse": os.getenv("SNOWFLAKE_WAREHOUSE")
}

### Create Snowflake Snowpark session
snowpark_session = Session.builder.configs(snowflake_connection_parameters).create()
That’s all there is to it really. Simply populate your App Settings appropriately and leverage them using os.getenv() to create your session.
Going Further with Service Accounts and Authentication Key Pairs
The solution discussed so far is okay. It gets the job done. However, password-based connections are often impacted by various security features which can get in the way of an automated system process, such as multi-factor authentication and policies that enforce regular password changes.
When connecting one technology to another, such as Azure to Snowflake in our case, the best practice would be to leverage a service account that is configured to authenticate with a key pair.
What Is a Service Account?
In short, a service account is an account that has been created specifically to facilitate a service or process. This is different to a user account, which would be an account given to a specific user and intended for their use only. Service accounts should still be strictly protected and controlled, as they will often have more powerful access than a user account depending on the scenario.
To better explain this we will refer to an example. In this example, both myself (Chris) and my colleague Jason could be working in the same environment of Azure and Snowflake to build several automated processes. If using our own user accounts, some of the functions would be configured to use my credentials and some to use Jason’s. If we move on from the project and hand over our respective parts to another pair of colleagues, we would then need to ensure the credentials in use by the process are changed to that of the new colleague. If we didn’t and we continued to work on multiple projects over time, we would build up a large list of services/processes that rely on our specific user credentials, and that would need updating every time one of us changed our credentials. This simply does not make sense.
Instead, a separate user is created in Snowflake with the specific purpose of facilitating the Azure Function App’s access to Snowflake. Service accounts often follow a specific naming convention within an organisation to clearly distinguish them from user accounts. In our example, we will use the “SVC_” prefix to denote a service account, and call our service account “SVC_AZURE_SNOWPARK_DEMO.” This user is very clearly intended for a specific purpose and will be configured in Snowflake to only be able to access the intended objects.
What Is Key Pair Authentication?
To keep things short, key pair authentication is similar to a password-based authentication method but it is intended for services/processes and has a different set of general ways of working. Most notably, this method consists of a pair of keys: a public key that is stored in the target platform (Snowflake in our case) and a private key that is kept safe by the service/process (Azure in our case). When authenticating, the service/process sends the private key to the target platform, where it is compared against the public key. For additional security, private keys are often password-protected too.
You can find out more in the following article, which covers this in more detail and demonstrates how to configure a key pair for authentication:
Zero to Snowflake: Key Pair Authentication with Windows OpenSSH Client
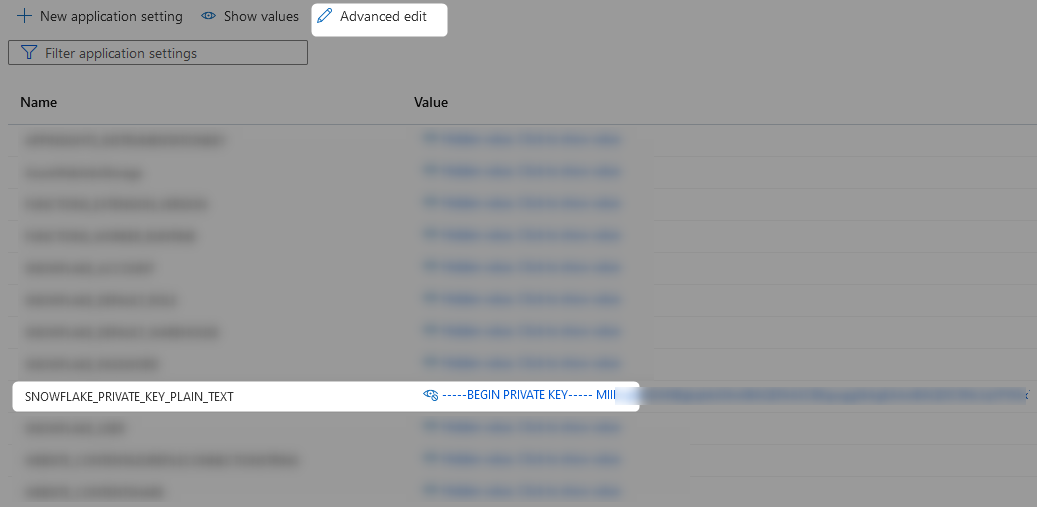
It is important to note that keys often spread over multiple lines and thus include newline characters. Populating these directly into an app setting is slightly more complicated as you must use “Advanced edit” and replace your newline characters with \n.

How to Leverage Key Pair Authentication in Snowpark for Python
At this stage, assume we have the following:
- A service account for Snowflake called “SVC_AZURE_SNOWPARK_DEMO”
- A private authentication key stored in the App Setting called “SNOWFLAKE_PRIVATE_KEY_PLAIN_TEXT”
- An aligning public key configured for the user in Snowflake
All we need now is to create a function which can retrieve the private key and serialize it so that it can be used to authenticate to create a Snowpark session. Fortunately, I have just the function for this! What a surprise, right? The following code block contains everything you need to establish a Snowpark for Python session using a private key that is stored in plain text as an App Setting. It even includes an option for a corresponding private key passphrase to also be provided as an App Setting.
## Import Azure packages
import logging
import azure.functions as func

## Import Snowpark session module
from snowflake.snowpark import Session

## Import packages with which to parse the private key
from cryptography.hazmat.backends import default_backend
from cryptography.hazmat.primitives import serialization

## Import other packages
import os

## Function to retrieve the private key
## from app settings and serialize it
## for Snowpark for Python
def retrieve_serialized_private_key() :

  ### Retrieve the private key from app settings
  private_key_plain_text = os.getenv("SNOWFLAKE_PRIVATE_KEY_PLAIN_TEXT")

  ### Encode the private key
  private_key_encoded = private_key_plain_text.encode()

  ### Retrieve the private key passphrase from app settings
  private_key_passphrase = os.getenv("SNOWFLAKE_PRIVATE_KEY_PASSPHRASE")

  ### Encode the private key passphrase if it has been provided
  private_key_passphrase_encoded = None
  if private_key_passphrase is not None :
    if len(private_key_passphrase) > 0 and private_key_passphrase != "None" :
      private_key_passphrase_encoded = private_key_passphrase.encode()

  ### Load the private key, leveraging passphrase if needed
  private_key_loaded = serialization.load_pem_private_key(
      private_key_encoded
    , password = private_key_passphrase_encoded
    , backend = default_backend()
  )

  ## Serialize loaded private key
  private_key_serialized = private_key_loaded.private_bytes(
      encoding = serialization.Encoding.DER
    , format = serialization.PrivateFormat.PKCS8
    , encryption_algorithm = serialization.NoEncryption()
  )

  return private_key_serialized

## Define main function for Azure
def main(req: func.HttpRequest) -> func.HttpResponse:
  logging.info("HTTP trigger received a new request")

  ### Retrieve the serialized private key
  private_key_serialized = retrieve_serialized_private_key()

  ### Retrieve connection parameters from app settings
  snowflake_connection_parameters = {
      "account": os.getenv("SNOWFLAKE_ACCOUNT")
    , "user": os.getenv("SNOWFLAKE_USER")
    , "private_key": private_key_serialized
    , "role": os.getenv("SNOWFLAKE_ROLE")
    , "warehouse": os.getenv("SNOWFLAKE_WAREHOUSE")
  }

  ### Create Snowflake Snowpark session
  snowpark_session = Session.builder.configs(snowflake_connection_parameters).create()
Making This Easier with Functioning Examples and the Dedicated InterWorks Submodule
To wrap things up, I’d like to mention a few resources to make this process easier. Firstly, all of the code and example today can be found in this dedicated GitHub repository: InterWorks Example Snowpark Azure Functions. In addition to bringing all of our code together into working examples that you can deploy yourself, this repository also demonstrates how to leverage our custom submodule to simplify these processes. Most notably, the submodule allows you to jump straight into creating Snowpark sessions without developing your own supporting functions, demonstrated by the following code snippet:
## Import Azure packages
import logging
import azure.functions as func

## Import other packages
import pandas
import json

## Import shared packages
from ..submodules.interworks_snowpark.interworks_snowpark_python.snowpark_session_builder import build_snowpark_session_via_environment_variables as build_snowpark_session

## Define main function for Azure
def main(req: func.HttpRequest) -> func.HttpResponse:
  logging.info("HTTP trigger received a new request")

  ### Create Snowflake Snowpark session
  snowpark_session = build_snowpark_session()
So concludes this article on leveraging App Settings in Azure to configure your Snowpark for Python connections to Snowflake. Some of you may be reading this and thinking about how this solution still stores the password or private key in plain text, and you’d be right to think that this is not the best approach. In my next article, we will address this by storing this sensitive information as secrets in Azure Key Vault and leveraging managed identities to allow our Azure Functions App to access them.