
Welcome back to our mini-series on Snowflake External Functions with Azure. Before we proceed, please read the previous post on how to set up these functions and how Snowflake interacts with Azure: A Definitive Guide to Setting up Snowflake External Functions with Azure
Why Choose an External Function over a Snowpark-Based Stored Procedure or Function?
As stated in the previous post, Snowflake has recently released Snowpark and this has unlocked a whole new realm of possibility. I have covered that extensively in my Snowflake with Python series, however there is a critical component that is lacking where Snowpark-based functionality is concerned: external connectivity.
In its current form, Snowpark-based stored procedures and functions cannot access external resources during execution. You can prepare them in advance by providing all the additional files that you want at time of creation, but you cannot access the “outside world” using the functionality itself. For example, you cannot send a request to an API or connect to outside data sources. This is where external functions can step in and provide a lot of value.
In this blog, we will walk through how to set up some a simple Python function within an Azure Function App and configure it as an external functions in Snowflake. This post assumes you already have an Azure environment and a basic understanding of how to navigate it. As stated above, this article also assumes you have completed the steps in my previous article: A Definitive Guide to Setting up Snowflake External Functions with Azure.
API Knowledge Disclaimer
If you are unfamiliar with APIs and how they work, don’t worry. This post will not explain APIs and how they work, however it also will not expect any knowledge of this kind and you should still be able to follow along and set up your own integrations. For this post, we have deliberately selected a public facing API that does not leverage any authentication processes to make our lives easier; although, if you have the understanding of how authenticated APIs are accessed, then you could replicate this process for an API of your choice.
UK Flood Warning Measurements
Now that we have set up our two basic sample functions in the previous article, this article will go through how to add new external functions to the framework that we have set up. This article will use a more complex example that leverages an API, specifically the UK government’s public facing API which contains data on flood monitoring measurements across various stations in the UK, documented here. We will set up an API call which retrieves the latest measurements for a given station and call this as a function within Snowflake to pull readings for a set of flood monitoring stations along the River Irwell.
If you are not interested in the API itself and just want to see an example of adding a new external function, feel free to skip down to the section called “Adding a New External Function to Snowflake.”
Creating a Table of Flood Monitoring Stations in Snowflake
Whilst we could set up external functions to do everything we need, it’s definitely simpler to play with the API a little directly first and set up a table of flood monitoring stations in Snowflake. As we have deliberately picked an open API, we can access the full list of stations directly by accessing the following URL:
http://environment.data.gov.uk/flood-monitoring/id/stations
If you open this URL, you will see a JSON dataset containing information for every flood monitoring station in the UK:
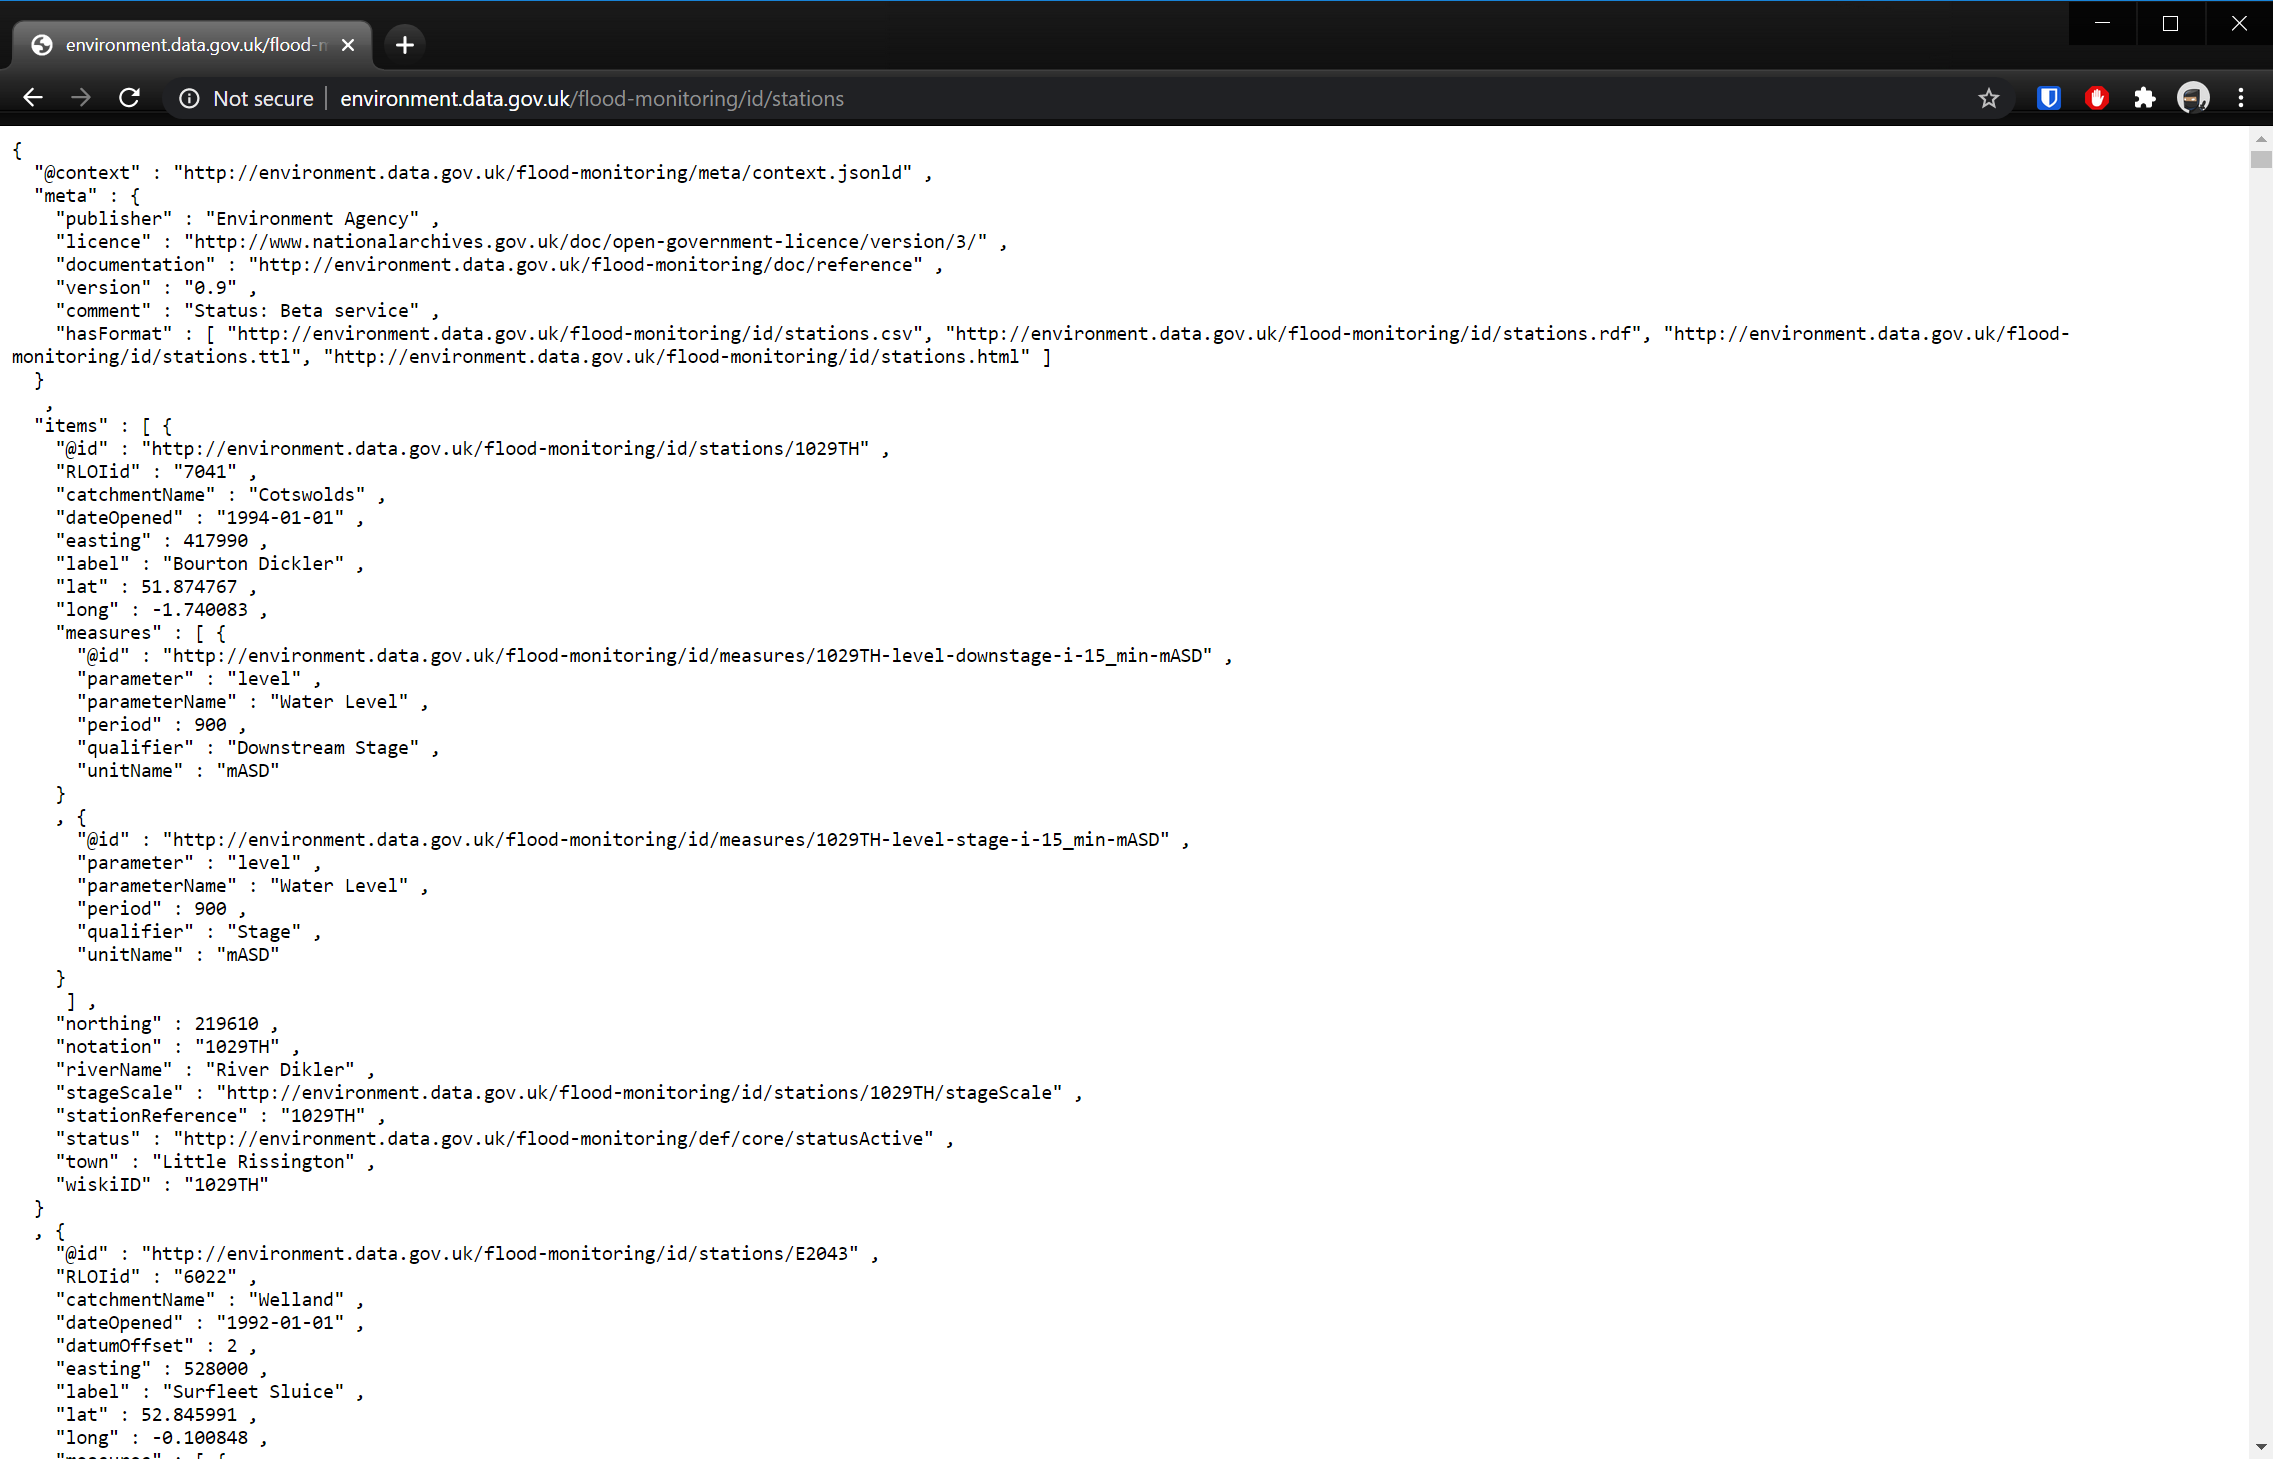
As this article is not focused on loading and transforming JSON data, I will not go into detail here. You can see that in our previous articles! By following these steps, we are able to get this data into a table in Snowflake called STATIONS:
- Copy the contents of the API Stations url into a local file called
flood_monitoring_stations.json - Create a database called
EXTERNAL_FUNCTIONS_AZUREand a schema calledUK_FLOOD_MONITORING - Create a stage within this schema called
STG_STATIONS - Use a
PUTcommand in SnowSQL to load the data into the stage - Load the data from the stage into a table called
RAW_STATIONS - Create a view parsing the raw station data into a table called
PARSED_STATIONS
If following along at home, the below script should achieve steps 2 through 6 if executed line by line in SnowSQL. This is not a best practice approach; however, it gets the job done quickly for the purposes of setting up our example.
--------------------------------------------
-- Environment

create database if not exists EXTERNAL_FUNCTIONS_AZURE;

use database EXTERNAL_FUNCTIONS_AZURE;

create schema if not exists UK_FLOOD_MONITORING;

use schema UK_FLOOD_MONITORING;

use warehouse wh_demo;

--------------------------------------------
-- Ingestion

CREATE OR REPLACE stage STG_STATIONS;

-- PUT command must be executed in SnowSQL or similar local execution platform
PUT 'FILE://path/to/file/flood_monitoring_stations.json' @STG_STATIONS;

CREATE OR REPLACE TABLE RAW_STATIONS (
  body variant
);

COPY INTO RAW_STATIONS
FROM @STG_STATIONS
  file_format = (
  type = 'JSON'
  );

--------------------------------------------
-- Parsing

CREATE OR REPLACE VIEW PARSED_STATIONS
AS
SELECT
    items.value:"@id"::string                   as id
  , items.value:"RLOIid"::number                as rloi_id
  , items.value:"catchmentName"::string         as catchment_name
  , items.value:"label"::string                 as label
  , items.value:"dateOpened"::date              as date_opened
  , items.value:"easting"::number               as easting
  , items.value:"northing"::number              as northing
  , items.value:"lat"::float                    as lat
  , items.value:"long"::float                   as long
  , items.value:"notation"::string              as notation
  , items.value:"riverName"::string             as river_name
  , items.value:"stationReference"::string      as station_reference
  , items.value:"status"::string                as status
  , items.value:"town"::string                  as town
  , items.value:"wiskiID"::string               as wiski_id
FROM RAW_STATIONS
  , lateral flatten (body:"items") as items
-- WHERE clause to remove some problematic entries
-- which are not relevant to this example
WHERE
    NOT is_array(items.value:"northing")
;
Once we have set this up, we can run a quick query on our view to confirm that there are 9 flood monitoring stations along the River Irwell:
select *
from PARSED_STATIONS
where river_name = 'River Irwell'
;
The following screenshot demonstrates the output of this query and highlights several key columns which we are interested in.

Retrieving the Most Recent Reading per Flood Monitoring Station by URL
One of the fields highlighted above is the NOTATION field. This field is the unique identifier for a flood monitoring station and can be used to interact with the API and retrieve further data. For example, we can retrieve the most recent measurements for a station by accessing the following URL:
http://environment.data.gov.uk/flood-monitoring/id/stations/{{stationId}}/measures
The first row of our data is for the flood monitoring station at Pioneer Mills in the town of Radcliffe. We can see that the NOTATION field for this record is 690250. Using this identifier, we can determine the following URL:
http://environment.data.gov.uk/flood-monitoring/id/stations/690250/measures
By opening this URL, we can access JSON-structured data similar to the following:
{
  "@context" : "http://environment.data.gov.uk/flood-monitoring/meta/context.jsonld" ,
  "meta" : {
    "publisher" : "Environment Agency" ,
    "licence" : "http://www.nationalarchives.gov.uk/doc/open-government-licence/version/3/" ,
    "documentation" : "http://environment.data.gov.uk/flood-monitoring/doc/reference" ,
    "version" : "0.9" ,
    "comment" : "Status: Beta service" ,
    "hasFormat" : [ "http://environment.data.gov.uk/flood-monitoring/id/stations/690250/measures.csv", "http://environment.data.gov.uk/flood-monitoring/id/stations/690250/measures.rdf", "http://environment.data.gov.uk/flood-monitoring/id/stations/690250/measures.ttl", "http://environment.data.gov.uk/flood-monitoring/id/stations/690250/measures.html" ]
  }
   ,
  "items" : [
    {
      "@id" : "http://environment.data.gov.uk/flood-monitoring/id/measures/690250-level-stage-i-15_min-m" ,
      "label" : "Pioneer Mills - level-stage-i-15_min-m" ,
      "latestReading" : {
        "@id" : "http://environment.data.gov.uk/flood-monitoring/data/readings/690250-level-stage-i-15_min-m/2020-08-11T04-30-00Z" ,
        "date" : "2020-08-11" ,
        "dateTime" : "2020-08-11T04:30:00Z" ,
        "measure" : "http://environment.data.gov.uk/flood-monitoring/id/measures/690250-level-stage-i-15_min-m" ,
        "value" : 0.584
      },
      "notation" : "690250-level-stage-i-15_min-m" ,
      "parameter" : "level" ,
      "parameterName" : "Water Level" ,
      "period" : 900 ,
      "qualifier" : "Stage" ,
      "station" : "http://environment.data.gov.uk/flood-monitoring/id/stations/690250" ,
      "stationReference" : "690250" ,
      "unit" : "http://qudt.org/1.1/vocab/unit#Meter" ,
      "unitName" : "m" ,
      "valueType" : "instantaneous"
    }
  ]
}
In short, what we have here is a set of descriptive header data, and a flood monitoring measurement contained within the "items" key. For our example, we are specifically interested in the datetime and value of the latest reading.
Python Function to Retrieve the Most Recent Reading for a Station
We could manually visit the URL for each of our desired stations every 15 minutes and update our data that way, but this would be far too much work and an automated solution would be far superior. We will start by building a Python function to access the API and retrieve the latest reading for a single given station:
## Import necessary modules for the function
import http.client
import mimetypes
import json

## Define the function which retrieves the latest readings for a single station ID
def retrieve_latest_reading(station_id: str) :
  ### Provide root URL for the connection to access
  url = "environment.data.gov.uk"

  ### Build an HTTP connection to the above URL
  conn = http.client.HTTPConnection(url)

  ### Since our API does not require one, we use an empty payload
  payload = ""

  ### To make our lives easier, we instruct the API to return a JSON object
  headers = {"Accept": "application/json"}

  ### Define the actual endpoint on the API that we wish to access
  ### Note that we specify the stationId in this endpoint
  endpoint = f"/flood-monitoring/id/stations/{station_id}/measures"

  ### Access the endpoint with a "GET" request, converting the response to a JSON object
  conn.request("GET", endpoint, payload, headers)
  res = conn.getresponse()
  data = res.read()
  json_response =  json.loads(data.decode("utf-8"))

  ### Return the JSON Response object as the output of our function
  return json_response
This returns the following set of results:

Python Function to Retrieve and Parse the Most Recent Readings for a Station
Taking this a step further, we can see that the output above contains a lot of information that is not relevant for our purposes. To resolve this, we create another function that executes the previous one to retrieve the readings for a given station, then parses out the information that we need.
## Create the function to retrieve all latest readings from an incoming
## Snowflake-structured array of data
def retrieve_and_parse_latest_readings(station_id: str) :

  ### Execute the function to send a request to the
  ### API to retrieve the latest readings for a given station
  latest_reading_json = retrieve_latest_reading(station_id=station_id)

  ### Retrieve the datetime and value for the latest reading from latestReadingJSON
  latest_reading_datetime = latest_reading_json["items"][0]["latestReading"]["dateTime"]
  latest_reading_value = latest_reading_json["items"][0]["latestReading"]["value"]

  ### Return the combined output
  parsed_reading_json = {"datetime": latest_reading_datetime, "value" : latest_reading_value}
  return parsed_reading_json
We can test our function quite simply using our same example:
retrieve_and_parse_latest_readings("690250")
This returns the following set of results:

Python Function to Retrieve the Most Recent Readings for a Given List of Stations
Now that we have a function to retrieve the most recent reading for a single station, we can adapt this to return data for a list of stations. In preparation for this becoming an external function for Snowflake, we structure our incoming data in a specific way that matches Snowflake’s method of transferring data. We thus expect incoming data to be in the following JSON structure where the first value is the row number and the second is the station ID. We call this input station_array_list.
station_array_list = [
    [0, 690250]
  , [1, 690155]
  , [2, 690120]
  , [3, 690510]
  , [4, 690511]
  , [5, 690140]
  , [6, 690150]
  , [7, 690503]
  , [8, 690160]
]
We can now put together a simple Python function to loop through the members of this incoming list and retrieve our desired values:
## Create the function to retrieve all latest readings from an incoming
## Snowflake-structured array of data
def retrieve_all_latest_readings(station_array_list: list) :
  ### Iterate over input rows to
  ### perform the row-level function and
  ### store the results in a single list
  ### that is a compatible response for
  ### a Snowflake External Function.
  response_list = []
  for station_array in station_array_list :

    ### Retrieve the row number
    row_number = station_array[0]

    ### Retrieve the station ID
    station_id = station_array[1]

    ### try/except is used for error handling
    try:
      #### Execute the function to retrieve and parse the reading
      parsed_reading_json = retrieve_and_parse_latest_readings(station_id=station_id)
    except:
      parsed_reading_json = "Error"

    ### Append the result to the list
    ### of rows to return
    response_list.append([row_number, parsed_reading_json])

  return response_list
We can test this simply enough in Python:
station_array_list = [
    [0, 690250]
  , [1, 690155]
  , [2, 690120]
  , [3, 690510]
  , [4, 690511]
  , [5, 690140]
  , [6, 690150]
  , [7, 690503]
  , [8, 690160]
]

retrieve_all_latest_readings(station_array_list)
This returns the following set of results:
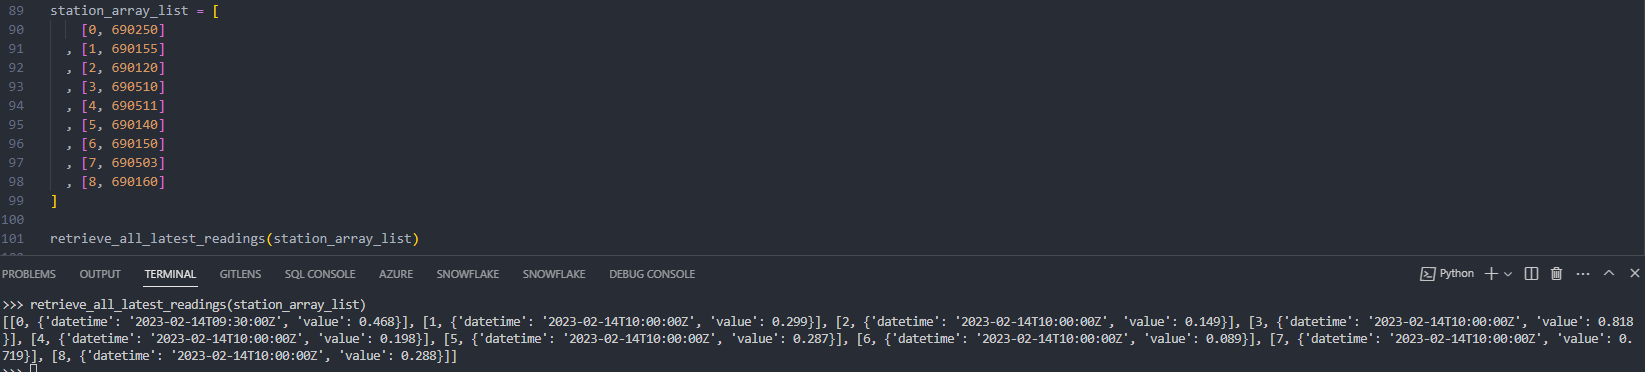
This gives us exactly what we need. We will come back to this shortly when creating our Azure function, but first lets review what we need to achieve to add this as a Snowflake external function with Azure.
Adding a New External Function to Snowflake
External Function Architecture Reminder
The following diagram was used in the previous post to demonstrate the flow between Snowflake and Azure for each of our external functions:
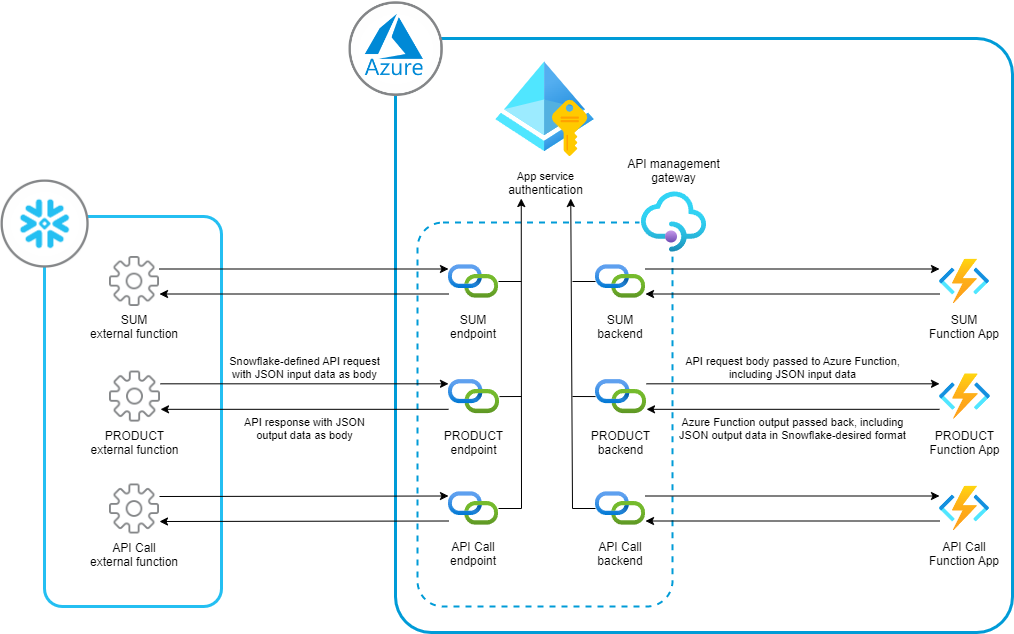
The full explanation of each of these elements is in the previous blog post. To add a new external function to our existing list, the following steps must be followed:
- Create a new Azure function inside the same Azure Function App (or follow the steps in the previous article if you wish to deploy a new one)
- Configure the Azure API management gateway to support the new Azure functions as an endpoint
- Create a new External Function object in Snowflake
Fortunately, this is a simple process and should not take too long to achieve. This process is streamlined as we configured most of the important elements in the previous article and can leverage them again easily by using the same Azure API management gateway.
1. Create a New Azure Function Inside the Same Function App
The Python code for the function itself is as follows:
# Snowflake External Function - Flood Monitoring Station Readings

## Sends a request to the API for UK flood monitoring
## stations to retrieve the latest reading

## Import Azure modules
import azure.functions as func
import logging

## Import necessary modules for the function
import json
import http.client
import mimetypes

## Define the function which retrieves the latest readings for a single station ID
def retrieve_latest_reading(station_id: str) :
  ### Provide root URL for the connection to access
  url = "environment.data.gov.uk"

  ### Build an HTTP connection to the above URL
  conn = http.client.HTTPConnection(url)

  ### Since our API does not require one, we use an empty payload
  payload = ""

  ### To make our lives easier, we instruct the API to return a JSON object
  headers = {"Accept": "application/json"}

  ### Define the actual endpoint on the API that we wish to access
  ### Note that we specify the stationId in this endpoint
  endpoint = f"/flood-monitoring/id/stations/{station_id}/measures"

  ### Access the endpoint with a "GET" request, converting the response to a JSON object
  conn.request("GET", endpoint, payload, headers)
  res = conn.getresponse()
  data = res.read()
  json_response =  json.loads(data.decode("utf-8"))

  ### Return the JSON Response object as the output of our function
  return json_response

## Create the function to retrieve all latest readings from an incoming
## Snowflake-structured array of data
def retrieve_and_parse_latest_readings(station_id: str) :

  ### Execute the function to send a request to the
  ### API to retrieve the latest readings for a given station
  latest_reading_json = retrieve_latest_reading(station_id=station_id)

  ### Retrieve the datetime and value for the latest reading from latestReadingJSON
  latest_reading_datetime = latest_reading_json["items"][0]["latestReading"]["dateTime"]
  latest_reading_value = latest_reading_json["items"][0]["latestReading"]["value"]

  ### Return the combined output
  parsed_reading_json = {"datetime": latest_reading_datetime, "value" : latest_reading_value}
  return parsed_reading_json

## Create the function to retrieve all latest readings from an incoming
## Snowflake-structured array of data
def retrieve_all_latest_readings(station_array_list: list) :
  ### Iterate over input rows to
  ### perform the row-level function and
  ### store the results in a single list
  ### that is a compatible response for
  ### a Snowflake External Function.
  response_list = []
  for station_array in station_array_list :

    ### Retrieve the row number
    row_number = station_array[0]

    ### Retrieve the station ID
    station_id = station_array[1]

    ### try/except is used for error handling
    try:
      #### Execute the function to retrieve and parse the reading
      parsed_reading_json = retrieve_and_parse_latest_readings(station_id=station_id)
    except:
      parsed_reading_json = "Error"

    ### Append the result to the list
    ### of rows to return
    response_list.append([row_number, parsed_reading_json])

  return response_list

## Define the main function
def main(req: func.HttpRequest) -> func.HttpResponse:

  ### Attempt to parse the body of the request as JSON
  try:
    req_body = req.get_json()
  except ValueError:
    logging.info("Failed to parse request body as JSON")
    logging.info(e)
    return func.HttpResponse(body="Failed to parse request body as JSON", status_code=400)
  else:

    try :

      #### Additional logging that is not necessary
      #### once in production
      logging.info("req_body:")
      logging.info(req_body)

      #### Retrieve the "data" key of the request body.
      #### When the request comes from Snowflake, we expect data to be a
      #### an array of each row in the Snowflake query resultset.
      #### Each row is its own array, which begins with the row number,
      #### for example [0, 690250] would be the 0th row, in which the
      #### variable value passed to the function is 690250.
      input_rows = req_body.get("data")

      #### Additional logging that is not necessary
      #### once in production
      logging.info("input_rows:")
      logging.info(input_rows)

      #### Iterate over input rows to
      #### perform the row-level function and
      #### store the results in a single list
      #### that is a compatible response for
      #### a Snowflake External Function.
      response_list = retrieve_all_latest_readings(input_rows)

      #### Put response into a JSON dictionary,
      #### then convert it to a string for transmission
      response_json = {"data": response_list}
      response_as_string = json.dumps(response_json)

      #### Send the response
      response_headers = {"Content-Type" : "application/json"}
      return  func.HttpResponse(body=response_as_string, status_code=200, headers=response_headers)

    ### Error handling
    except Exception as e:

      logging.info(f"Manual log - Error encountered")
      logging.info(e)
      return  func.HttpResponse(body=f"Error encountered", status_code=400)
We will follow similar steps in section “2c. Deploying Azure Functions using VSCode” in the previous article, A Definitive Guide to Setting up Snowflake External Functions with Azure, to leverage the demos in InterWorks’ Example Snowflake Azure External Functions Git repository through VSCode as a short cut to deploying the functions in Azure.
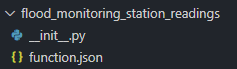
For this approach, simply add a new folder for our function with an __init__.py file containing the code above, along with a function.json file:
For this example, I use the following content for the function.json file:
{
"scriptFile": "__init__.py",
"bindings": [
{
"authLevel": "anonymous",
"type": "httpTrigger",
"direction": "in",
"name": "req",
"methods": [
"get",
"post"
]
},
{
"type": "http",
"direction": "out",
"name": "$return"
}
]
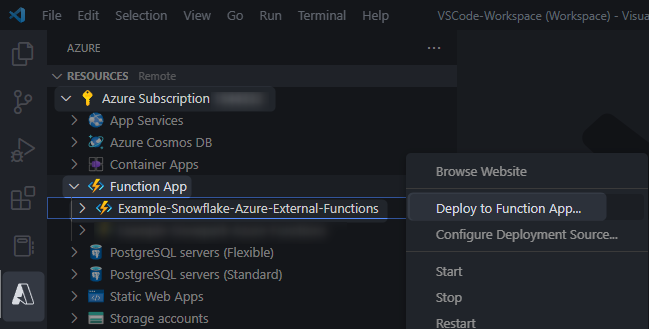
}You can then use VSCode to deploy this in the same way as before:
2. Configure the Azure API Management Gateway to Support the New Azure Functions as an Endpoint
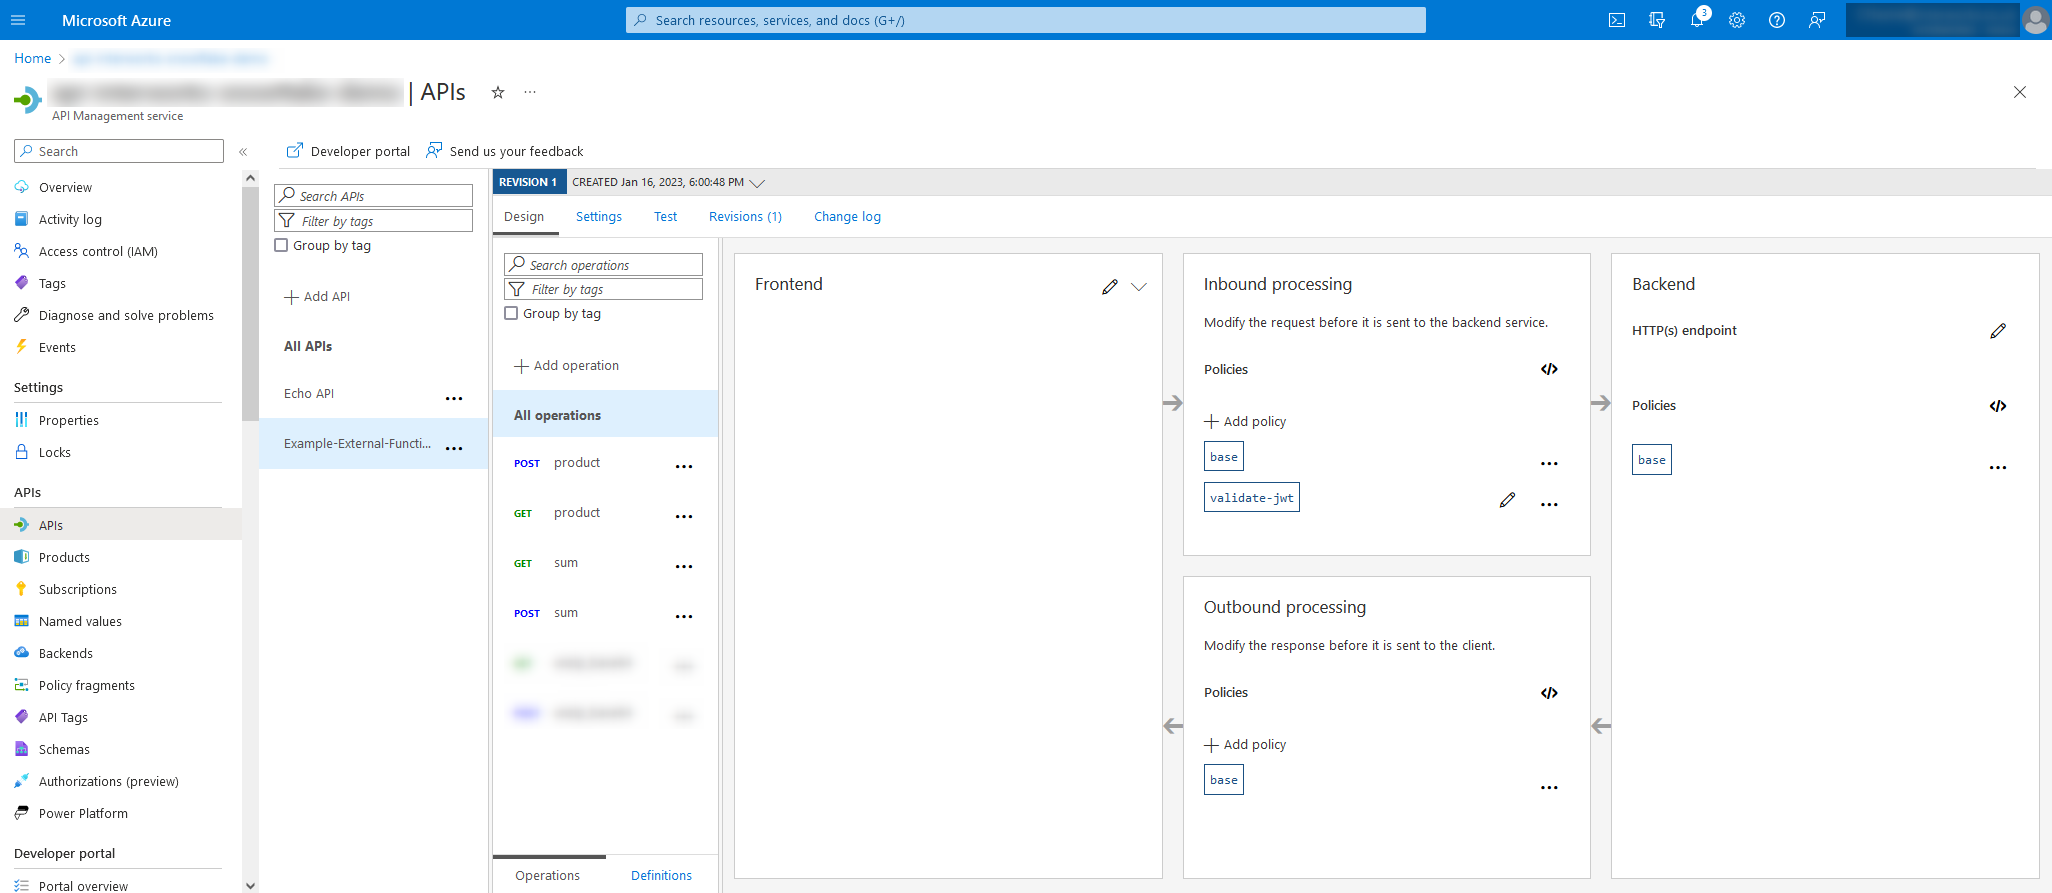
Return to your API management gateway in Azure and view your API in the APIs pane. If you followed the previous article, it should look similar to the following screenshot:
We have a couple of options at this point:
- Add the new function as an entirely new API in the management gateway by following the steps in section “4. Configure the Azure API Management Gateway to Support the Azure Functions as Endpoints” of the previous article
- Add the new function as a new operation in the existing API
This article will cover the process involved for the latter option, as the former simply follows the steps in the aforementioned section.
To add the new function as a new operation, the advised method would be to select + Add operation and follow the various steps.
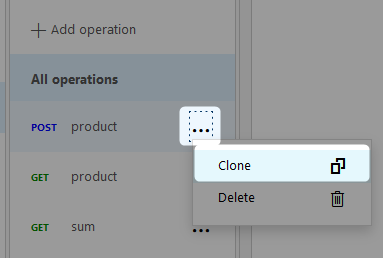
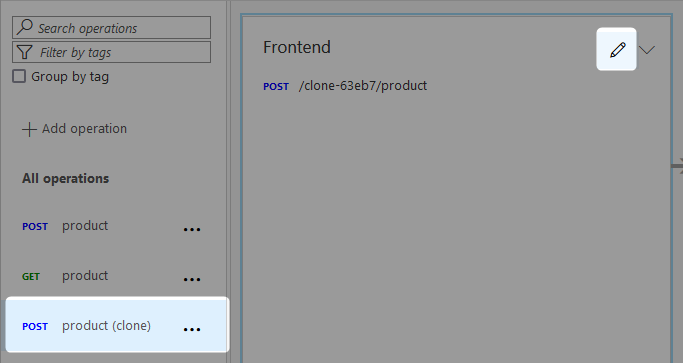
Personally, I don’t like filling everything in again when we can save ourselves some effort, so instead I would recommend cloning an existing endpoint and tweaking it. For this example, we clone the product POST endpoint:
After selecting clone, Azure will spend a few moments deploying the clone. When it finishes, you should see it appear:
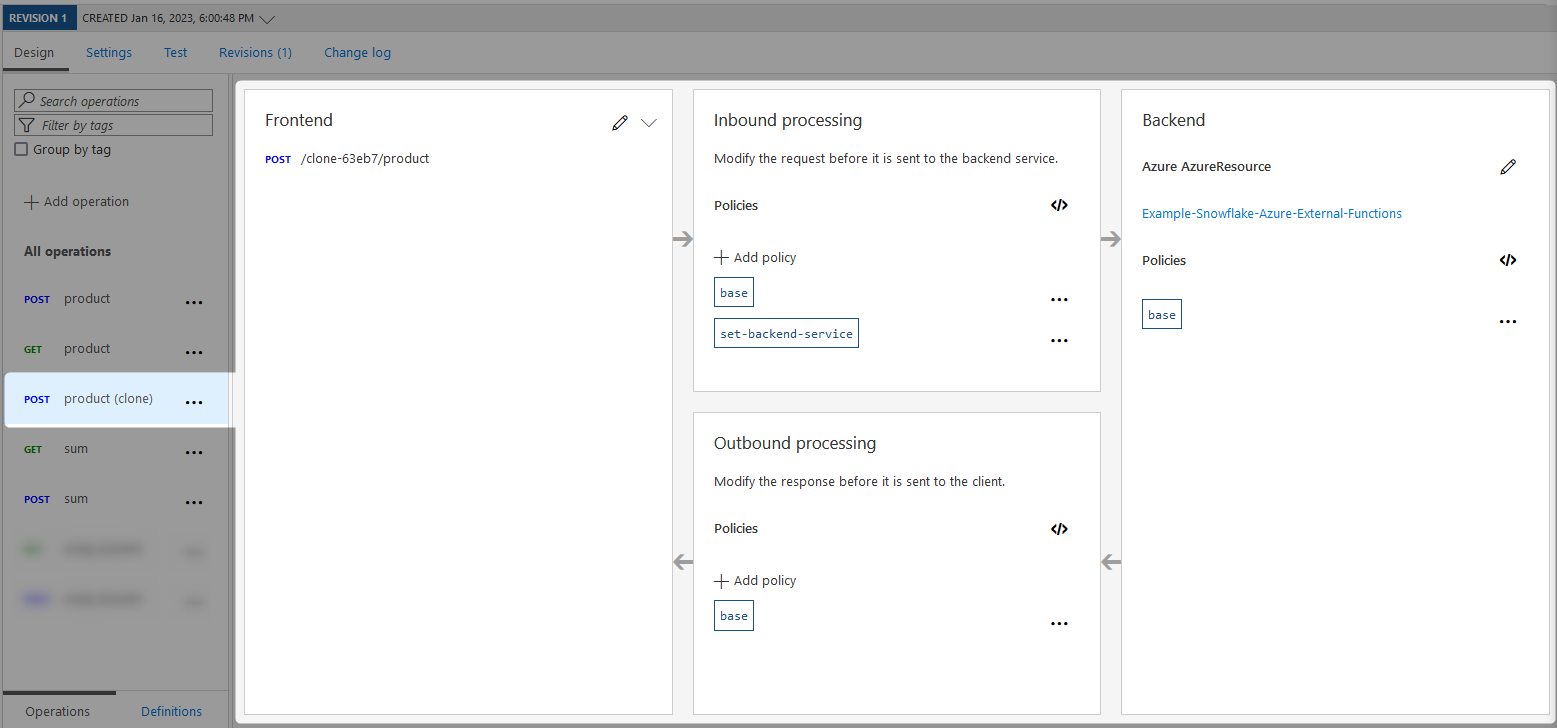
From here, we just need to clean up the frontend. Fortunately the other areas (inbound processing, backend and outbound processing) can remain as they are, which has the added benefit of leveraging any policies that we configured previous for the endpoint that we cloned.
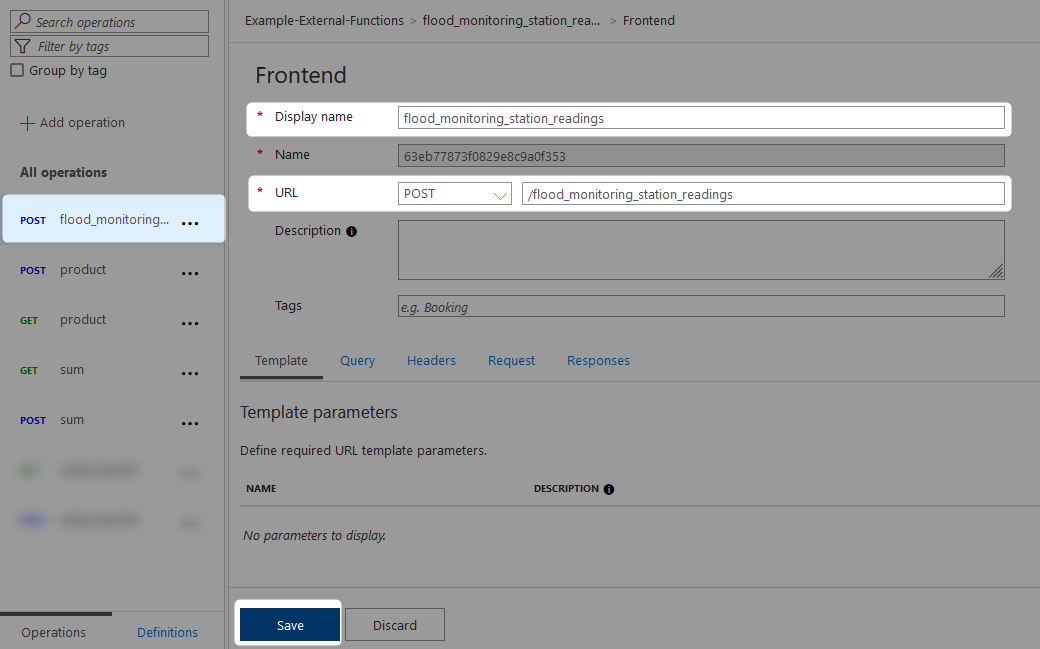
To open the frontend configuration, select the pencil icon in the relevant section.
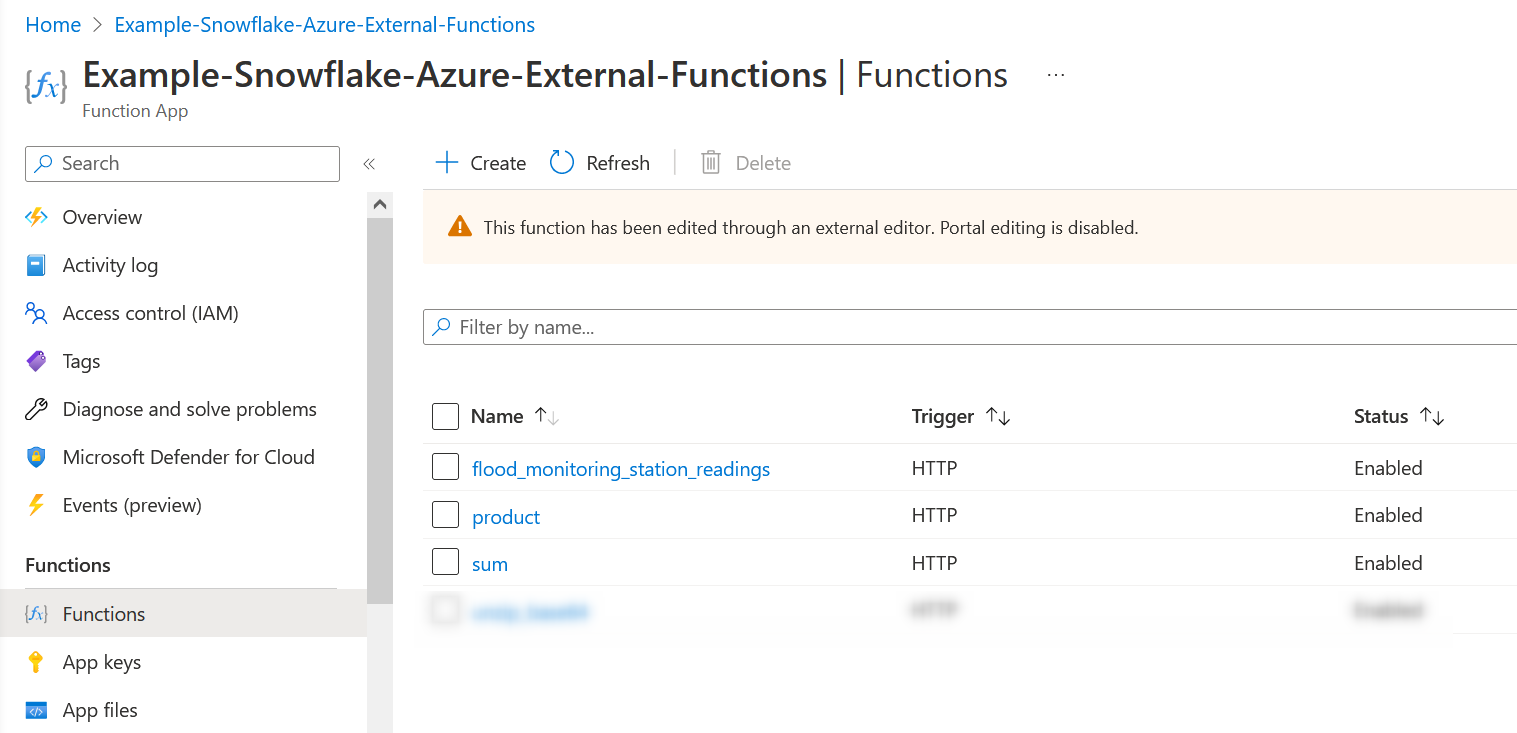
It is important that the URL matches the name of your Azure Function. See the below screenshot for a reference of the functions available in our Azure Functions App:
Once you have configured the values, select Save. The name change will be reflected on the left:
This should be the only change required as this API is already configured to point to our main Azure Functions App and the URL how we map to the specific function.
3. Create a new External Function object in Snowflake
The final steps are to build and test the external function in Snowflake.
Be sure that the role creating the external functions has been granted
USAGEon the API integration.
As before, the template to create an external function is as follows:
CREATE [OR REPLACE] external function <database>.<schema>.<function name>(variables)
  returns variant
  api_integration = <api integration object>
as
  '<endpoint url>'
;
Following this template, we can create both of our functions:
create [or replace] external function external_functions.uk_flood_monitoring.retrieve_flood_monitoring_station_readings(x number, y number)
  returns variant
  api_integration = API_AZURE_EXTERNAL_FUNCTIONS
as
  'https://api-snowflake-demo.azure-api.net/Example-External-Functions/flood_monitoring_station_readings'
;
Now all we need to do is test our function to make sure it works. The simplest way to test these is to execute them directly with manual inputs:
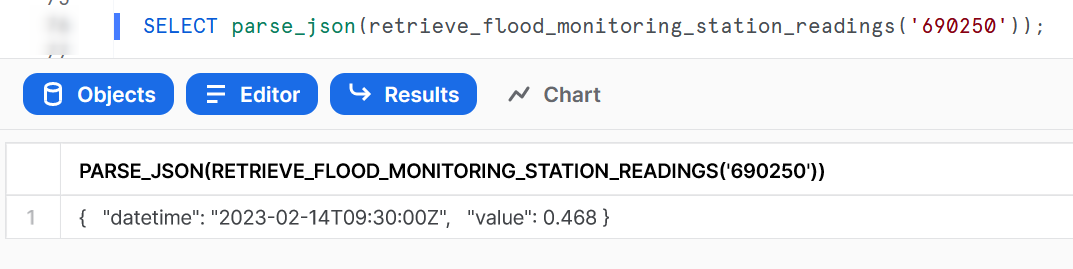
This gives us everything we need. We can now replace our original view with a similar view that can also retrieve the latest metrics, directly parsing the datetime value while we are at it:
CREATE OR REPLACE VIEW stations_from_api
AS
SELECT
    items.value:"RLOIid"::number                as rloi_id
  , items.value:"label"::string                 as label
  , items.value:"town"::string                  as town
  , items.value:"riverName"::string             as river_name
  , items.value:"catchmentName"::string         as catchment_name
  , items.value:"notation"::string              as notation
  , to_timestamp(parse_json(retrieve_flood_monitoring_station_readings(notation)):"datetime"::string, 'YYYY-MM-DD"T"HH24:MI:SS"Z"') as datetime
  , parse_json(retrieve_flood_monitoring_station_readings(notation)):"value"::float as value
  , items.value:"@id"::string                   as id
  , items.value:"dateOpened"::date              as date_opened
  , items.value:"easting"::number               as easting
  , items.value:"northing"::number              as northing
  , items.value:"lat"::float                    as lat
  , items.value:"long"::float                   as long
  , items.value:"stationReference"::string      as station_reference
  , items.value:"status"::string                as status
  , items.value:"wiskiID"::string               as wiski_id
FROM raw_stations
  , lateral flatten (body:"items") as items
-- WHERE clause to remove some problematic entries
-- which are not relevant to this example
WHERE
    NOT is_array(items.value:"northing")
;
Once we have set this up, we can run a quick query on our view to retrieve the latest metrics for our 9 flood monitoring stations along the River Irwell:
SELECT *
FROM stations_from_api
WHERE river_name = 'River Irwell'
;
You should see a result similar to the following:
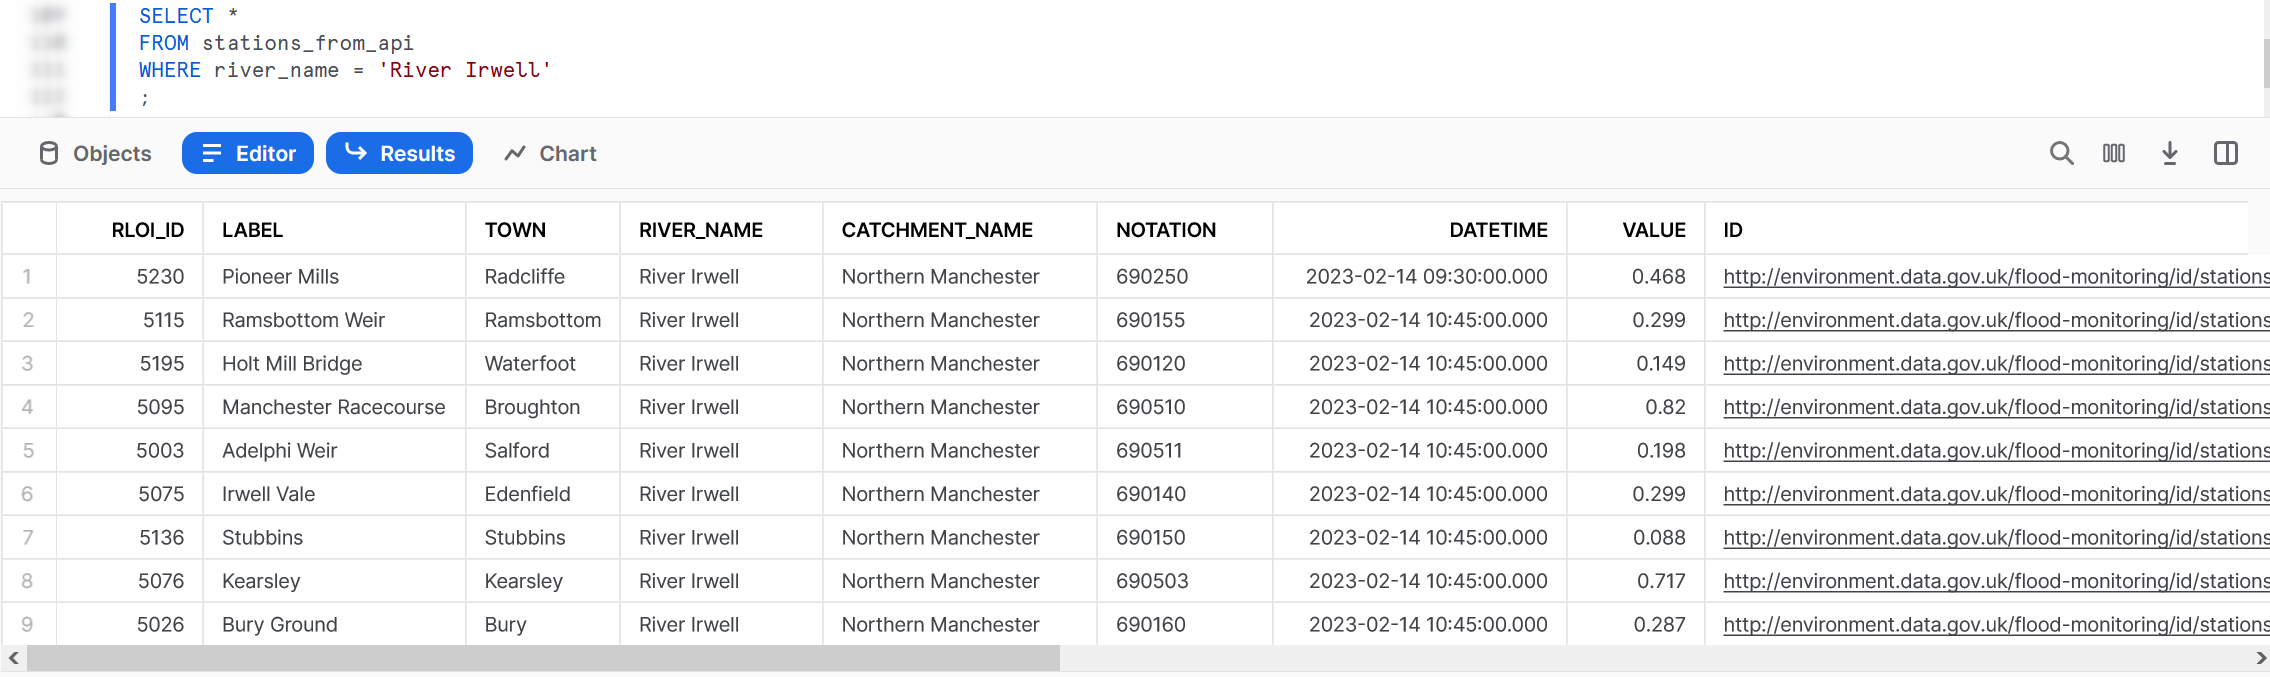
And with that, we have a view that can successfully query an API!
Wrap Up
And there we have it! Whenever we need the latest data, we can query this view and the API will be accessed to retrieve the latest readings.
To recap: To add a new external function to our existing list, the following steps must be followed:
- Create a new Azure function inside the same Azure Function App (or follow the steps in the previous article if you wish to deploy a new one)
- Configure the Azure API management gateway to support the new Azure functions as an endpoint
- Create a new External Function object in Snowflake
After creating your Azure function in step 1, the remaining steps are both quick to complete.
Hopefully this post and its predecessor have been useful for you and have provided a strong foundation for you to make your own Snowflake external functions with Azure.