
Single sign on is something we take for granted (I certainly have), mostly because it seems to just work or perhaps I’ve just been lucky? Sure getting the login and account can be a challenge and take a bit of time; but once you’ve got it, you’re generally smooth sailing across the corporate applications landscape.
Why This Blog?
Two reasons: First, I was recently setting up SSO for one of my clients and, based on few questions from the team, realised that there isn’t a common understanding on what is going on in the backend and how it works. Specifically, I was setting up SSO between Snowflake and Azure AD, so you might notice a certain bias in this here blog. I’m hoping to keep specifics to minimum and that the concepts translate to other providers.
The second reason is somewhat Memento-esque. I’m guaranteed to forget what and how I’d done something in three to six months’ time, and documentation (I’m already writing a step by step guide for the client) is best chance I’ve got at retracing my steps.
What Is SSO?
SSO, or single sign on, is a service that allows user to hold a single set of login credentials across multiple applications (within a single organisation or across multiple). So, you can login to outlook 365, open up separate tab and go to your company’s preferred whiteboarding tool. If “voila,” you’re taken straight to the content without having to authenticate yet again with separate set of credentials.
It’s great because your IT folks have central control around who has access to what application within the organisation and they can control how users are authenticated within a single place. They can, for example, require users setup MFA on their accounts, which would cover providers that don’t support it natively (they do have to support SSO, though).
Sounds Simple
It sure sounds simple, but the backend services that enable this feature can be quite tricky to get your head around, especially since there’s a whole host of new (at least there were for me) acronyms out there.
Identity provider (IdP), for example. This is basically a thing that checks that you are who you say you are. You give it something that it knows about you (username/password) and also possibly something you have (MFA token). It then checks that those are legit and lets you through on to wherever you intended to go. Glorified passport control, basically.
Service provider (SP) is the thing you are trying to get access to in the first place. That could be GMail, Snowflake, Croatia, stuff like that. Once through passport control and inside Croatia, you can access a bunch of services (coffee shop, public transport) without having to prove your identity / right to be there each and every time.
However, expanding on the analogy slightly, not only do you need to prove that you are who you say you are (passport control step A), you also need to have specific authorisation to access the thing you want to access (visa check, step B). If, upon arrival in Beijing, you find yourself at a passport control without a visa, back home you go.
IdP handles not only authorisation but also the scope of your access to services. For example, you may be able to access outlook and Figma but not an internal HR server. That’s where SAML assertions / claims come in.
Security Assertion Markup Language, or SAML, is XML-based open standard that allows for IdP to communicate authorisation and the level of access of a particular user to the SP.
But Wait, There’s More
How does service provider know it can trust claims it received about the user from identity provider? You need to establish a trust relationship between IdP and SP. You do this by utilising public-key cryptography. Here’s a brief explainer of how that works.
You generate two keys:
- One public that you can share with whomever you want to communicate
- One private that you keep to yourself
They are linked but not the same. You cannot infer what the private key was given its linked public key, for example.
If you were after encrypting communication between yourself and third party, you’d use something called asymmetric key encryption scheme. If someone wants to send you a message, they use the public key to encrypt the message. The resulting gibberish-looking encrypted message can be shared over unsecured network. You then use the your private key to decrypt and read the message. Crucially, public key cannot be used to decipher the message, only to encrypt. So, to anyone not in possession of your private key, the message would still read gibberish.
There are other schemes and algorithms that allow users to instead digitally sign some message (with their private key) and then publish the message to the public along with the signature. That message can then be verified by anyone with pre-shared public key.
When setting up trust between systems, you need exchange keys between them (pre-sharing). In Snowflake’s case, for example, you would need your IdP’s x509 certificate (=public key), which you can use to verify messages (eg SAML responses) IdP signs with its private key and sends to Snowflake.
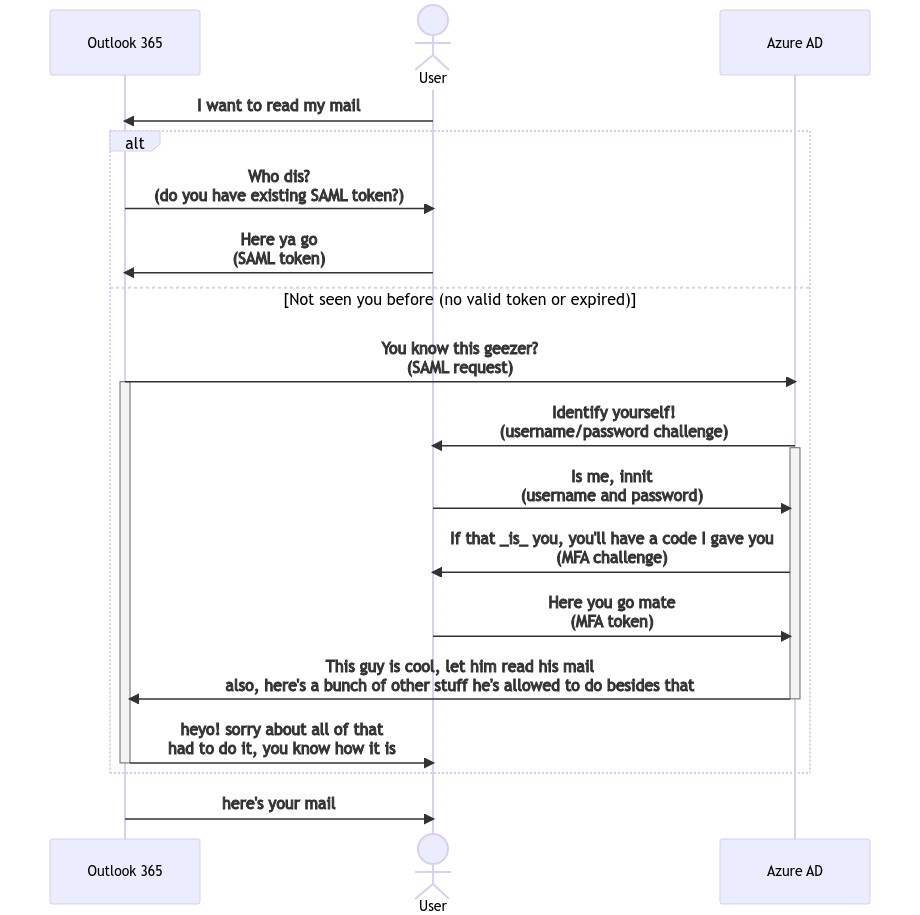
Simplified SSO Flow
The process usually goes something like this:
- User tries to access a service provider resources
- This services creates a SAML request and forwards user (via browser, perhaps) to SSO’s login page
- User authenticates against SSO
- SSO generates SAML reply (XML essentially) containing:
- Assertions about user access – effectively a list of actions a user is allowed to perform
- A token – a visa of sorts, which proves to SP that this user can have stated level of access
- A digital signature for SAML reply – IdP signs the reply with its private key to signify that this reply indeed came from IdP and not a random third party
- User then gets returned back to the service provider that requested access in the first place
- Service provider verifies that the SAML response is valid, permissions are correct and the response itself is properly signed (against pre-shared public key / certificate)
- User can then carry on working with the service provider as normal, reusing the token as means of proving authorised access
The flow above describes SP-initiated authorisation, there’s also IdP-initiated flow as well. Difference being that the flow starts at step three and users are not redirected back to the service provider at the end (but instead to some pre-defined by the SSO page).
ELI-inner-London-lad version below because there are literary >2.1 million “drier” versions of this diagram on the web:
And Then There’s User Management
So far, we’ve only discussed SAML and the roles of IdP and SP in communicating access between each other. However, imagine that as a sysadmin, every time you get a new hire, you need to also create users. And not only do you need to give them access to GMail and Figma, but you need to give access to 100s of other applications, too.
But haven’t we already established that SSO can handle it, I heard you scream silently? Not quite. People tend think that SSO handles both – user authentication and their creation within SP. In truth, these are almost always working together, but they are technically separate processes.
SAML technically can also be set up to provision and manage users, not just communicate access rights and authorisation. There are drawbacks to letting SAML do that though – most significantly with how SP is notified when there’s a change to user access. With SAML, service provider is only notified of changes when it receives aforementioned SAML response alongside assertions about user. From that point on, unless token is invalidated (e.g., expires) it is considered valid and user can access service provider as normal.
However, what if there’s a change to user access after SAML response was sent? Say a user gets removed from the organisation. Well, there could be a period of time where user technically should not have access to service provider resources but practically still does. Because SP doesn’t yet know there was a change, it hadn’t been notified of changes because it had not needed to do a SAML request since the token is still valid.
Enter SCIM
SCIM stands for System for Cross-domain Identity Management. Rolls off the tongue. It’s an open standard that allows your IdP to sync users to whatever service you desire. For example, in the case of Snowflake, you can use SCIM to automatically provision users (and AD groups = Snowflake roles) created in your Azure Active Directory within your target service provider. And this is done on a frequent schedule (20-40 minutes with Azure AD), not triggered by infrequent SAML request. Neat.
SCIM is separate to SAML too. You’d need to establish separate trust there. This is done via SCIM tokens, this time coming from the SP rather than IdP. You pre-share that token with SCIM application in your Azure Active Directory (AAD), for example, and let the sync happen. SCIM will even help with user off-boarding, too. All with standardised calls to service provider’s REST API. Swish.
Tokens generated on SP side tend to have an expiration date, usually long lasting; but in Snowflake’s case, those are only valid for six months. So, you would need to be on top of making sure those are renewed periodically.
Okay, so What Is SSO?
Well, it’s complicated.
SSO allows users to authenticate using a single set of credentials within their organisation without having to manage multiple “identities,” passwords, logins, etc. But it can also mean automated user provisioning and permission/group management on the target system. And there are different resources you need to setup to orchestrate all of that.
If setting up SSO and automated user management with bias toward Azure, AD and Snowflake is what you’re after, then stick around because you’re in luck. Next up is a step-by-step guide on what you need to do to establish SSO authentication with Snowflake … and SCIM. Don’t forget SCIM.