
If you wish to automatically stream/ingest data from an Azure Storage container into Snowflake, using native functionality, you will most likely be considering what is commonly referred to as a Snowpipe. In real terms, a Snowpipe for Azure is actually a combination of multiple components:
- Azure Storage Container – stores files to be ingested into Snowflake
- Azure Storage Queue – tracks each file that lands in the storage container
- Azure Storage Event – updates the storage queue each time a new file is uploaded to the storage container
- Snowflake Notification Integration – facilitates access between Snowflake and the Azure storage queue
- Snowflake Storage Integration – facilitates access between Snowflake and the Azure storage container
- Snowflake Stage – leveraged in ingestion statements such as
COPY INTOto directly link the ingestion statement in Snowflake with the files to ingest from Azure - Snowflake Pipe – triggered using the notification integration to execute a
COPY INTOstatement to ingest data via a stage - Snowflake Table – table to store the ingested data in Snowflake
Flow Diagram
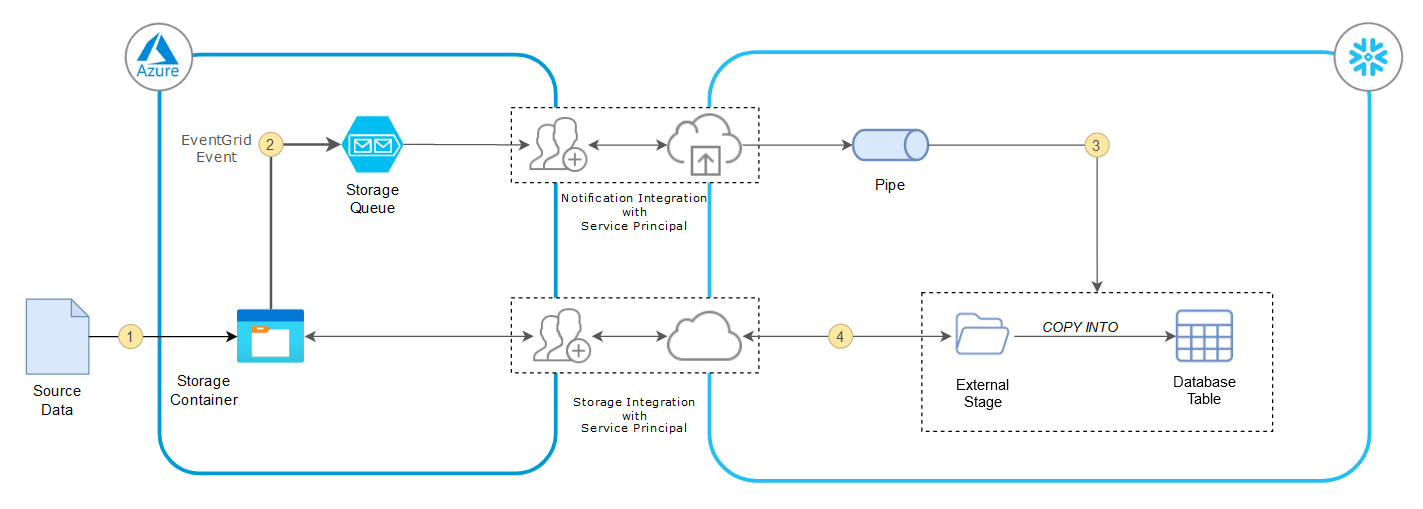
The following diagram provides a very simple overview of the flow involved for a Snowpipe between Snowflake and Azure, leveraging both a storage integration and a notification integration.
Requirements
This article assumes that the following objects are already configured:
- Azure Storage Container – stores files to be ingested into Snowflake
- Snowflake Storage Integration – facilitates access between Snowflake and the Azure storage container
- Snowflake Stage – leveraged in ingestion statements such as
COPY INTOto directly link the ingestion statement in Snowflake with the files to ingest from Azure - Snowflake Table – table to store the ingested data in Snowflake
- Snowflake File Format – leveraged to ensure files are parsed correctly during ingestion
The core components are covered in my previous blog post: Configuring Storage Integrations between Snowflake and Azure Storage.
To perform the steps described in this article, the following components are required:
- Snowflake
ACCOUNTADMINrole or other role(s) with the following privileges:CREATE INTEGRATIONon the accountINSERT(or higher) on the table to which data will be ingestedUSAGEon both the database and schema containing the tableUSAGEon the stage that facilitates access to the Azure storage containerUSAGEon both the database and schema containing the stageCREATE PIPEon the schema in which the pipe will be created
- Sufficient access in Azure to:
- Approve the creation of a new service principal and grant it the required access to the storage queue
- Configure an Azure storage event that updates the storage queue when a file is uploaded to the storage container
- Create an Azure Event Grid Topic or leverage an existing one
Components Covered in This Article
With the above requirements out of the way, this article covers the configuration of the following objects:
- Azure Storage Queue – tracks each file that lands in the storage container
- Azure Storage Event – updates the storage queue each time a new file is uploaded to the storage container
- Snowflake Notification Integration – facilitates access between Snowflake and the Azure storage queue
- Snowflake Pipe – triggered using the notification integration to execute a
COPY INTOstatement to ingest data via a stage
Step 1: Create the Azure Storage Queue and Event
Before we can create a notification integration or pipe, we need to create the queue and event in Azure that will work together to identify files to be ingested into Snowflake. To keep things simple, we will create these in the same Azure storage account as our Azure storage container.
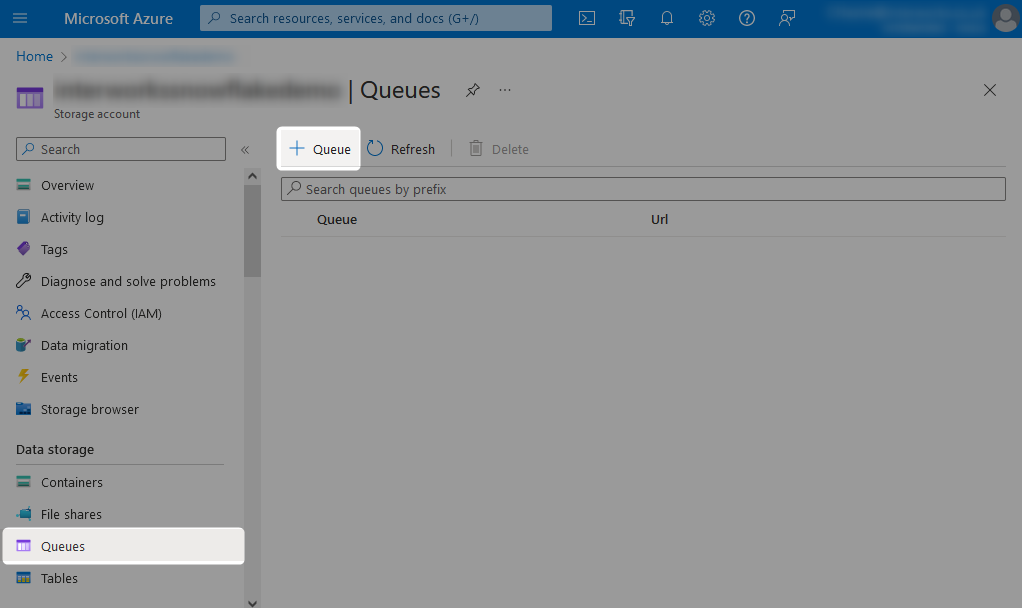
Step 1a: Create the Storage Queue
Creating a storage queue in Azure is as simple as clicking a button and entering a name. If only everything was so simple! The steps are as follows.
Give your queue a name and hit OK.
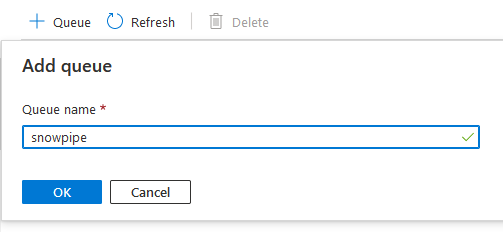
The storage queue should then be visible in your storage account:

Step 1b: Create the Storage Event to populate the Storage Queue
Creating an event is a little bit more complex than creating a queue, though it is still relatively simple.
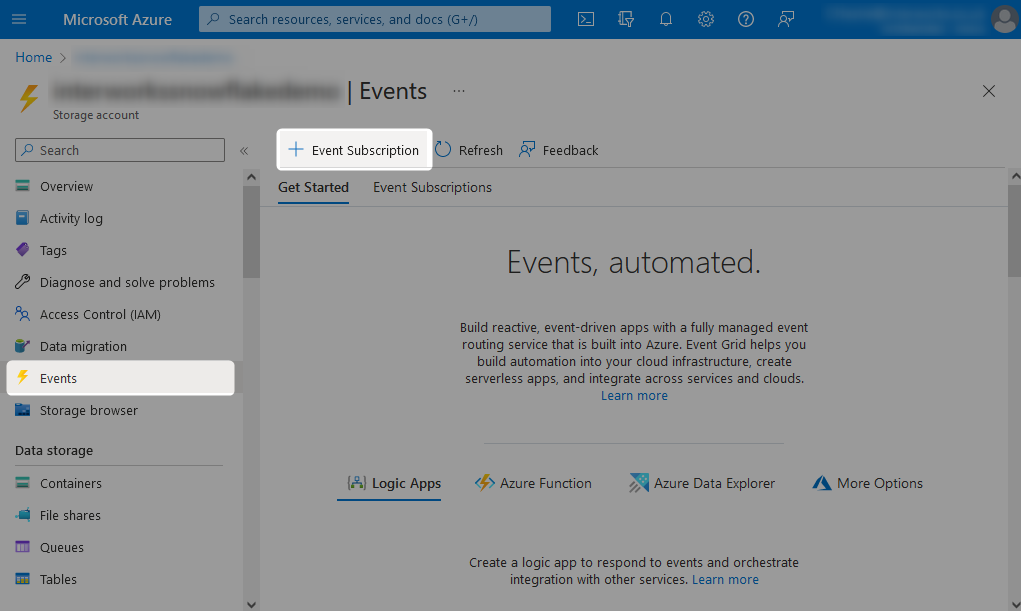
Configure your new event subscription to send messages to your storage queue (i.e., the endpoint) whenever a blob is created. You may need to create a new topic if a suitable one does not exist already.
Do not click Create yet!
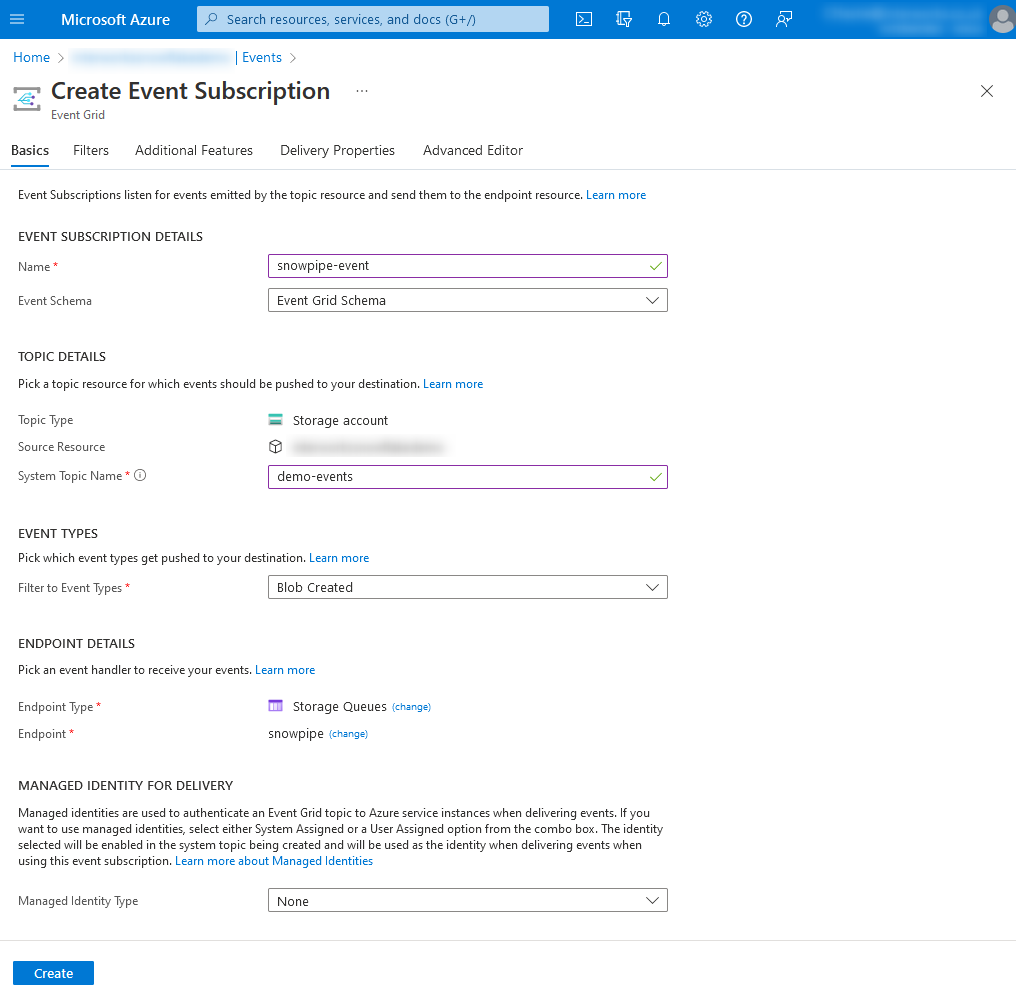
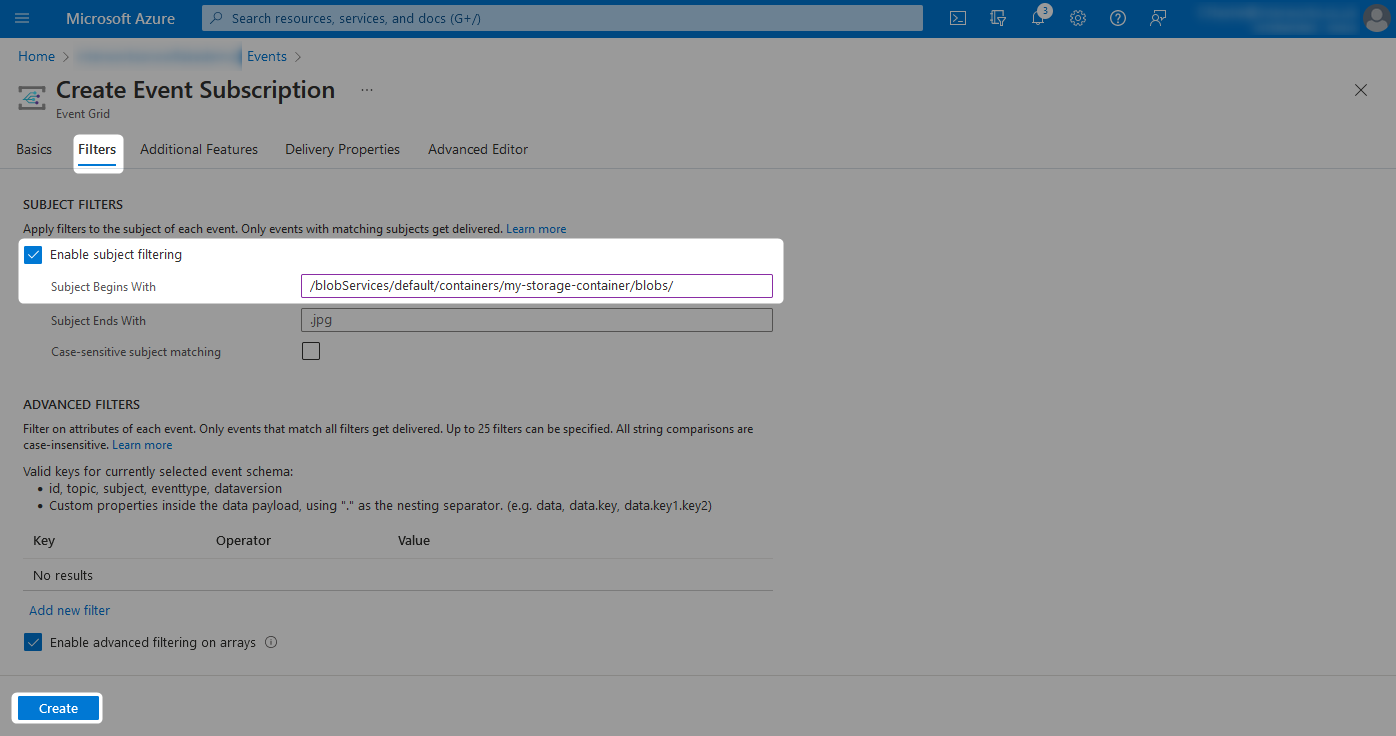
Before selecting Create, navigate to the Filters pane and add a subject filter so that the subject begins with the subject of your storage container. For example, if our storage container is called my-storage-container, then the path would be /blobServices/default/containers/my-storage-container/blobs/.
If you like, you can add further filtering too, before finally selecting Create.
The event subscription should then be visible in your storage account. For this demo, we have created an event called snowpipe-event which triggers whenever a file is uploaded to the snowpipe storage container.
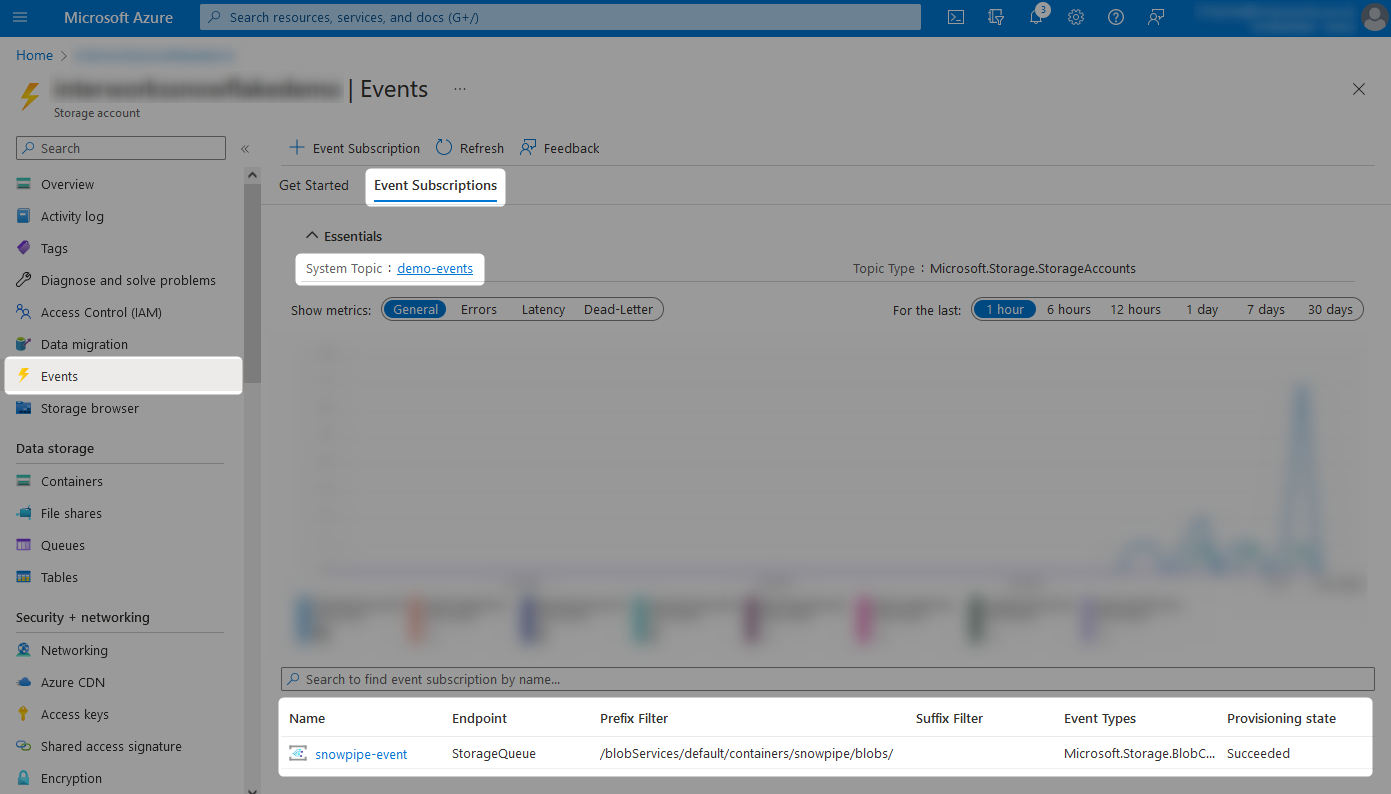
You may wish to test the event by uploading a file to your storage container and waiting to see
Step 2: Create Notification Integration Between Snowflake and Azure
In order to leverage our newly created Azure storage queue, we must create a corresponding notification integration in Snowflake that can authenticate into the Azure tenant and access the storage queue.
To achieve this, we need to know the location of the resources in Azure. Specifically, we need to know the Azure Tenant ID and the URL of the storage queue.
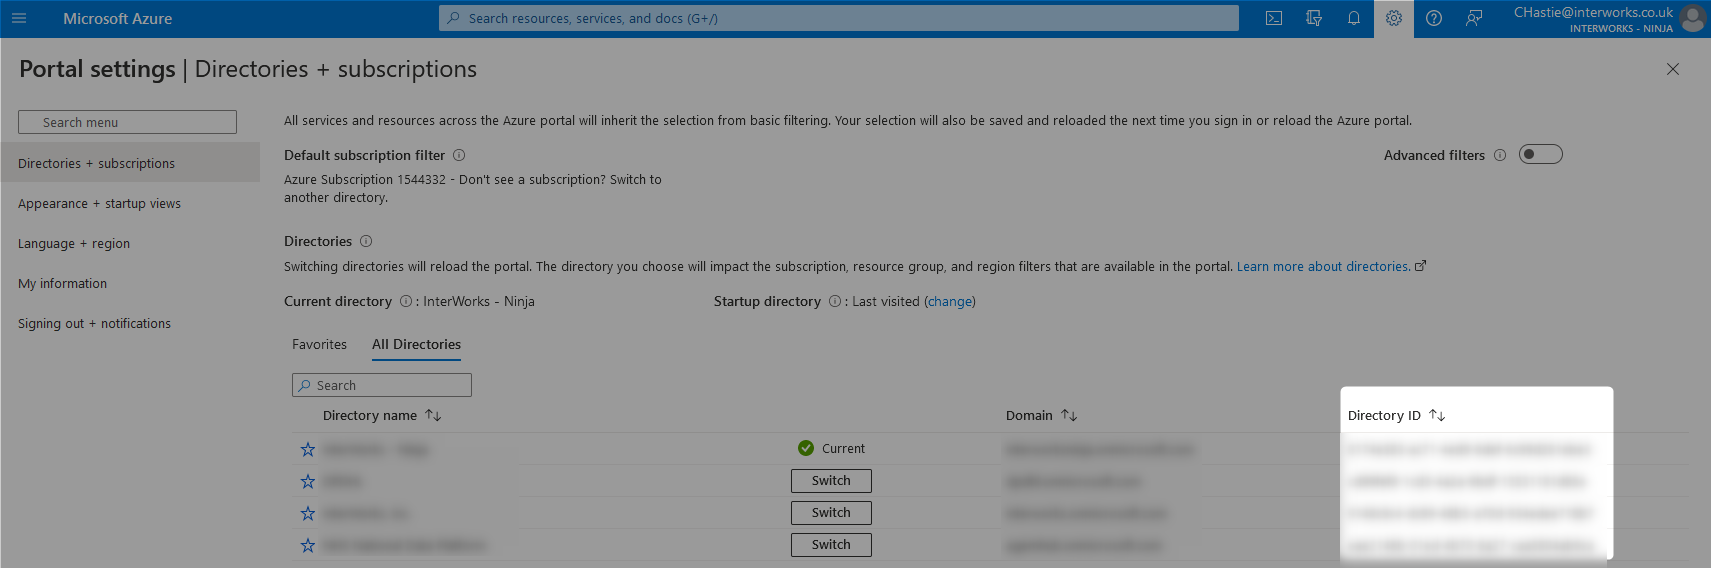
Step 2a: Retrieve the Azure Tenant ID
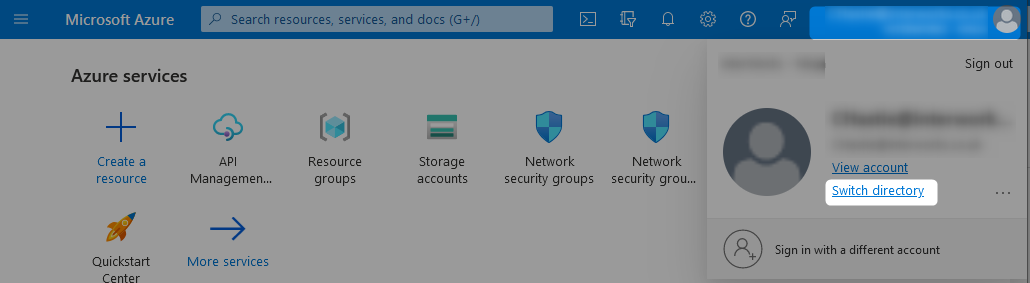
There are many ways to retrieve the ID for a given Azure tenant. My personal favourite method is by attempting to switch directory within the Azure portal, as this provides the Directory ID for each Azure tenant. In this case, the Directory ID is the tenant ID that we are looking for.
The following pair of screenshots demonstrate this method.
You may find it easier to record your Azure Tenant ID for later reference in a text file or similar.
Our important demo variables so far:
Azure Tenant ID: 1234a567-bc89-1ab2-3cde-4f56a789bcd1
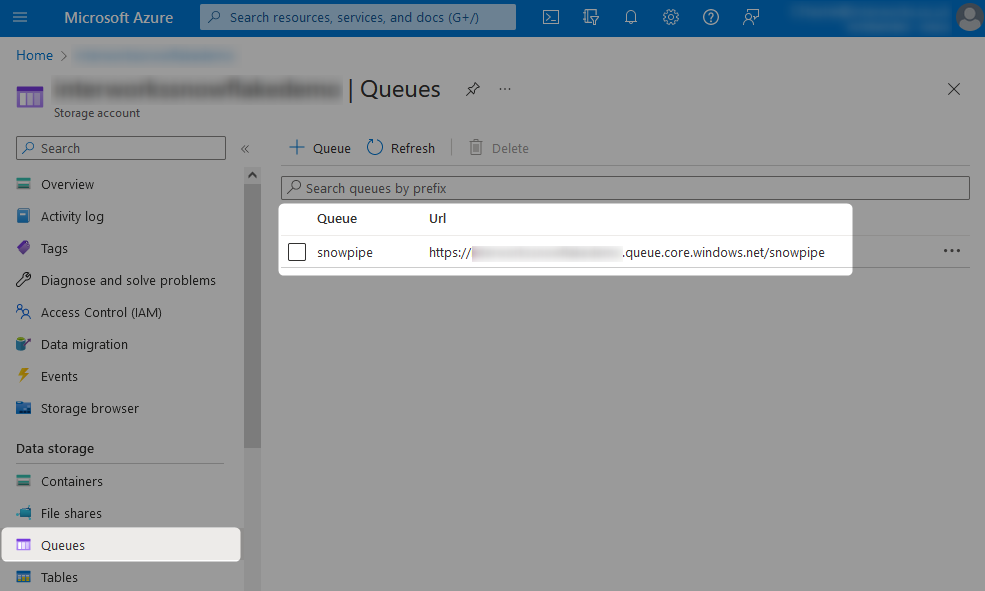
Step 2b: Retrieve the URL for the Storage Queue
Personally, I find it easiest to retrieve the URL for the Azure storage queue through the Azure portal by opening the specific queue and simply reading the URL value.
The following screenshot demonstrate this method.
As with the Azure Tenant ID, you may find it easier to record this URL for later reference in a text file or similar.
Our important demo variables so far:
Azure Tenant ID: 1234a567-bc89-1ab2-3cde-4f56a789bcd1
Storage Queue URL: https://mystorageaccount.blob.core.windows.net/my-storage-queue
It is important to note at this time that do not we place azure:// at the start of the URL as we would with a storage integration. In this case, we keep the https:// as Snowflake expects this format for notification integrations.
Step 2c: Create the Notification Integration Object in Snowflake
As mentioned above, this process can only be achieved using the Snowflake ACCOUNTADMIN role, or another role with the CREATE INTEGRATION privilege.
We now have the required variables to create our notification integration. This is achieved by executing a SQL script within Snowflake with the following template:
CREATE NOTIFICATION INTEGRATION <INTEGRATION_NAME>
  TYPE = QUEUE
  NOTIFICATION_PROVIDER = AZURE_STORAGE_QUEUE
  ENABLED = TRUE
  AZURE_TENANT_ID = '<retrieved in step 2a>'
  AZURE_STORAGE_QUEUE_PRIMARY_URI = 'https://<storage account>.queue.core.windows.net/<storage queue>'
;
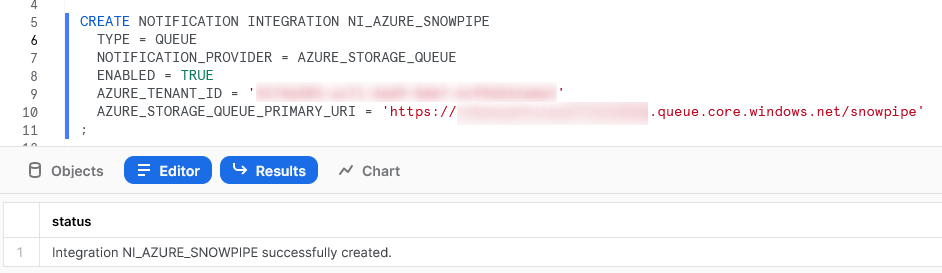
Entering our demo variables, we can create a new storage integration called NI_AZURE_SNOWPIPE with the following script:
CREATE NOTIFICATION INTEGRATION NI_AZURE_SNOWPIPE
  TYPE = QUEUE
  NOTIFICATION_PROVIDER = AZURE_STORAGE_QUEUE
  ENABLED = TRUE
  AZURE_TENANT_ID = '1234a567-bc89-1ab2-3cde-4f56a789bcd1'
  AZURE_STORAGE_QUEUE_PRIMARY_URI = 'https://mystorageaccount.queue.core.windows.net/snowpipe'
;
Executing this form of statement in Snowflake will yield the following result:
At this stage, the notification integration object exists in Snowflake but it cannot access Azure. It must be authorised via Azure itself.
Step 3: Authorise the Snowflake Notification Integration in Azure
Now that we have created our notification integration in Snowflake, we must authorise it in Azure.
Step 3a: Retrieve the Required Information About the Snowflake Notification Integration
Snowflake helpfully provides the information we need in the output of a DESCRIBE command of the following template:
DESCRIBE NOTIFICATION INTEGRATION <INTEGRATION_NAME>;
For example, we can execute the following statement to see the details for our new NI_AZURE_SNOWPIPE notification integration:

The important information that we require here are the AZURE_CONSENT_URL and the AZURE_MULTI_TENANT_APP_NAME fields. As with the previous variables, you may find it easier to record these for later reference in a text file or similar.
Our important demo variables so far:
Azure Tenant ID: 1234a567-bc89-1ab2-3cde-4f56a789bcd1
Storage Queue URL: https://mystorageaccount.blob.core.windows.net/my-storage-queue
AZURE_CONSENT_URL: https://login.microsoftonline.com/1234a567-bc89-1ab2-3cde-4f56a789bcd1/oauth2/authorize?client_id=a123bcd4-1234-1a23-bcd4-1a23b45678cd&response_type=code
AZURE_MULTI_TENANT_APP_NAME: SnowflakePACInt5678_1234567890123
Step 3b: Approve the Authorisation in the Azure Consent URL
Access the AZURE_CONSENT_URL whilst logged into Azure as a user with admin privileges to authenticate the storage integration. After clicking on the consent URL and signing in with an administrator account, the following prompt will be displayed:
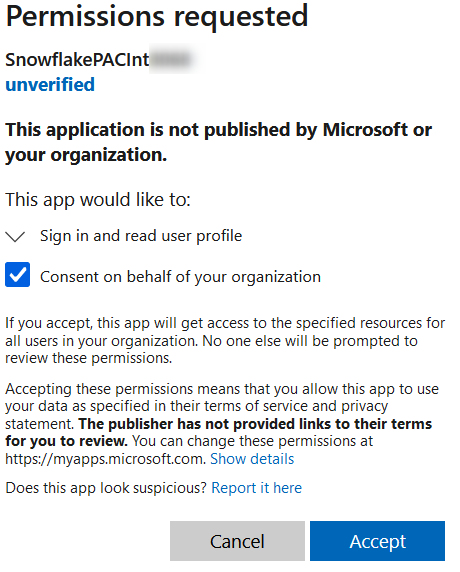
After consenting on behalf of your organisation and accepting, the app will appear under Azure AD - Enterprise applications in your tenant as shown below:

Finally, you may be prompted with the following option which you can ignore:

This has created a new service principal in your Azure tenancy with a name matching the first part of the AZURE_MULTI_TENANT_APP_NAME, before the underscore. Again, you may find it easier to record these for later reference in a text file or similar.
Our important demo variables so far:
Azure Tenant ID: 1234a567-bc89-1ab2-3cde-4f56a789bcd1
Storage Queue URL: https://mystorageaccount.blob.core.windows.net/my-storage-queue
AZURE_CONSENT_URL: https://login.microsoftonline.com/1234a567-bc89-1ab2-3cde-4f56a789bcd1/oauth2/authorize?client_id=a123bcd4-1234-1a23-bcd4-1a23b45678cd&response_type=code
AZURE_MULTI_TENANT_APP_NAME: SnowflakePACInt5678_1234567890123
Azure Service Principal for the Notification Integration: SnowflakePACInt5678
Azure may take a few minutes to create the new service principal. Often it is near-instant, however it may take up to an hour depending on the performance of the platform and any other activity.
Step 3c: Grant the Azure Service Principal the Desired Access to Each Storage Queue
Now that Snowflake is able to use a notification integration to leverage an Azure service principal, the only remaining step is to ensure that the Azure service principal has the desired access to the Azure storage queue.
To grant the required access, add a new role assignment under the Access Control (IAM) pane from within the storage queue.
You may wish to grant the service principal the desired access at the storage account level instead of the queue level. This is only if you want to allow access to all queues within the storage account for multiple notification integrations, as they will all authenticate with the same service principal.
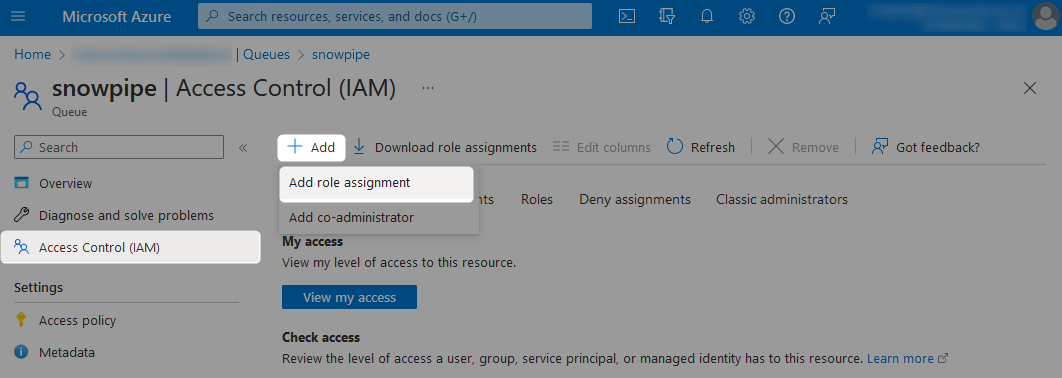
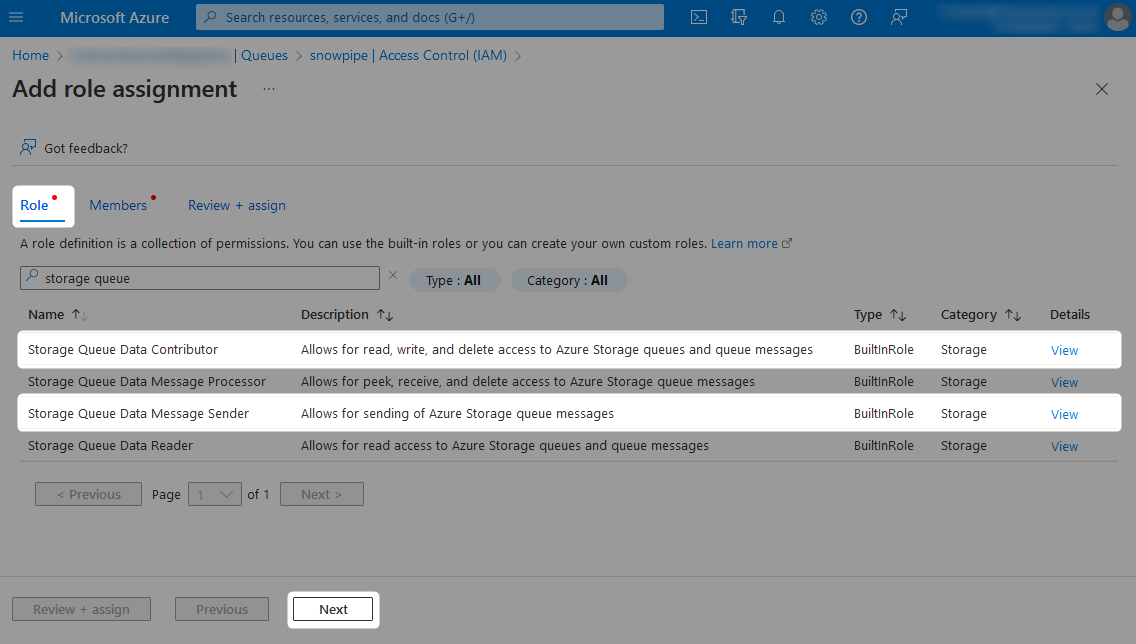
When adding the new role assignment, choose which level of access you wish to grant from the list of possible roles.
- If you wish for read access only, the
Storage Queue Data Message Readerrole is required. - If you wish for deeper access, such as for sending messages to the queue from Snowflake, then the
Storage Queue Data Contributorrole is required.
Finally, locate the service principal which you wish to grant access to. This is the Azure Service Principal for the Storage Integration from our tracking sheet, which is SnowflakePACInt1234 in our example.
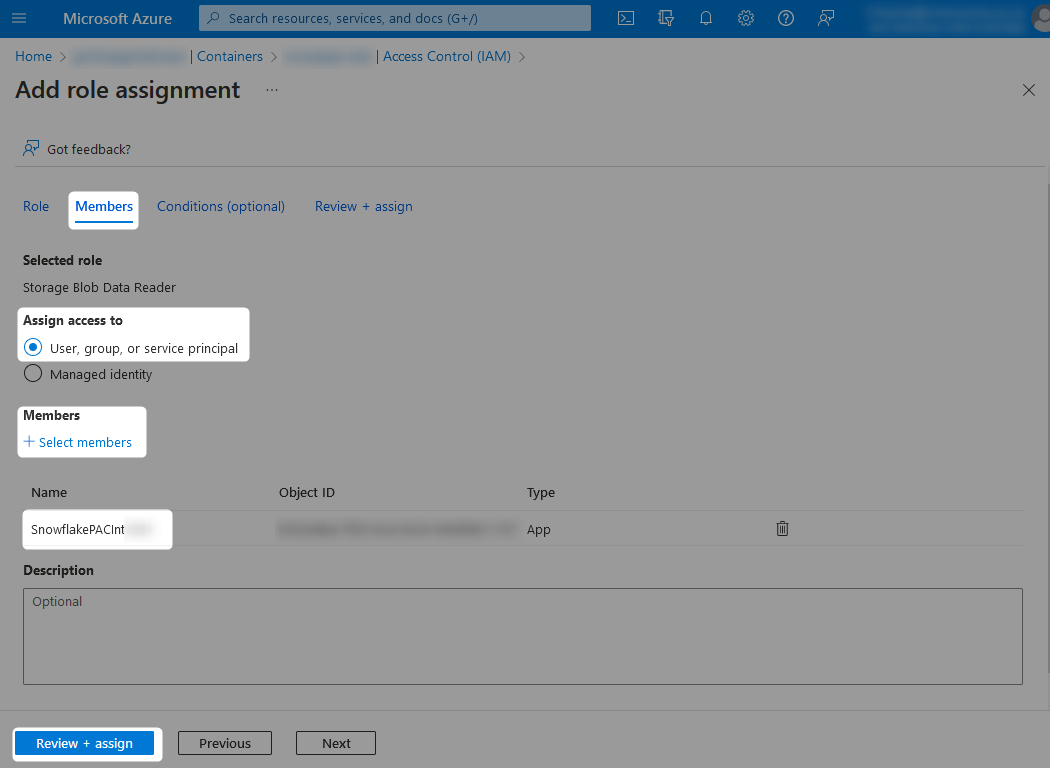
The service principal should now have the desired access on the storage queue.
Step 4: Build the Pipe in Snowflake
Now that we have created our notification integration, we are ready to begin automatically ingesting data into Snowflake!
As mentioned earlier, we have assumed several components are already configured to avoid bloating this article and retreading earlier ground. Specifically, we assume the existence of a functioning stage, file format and table. This also means we can assume the existence of a functioning COPY INTO statement to ingest data directly (without an automated pipe).
Assume the following script already works to ingest data into the table manually:
copy into STREAMING_DEMO_DATA
  from (
    select
        metadata$filename
      , current_timestamp()
      , $1
      , $2
      , $3
    from @STG_STREAMING_DEMO
  )
  file_format = (format_name = FF_STREAMING_DEMO)
;
There is nothing particularly special about the above COPY INTO statement, and I will not explain it further as this is not relevant for the article. What we wish to focus on is how this can easily be converted into a pipe to facilitate automated ingestion. To achieve this, we must fit this ingestion statement into the following template:
create pipe <pipe name>
  auto_ingest = true
  integration = <integration name>
  as
    <ingestion statement>
;
For our demonstration, we execute the following code to create our pipe:
create pipe PIPE_STREAMING_DEMO
  auto_ingest = true
  integration = NI_AZURE_SNOWPIPE
  as
    copy into STREAMING_DEMO_DATA
    from (
      select
          metadata$filename
        , current_timestamp()
        , $1
        , $2
        , $3
      from @STG_STREAMING_DEMO
    )
    file_format = (format_name = FF_STREAMING_DEMO)
;
Now that we have created our pipe, can monitor its status with the SYSTEM$PIPE_STATUS() function, demonstrated as follows:

To test this, simply upload files to your Azure storage container and watch as the events are added into your Azure storage queue. After a short time, you will then see the files ingest into your table in Snowflake.
If you are not seeing the ingestion work as expected, I would recommend combining the SYSTEM$PIPE_STATUS() function with the PIPE_USAGE_HISTORY and COPY_HISTORY table functions to identify if any errors are occurring.
Wrap Up
In this article, we have demonstrated how to create a Snowpipe that leverages a Notification Integration object in Snowflake to facilitate access to a storage queue in Azure and automatically ingest data from an Azure storage container. The best part of this is that an administrator can set up a single storage integration and a single notification integration for an Azure storage account, and engineers can leverage these to create multiple pipes that ingest data into multiple tables, without ever needing to worry about the authentication to Azure. Engineers can add filters to the COPY INTO statements within individual pipes to allow multiple pipes to share the same queue and notification integration whilst controlling which data is ingested.