
This article is builds on the following two previous articles:
- Intro to Azure Functions and Snowpark: Populating Snowflake Control Tables
- Using Azure App Settings to Authenticate Snowflake with Python
The above articles do a great job at building a foundation for building Azure Functions that leverage Snowpark for Python to interact with Snowflake whilst maintaining important authentication information as variables within the Azure Function App itself, known as App Settings. However, there is still the possibility here that a user accessing the Azure Function App should not see sensitive values such as the authentication password or private key, and using app settings alone does not secure this.
This article aims to resolve that by discussing how to use Azure Key Vault to securely store your sensitive secrets and retrieve them during the execution of your Azure functions by leveraging the managed identity of the Azure Functions App itself. App settings are still required to store the names of the secrets to be retrieved, along with other pertinent information; however, a user must have access to the secrets within the Azure Key Vault itself if they are to see the sensitive values.
This article assumes that you have already configured an Azure function that leverages Azure app settings to authenticate Snowflake with Python, which is covered in the previous article mentioned above.
Configuring Azure Key Vault to Store Snowflake Credentials
To put it briefly, Azure Key Vault is a service for securely storing secret values such as passwords or authentication keys. You can give each secret a name, store a value within it and then retrieve that value when required.
Creating a New Key Vault
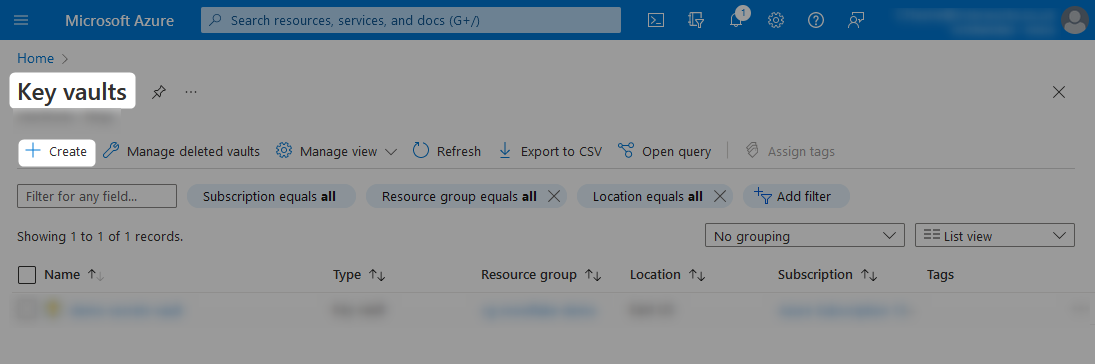
To configure a new Azure Key Vault, navigate to the Key vaults service in Azure and click Create. This window will display any existing key vaults if appropriate.
Provide a name for your key vault, along with the resource group and region that it should belong to. You may wish to change some of the other settings before selecting Next to view the access policy pane.
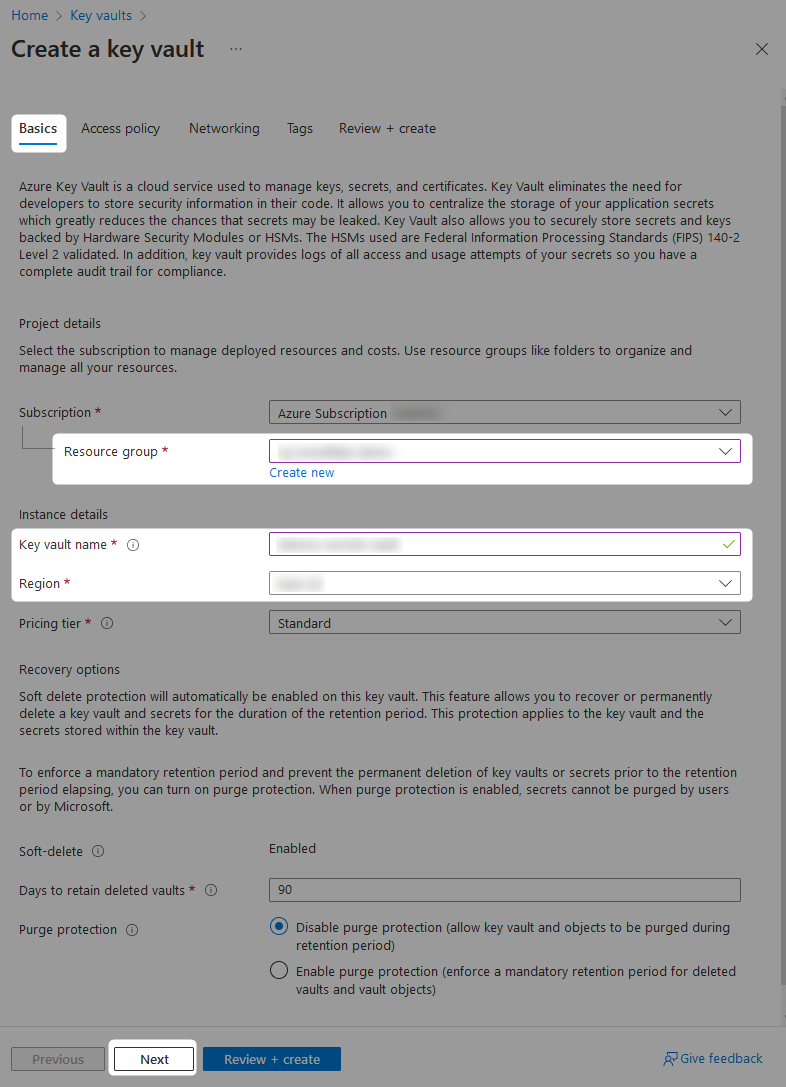
On the Access policy tab, decide which permission model you wish to leverage. For our demonstration, we will use the Azure role-based access control model as this allows more granular control. Again, you may wish to change some of the other settings before finally reviewing and creating the key vault.
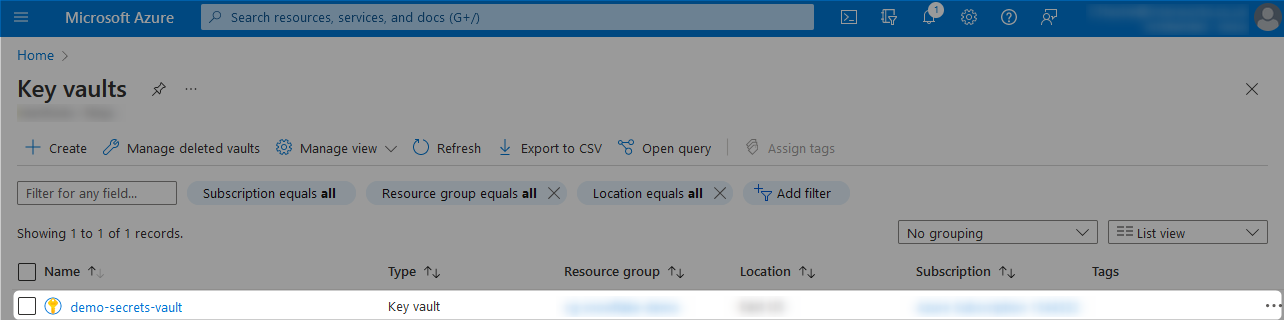
Once the key vault is created, it will be listed in the Key vaults service in Azure. For our example, we have created a key vault called demo-secrets-vault.
Granting Access to Create Secrets Within a Key Vault
Before we can create a secret inside the key vault, we must grant ourselves the relevant permissions to create and access secrets. This is only relevant if using the Azure role-based access control permission model.
To add a new permission to a user, navigate to the Access control (IAM) pane and select Add followed by Add role assignment.

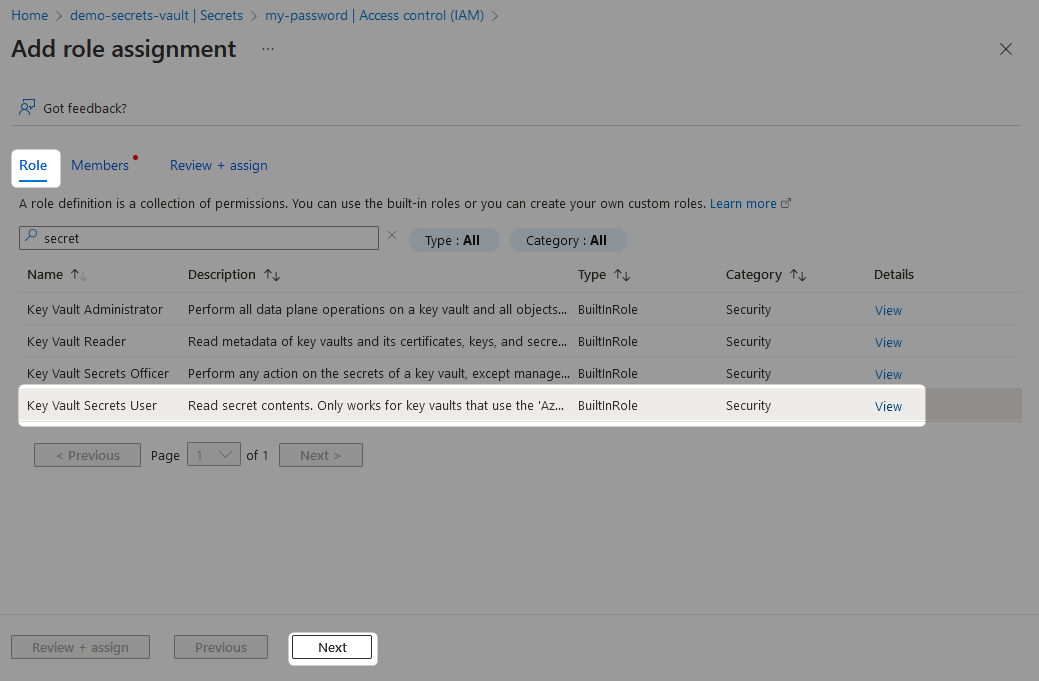
On the Role tab, the specific role required to create new secrets is the Key Vault Secrets Officer. This role allows for both read and write permissions on secrets.
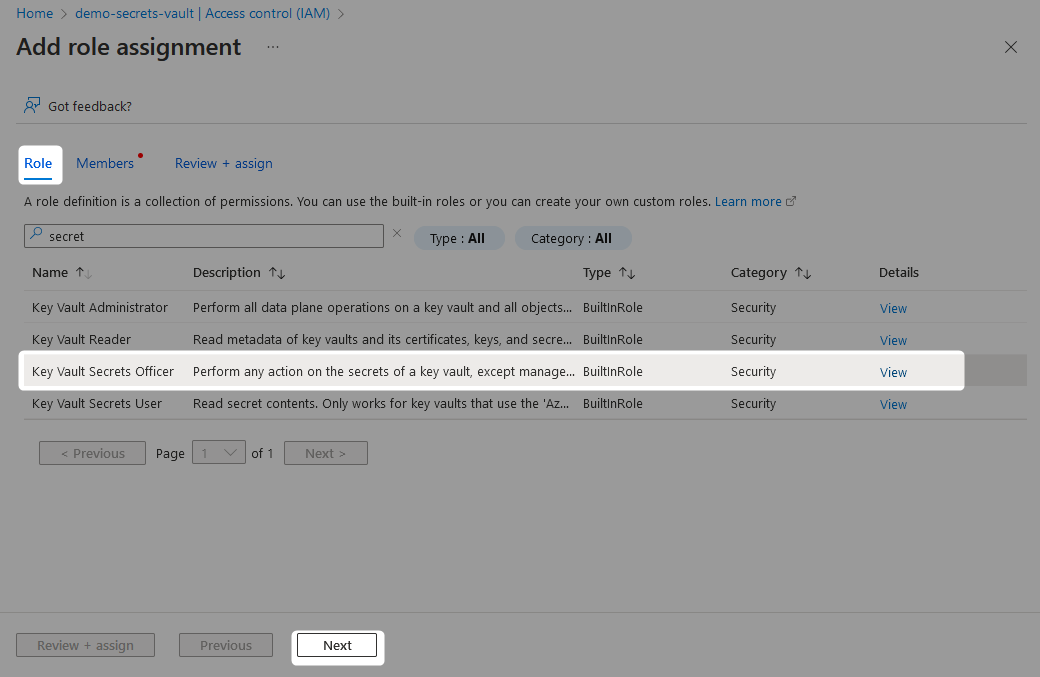
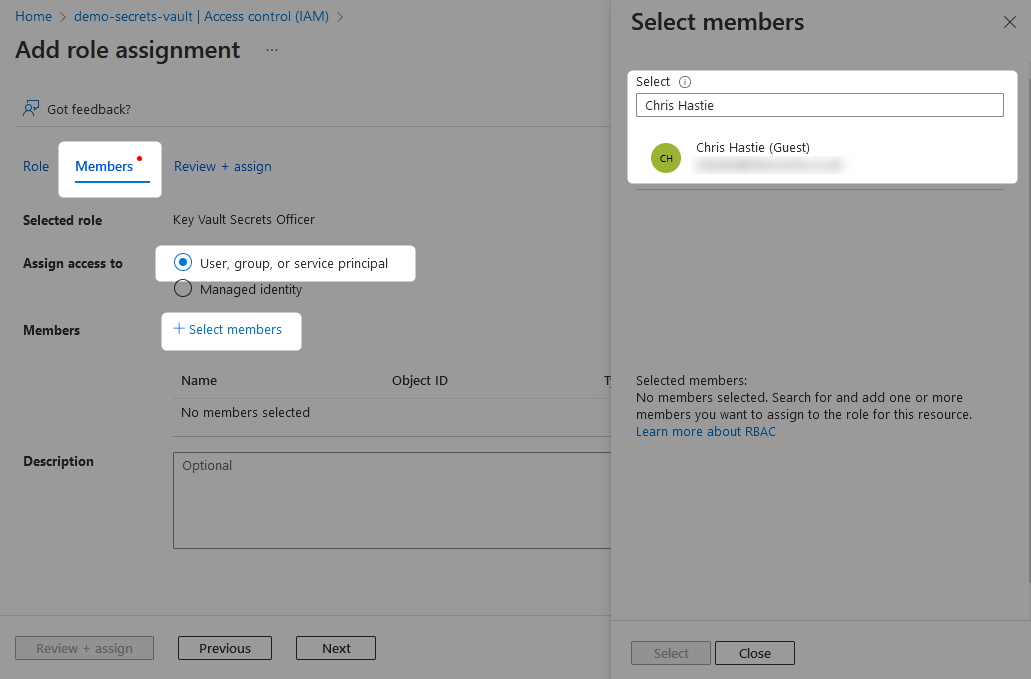
On the Members tab, find your user through the submenu that is accessed by selecting Add Members.
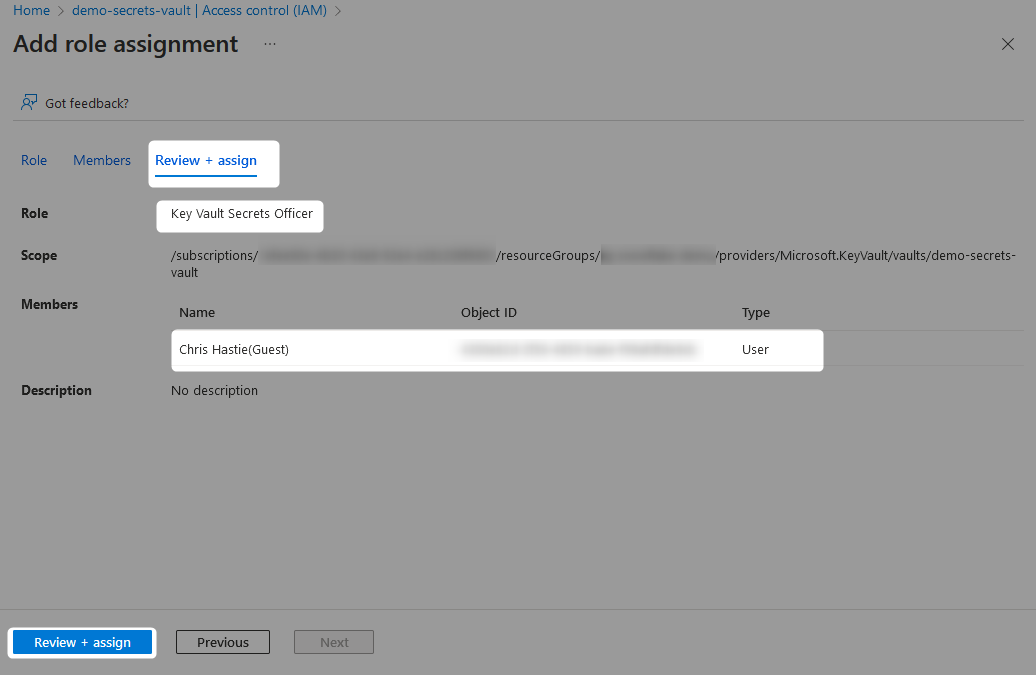
Finally, review and assign the role.
Creating Secrets Within a Key Vault to Support Snowflake Authentication
To authenticate with Snowflake, we must leverage either a password or a private authentication key, where the latter may be additionally secured with a passphrase if desired. Regardless of your method of authentication, the process to create the secret in the key vault is the same.
To start, we will assume that we are using a standard username and password combination and configure that example. The following section will then discuss how to configure a similar approach for a service account and private authentication key.
There is no need to store the username securely, so we only focus on storing the password. To do so, navigate to the Secrets pane within your Azure key vault and select Generate/Import.
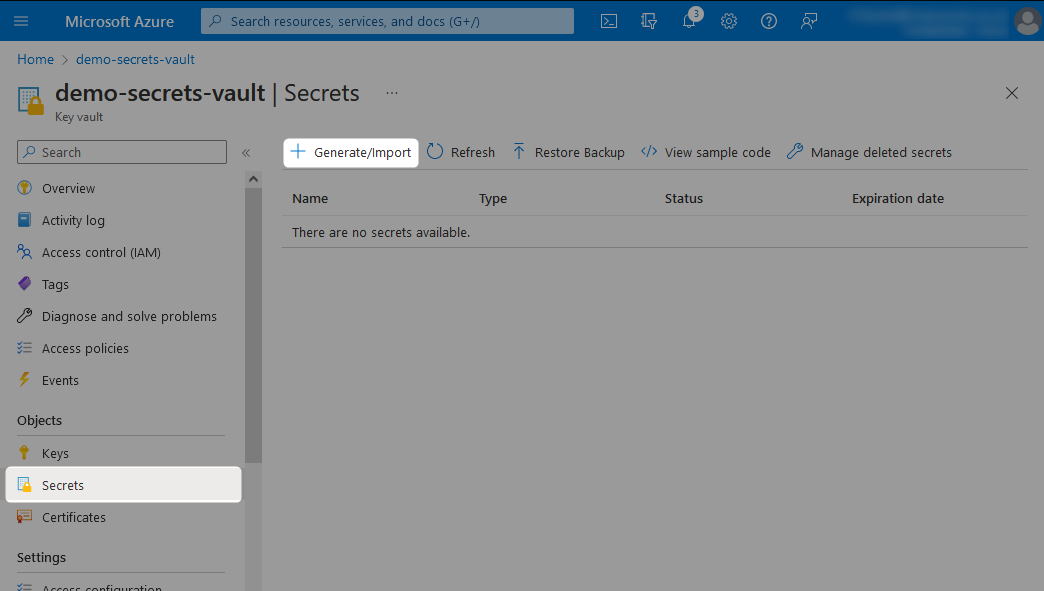
Enter the details for your secret. For our example, we can create a new secret called my-password and store a password within it.
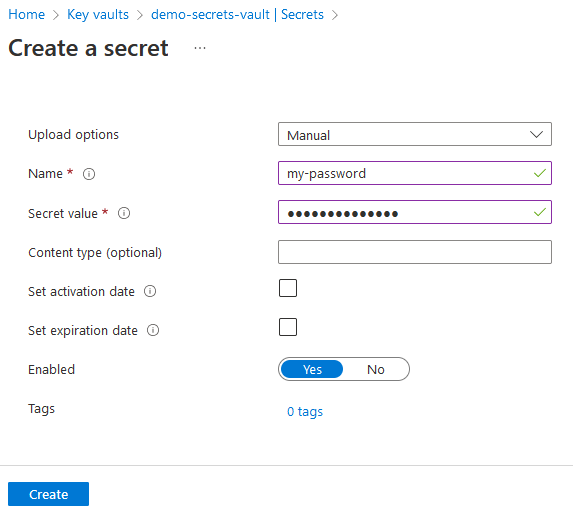
This secret will now be visible under the Secrets pane of the key vault.

Leveraging Secrets from Azure Key Vault to Connect to Snowflake
So far, we have created a secret called my-password within an Azure key vault called demo-secrets-vault. We also have an Azure function that leverages app settings to authenticate Snowflake with Python, as configured in this previous article: Using Azure App Settings to Authenticate Snowflake with Python.
Our core challenge now is to configure our Azure function to access our secret and leverage it to connect to Snowflake. For this, we must achieve three things:
- Configure the Azure Function App with a managed identity that can be used for permission grants
- Grant the Azure Function App’s managed identity access to the relevant secret
- Modify the Python code in our Azure function to retrieve the password from the secrets vault and use it to authenticate to Snowflake
1. Configure the Azure Function App with a Managed Identity That Can Be Used for Permission Grants
From within your Azure Functions App, navigate to the identity pane and change the status for the System assigned identity to On. After hitting save, you will see a warning message regarding adding the managed identity to Azure Active Directory, which you can accept.
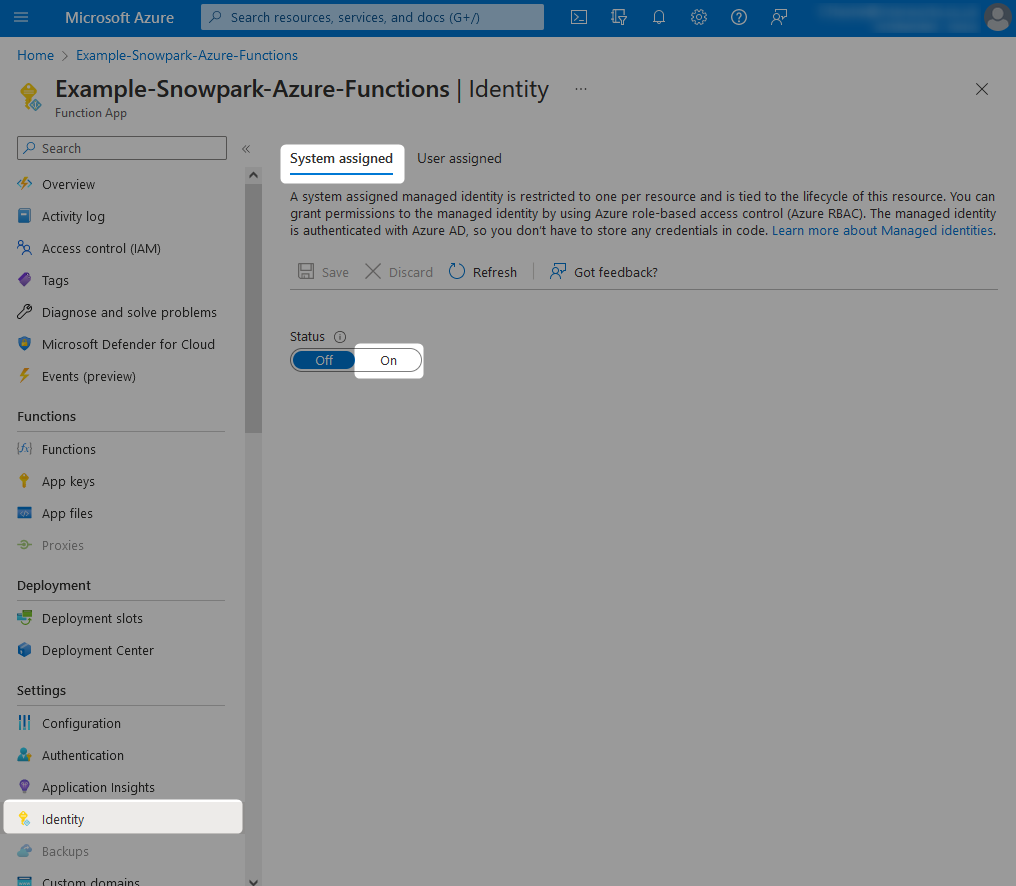
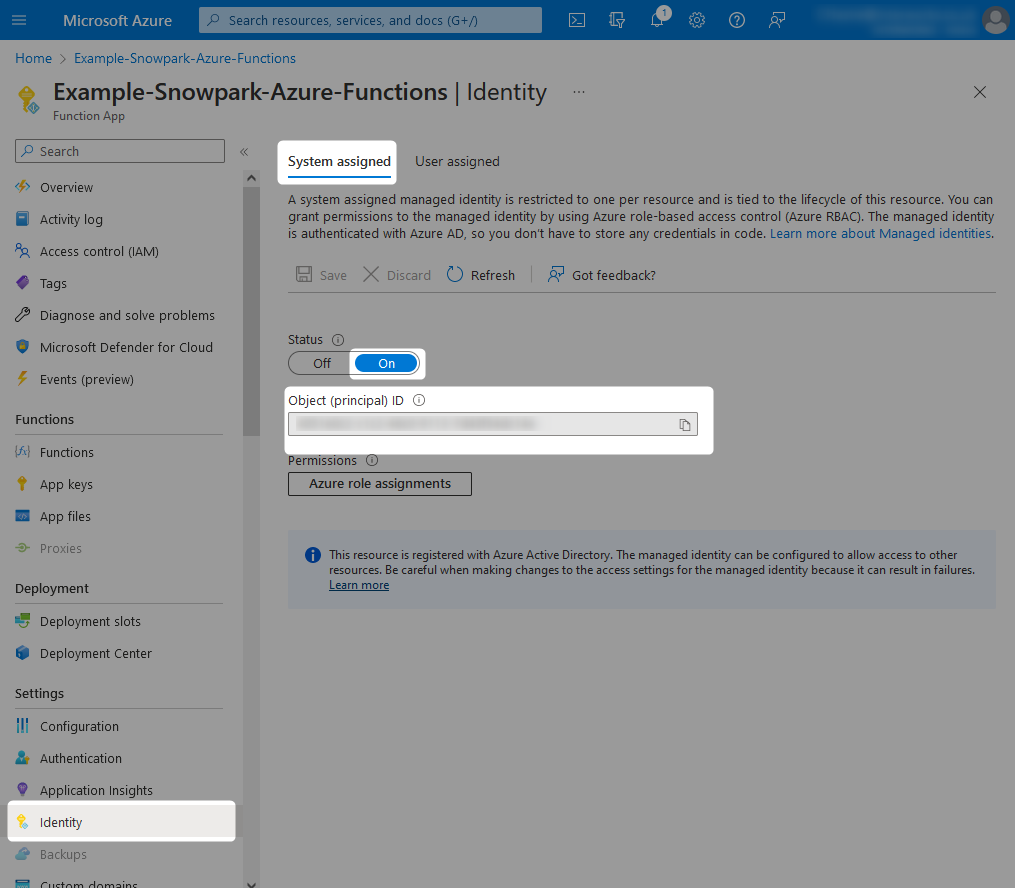
Once this is complete, the Object (principal) ID for the managed identity assigned to your Azure Functions App will be displayed. You can note this down if you wish; however, we will not need it as we can reference our new managed identity by name, which will match the name of the Azure Functions App.
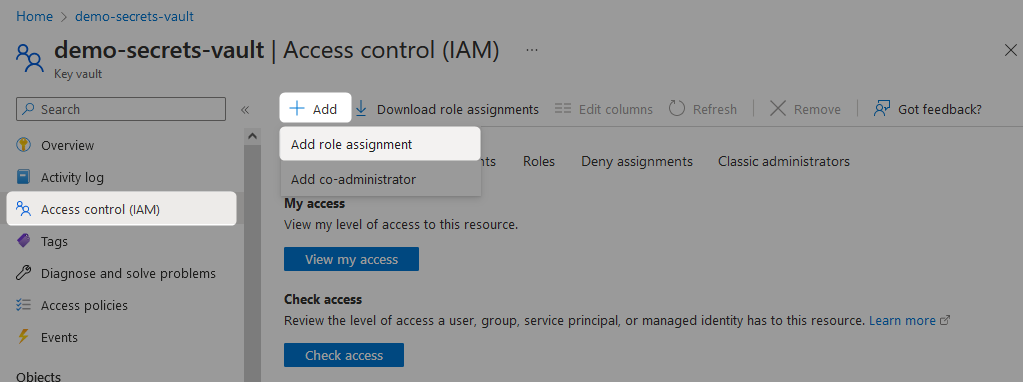
2. Grant the Azure Functions App’s Managed Identity Access to the Relevant Secret
Return to your Azure key vault. From here, you can either grant your Azure Functions App access to every secret in the key vault, or you can assign access for specific secrets if you are leveraging the Azure role-based access control permission model. Either way, the steps are the same.
Either from within your specific secret, or from your secrets vault in general, navigate to the Access control (IAM) pane and select Add followed by Add role assignment.
On the Role tab, the specific role required to create new secrets is the Key Vault Secrets User. This role allows read access to secrets without the ability to edit them or create new ones.
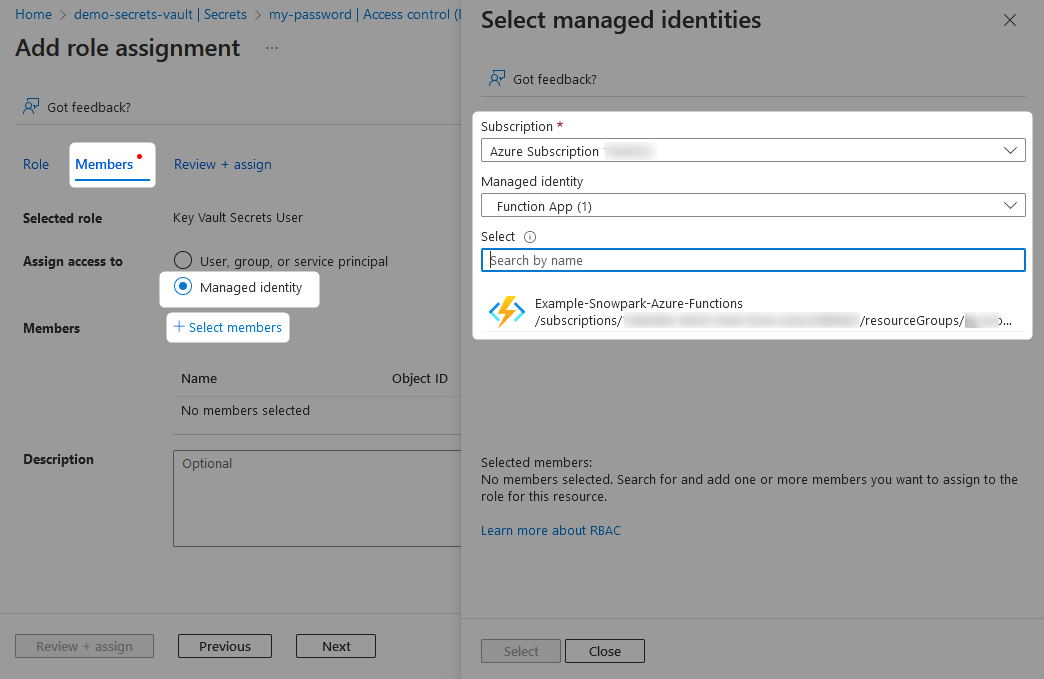
On the Members tab, change the radio button selection to Managed identity, then find your managed identity through the submenu that is accessed by selecting Add Members.
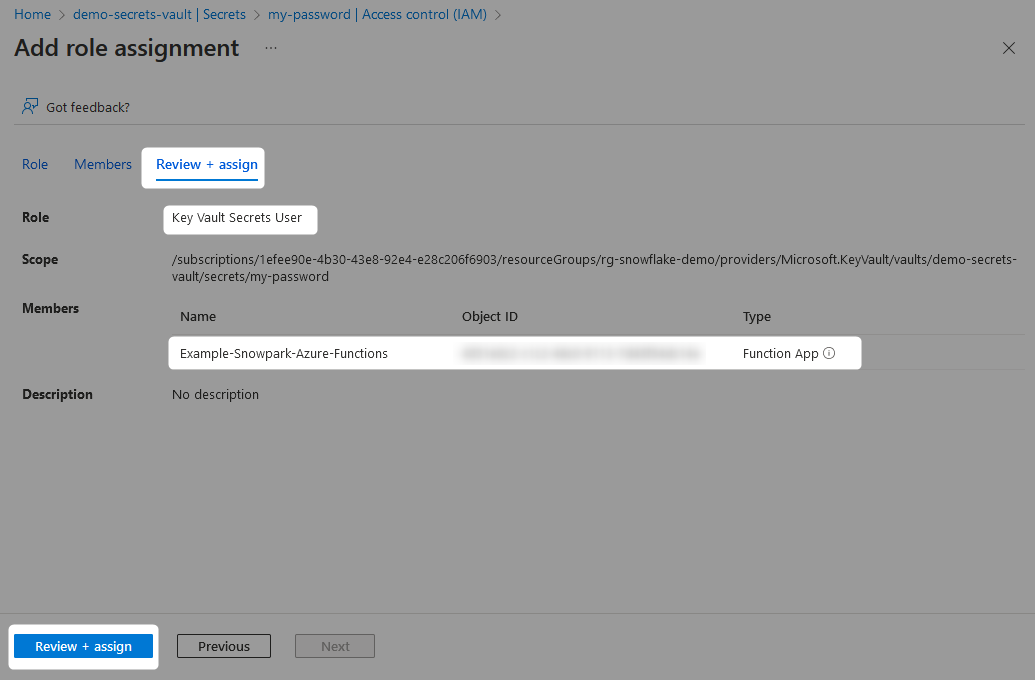
Finally, review and assign the role.
3. Modify the Python Code in Our Azure Function to Retrieve the Password from the Secrets Vault and Use It to Authenticate to Snowflake
The below screenshot shows several App Settings that are leveraged by our example Azure Function App. Along with the default ones, we have the following additional ones:
- SNOWFLAKE_ACCOUNT
- SNOWFLAKE_DEFAULT_ROLE
- SNOWFLAKE_DEFAULT_WAREHOUSE
- SNOWFLAKE_USER
- AZURE_KEY_VAULT_NAME
- SNOWFLAKE_PASSWORD_SECRET_NAME
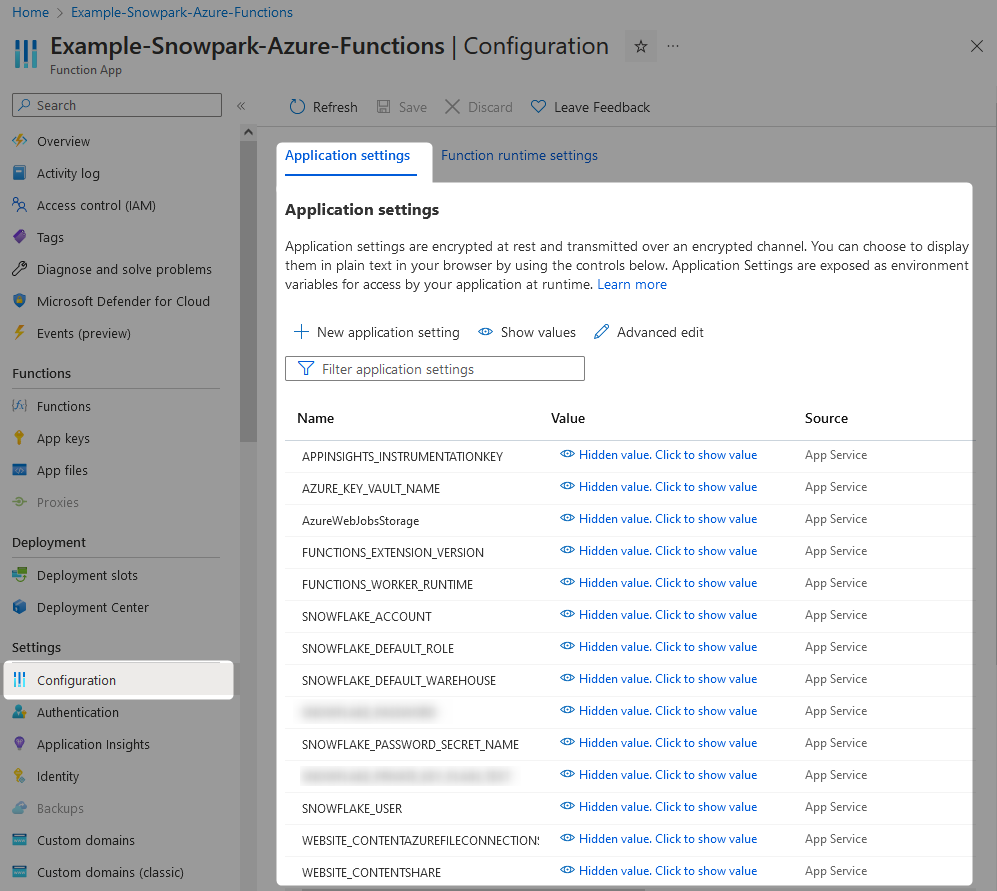
Each of these were added by simply selecting the New application setting button on the above screenshot and providing the values.
As you have likely assumed, these are the variables that we will use in our first demonstration to authenticate to Snowflake with Snowpark for Python inside an Azure Function, leveraging a password stored as a secret in Azure key vault. In Python, these variables can be accessed through the getenv() method of the os package, as demonstrated in the following code:
## Import Azure packages
from azure.keyvault.secrets import SecretClient
from azure.identity import ManagedIdentityCredential

## Import Snowpark session module
from snowflake.snowpark import Session

## Import other packages
import os

## Retrieve key vault name from app settings
## and convert it into a URI
key_vault_name = os.getenv("AZURE_KEY_VAULT_NAME")
key_vault_uri = f"https://{key_vault_name}.vault.azure.net"

## Retrieve password secret name from app settings
snowflake_password_secret_name = os.getenv("SNOWFLAKE_PASSWORD_SECRET_NAME")

## Leverage managed identity to retrieve key vault secrets client
managed_identity_credential = ManagedIdentityCredential()
secret_client = SecretClient(vault_url=key_vault_uri, credential=managed_identity_credential)

## Retrieve the secret password from the key vault
snowflake_password = secret_client.get_secret(snowflake_password_secret_name).value

## Retrieve connection parameters from app settings
snowflake_connection_parameters = {
    "account": os.getenv("SNOWFLAKE_ACCOUNT")
  , "user": os.getenv("SNOWFLAKE_USER")
  , "password": snowflake_password
  , "role": os.getenv("SNOWFLAKE_ROLE")
  , "warehouse": os.getenv("SNOWFLAKE_WAREHOUSE")
}

## Create Snowflake Snowpark session
snowpark_session = Session.builder.configs(snowflake_connection_parameters).create()
That’s all there is to it really. Simply populate your App Settings appropriately and leverage them using os.getenv() to retrieve them, then follow the steps on rows 13-24 to retrieve the secret from Azure key vault. This can then be combined to create your session. Remember the module imports on rows 2-3!
Going Further with Service Accounts and Authentication Key Pairs
The solution discussed so far is okay. It gets the job done. However, password-based connections are often impacted by various security features which can get in the way of an automated system process, such as multi-factor authentication and policies that enforce regular password changes.
When connecting one technology to another, such as Azure to Snowflake in our case, the best practice would be to leverage a service account that is configured to authenticate with a key pair.
What Is a Service Account?
In short, a service account is an account that has been created specifically to facilitate a service or process. This is different to a user account, which would be an account given to a specific user and intended for their use only. Service accounts should still be strictly protected and controlled, as they will often have more powerful access than a user account depending on the scenario.
To better explain this we will refer to an example. In this example, both myself (Chris) and my colleague Jason could be working in the same environment of Azure and Snowflake to build several automated processes. If using our own user accounts, some of the functions would be configured to use my credentials and some to use Jason’s. If we move on from the project and hand over our respective parts to another pair of colleagues, we would then need to ensure the credentials in use by the process are changed to that of the new colleague. If we didn’t and we continued to work on multiple projects over time, we would build up a large list of services/processes that rely on our specific user credentials, and that would need updating every time one of us changed our credentials. This simply does not make sense.
Instead, a separate user is created in Snowflake with the specific purpose of facilitating the Azure Function App’s access to Snowflake. Service accounts often follow a specific naming convention within an organisation to clearly distinguish them from user accounts. In our example, we will use the “SVC_” prefix to denote a service account, and call our service account “SVC_AZURE_SNOWPARK_DEMO”. This user is very clearly intended for a specific purpose and will be configured in Snowflake to only be able to access the intended objects.
What Is Key Pair Authentication?
To keep things short, key pair authentication is similar to a password-based authentication method but it is intended for services/processes and has a different set of general ways of working. Most notably, this method consists of a pair of keys: a public key that is stored in the target platform (Snowflake in our case) and a private key that is kept safe by the service/process (Azure in our case). When authenticating, the service/process sends the private key to the target platform, where it is compared against the public key. For addtional security, private keys are often passphrase-protected too.
You can find out more in the following article, which covers this in more detail and demonstrates how to configure a key pair for authentication:
Zero to Snowflake: Key Pair Authentication with Windows OpenSSH Client
How to Store a Private Authentication Key as a Secret in Azure Key Vault
It is important to note that keys often spread over multiple lines and thus include newline characters. As this is the case, you cannot directly add such a value as a secret in Azure key vault, due to the Azure portal not supporting multi-line secret values as detailed below.

There are two options here. The easy option is to store your private key with newline characters represented by \n and parse this back out in your Python. I will demonstrate this later in the article. If you choose this option, you can insert your secret value into the Azure key vault directly.
The other option is a bit more complex but is also the best practice approach. This option is to store your multi-line key correctly by inserting it into the Azure key vault programmatically. Instructions for how to do this using Azure CLI or with PowerShell are provided in Azure’s documentation. Alternatively, you could achieve this with the following Python code.
The code snippet below is sufficient to store a hard-coded authentication key as a secret. If you intend to execute this from within an Azure function, note that you will need to follow steps similar to those above to grant the Azure Functions App’s managed identity the Key Vault Secrets Officer role in the Azure key vault as this will allow the Azure function to write a new secret value.
This code snippet deliberately leverages similar app settings as we used previously to hopefully make the process easier to follow:
- AZURE_KEY_VAULT_NAME
- SNOWFLAKE_USER – This will act as the name of the secret in the Azure key vault
- SNOWFLAKE_PRIVATE_KEY_PLAIN_TEXT – Stored as an app setting as descibed in the previous article: Using Azure App Settings to Authenticate Snowflake with Python
## Import Azure packages
from azure.keyvault.secrets import SecretClient
from azure.identity import ManagedIdentityCredential

## Import Snowpark session module
from snowflake.snowpark import Session

## Import other packages
import os

## Retrieve key vault name from app settings
## and convert it into a URI
key_vault_name = os.getenv("AZURE_KEY_VAULT_NAME")
key_vault_uri = f"https://{key_vault_name}.vault.azure.net"

## Retrieve secret name from app settings.
## Replace underscores with hyphens, as underscores
## are expected in Snowflake service account usernames
## but secrets in key vault cannot contain underscores
snowflake_user = os.getenv("SNOWFLAKE_USER")
protected_snowflake_user = snowflake_user.replace("_", "-")

## Retrieve new secret value, which is the
## private key in multi-line form
snowflake_private_key_plain_text = os.getenv("SNOWFLAKE_PRIVATE_KEY_PLAIN_TEXT")

## Leverage managed identity to retrieve key vault secrets client
managed_identity_credential = ManagedIdentityCredential()
secret_client = SecretClient(vault_url=key_vault_uri, credential=managed_identity_credential)

## Retrieve the secret password from the key vault
secret_client.set_secret(protected_snowflake_user, snowflake_private_key_plain_text)
How to Leverage Key Pair Authentication in Snowpark for Python
At this stage, assume we have the following:
- A service account for Snowflake stored in the app setting SNOWFLAKE_USER with the value SVC__AZURE_SNOWPARK_DEMO
- A private authentication key stored as a secret in Azure key vault called SVC–AZURE-SNOWPARK-DEMO
- An aligning public key configured for the user in Snowflake
All we need now is to create a function which can retrieve the private key (i.e., the secret value) from the Azure key vault and serialize it so that it can be used to authenticate to create a Snowpark session. Fortunately, I have just the function for this! What a surprise, right? The following code block contains everything you need to establish a Snowpark for Python session using a private key that is stored as a secret in Azure key vault, where the secret name matches the Snowflake user but with underscores replaced with hyphens. It even includes an option for a corresponding private key passphrase to also be provided as an App Setting.
## Import Azure packages
import logging
import azure.functions as func
from azure.keyvault.secrets import SecretClient
from azure.identity import ManagedIdentityCredential

## Import Snowpark session module
from snowflake.snowpark import Session

## Import packages with which to parse the private key
from cryptography.hazmat.backends import default_backend
from cryptography.hazmat.primitives import serialization

## Import other packages
import os

## Function to retrieve the private key
## from app settings and serialize it
## for Snowpark for Python
def retrieve_serialized_private_key() :

  ### Retrieve key vault name from app settings
  ### and convert it into a URI
  key_vault_name = os.getenv("AZURE_KEY_VAULT_NAME")
  key_vault_uri = f"https://{key_vault_name}.vault.azure.net"

  ### Retrieve secret name from app settings.
  ### Replace underscores with hyphens, as underscores
  ### are expected in Snowflake service account usernames
  ### but secrets in key vault cannot contain underscores
  snowflake_user = os.getenv("SNOWFLAKE_USER")
  protected_snowflake_user = snowflake_user.replace("_", "-")

  ### Leverage managed identity to retrieve key vault secrets client
  managed_identity_credential = ManagedIdentityCredential()
  secret_client = SecretClient(vault_url=key_vault_uri, credential=managed_identity_credential)

  ### Retrieve the private key from the key vault
  private_key_plain_text = secret_client.get_secret(protected_snowflake_user).value

  ### Encode the private key
  private_key_encoded = private_key_plain_text.encode()

  ### Retrieve the private key passphrase from app settings, if appropriate
  private_key_passphrase = os.getenv("SNOWFLAKE_PRIVATE_KEY_PASSPHRASE")

  ### Encode the private key passphrase if it has been provided
  private_key_passphrase_encoded = None
  if private_key_passphrase is not None :
    if len(private_key_passphrase) > 0 and private_key_passphrase != "None" :
      private_key_passphrase_encoded = private_key_passphrase.encode()

  ### Load the private key, leveraging passphrase if needed
  private_key_loaded = serialization.load_pem_private_key(
      private_key_encoded
    , password = private_key_passphrase_encoded
    , backend = default_backend()
  )

  ## Serialize loaded private key
  private_key_serialized = private_key_loaded.private_bytes(
      encoding = serialization.Encoding.DER
    , format = serialization.PrivateFormat.PKCS8
    , encryption_algorithm = serialization.NoEncryption()
  )

  return private_key_serialized

## Define main function for Azure
def main(req: func.HttpRequest) -> func.HttpResponse:
  logging.info("HTTP trigger received a new request")

  ### Retrieve the serialized private key
  private_key_serialized = retrieve_serialized_private_key()

  ### Retrieve connection parameters from app settings
  snowflake_connection_parameters = {
      "account": os.getenv("SNOWFLAKE_ACCOUNT")
    , "user": os.getenv("SNOWFLAKE_USER")
    , "private_key": private_key_serialized
    , "role": os.getenv("SNOWFLAKE_ROLE")
    , "warehouse": os.getenv("SNOWFLAKE_WAREHOUSE")
  }

  ### Create Snowflake Snowpark session
  snowpark_session = Session.builder.configs(snowflake_connection_parameters).create()
Making This Easier with Functioning Examples and the Dedicated InterWorks Submodule
To wrap things up, I’d like to mention a few resources to make this process easier. Firstly, all of the code and example today can be found in this dedicated GitHub repository: InterWorks Example Snowpark Azure Functions. In addition to bringing all of our code together into working examples that you can deploy yourself, this repository also demonstrates how to leverage our custom submodule to simplify these processes. Most notably, the submodule allows you to jump straight into creating Snowpark sessions without developing your own supporting functions, demonstrated by the following code snippet:
## Import Azure packages
import logging
import azure.functions as func

## Import other packages
import pandas
import json

## Import shared packages
from ..submodules.interworks_snowpark.interworks_snowpark_python.snowpark_session_builder import build_snowpark_session_using_stored_private_key_in_azure_secrets_vault as build_snowpark_session

## Define main function for Azure
def main(req: func.HttpRequest) -> func.HttpResponse:
  logging.info("HTTP trigger received a new request")

  ### Create Snowflake Snowpark session
  snowpark_session = build_snowpark_session()
So concludes this article on leveraging key vault in Azure to securely store authentication variables for Snowpark for Python connections to Snowflake. I hope you found this useful! The next step on this journey will be to automatically deploy and rotate authentication key pairs for Snowflake service accounts, storing the secrets in Azure key vault so that Azure Function Apps are continuously supported even when the underlying Snowflake authentication key pairs change.