
In previous articles in this series, we have demonstrated how to set up Azure Functions to leverage Snowpark for Python. This allows us to interact with Snowflake from an Azure Function, unlocking a wide range of opportunities for scripting activity.
In this article, we will focus on how we can configure an Azure Functions App to react automatically when a file is uploaded to a container in an Azure storage account and leverage the contents of the file to perform an activity.
Requirements
This article assumes that the following objects are already configured:
- Azure Storage Container – stores files to be ingested into Snowflake
- Azure Storage Queue – tracks each file that lands in the storage container
- Azure Storage Event – updates the storage queue each time a new file is uploaded to the storage container
- Azure Functions App – should contain a function that can successfully connect to Snowflake
Supporting Articles
To understand how to configure the Azure Storage Queue and Event, take a look at “Step 1: Create the Azure Storage Queue and Event” in the following article: Automated Ingestion from Azure Storage into Snowflake via Snowpipe
To understand how to deploy Azure Functions Apps that connect to Snowflake, and how to leverage application settings, take a look at the following articles:
- Intro to Azure Functions and Snowpark: Populating Snowflake Control Tables
- Using Azure App Settings to Authenticate Snowflake with Python
You may also wish to leverage components from this article to more securely connect to Snowflake:
Step 1: Authorise the Azure Functions App to Access the Storage Account Objects
The first step on our journey is to allow our Azure Functions App to access the required objects in Azure Storage. Specifically, we want our app to be able to react when a new message is sent to the queue, and access the corresponding file in the container.
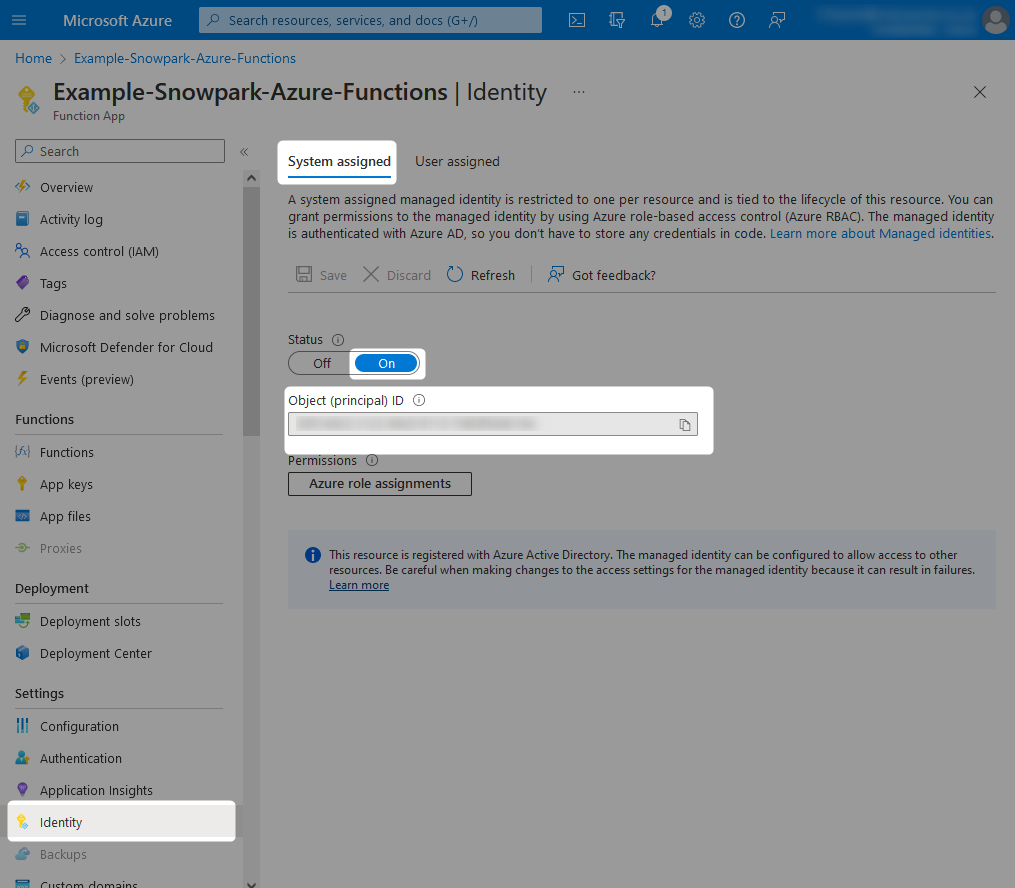
Step 1a: Configure the Azure Functions App with a Managed Identity That Can Be Used for Permission Grants
From within your Azure Functions App, navigate to the identity pane and change the status for the System assigned identity to On. After hitting save, you will see a warning message regarding adding the managed identity to Azure Active Directory, which you can accept.
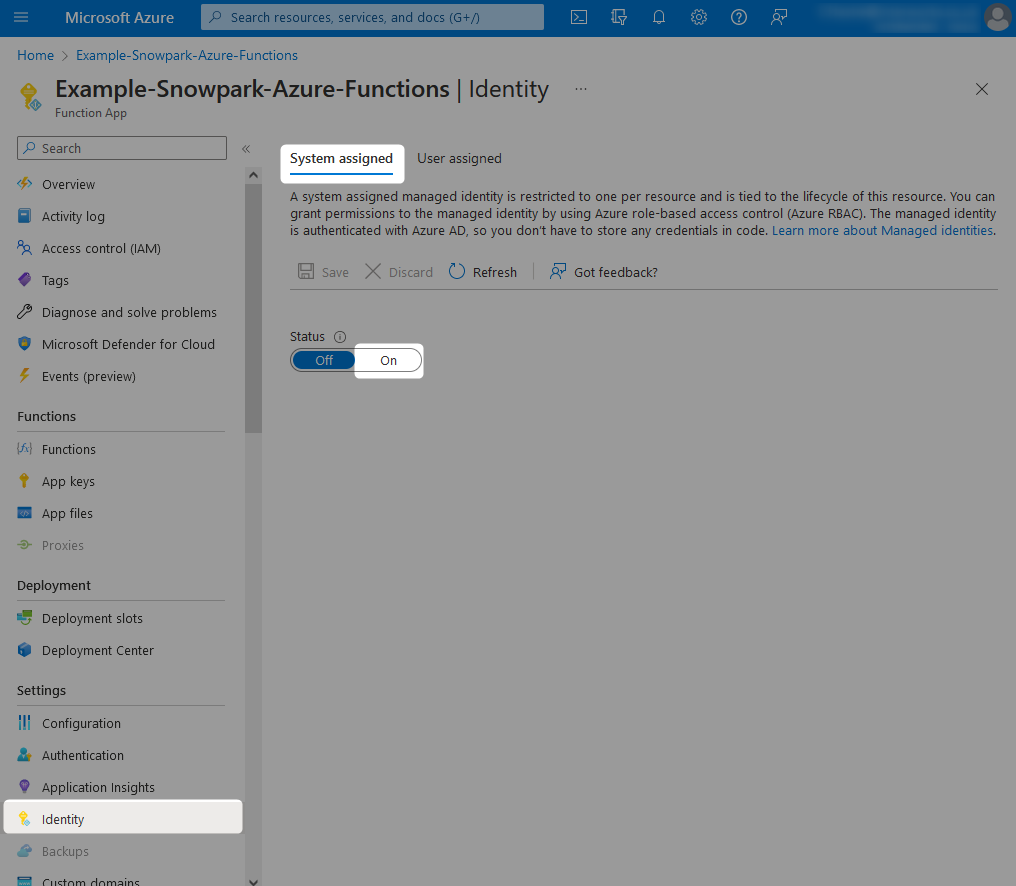
Once this is complete, the Object (principal) ID for the managed identity assigned to your Azure Functions App will be displayed. You can note this down if you wish, however we will not need it as we can reference our new managed identity by name, which will match the name of the Azure Functions App.
Step 1b: Grant the Managed Identity the Desired Access to the Storage Container(s) and Queue(s)
Now that the Azure Functions App has a managed identity, we can grant it access to other objects within Azure.
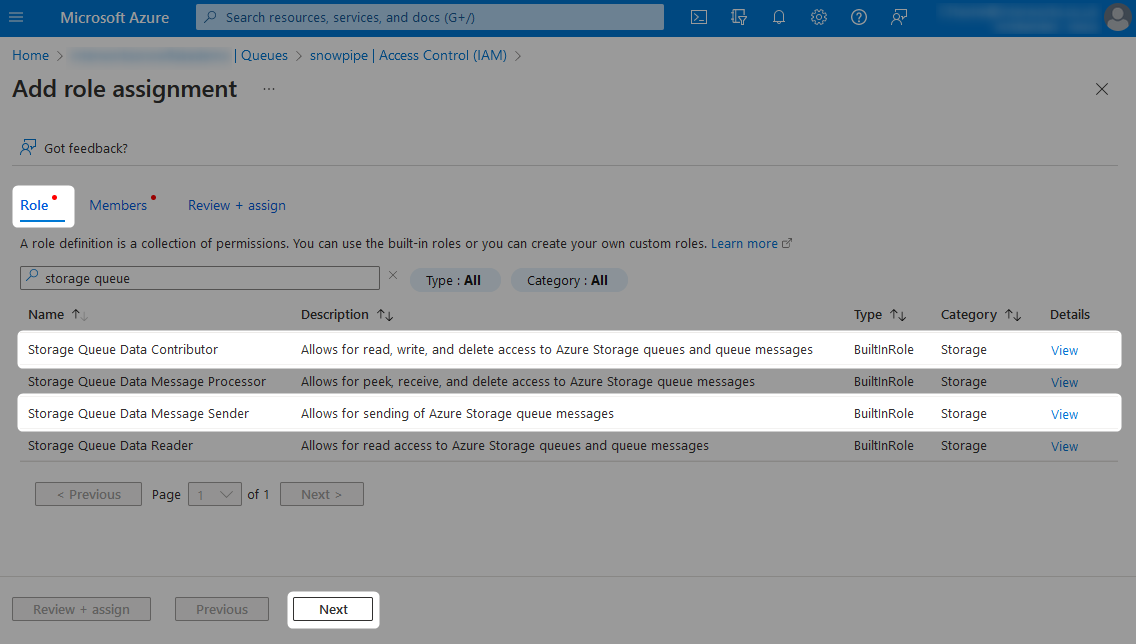
To grant the required access, add a new role assignment under the Access Control (IAM) pane from within each desired storage queue and container.
You may wish to grant the managed identity the desired access at the storage account level instead of the container/queue level. This is only if you want to allow access to all containers/queues within the storage account, as they will all authenticate with the same managed identity.
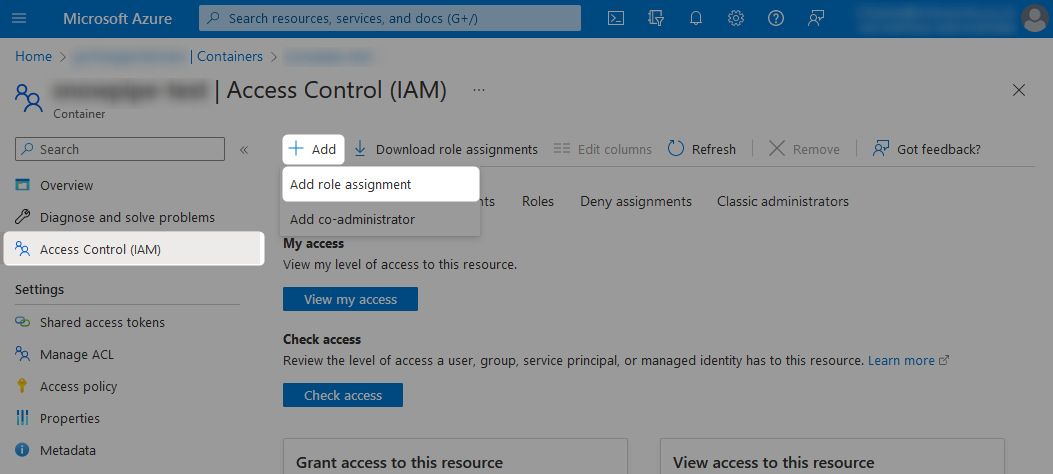
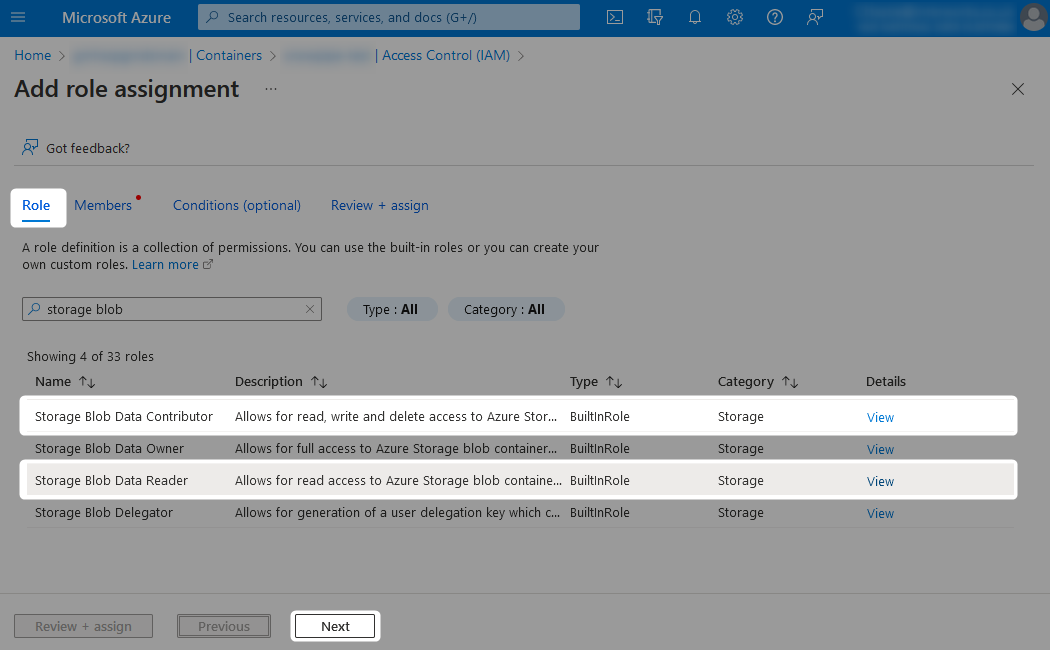
When adding the new role assignment, choose which level of access you wish to grant from the list of possible roles.
- Storage account roles
- If you wish for read access only, the
Storage Blob Data Readerrole is required. - If you wish for deeper access, such as writing file to the container or moving files within the container, then the
Storage Blob Data Contributorrole is required.
- If you wish for read access only, the
- Storage queue roles
- If you wish for read access only, the
Storage Queue Data Message Readerrole is required. - If you wish for deeper access, such as for sending messages to the queue, then the
Storage Queue Data Contributorrole is required.
- If you wish for read access only, the
The following pair of screenshots demonstrate these role assignments:
Finally, locate the managed identity which you wish to grant access to. This will have the same name as the Azure Functions App.
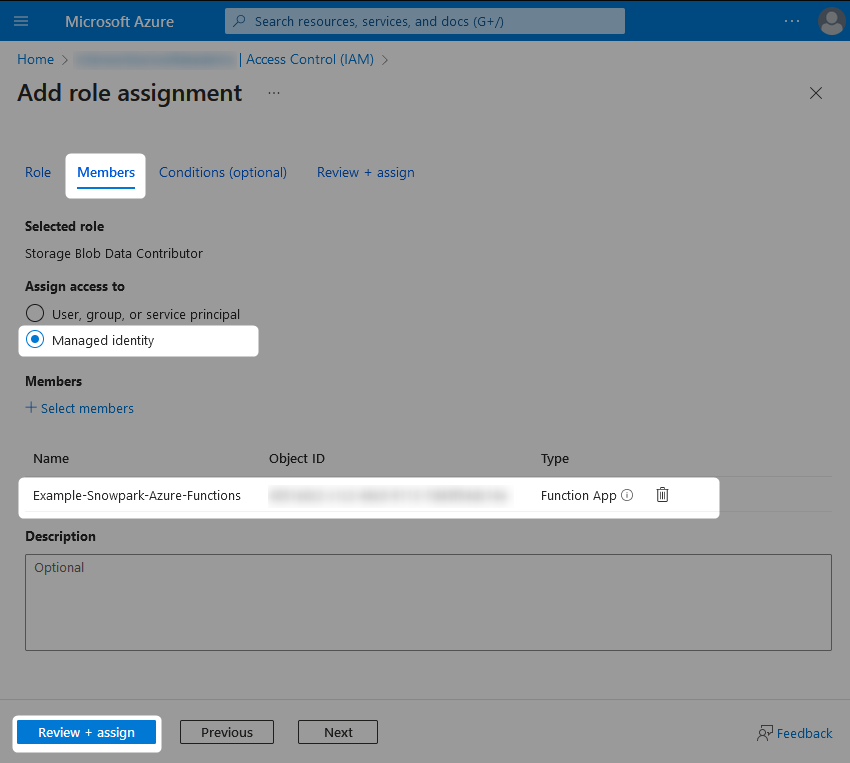
The Azure Functions App should now have the desired access on both the storage container(s) and the storage queue(s).
Step 2: Configure the Azure Function with a Queue Trigger
The next step on our journey is to configure a function inside our functions app that will react to a message landing in a queue. To configure this, we must configure a collection of application settings in our Azure Functions App that will facilitate this access then configure a matching binding for the function.
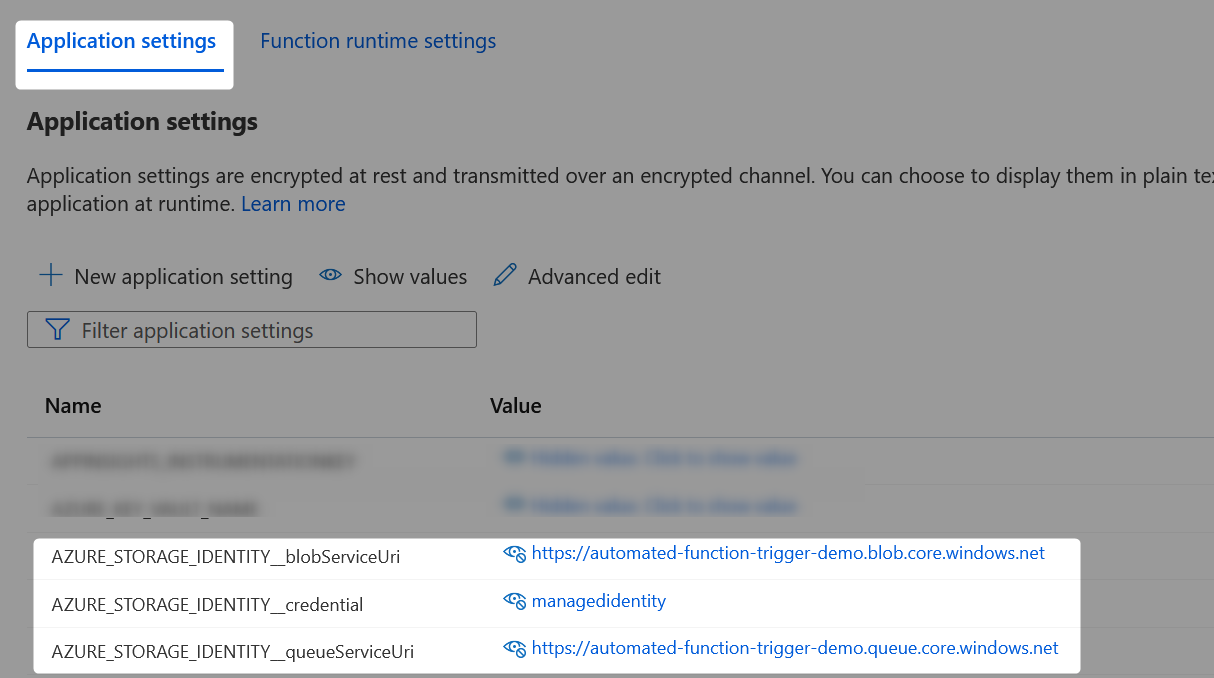
Step 2a: Configure Appropriate App Settings in the Azure Functions App
Each of these application settings must be named with a specific pattern, consisting of a shared prefix and a targeted suffix.
For our example, we create three app settings that each have the shared prefix “AZURE_STORAGE_IDENTITY”.
Azure App Setting: AZURE_STORAGE_IDENTITY__blobServiceUri
This app setting is part of a series of settings that instruct the Azure function to leverage its own managed identity when connecting to the storage container. Specifically, this is the URI of the storage account that contains the container.
Example value: https://my-storage-account.blob.core.windows.net
Azure App Setting: AZURE_STORAGE_IDENTITY__credential
This app setting is part of a series of settings that instruct the Azure function to leverage its own managed identity when connecting to the storage container and queue. Specifically, this app setting instructs the use of managed identity.
Example value: managedidentity
Azure App Setting: AZURE_STORAGE_IDENTITY__queueServiceUri
This app setting is part of a series of settings that instruct the Azure function to leverage its own managed identity when connecting to the storage queue. Specifically, this is the URI of the storage account that contains the queue.
Original value: https://my-storage-account.queue.core.windows.net
Azure App Settings Example Screenshot
The following screenshot demonstrates these three app settings in use:
Step 2b: Configure a queue binding for the function
Now that the app settings have been configured, the shared prefix can be used as a connection inside a binding. Recall that any Azure function is configured by default with two files:
__init__.py– contains the Python code for the functionfunction.json– contains the metadata for the function, including the list of bindings that determine how the function is triggered
The following structure demonstrates the contents of a function.json file that has been configured to trigger based on a queue event.
{
  "scriptFile": "__init__.py",
  "bindings": [
    {
      "name": "msg",
      "type": "queueTrigger",
      "direction": "in",
      "queueName": "<name of queue>",
      "connection": "<connection string for queue>"
    }
  ]
}
For our example, we use the following to populate the function.json file:
{
  "scriptFile": "__init__.py",
  "bindings": [
    {
      "name": "msg",
      "type": "queueTrigger",
      "direction": "in",
      "queueName": "automated-function-trigger-demo",
      "connection": "AZURE_STORAGE_IDENTITY"
    }
  ]
}
The important detail here is that the shared prefix for the app settings from the previous step has been used as the “connection” within the queue trigger binding.
Step 2c: Ensure the Dunction Is Prepared to React to a Queue Trigger
The final change to make when configuring a queue trigger for a function is to ensure the function expects this trigger. To do this, simply modify the __init__.py file so that the main function expects a func.QueueMessage input called “msg.”
The following code block demonstrates this in a very simple fashion.
## Import Azure packages
import logging
import azure.functions as func

## Define main function for Azure
def main(msg: func.QueueMessage):
  logging.info('Received new message from queue')
  logging.info(msg)
It is useful to extend this by parsing the queue for important information. The core information we need from the queued message is the URL for the file it corresponds to in the storage container. This can be parsed to retrieve the storage blob service URI, the container and the relative path for the file within the container:
## Define function to retrieve the desired
## information from the input message
def parse_input_message(msg: func.QueueMessage):

  ### Retrieve message as JSON
  msg_json = msg.get_json()
  logging.info('Message JSON:')
  logging.info(msg_json)

  ### Retrieve message ID
  msg_id = msg_json["id"]
  logging.info(f'Message ID: {msg_id}')

  ### Retrieve full file URL from input blob.
  ### The specific key varies depending on the type
  ### of storage container
  if "url" in msg_json["data"] :
    file_path_url = msg_json["data"]["url"]
  elif "blobUrl" in msg_json["data"] :
    file_path_url = msg_json["data"]["blobUrl"]
  else :
    logging.error("Function abort - Path URL does not match expected storage blob service URI")
    raise ValueError("Function abort - Path URL does not match expected storage blob service URI")

  logging.info(f'File path URL: {file_path_url}')

  '''
  Expected file URL format:
  https://<storage account>.blob.core.windows.net/<container>/path/to/file.json

  Example expected file URL:
  https://my-storage-account.blob.core.windows.net/automated-function-trigger-demo/example_file.json
  '''

  ### Retrieve storage blob service uri
  storage_blob_service_uri = os.getenv("AZURE_STORAGE_IDENTITY__blobServiceUri")

  ### Parse storage queue service URI from file path URL
  if file_path_url.startswith(storage_blob_service_uri) :
    file_path = file_path_url[1 + len(storage_blob_service_uri):]
  else :
    logging.info(f'Function abort - Path URL does not match expected storage blob service URI')
    return

  ### Split file path into container and relative file path
  container, relative_file_path = file_path.split('/', 1)

  return storage_blob_service_uri, container, relative_file_path
Step 3: Configure the Azure Function to Read the Given File from the Storage Container
The next step on our journey is to configure the function to interact with the file that was uploaded to the storage container to perform an activity in Snowflake. For this article, we will demonstrate a very simple use-case where the content of the file will simply contain a SQL statement that we will execute in Snowflake.
This article does not provide any guidance on avoiding or preventing destructive or negative code, nor does it discuss preventing SQL injection or similar. This article is simply providing a demonstration of the possible functionality and it is strong recommended to configure additional validations and security methods if you configure a similar Azure function in your own environment.
Step 3a: Python Code to Download a JSON File from a Given Storage Account, Container and Relative File Path
First, we focus on the specific code to download the file based on the given container and relative file path. The following code block leverages the DefaultAzureCredential class, which is designed to attempt a series of different authentication methods in sequence until it finds one that works. Among others, this class will attempt to authenticate using managed identity credentials, which we already configured for the Azure Functions App in step 1b.
## Import Azure packages
from azure.identity import DefaultAzureCredential
from azure.storage.blob import BlobServiceClient

## Import other packages
import os
import json
from io import BytesIO

## Define function to download full JSON file from blob
def azure_download_json_file(storage_blob_service_uri=None, container=None, relative_file_path=None):
  default_azure_credential = DefaultAzureCredential()
  blob_service_client = BlobServiceClient(storage_blob_service_uri, credential=default_azure_credential)
  blob_client = blob_service_client.get_blob_client(container=container, blob=relative_file_path)
  with BytesIO() as input_blob:
    blob_client.download_blob().download_to_stream(input_blob)
    input_blob.seek(0)
    json_input = json.load(input_blob)

  return json_input
Step 3b: Python Code to Retrieve the SQL Statement from the JSON Input
Once we have the JSON input, we can extract the SQL statement that we intend to execute:
## Define function that retrieve the SQL statement
## to execute from the JSON input
def retrieve_sql_statement_to_execute(json_input: dict):

  '''
  Expected format of JSON file:
  json_input = {
    "sql_statement_to_execute" : "<sql_statement_to_execute>"
  }
  '''

  ### Error if JSON file is not in expected format
  if "sql_statement_to_execute" not in json_input.keys() :
    logging.error(f"Manual log - Downloaded file did not include the key 'sql_statement_to_execute'")
    raise ValueError("Manual log - Downloaded file did not include the key 'sql_statement_to_execute'")

  ### Retrieve the value as its own variable
  sql_statement_to_execute = json_input["sql_statement_to_execute"]

  return sql_statement_to_execute
Step 3c: Python Code to Execute the SQL Statement in Snowflake
Finally, we can leverage a snowpark session to execute the statement in Snowflake.
## Define function that executes given SQL in Snowflake
def execute_sql_in_snowflake(sql_statement_to_execute: str):

  ### Create Snowflake Snowpark session
  snowpark_session = build_snowpark_session()

  ### Execute the SQL command in Snowflake
  ### and log the result
  sf_df_statement_result = snowpark_session.sql(sql_statement_to_execute).collect()

  logging.info("SQL statement result:")
  logging.info(sf_df_statement_result)

  ### Close the Snowflake Snowpark Session
  snowpark_session.close()

  return
Making This Easier with Functioning Examples and the Dedicated InterWorks Submodule
The final part of this post was a very simple example to show how you could leverage an input from blob storage to trigger and execute SQL statements in Snowflake, but the capability here is far greater. Depending on your use case, you could use this to mimic your own snowpipes with custom pre-ingestion transformations using Pandas, or introduce your own additional logging and API calls whilst orchestrating activity, or any number of other ideas. My goal with this post is to give a taste of the possible and lay the groundwork for using queue-based triggers based on files being uploaded to blob storage. I’d love to hear what use cases you come up with!
To wrap things up, I’d like to mention a few resources to make this process easier. Firstly, all of the code and example today can be found in this dedicated GitHub repository: InterWorks Example Snowpark Azure Functions. In addition to bringing all of our code together into working examples that you can deploy yourself, this repository also demonstrates how to leverage our custom submodule to simplify these processes. Most notably, the submodule allows you to jump straight into creating Snowpark sessions without developing your own supporting functions, demonstrated by the following code snippet:
## Import Azure packages
import logging
import azure.functions as func

## Import other packages
import pandas
import json

## Import shared packages
from ..submodules.interworks_snowpark.interworks_snowpark_python.snowpark_session_builder import build_snowpark_session_using_stored_private_key_in_azure_secrets_vault as build_snowpark_session

## Define main function for Azure
def main(req: func.HttpRequest) -> func.HttpResponse:
  logging.info("HTTP trigger received a new request")

  ### Create Snowflake Snowpark session
  snowpark_session = build_snowpark_session()