
This is the third and last installment of the three-part series on SSO, SAML and user provisioning in general. Today, we’ll focus on SAML and setting up SSO between Snowflake and Azure AD / ADFS.
What Is SAML, ADFS, Azure AD, Okta, Etc.?
It is useful to understand what SAML is in the context of security, specifically with what we’re trying to do when setting up SSO. In searching for an analogy, I stumbled upon an excellent and surprisingly apt explainer blog on SAML (and IdP, and other related stuff) from Greg Seador at Duo Security here.
TL;DR: SAML stands for Security Assertion Markup Language and is a protocol (pre-agreed-upon structure) that Identity Provider (e.g., Azure AD) uses to communicate user access / permissions (digitally signed, XML-based assertions) to the service provider (application user wants to access e.g., Snowflake).
Azure AD is a software implementation of that protocol, as is Duo, Okta, ADFS and others.
Why This Blog Post?
You might be wondering, why on earth – considering there are a few (hundred) resources on the topic especially some written by Snowflake and Microsoft themselves – does this post exist?
Fair question.
The reason for this blog post’s existence is that, by following the above tutorials step-by-step, I found a couple of gotchas worth mentioning. Moreover, I included a few relevant bits of explanation along the way to help readers better understand the topic, not just to mindlessly and functionally execute steps as directed.
To put simply, I’m hoping this blog post adds value to the reader beyond what’s already mentioned in the two tutorials above. Let’s GOOO!
Overview and What You Will Need
Before you proceed, you’ll need to have the following:
- Your snowflake instance URL – something like
https://company.region.cloud.snowflakecomputing.comor similar - You (or your friend) should have
accountadminrole granted to them in Snowflake
Broadly, the steps are:
- Add Snowflake Application on Azure AD
- Grab certificates and identifiers generated by Azure app
- Create security integration in Snowflake and populate with values from point above
- Test integration
Add Snowflake Application on Azure AD
Head over to Azure portal, Enterprise applications section, and in the search box search for Snowflake. If you’ve added it previously, it should pop up on the list of the applications already enabled on your account. You may have been following along at home and added application as described in the SCIM blog post; no worries if not, just go ahead and click on the application to open up its properties.
If you do not have Snowflake entered into your enabled applications, click on the + button, search for Snowflake and click add.
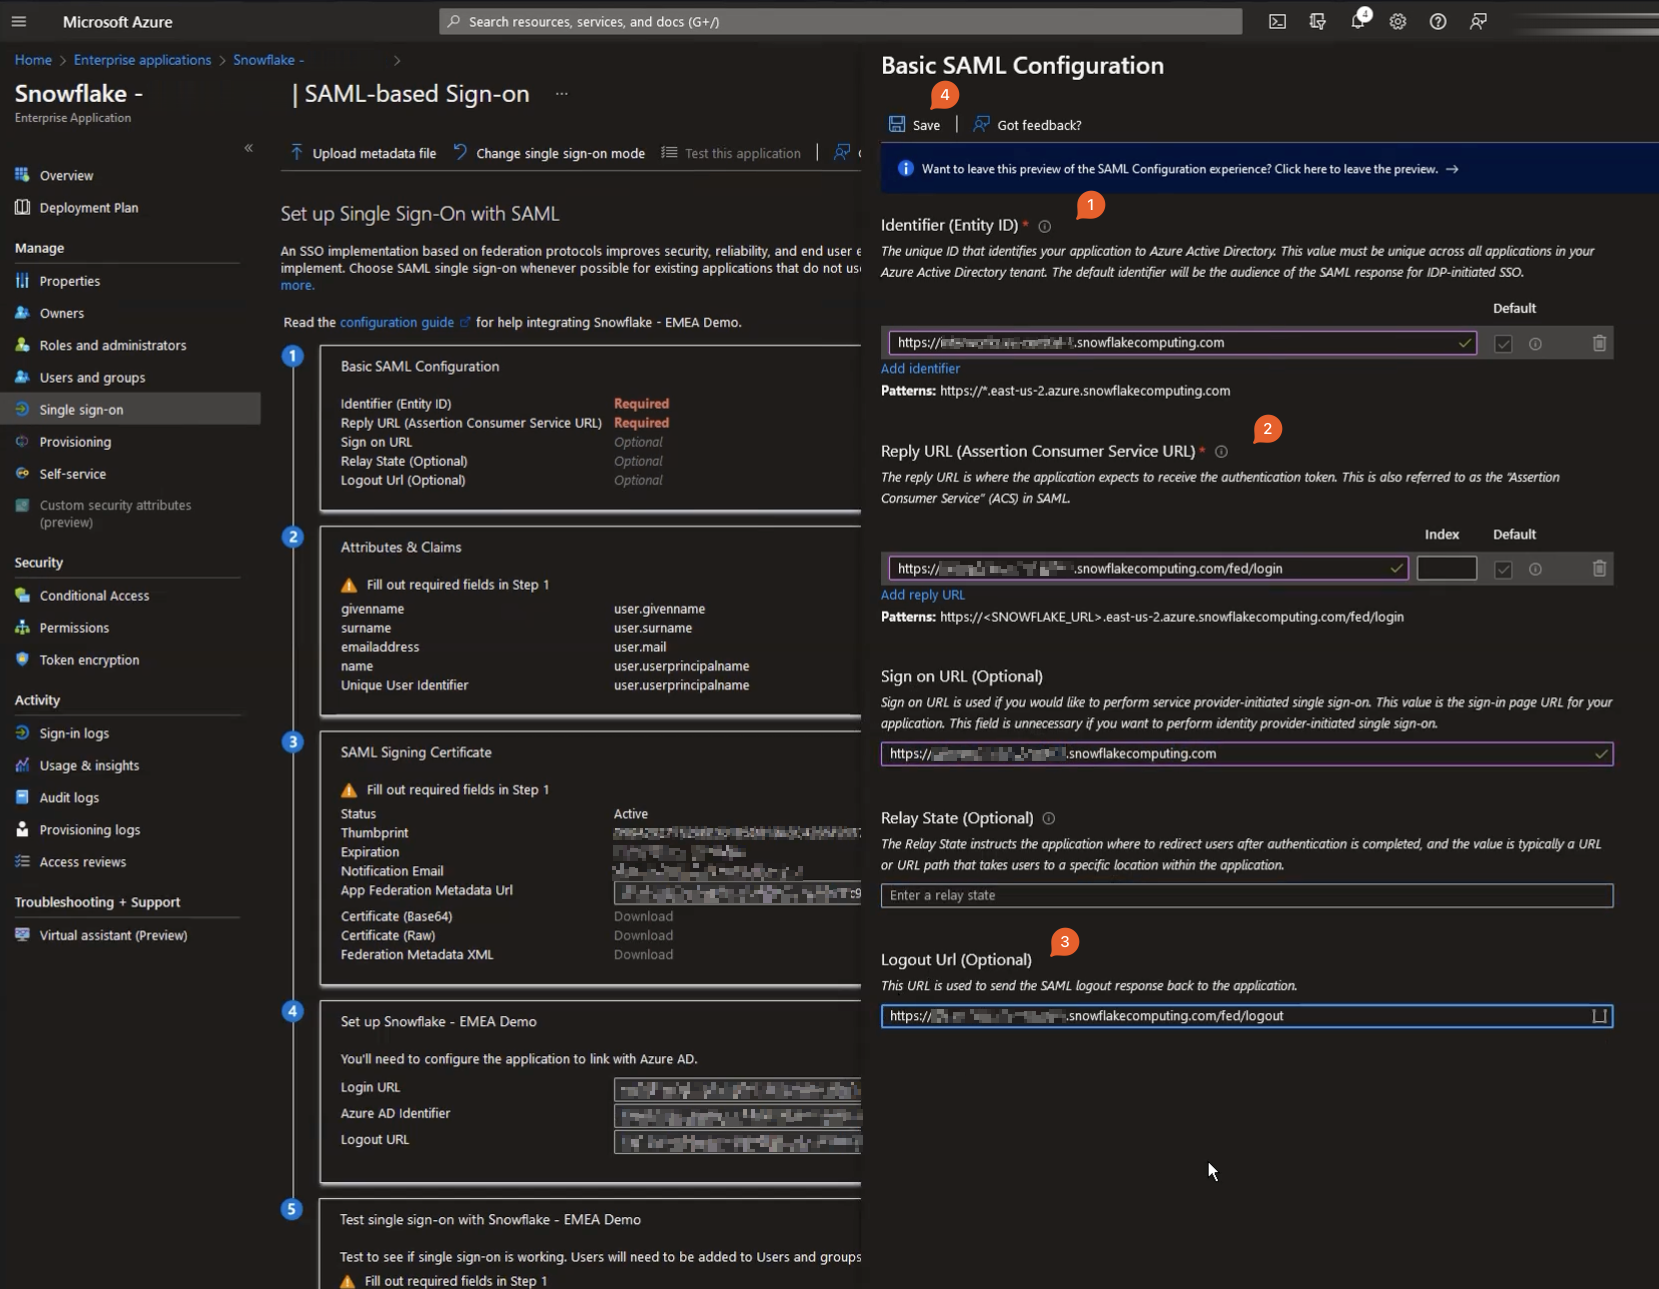
You should be dropped into properties / overview of the application. On the left-hand side click on the Single sign-on section.
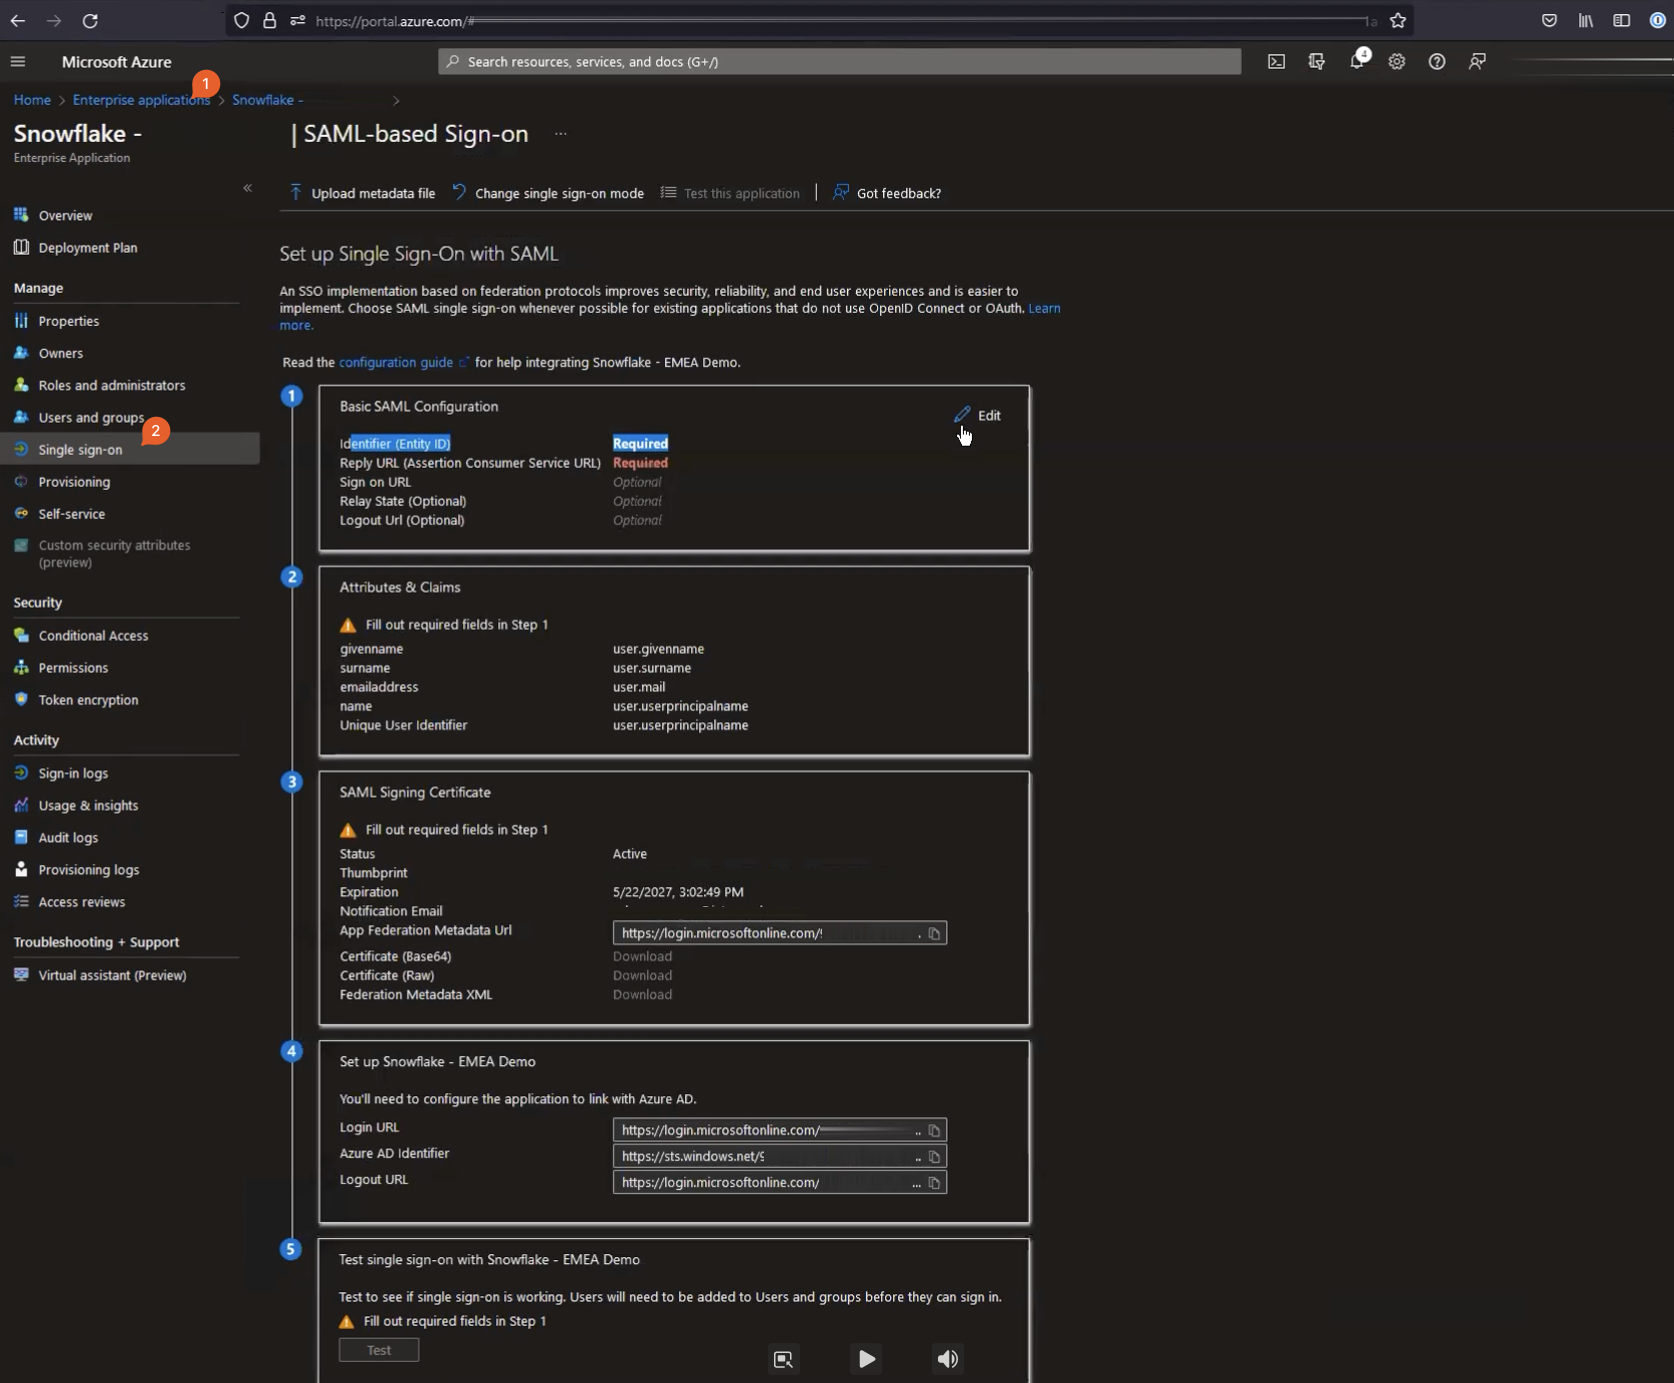
Once on the page above, in the Basic SAML Configuration, hit the pencil button to edit. A new window will slide from the right with the parameters for you to configure basic SAML.
| Property | Description |
|---|---|
| Identifier (Entity ID) | Your Snowflake instance URL (e.g., https://company.region.cloud.snowflakecomputing.com) and this string has to be identical to what is expected to be coming through from Snowflake. If you accidentally put an uppercase letter – http instead of https – it will not work. Once the user gets directed to the log in URL (log in screen for your organisation), assuming they came from Snowflake, Snowflake will have given them application ID. In this case, this is the URL-like string for the Snowflake account. Azure will then perform a strict lookup for the text and try matching an application within your azure account to figure out what to do with the request (which app this request pertains to). |
| Reply URL (optional) | Your Snowflake instance URL with /fed/login suffix, eg https://company.region.cloud.snowflakecomputing.com/fed/login. This is where, once authenticated, Azure AD will post SAML claims back to. The SAML claim is just an XML containing authentication token, which the Snowflake resource at fed/login will consume and once validated against a pre-shared certificate, will generate Snowflake authentication token for the user. |
| Sign on URL (optional) | Optional but useful for service provider (e.g., Snowflake) initiated authentication requests. This is the URL that Azure will redirect the user once they are authenticated with the SSO. Set this to your Snowflake account URL https://company.region.cloud.snowflakecomputing.com. |
| Relay State (optional) | Some service providers allow for context to be passed on between IdP and SP. For example, say you wanted to get access to a notion.so page by URL. If no valid authorisation token exists for your user, notion is going to send you to authenticate against your IdP and may also pass on a context – a page in this case you tried accessing before you were redirected to get authenticated. Your IdP after performing standard authentication will send the user back to Sign on URL but also will relay the page that you had tried to access originally. If this value is not set, you’ll be redirected to notion’s home page and would have to find your way to the original page you tried to access again. |
| Logout URL (optional) | This is the URL that application on the Azure side would send logout message to. In Snowflake’s case, that’s something long the lines of: https://company.region.cloud.snowflakecomputing.com/fed/logout |
Once you filled the appropriate values in, click Save.
Download and Share Certificates and Identifiers with Snowflake
Your screen should look something like below, here you will need to:
- Download base64 encoded certificate
- Copy your
Login URL(=SAML2_SSO_URL) - Copy
Azure AD Identifier(=SAML2_ISSUER) - (Optional but highly recommended) Logout URL (=SAML2_POST_LOGOUT_REDIRECT_URL)
The latter (logout URL) is optional on the Snowflake side but is recommended to be set. This is because when you log out of one SSO-authenticated application, you rarely then go and log out of all application you logged on to before. This leaves a bunch of orphaned services you’ve logged on to, but not logged out of, something that can potentially be exploited.
With the logout URL, not only are you telling Snowflake that your session is finished and you want all your Snowflake-related tokens destroyed, you are also telling your IDP to initiate log out from all services providers connected to that IdP.
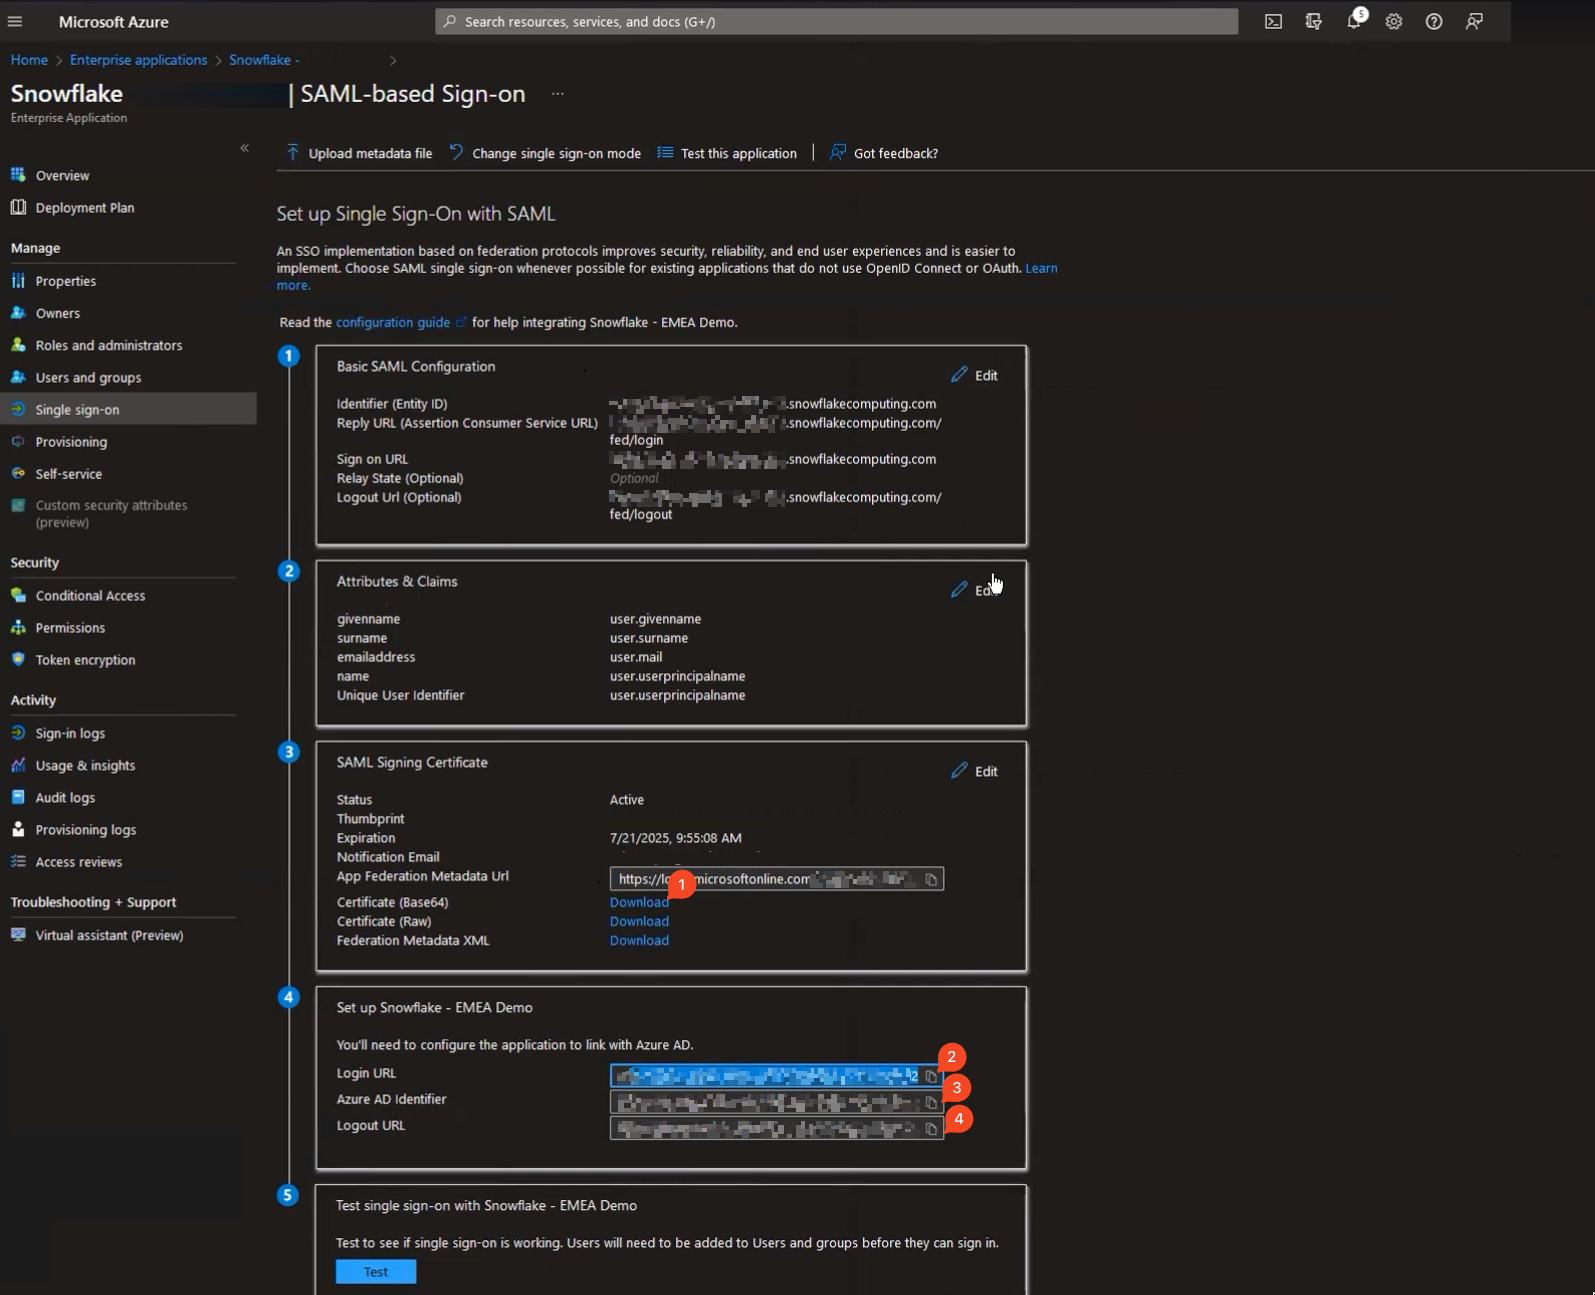
Login URL and Azure AD Identifier are basically the reverse of what we’d just configured for Snowflake. Login URL is where Snowflake should redirect users that need logging in, and Identifier is the name of the authority granting access. The same principle as above applies – both these (and certificate, too) should be exactly as Azure specified them. Take care copy/pasting these between applications (I know MS Teams is notorious for adding invisible characters where they don’t belong).
Head over to Snowflake UI, open up worksheets,and paste the code below:
use role accountadmin; create security integration my_security_integration_name if not exists type = saml2 enabled = true saml2_issuer = '<Azure AD Identifier copied from Azure portal>' saml2_sso_url = '<Login URL copied from Azure portal>' saml2_provider = '<CUSTOM or ADFS -- should not make practical difference>' saml2_x509_cert = '<Paste the content of downloaded certificate from Azure portal>' saml2_enable_sp_initiated = true -- set this to false if you don't want to make "login with SSO" button to appear on the login page immediately saml2_post_logout_redirect_url = '<Paste Logout URL copied from Azure portal>' ;
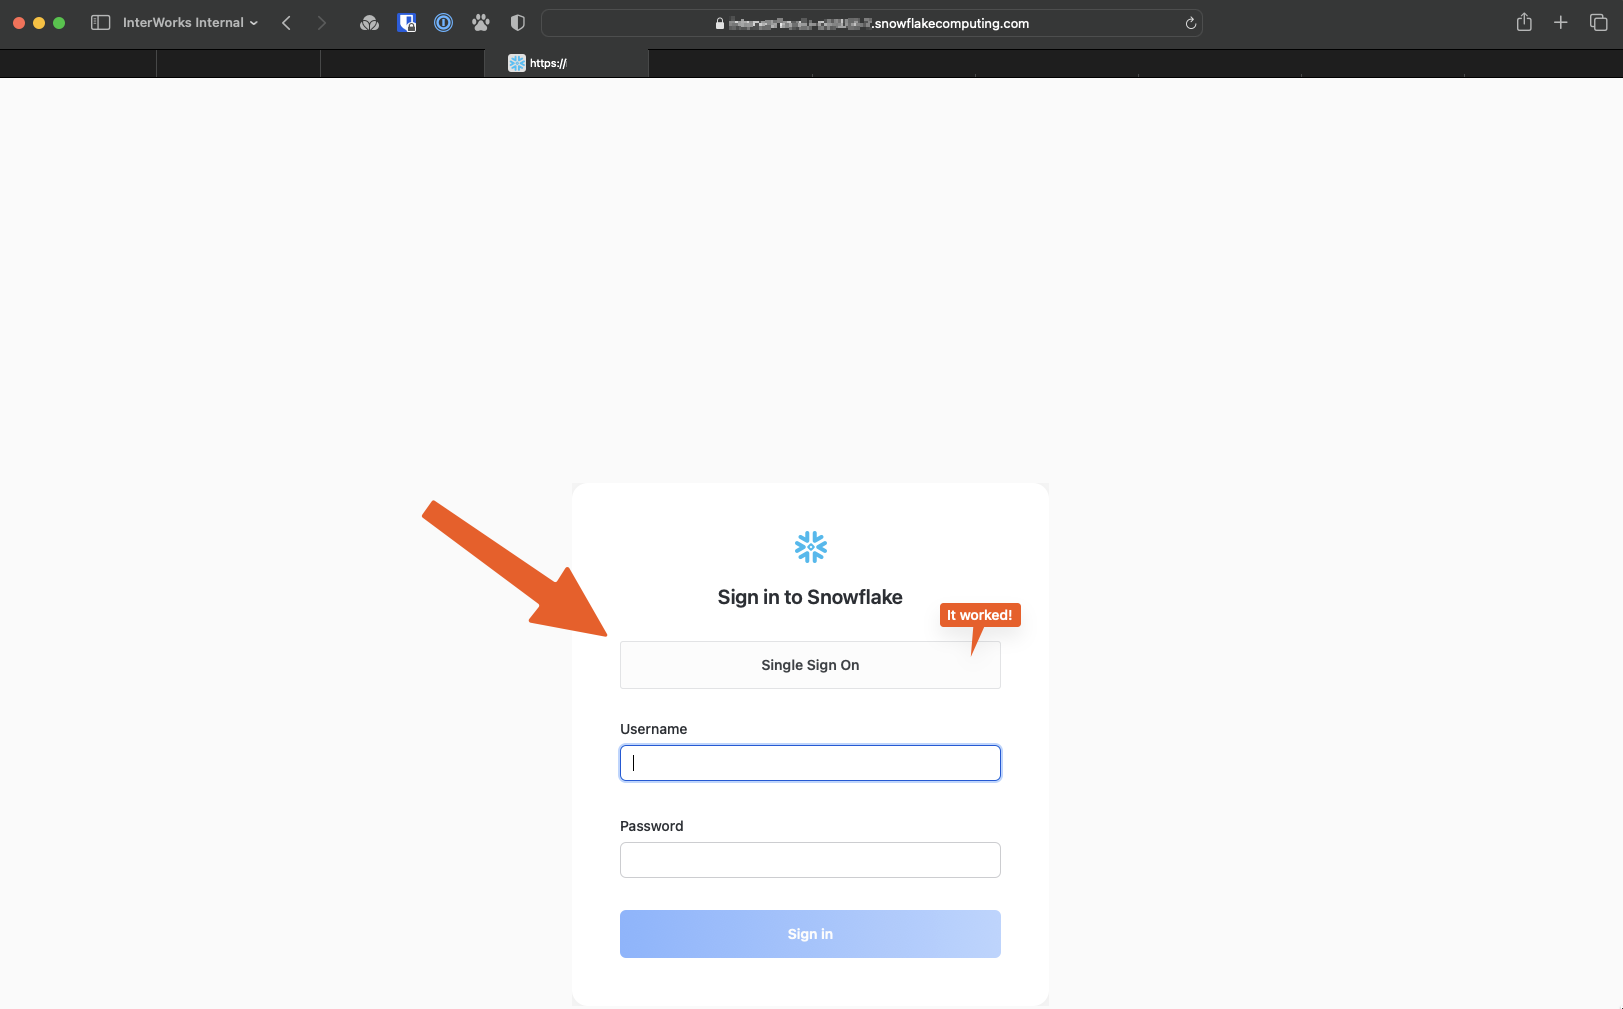
Test SAML Integration Works Correctly
If you have set saml2_enable_sp_initiated = false above, when you log out of Snowflake and get redirected back to Snowflake login page, you likely would not notice any difference.
To test the SP-initiated login process, add console/login?fedpreview=true to the path of your URL, like so: https://company.region.cloud.snowflakecomputing.com/console/login?fedpreview=true.
You now should see new button appear at the top of the login box prompting you to sign in with SSO. You can add a custom message to the button if you like, using:
alter security integration my_security_integration_name
  set SAML2_SP_INITIATED_LOGIN_PAGE_LABEL = 'Button text goes here'
;
If you have followed along at home, have already setup SCIM integration, and have checked that your AD users and groups are syncing with Snowflake fine, you can now try clicking that button and using SSO to connect.
Don’t forget to set saml2_enable_sp_initiated parameter on your security integration if you haven’t already:
alter security integration my_security_integration_name set saml2_enable_sp_initiated = true ; alter account set sso_login_page = true;
Et Voilà
And there it is folks: You should now have a fully working SAML-based SSO authentication path to Snowflake as your Service Provider using Azure AD as your Identity Provider. Together with SCIM, you should have a holistic approach to creating and managing users and roles, as well as authenticating users against a single source of identity.