Portals for Tableau 101 shares the basics of interacting with InterWorks' embedded analytics solution, Portals for Tableau.
Please note that Portals for Tableau are now officially known as Curator by InterWorks. You can learn more at the official Curator website.
Welcome back to Portals for Tableau 101! In today’s lesson, we will cover how to add a dashboard to your portal from Tableau Server. If you missed the last lesson, please check it out as we cover how to set up your portal to connect to your Tableau Server. If you’ve stumbled upon this post and aren’t sure what a portal is, head to our Portals for Tableau solution page.
Adding Dashboards to Your Portal
Now that we have the portal configured to work with the Tableau Server, we can begin to add dashboards to the Portal. To start we will have to log in to the backend of the portal: https://[site-url]/backend. After logging in, click on the Content button in the top navigation.

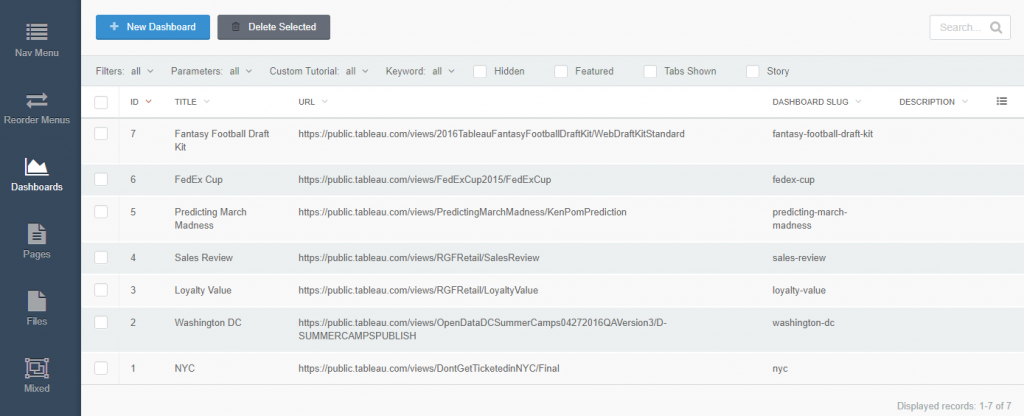
Next, we will click on the Dashboard button in the left-hand navigation. This will take is to the dashboard landing page. Here we can click the New Dashboard button to create a new dashboard.

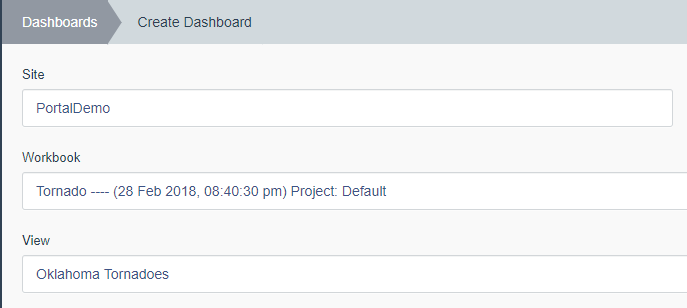
On the dashboard create/edit page you will see the Site, Workbook and eventually the View drop-down.

The Site drop-down will be automatically chosen based on the Tableau Server Site in the Tableau Server Settings. If you set up the backend Service Account with a Tableau Server Admin account, the Site drop-down will let you select from the different Tableau Server sites to pull workbooks from. This can also be done with a Tableau Site Admin account if the account is also a Tableau Site Admin for other sites.
Selecting Your Dashboard, Filling Out Fields
Once you select the site to work with the system will pull in all the workbooks from the site. Then you can select the desired workbook to populate the View drop-down. Select the view you want to add to the portal and the system will automatically fill out the required fields.

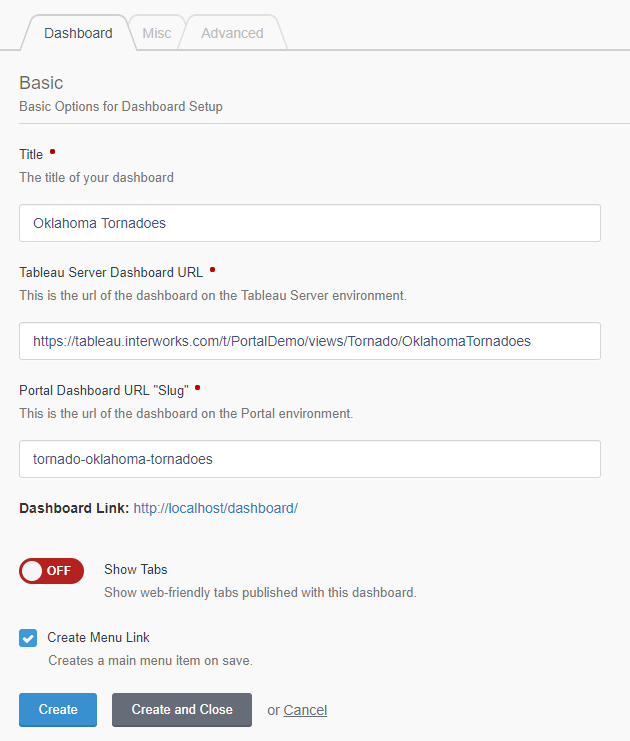
The Title field will be filled out using the View/Dashboards Title on the Tableau Server. You can change this field to be anything you want it to be if you’re not happy with the default title.
The Tableau Server Dashboard URL’s format will look like the URL from the Tableau Server. It will be changed to work with the APIs and you will not need to edit it.
The final field to be automatically completed will be the Portal Dashboard URL “Slug.” This will affect the way the URL looks on the Portal. The system creates this based on the Workbook and View name so many people like to change it to be more concise.
If you have published your workbook sheets as tabs, you can display these by flipping the Show Tabs switch. This will publish the tabs in a web-friendly format instead of the default Tableau Server version.
Create Menu Link will add a dashboard link to the main menu when checked. It will be automatically added to the bottom of the list of the main menu. You can rearrange this in the Navigation menu section.
More/Advanced Options
We have more options that greatly expand the functionality of our dashboard located in the Misc and Advanced tabs. For more on these features and others, please check out our documentation page.

