Portals for Tableau 101 shares the basics of interacting with InterWorks' embedded analytics solution, Portals for Tableau.
Please note that Portals for Tableau are now officially known as Curator by InterWorks. You can learn more at the official Curator website.
Several of our clients utilize their portal to show dashboards to numerous clients of theirs in a multi-tenant architecture. Unlike traditional apartment buildings, these tenants shouldn’t really know the others exist. They shouldn’t hear anyone stomping around like an elephant on their ceiling in the middle of the night, nor should they have to make awkward eye contact and small talk when they pass each other in the halls. They should feel like the portal was built specifically for them.
If this sounds like something you’d like to implement, there are a few different options for making this happen depending on what sort of dashboards you need to share with your tenants.
Option 1: Shared Dashboards
If all of your tenants consume the same dashboards and data, just publish them normally. If you have tiers of access, you can use Tableau Server’s permissions, roles and groups to control access to them. The portal will automatically inherit those restrictions to only show each client the dashboards to which they have access.
Option 2: Tenant-Specific Dashboards
If each of your tenants has their own unique set of workbooks or dashboards, you can just use Tableau Server’s permissions, roles and groups to control access to them. However, for ongoing maintenance purposes, you should use some sort of site, project and/or workbook organization to be able to easily drill down to see a given tenant’s dashboards within Tableau Server.
If it makes sense, you can sprinkle all of these dashboards into your navigation to make one big menu. When a tenant logs in, they’ll only see the dashboard menu items they can access. If you need to restrict other types of content, you can use Tableau Server groups to only show the content to the members of the selected groups.
Another route is to create completely separate menus that only contain the links that are specific to each tenant. To do this, create a new menu link. Next, on the Reorder Menus page, drag that menu item out from underneath any other menu. Using the portal’s group-override functionality (Backend > Settings > Frontend Group Overrides), you can then specify which group sees which menu. Going further, you can customize the theme, logo and other design elements and functionality within those same group overrides.
Option 3: Shared Dashboards, Tenant-Specific Data
If you have a common set of dashboards that you sell to your tenants, but each tenant should only see their own data, there are two alternatives for implementing that: row-level security and cloning.
Row-Level Security
This first alternative is the easiest to implement within the portal but requires Tableau workbooks and data sources to be configured in a specific way. If possible, utilize row-level security within your dashboards to restrict the data as needed. The portal will inherit the row-level security, so there isn’t any additional work needed beyond option 1 above.
Cloning
If row-level security is not possible or feasible, the solution gets a bit more complicated. The gist is that you’ll need to replace the data source in each Tableau workbook to point to the client-specific data, then publish the workbook as a new copy on Tableau Server. You’ll need to use some sort of site, project and/or workbook organization in Tableau Server to keep track of the various client-specific clones.
The next step is to publish these to the portal. While you can do this manually, you can also automate it if you set things up correctly.
The Initial Setup Process
- When you publish the workbook to Tableau Server, part of each dashboard’s URL needs to contain a client-specific part. This could be the site name, or it could be a prefix on the dashboard’s name. It’s important to keep this client-specific part consistent for all of the client’s dashboards.
- Create a tenant-specific group in Tableau Server. If you are using multiple sites, create this group in the site the portal uses to connect to the REST API.
- When you publish the dashboard in the portal (Backend > Content > Dashboards), part of its slug field needs to contain a client-specific part. This client-specific part also needs to be consistent.
- Build out a new menu for one of the tenants as needed (Backend > Content > Nav Menu).
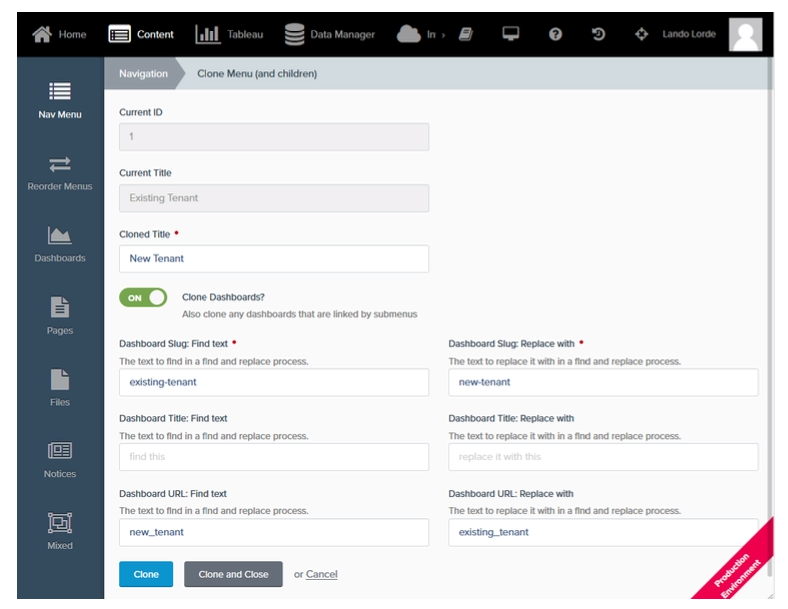
Cloning Everything for a New Tenant
- Publish the new tenant’s workbook(s) to Tableau Server, and create a tenant-specific group using the above process.
- In the portal, click on an existing tenant’s top menu item (Backend > Content > Nav Menu).
- Click on the Clone button at the bottom of the screen.
- Name the title of the menu something appropriate for the new tenant.
- Toggle on the Clone Dashboards? button, and you’ll see a set of three Find and Replace fields (Find on the left, Replace on the right).
- In the Dashboard Slug fields, enter the tenant-specific part of the slug for your existing tenant in the left field and the tenant-specific part of the slug for your new tenant in the right field.
- In the Dashboard URL fields, enter the tenant-specific part of the URL for your existing tenant in the left field and the tenant-specific part of the URL for your new tenant in the right field.
- If you have a tenant-specific part of the dashboard titles, fill in the Dashboard Title Find and Replace fields appropriately.
- Click on the Clone button at the bottom of the screen. Depending on how many menu items you have, this may take a while.
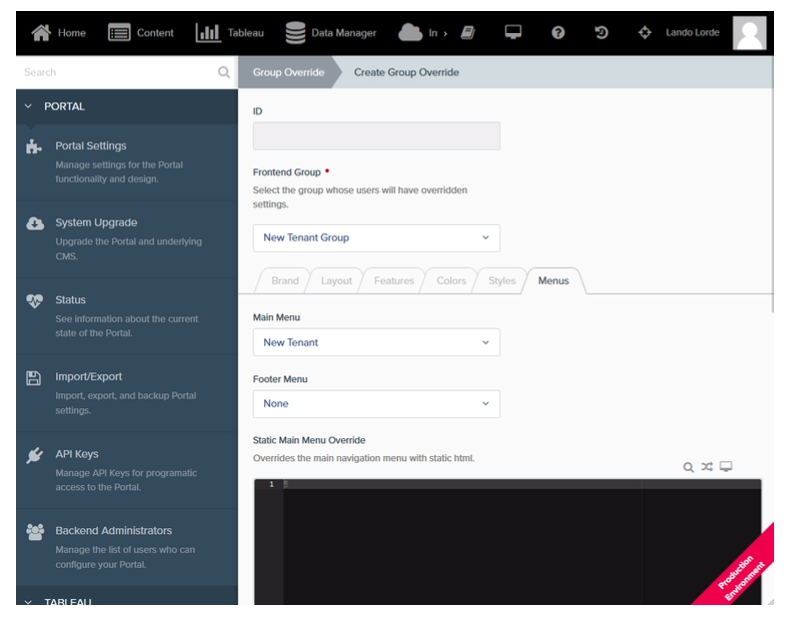
- Create a new group override (Backend > Settings > Frontend Group Overrides) for the tenant-specific group, and assign it the tenant-specific menu that was created in the cloning process: