Portals for Tableau 101 shares the basics of interacting with InterWorks' embedded analytics solution, Portals for Tableau.
Please note that Portals for Tableau are now officially known as Curator by InterWorks. You can learn more at the official Curator website.
For a more up-to-date walkthrough of this feature, visit the recently updated Curator blog post.
Disclaimer: This is a more advanced topic than our typical 101 blogs. You will need to feel somewhat comfortable with editing HTML code to complete the activity. You don’t necessarily need to know what that code means or how to program or anything like that, but try to avoid a panic attack when you get to the part about editing a few lines of code.
With that said, if you want to get fancy, having some JavaScript (JS) and Cascading Style Sheets (CSS) experience can really take your custom forms to the next level.
Configuring Email
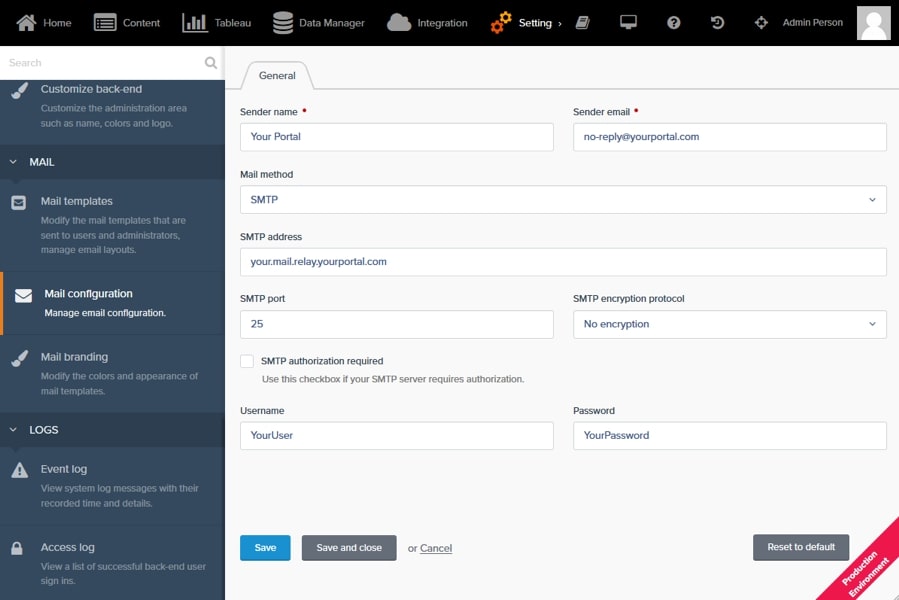
This step is optional but recommended. It is only needed if you want your form to send an email whenever someone submits the form. If your goal is a “Contact Us” form, I would hope you’d want an email notification when you get a submission, but you do you.
To enable the portal to send an email, you must have access to an SMTP server or mail relay. This is usually managed by whomever administers your corporate email. The SMTP configuration screen can be found at Backend > Settings > Mail Configuration:
Setting up the Data Manager
Activating the Data Manager
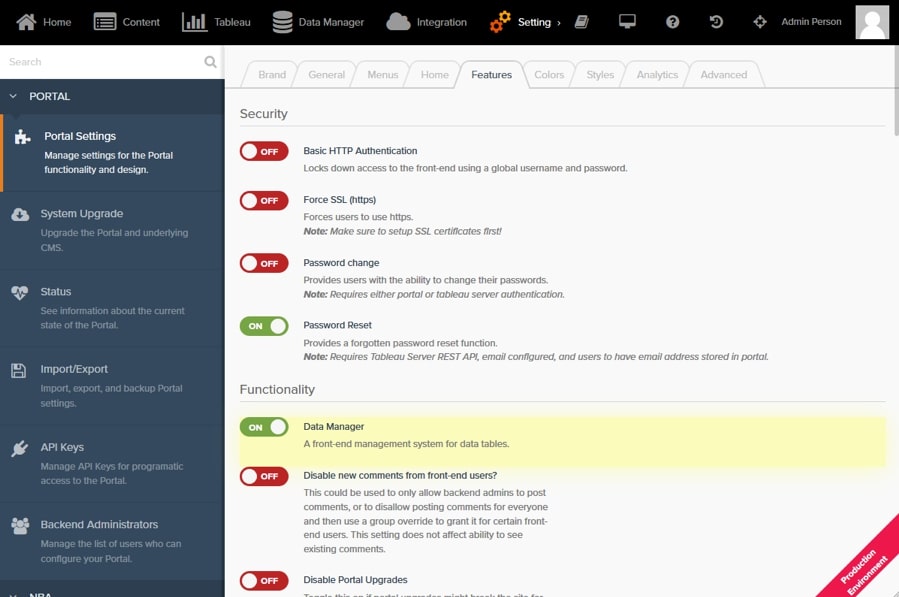
If you haven’t already done so, you will need to switch on the Data Manager feature. The setting can be found at Backend > Settings > Portal Settings > Features tab > Functionality section. Make sure it’s toggled to the ON position, and click the Save button at the bottom. Refresh the page to make the Data Manager area show up at the top of the screen:
Attributes/Fields Library
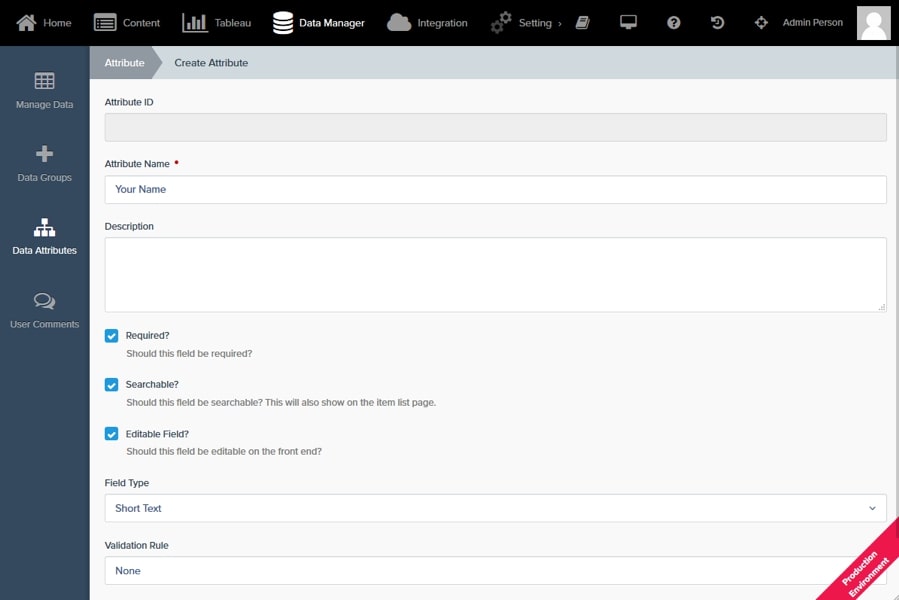
The next step is to populate the Data Manager attributes library with the fields you’ll want to use on your form. In this context, attribute is a synonym for form field. Navigate to Backend > Data Manager > Data Attributes and add attributes as needed. Each one can be a different type of field and have its own validation rule:
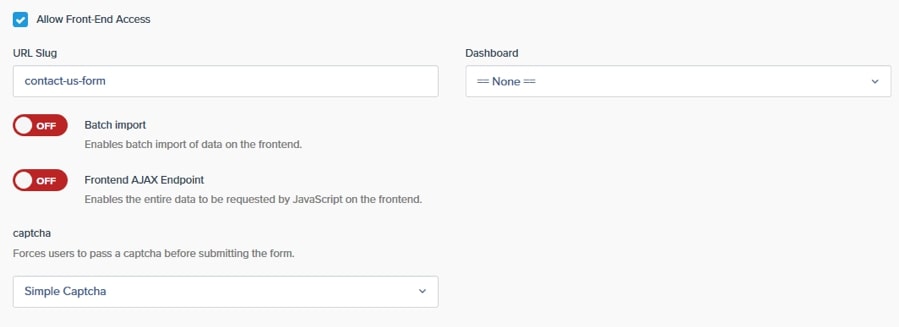
Group/Form Setup
After you have added to the library all the fields your form will use, the next step is to group them together into a form. Navigate to Backend > Data Manager > Data Groups and create a new group. In this context, Group is synonymous with form:
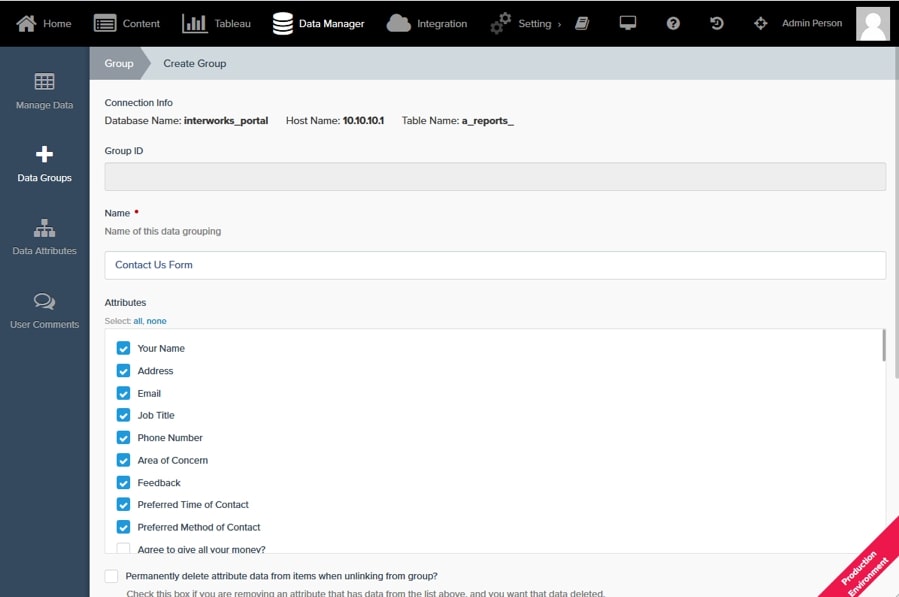
For a contact us/feedback form, be sure to check the box to allow front-end access and then select Simple Captcha to avoid bots from spamming you. Optional but recommended: turn on the Email Submissions setting and provide an email address to send all submissions to. Be sure to click the Create or Save button at the bottom:
Creating the Custom Form
Creating the Page
While you can use the default Data Manager front-end page and style it out using global settings, it’s often preferable to create a completely custom page to get full control. To see what that default page looks like and to use it for the next steps, click on the link in the Link section at the bottom of your Data Manager group.
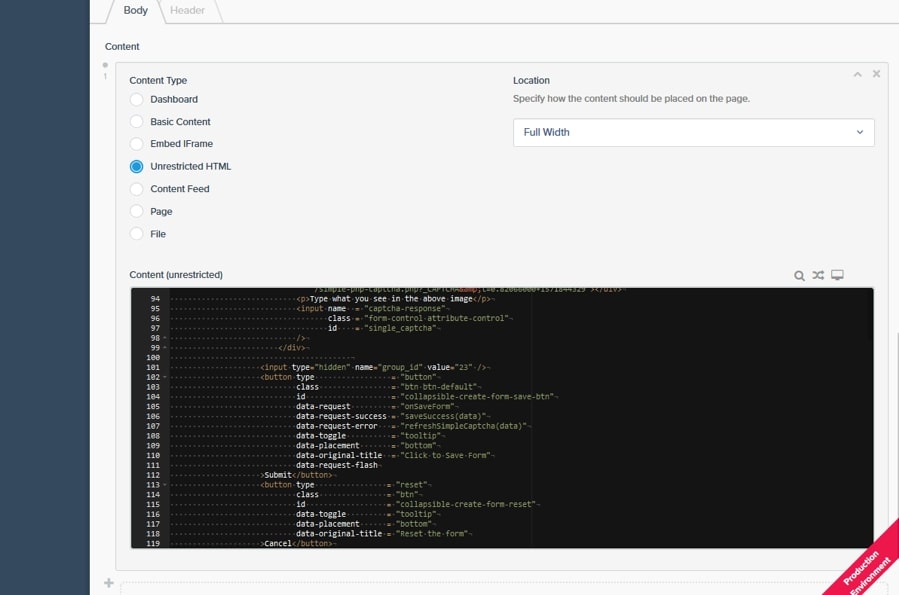
To create a page, open a new tab or browser, and navigate to Backend > Content > Pages then click the + New Page button. Give your page an appropriate title. At the bottom of the page in the Body tab, click the Add New Item button to add a page section. Select the Unrestricted HTML option.
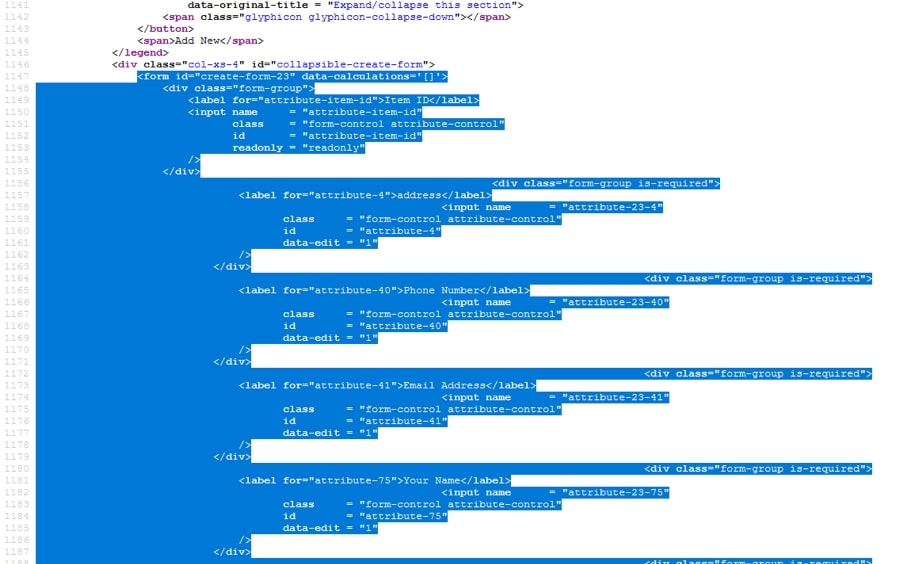
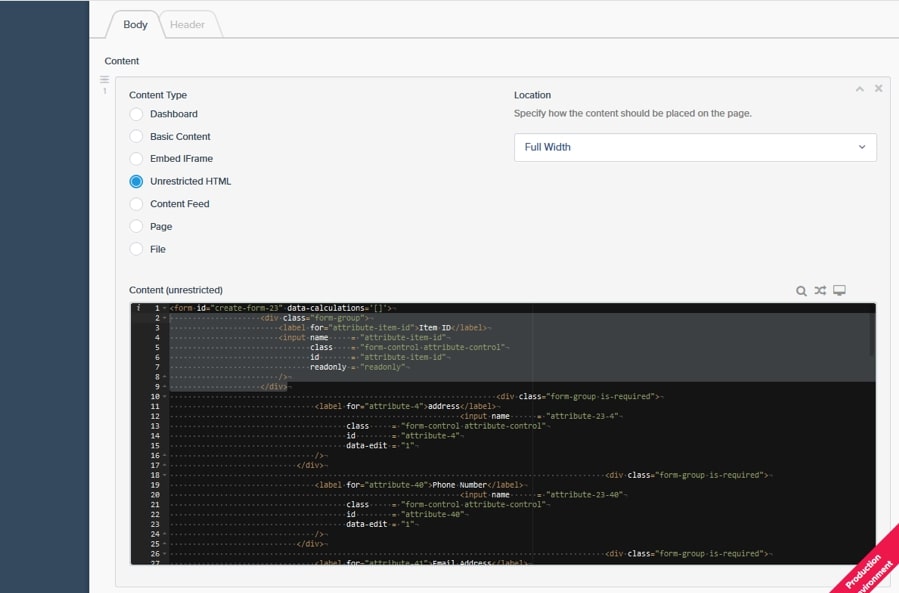
Back in your previous browser tab/window, right-click on the Data Manager page and view its page source. Search using Ctrl+F (or other appropriate means) to find the form HTML tags. The start tag can be found by searching for <form and the end tag can be found by searching for </form>. Select with your mouse and copy the entire source between and including these tags:
Go back to your other tab/window and paste the HTML code into the Content (unrestricted) field:
Once pasted, remove the Item ID field. It will be towards the very top of the code. You’ll need everything between and including the corresponding div tag:
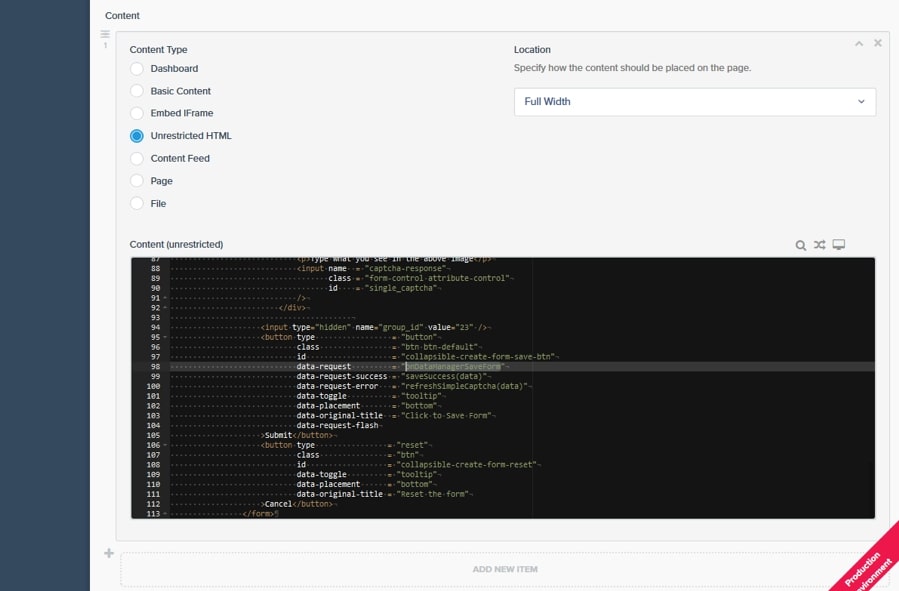
Lastly, at the bottom, find the line that specifies the submit button’s data-request attribute. You’ll need to change the attribute’s value from onSaveForm to onDataManagerSaveForm. Then, click on the Create or Save button at the bottom to save your changes:
Submission Handling
At this point, your form may look ready to use, but the mechanism to handle form submission response and errors still needs to be set up. Above the Content section, click on the Header tab. Next, copy the JavaScript code below and paste it into the Head Insert field. Click on the Save button to save these changes:
<script>
function saveSuccess(data) {
    //show status
    if (typeof data == "object" && data != null) {
        if ("X_WINTER_FLASH_MESSAGES" in data && "success" in data["X_WINTER_FLASH_MESSAGES"]) {
            $.wn.flashMsg({
                "text": "Thank you for your feedback.",
                "class": "success",
            });
        } else {
            $.wn.flashMsg({
                "text": "There was a problem with the submission: "+JSON.stringify(data),
                "class": "error",
            });
        }
    } else {
        $.wn.flashMsg({
            "text": "There was an unexpected problem with the submission: "+JSON.stringify(data),
            "class": "error",
        });
    }

    //reset form
    resetForm();
}

function refreshSimpleCaptcha(data) {
    if (data != null && "src" in data) {
        $("#single_captch_img").attr("src", data["src"]);
    } else {
        requestNewCaptcha(data);
    }
}

function requestNewCaptcha(data) {
    $.request('onDataManagerRefreshSimpleCaptcha', {
        "success": refreshSimpleCaptcha
    });
}

function resetForm() {
    requestNewCaptcha();
    var form = $("form");
    if (form.length) {
        form[0].reset();
    }
}

$(document).ready(function() {
    requestNewCaptcha();
});
</script>

To try out the page, click on the link in the Link section above the Body and Header tabs. If you need more customization, you can modify the HTML and JavaScript code as needed, and add custom CSS into the Custom Stylesheet field under the Header tab.
Add Link to Form
When you’re satisfied with the form and function of your page, be sure to add the page to your navigation somewhere. When adding a menu link under Backend > Content > Nav Menu, use the Page link type and select the page you’ve created here.
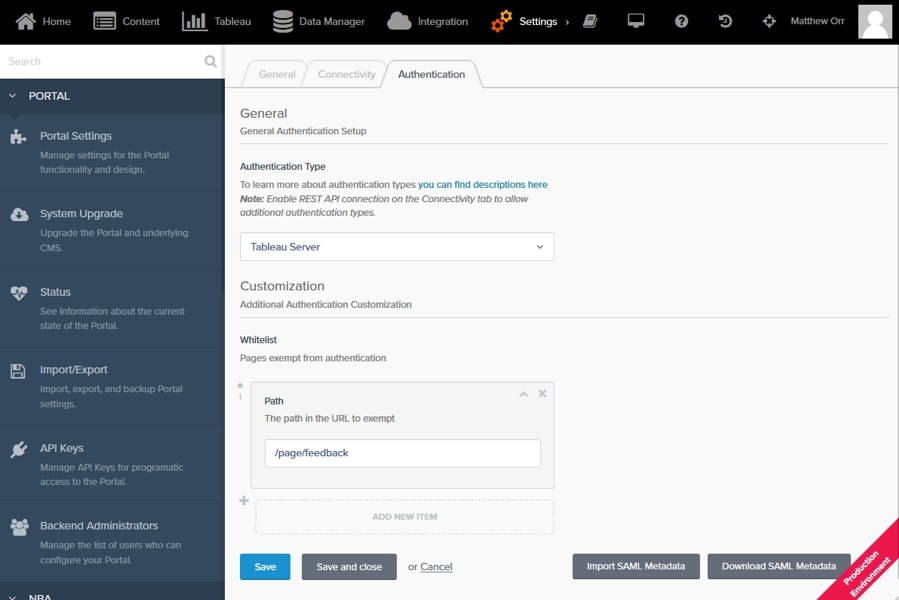
Whitelisting the Page
This step is also optional, but it’s most likely what you want. If you want your form to be accessible by someone who isn’t logged into your portal, you’ll need to whitelist it from authentication. To do this, copy the path to the page. If your page is at “https://yourportal.com/page/feedback” then you’ll copy the “/page/feedback” portion (without quotes).
Next, navigate to Backend > Settings > Tableau Server Settings > Authentication tab. Under the Customization section, click the Add New Item button under the Whitelist field. Note that you may need to scroll to find this section depending on which authentication type your portal uses. Paste the path into the Path field and click the Save button: