
This series takes you from zero to hero with the latest and greatest cloud data warehousing platform, Snowflake.
Various people come by our house, whether it be someone delivering mail, an Amazon Prime package or from the utilities. However, there are times when people try to come by who are not wanted. It is our responsibility to ensure that we do not give someone access to our house or let someone in who should not be let in our house. How does this relate to Snowflake? It is your responsibility to ensure that the right person has the right privileges and access in Snowflake.
Role-Based Access to Your Snowflake Environment
You may already know about Snowflake’s end-to-end encryption, the various compliance standards or how it is one of the most sophisticated cloud security technologies on the market. Today, I’m here to tell you about how you can control the access to your Snowflake environment and help your users optimize their Snowflake experience. Specifically, I’ll discuss how role-based access will ensure the right people have the right access and ability to operate in your Snowflake environment.
What is role-based access? Role-based access is an approach to restricting access to authorized users. Role-based access in Snowflake is the process of creating specific roles that are given the ability to access specific objects and granting privileges on how the objects can be accessed.
Upon initial setup, the following roles come preconfigured in Snowflake:
- ACCOUNTADMIN – The account admin is an extremely powerful role; it has all the privileges of SECURITYADMIN and SYSADMIN. The role should only be used for the initial setup of Snowflake. This role also can access billing information and visualize the resources used by each warehouse.
- SECURITYADMIN – The SECURITYADMIN (Security Administrator) is responsible for users, roles and privileges. All roles, users and privileges should be owned and created by the security administrator.
- SYSADMIN – The SYSADMIN (Systems Admin) oversees creating objects inside Snowflake. The SYSADMIN is responsible for all databases, schemas, tables and views.
- PUBLIC – This is automatically granted to every user and role and is publicly available.
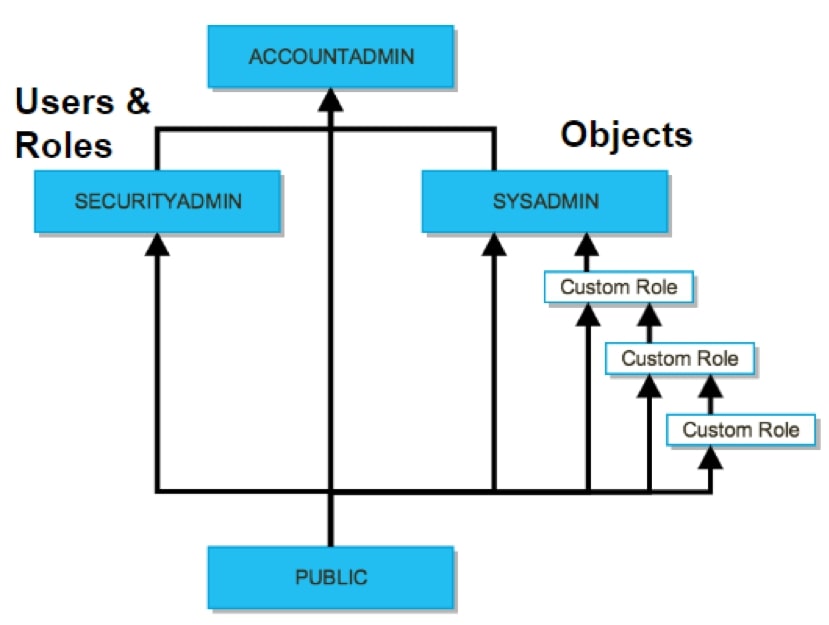
These four roles are the initial roles once a Snowflake environment is set up. Following best practices, it is advised to create more roles for various business processes. When it comes to security and access, it is up to the SECURITYADMIN to decide who has access to each object. Following best practices, one should implement the principles of least privilege to ensure each user only has access to objects and privileges essential to their daily roles. For instance, we would not want to give a business analyst the capability to drop a database or give one of the data engineers access to confidential employee information. To show this, I am going to create an analyst role that will only be allowed to select values from tables in the operations schema.
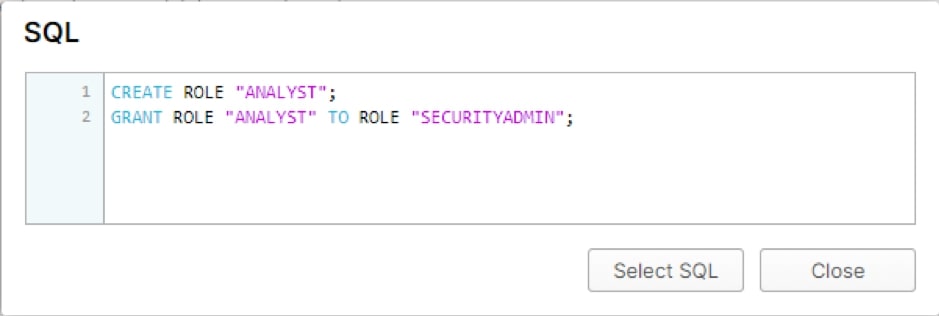
Analyst Role Example
We need to ensure that the analyst will only be allowed to query certain areas. The first step is to create an analyst role. Using the Show SQL button, we can see the statement that needs to be run:
After the role is created, the role will be granted to users. In this case, my user is INTERWORKS:
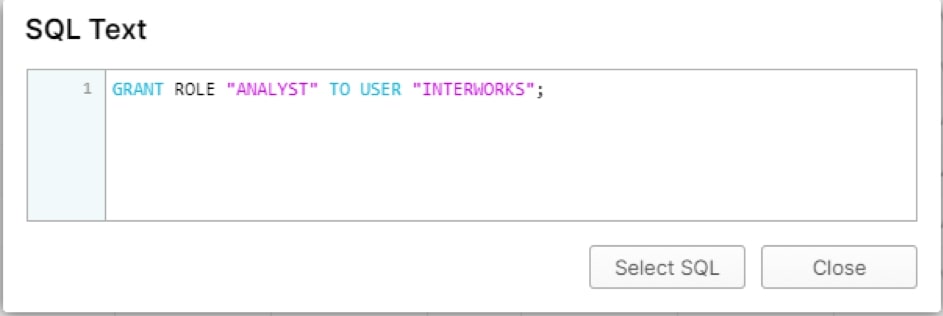
Now, the user INTERWORKS has the role of an analyst. Think of the roles as a hierarchy: each user can have one or more roles, and each role gives the user access to objects and privileges to execute statements against those objects. In this case, the role is a business analyst, and it will be given the minimum permissions that allow the users to operate:
- Operate on warehouse – Users need to have access to a warehouse, which will give them computing power to perform queries in Snowflake.
- Select – This will allow users to select values and give them the ability to create dashboards in Tableau. In this case, the analysts do not need the ability to change any of the data in the objects.
- Select on future – This command is similar to the one above but will allow the user to access future objects, so we do not have to return and grant future access in the schemas.
Setting up the Role in Snowflake
Now, we need to set up the role in Snowflake. First, the role needs to have the ability to use a warehouse. In this case, I am giving the user access to the Tableau warehouse. The command that I run is the following:
Grant operate on warehouse tableau to role analyst;
Secondly, the analyst role only can query values from tables in the operations schema inside the InterWorks database, and this is accomplished like this:
Grant select on all tables in schema iw.operations to role analyst;
A note here is that there is no connection between database and warehouse for security and role-based-access-controls. The ability to restrict the usage of a warehouse to a specific database, or vice versa, is not allowed. Restricting warehouses and databases is done at the role and user level. It is on the SECURITYADMIN to determine how much access should be granted to warehouses and databases.
Since the analyst can only select values from tables currently in the schema, they also need to be given the ability to select on future tables in the schema, like so:
Grant select on future tables in schema iw.operations to role analyst;
After gaining access to the schema in Snowflake, the user is now able to query any table in the schema and benefit from the power of Snowflake within tableau.
Security and Snowflake
What’s next? Be on the lookout for a future blog about the measures taken by Snowflake to ensure the security and protection of your data. In the meantime, let us know how we can help you create other roles needed within your organization. We’d love to support you!