This series takes you from zero to hero with the latest and greatest cloud data warehousing platform, Snowflake.
As many are already aware, recently there has been a lot of noise about security on the Snowflake platform. On June 2, 2024 Snowflake issued this statement regarding a targeted threat campaign against some Snowflake customer accounts. This appeared to be a targeted campaign directed at users with single-factor authentication, where threat actors leveraged credentials previously purchased or obtained through infostealing malware. It’s important to note that their investigation has not discovered any vulnerabilities, exposure or misconfiguration in Snowflake directly, but rather the attack seems to leverage passwords that were retrieved by threat actors outside of Snowflake and then used in attempts to log into various accounts and websites.
As a response to this incident, Snowflake is repeating their best practice suggestions that all customers review their own security configurations and ensure sufficient security hardening is in place. This includes:
- Reviewing your security and user lifecycle policies
- Password rotation
- Password policies
- Stale account review
- Etc
- Ensuring that MFA is enabled on all user accounts (not just the ones with admin-level access)
- Ensuring network policies are in place that limit the access to Snowflake down to specific IP addresses or subnets where possible, especially for service principals
- Leveraging SSO where possible
Snowflake’s security hardening documentation in response to this risk can be found here. They have included scripts that can be executed to detect if your account was compromised, as well as steps to review your security and harden it against these types of attacks.
The rest of this article is dedicated to providing a setup and review of new functionality in Snowflake that can help automate the continued assessment of your environment for security vulnerabilities. It is important to point out that whilst this is an excellent step in ongoing security automation, it lacks the same depth and breadth of experience as trusted Snowflake experts, such as InterWorks. If you require assistance in optimising your Snowflake environment, not only tightening the security but also optimising the architecture and improving cost efficiency, our Snowflake Health Check solution is ideally positioned to support you. If you have any requirements beyond this, we can support you find and implement the appropriate solution.
Introducing Snowflake Trust Center
Snowflake has been working on security and threat detection automation and has now released into public preview: Trust Center.
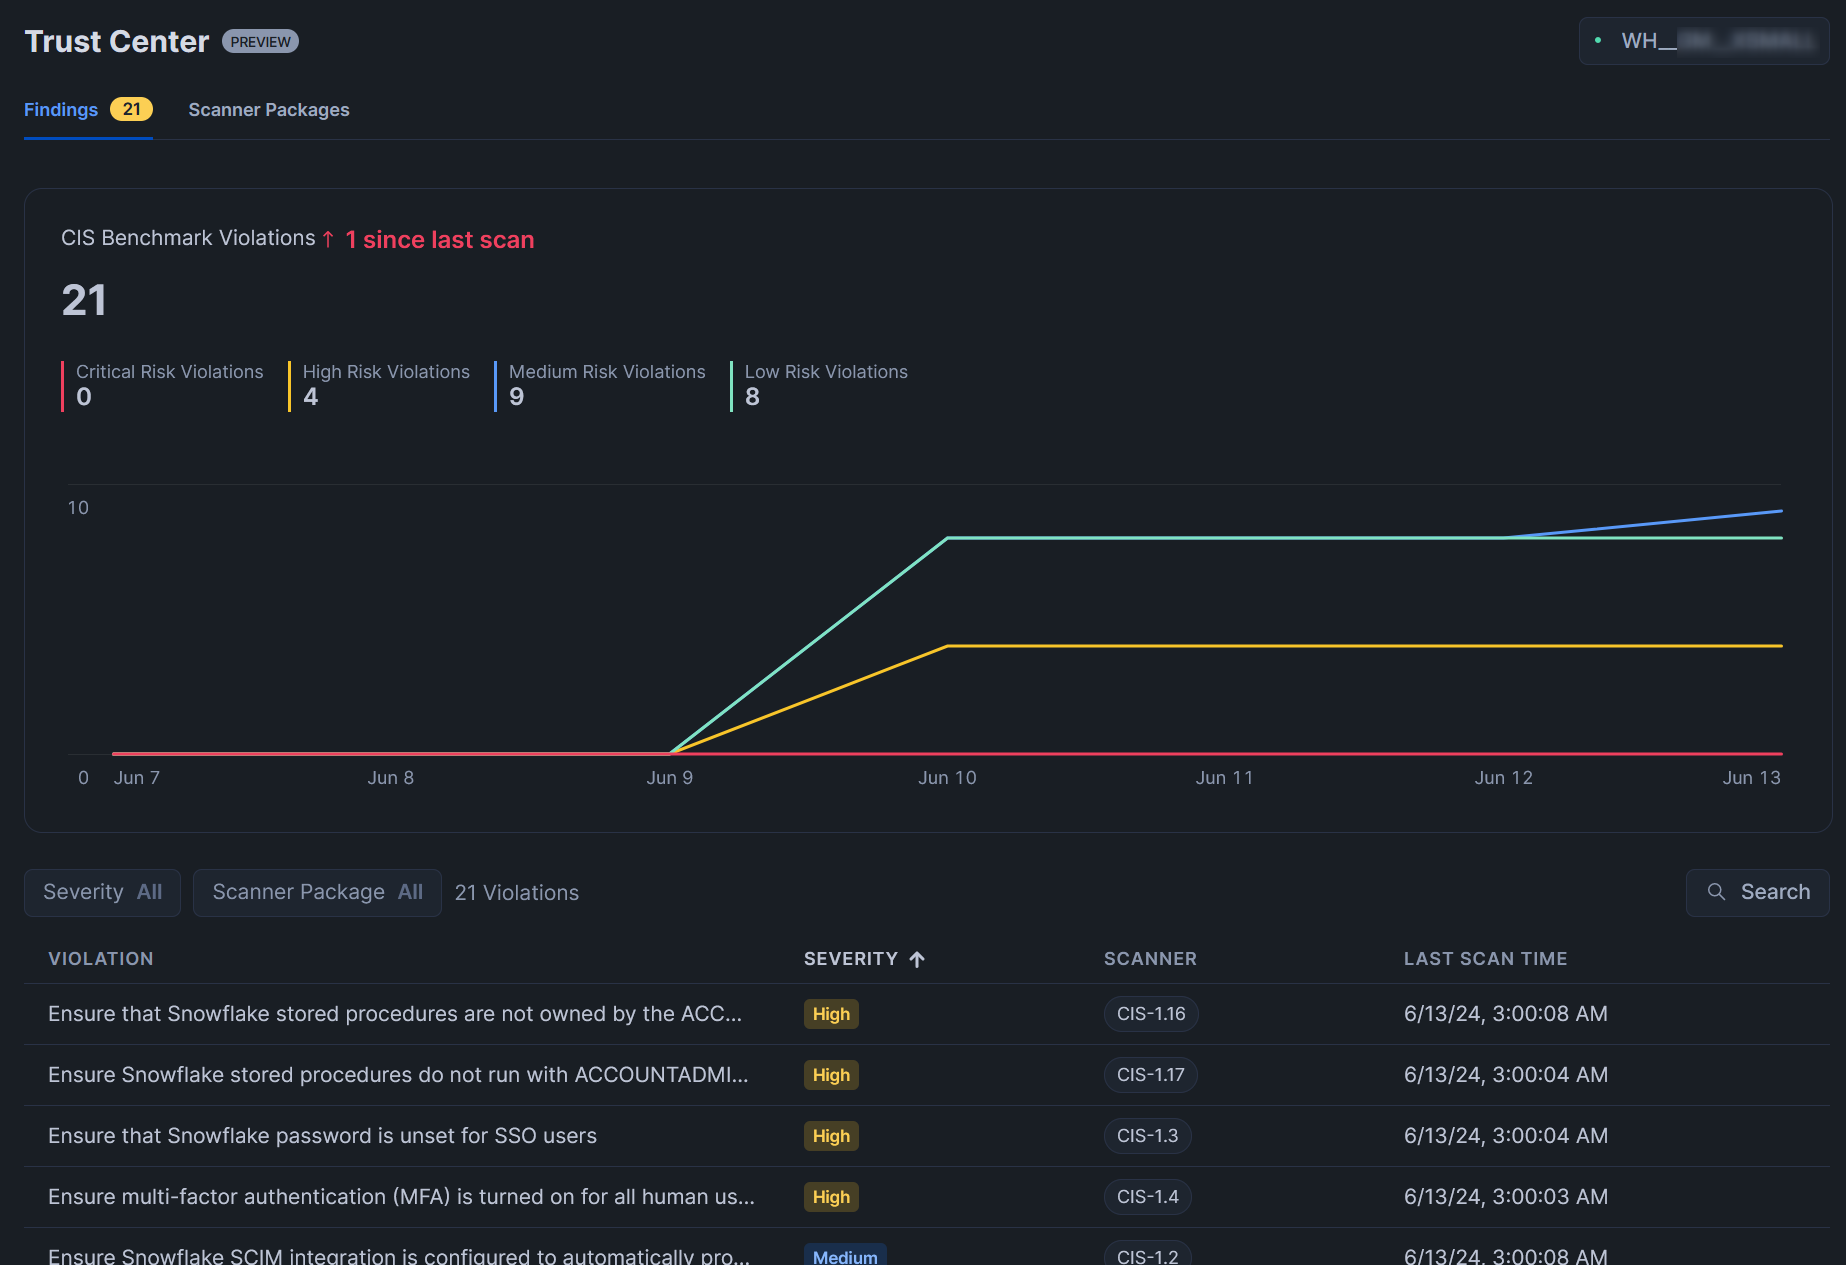
Trust Center is a new area in the Snowflake user interface where administrators can deploy and monitor scanner packages, which are collections of security hardening tests that can be scheduled to run at regular intervals and display the results in the same UI. This includes a chart that shows the volume of potential risks over time, along with a list of all potential risks and suggested remediation actions:
How to Access the Trust Center
By default, the only way to access the Trust Center is by using the ACCOUNTADMIN role. However, access can be granted to other roles if you desire by granting the following database roles, depending on your requirements:
SNOWFLAKE.TRUST_CENTER_ADMIN– Grants full access to the Trust Center.SNOWFLAKE.TRUST_CENTER_VIEW– Grants read-only access to the “findings,” which is the area in the above screenshot where potential risks and remediations are listed and visualised.
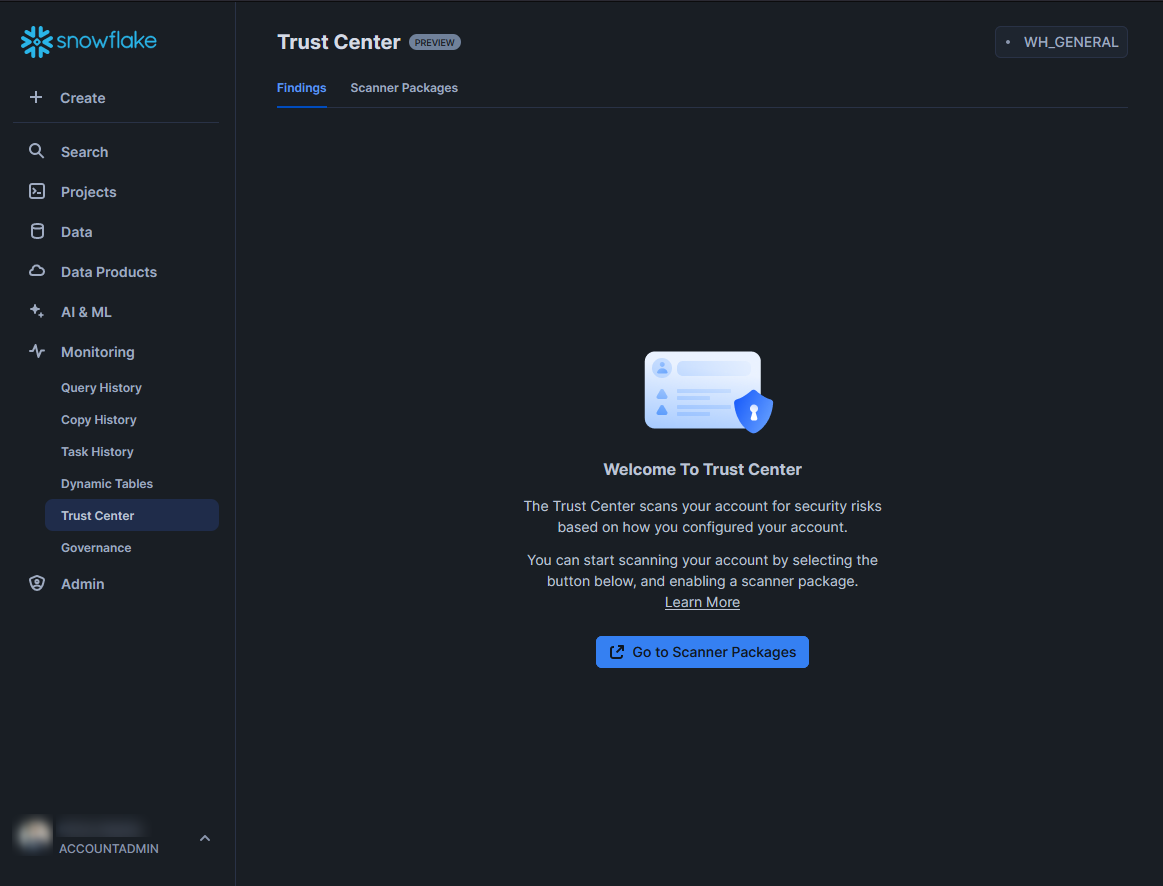
Once you have your role sorted (or just use the ACCOUNTADMIN role for simplicity), the Trust Center can be accessed under the “Monitoring” area in the navigation menu. When this area is first opened, you will see a welcome screen. As long as you can see both the “Findings” and “Scanner Packages” tabs at the top, you’ve got the right access to set things up:
Deploying a Scanner Package
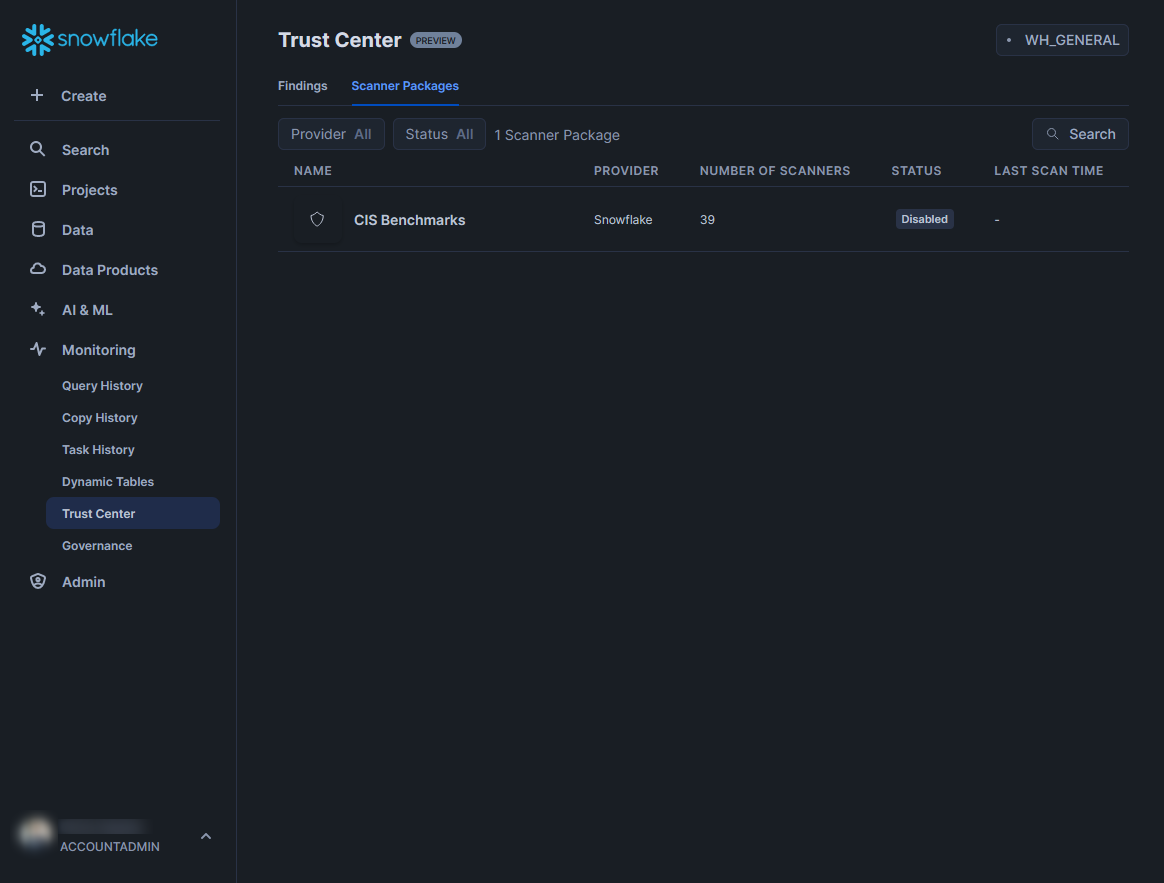
To configure the Trust Center to start monitoring the security of your Snowflake account, you must deploy a scanner package. Begin by switching to the “Scanner Packages” tab, which contains a list of all available packages. At this time, there is only a single package called “CIS Benchmarks” which has been provided by Snowflake themselves:
Select the scanner package that you wish to deploy, which is most likely “CIS Benchmarks,” unless you are reading this article a while after publishing. This will give you more details about the scanner package, including a full list of all the scanners included in the package:
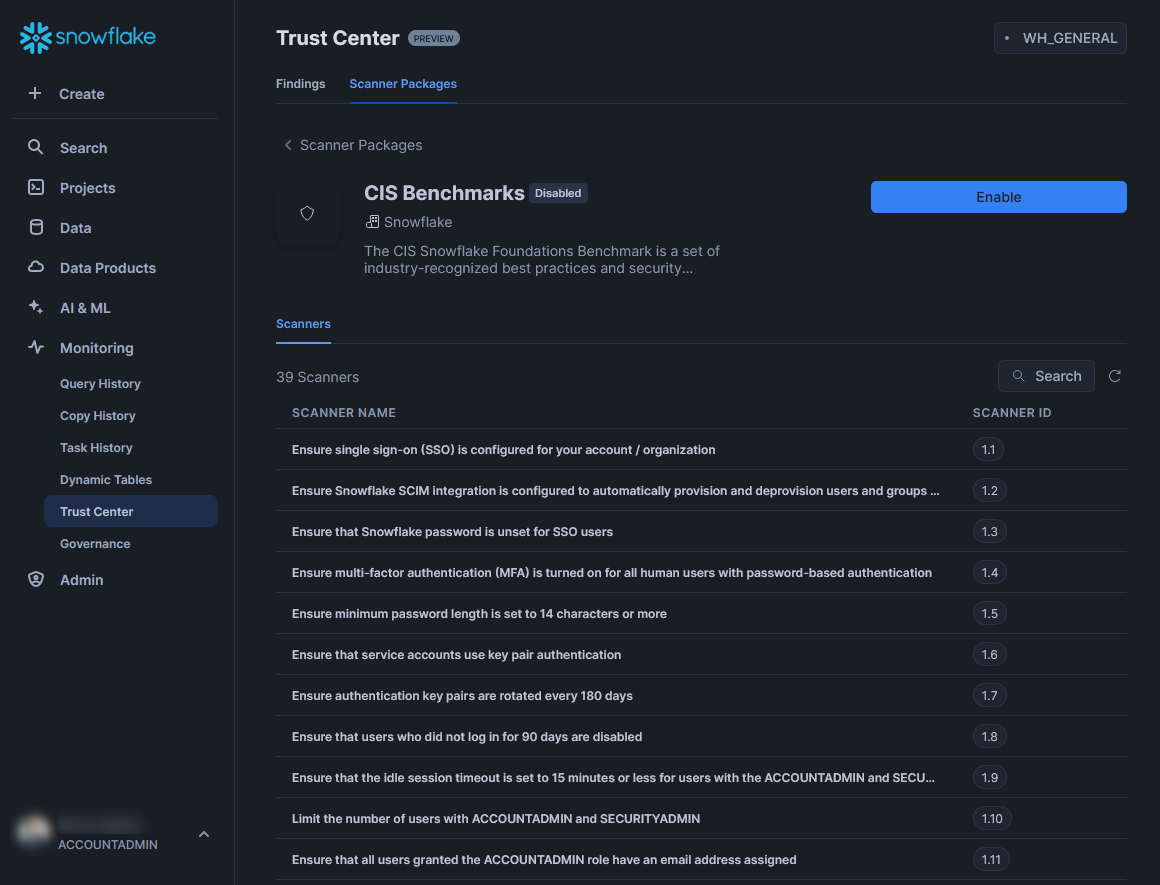
A scanner is an individual test that will be executed on your Snowflake environment to identify a specific risk. If you select any of the scanners on the list, a more detailed description will be provided:
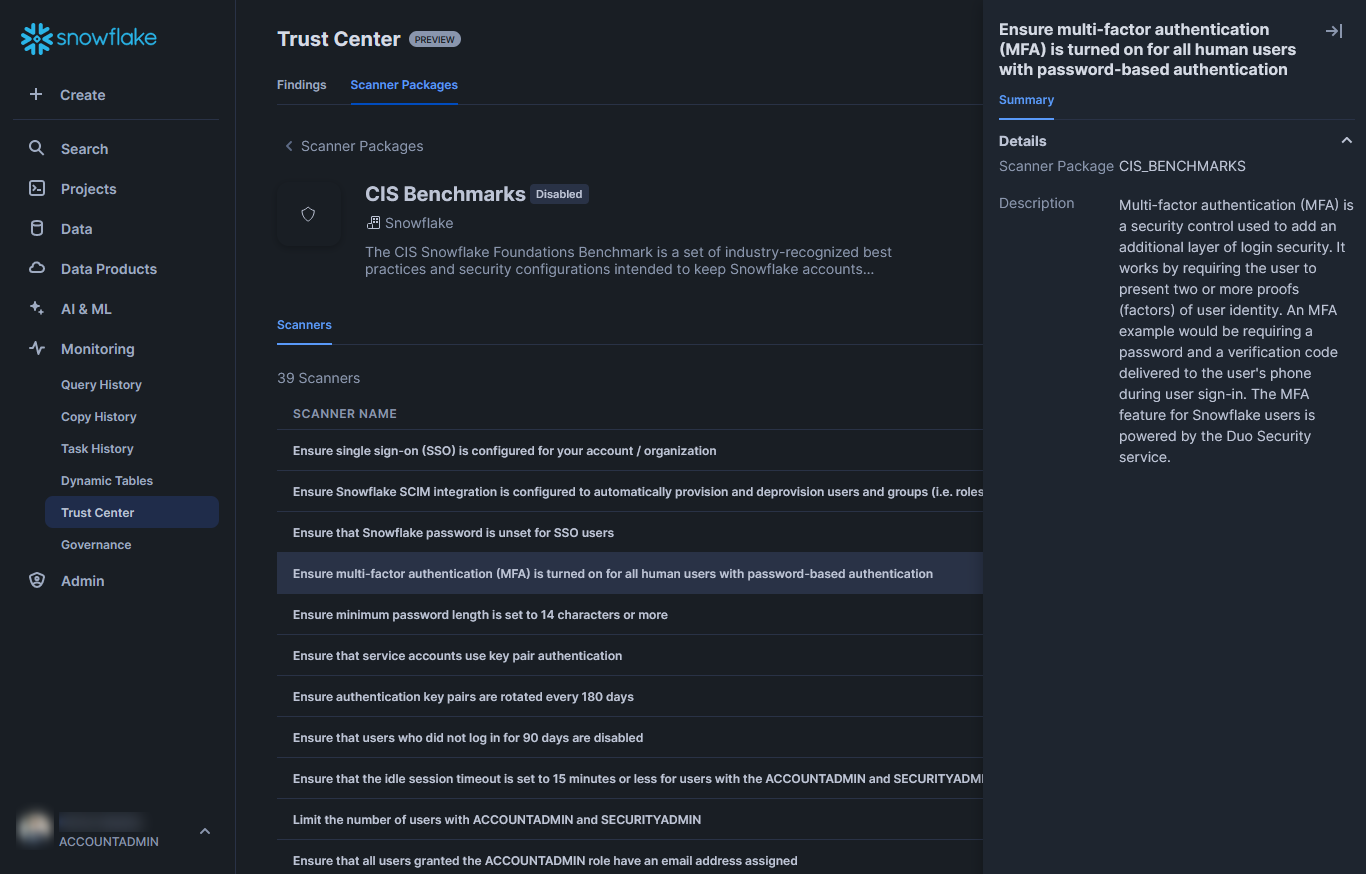
When you are happy that you wish to deploy the scanner package, select the large “Enable” button in the top right corner. You may need to minimise a selected scanner description by selecting the minimise arrow:
![]()
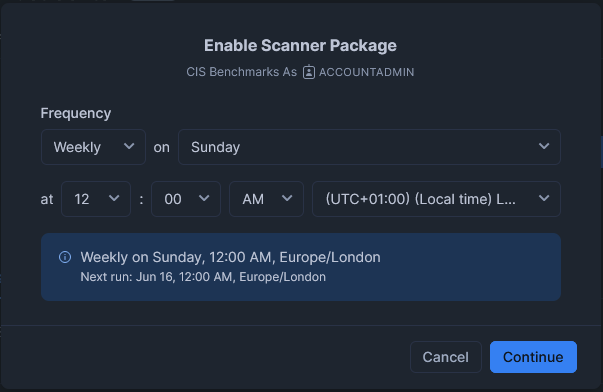
When the “Enable” button is selected, a scheduling window will open. You can set any frequency you wish here. The important things to note are:
- The Trust Center will only include results up to the most recent scan. Naturally if you wish for the area to be updated more frequently then you must increase the frequency of the schedule.
- Each time the scanner package runs, it will leverage serverless compute credits in your Snowflake account. More details on this below.
With these in mind, select a schedule that you feel is appropriate.
This schedule can be modified at any time so don’t overthink it at this time! You can manually trigger a scanner package manually after deployment. More details on this below.
Whilst you are familiarising yourself with the general environment, you may wish to set a weekly schedule:
Alternatively, if your Snowflake environment is a larger deployment and/or has needs of tighter security monitoring, you may wish to set a daily schedule, or maybe something even more frequent: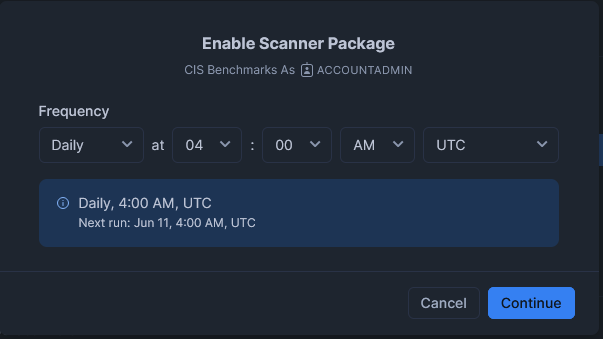
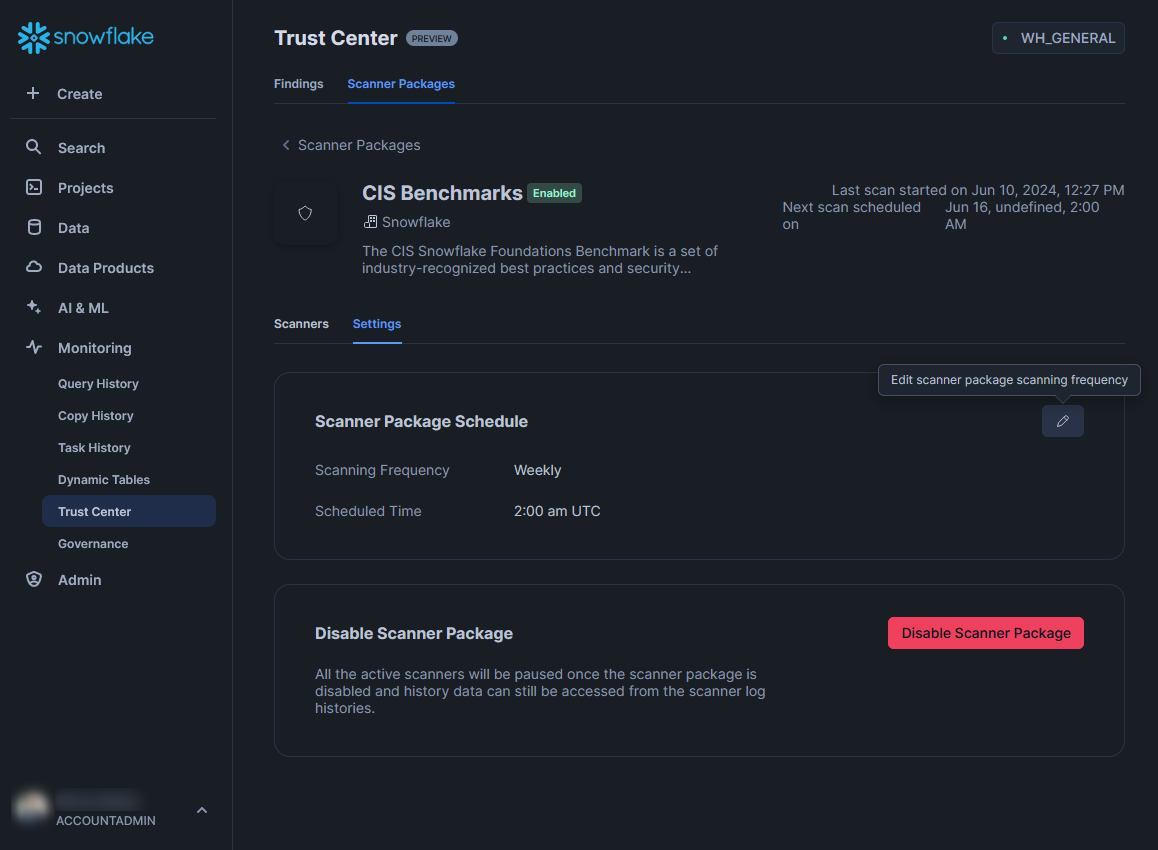
Once you select “Continue,” the scanner package will be deployed. This will include triggering a scan immediately, which should populate the “Findings” tab after a short time. Now that the scanner package is deployed, a new “Settings” subtab will be available. This area can be used to modify the schedule or to disable the scanner package completely:
Manually Triggering a Scan
At any time, you can manually trigger a scan by selecting the refresh icon in the upper right corner of the scanners list:
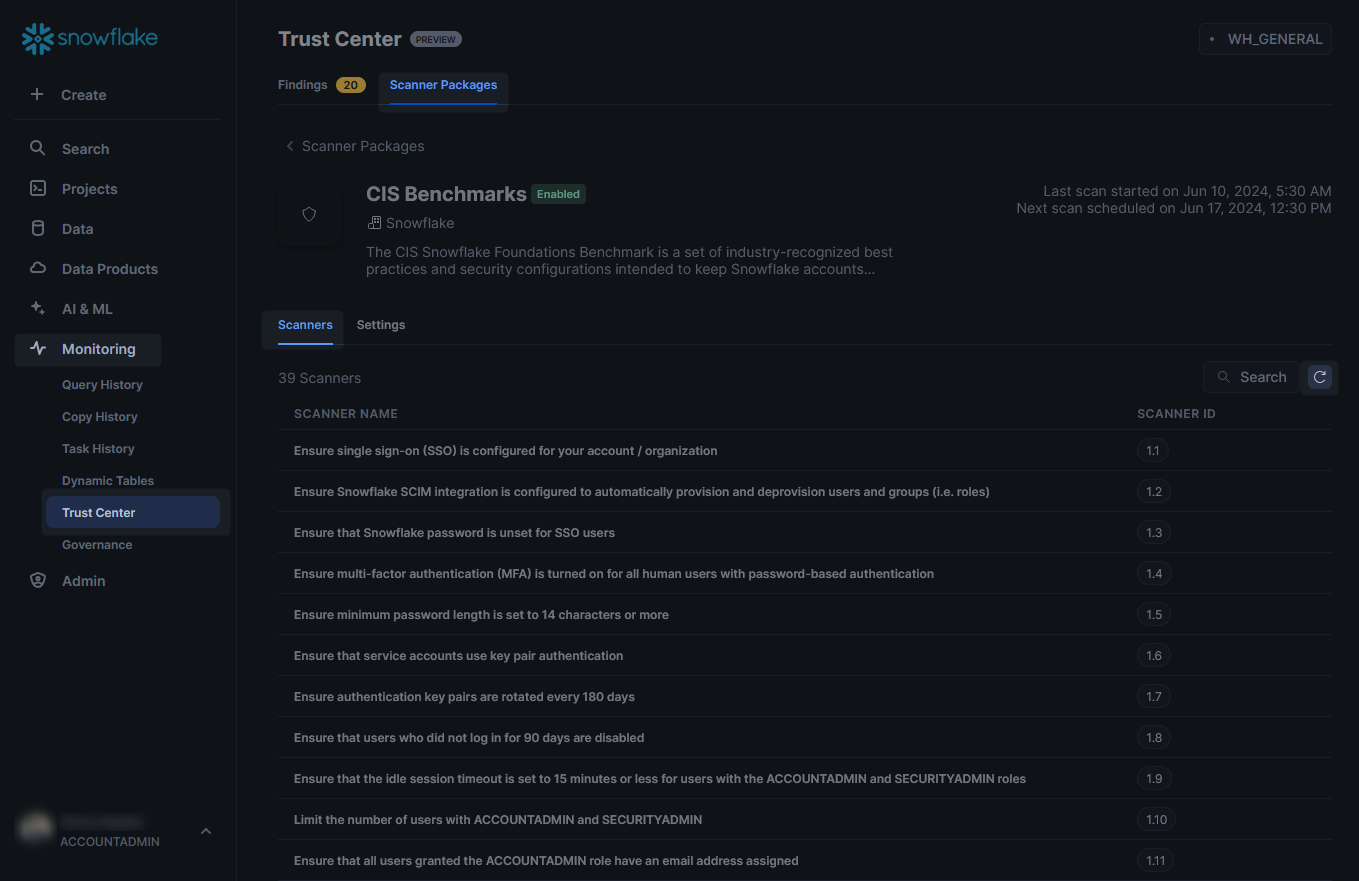
Reviewing Identified Potential Risks and Suggestion Remediation Steps
Once the scanner package has completed its scan, the “Findings” tab will be populated. You may need to wait a few minutes and/or refresh your page for this to populate. This view provides a strong overview of all current potential risks that have been identified for your account:
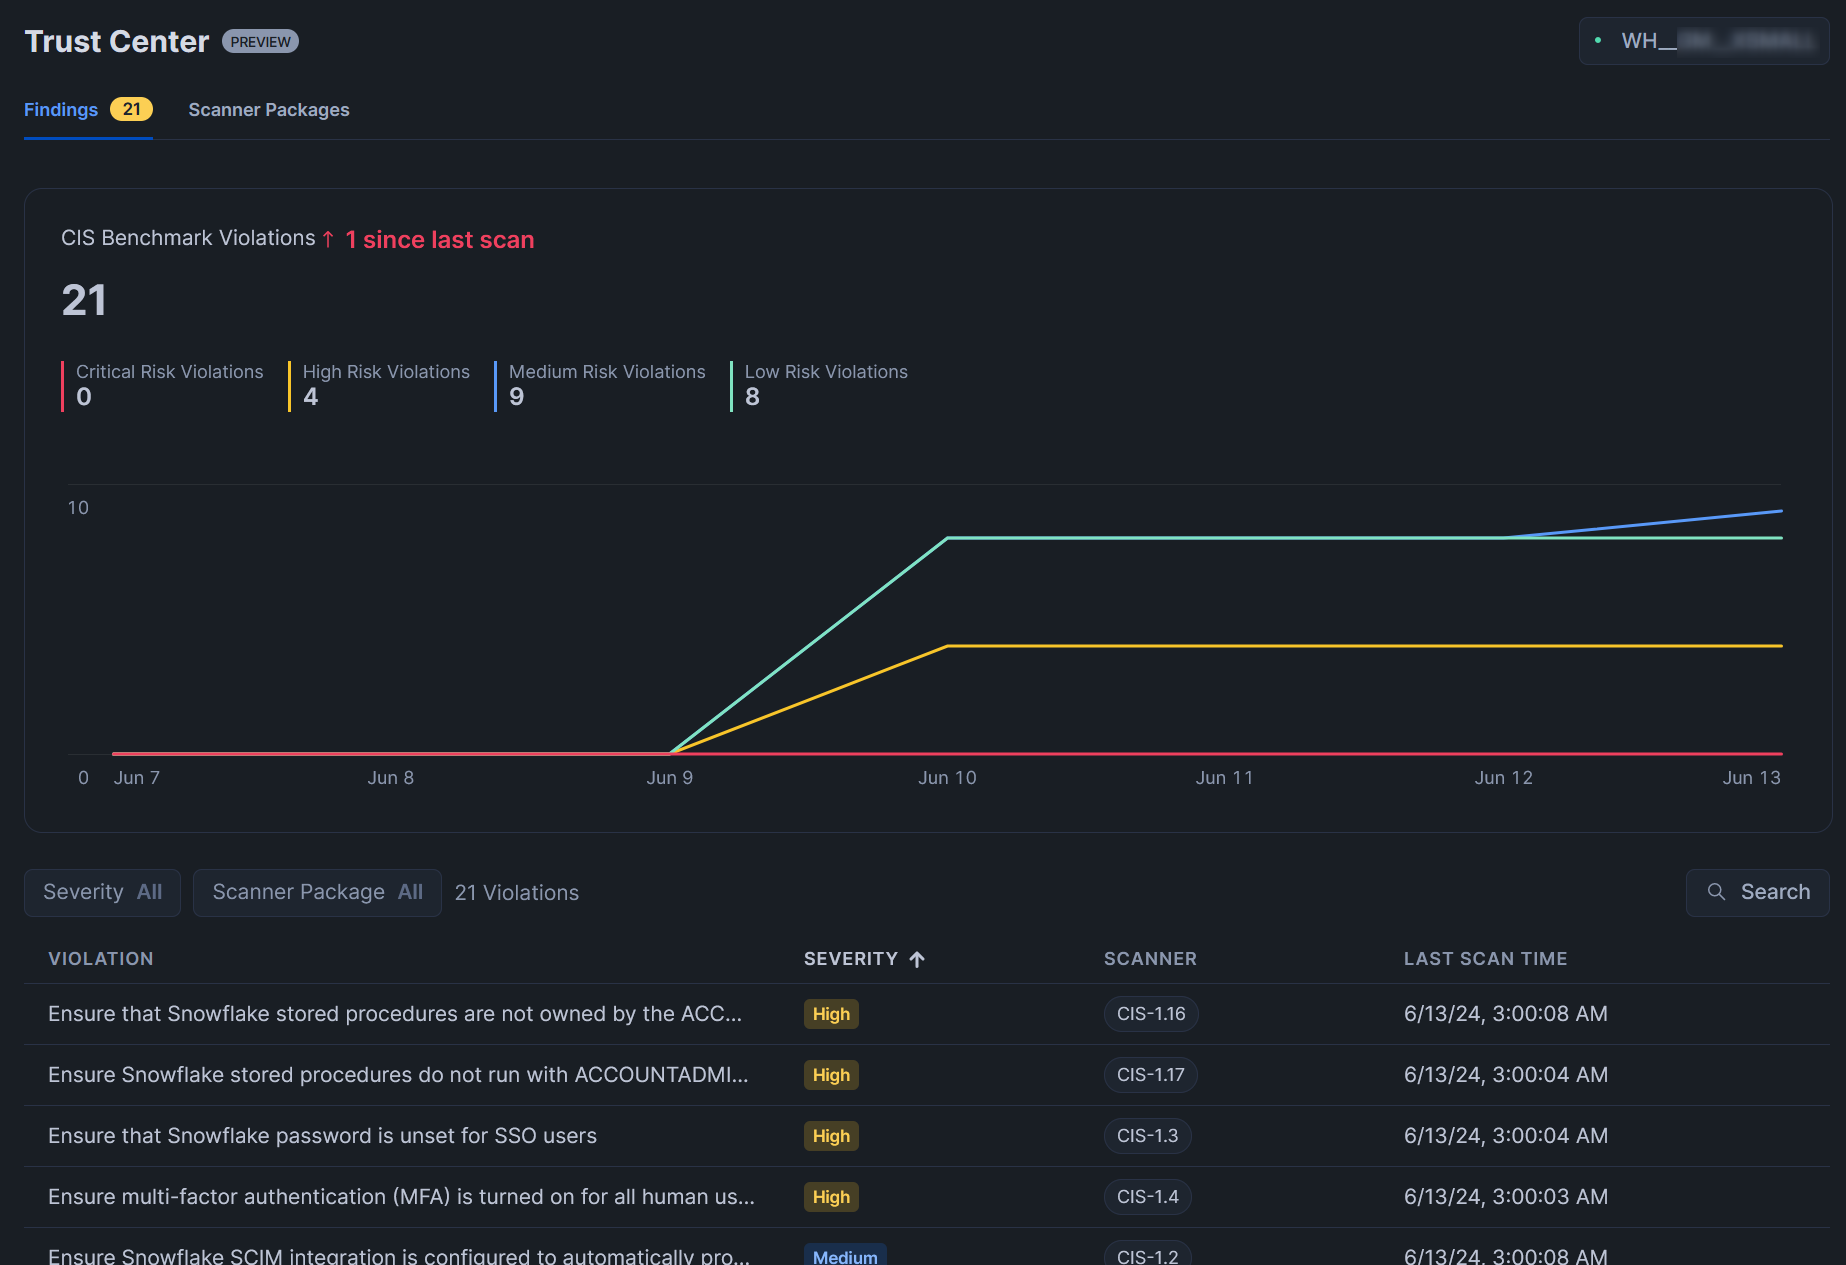
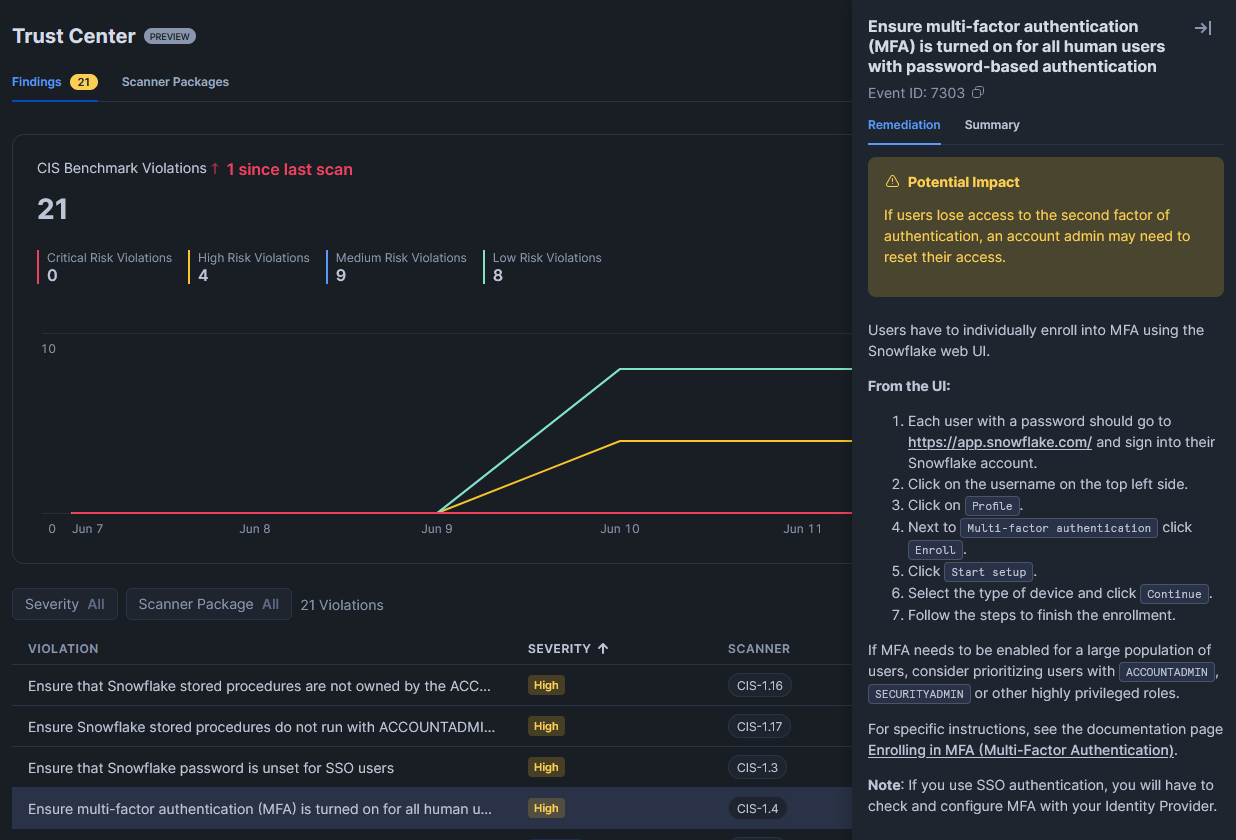
To investigate a potential risk in more detail, select it. This will open a new pane that provides suggested remediation steps to resolve the potential risk:
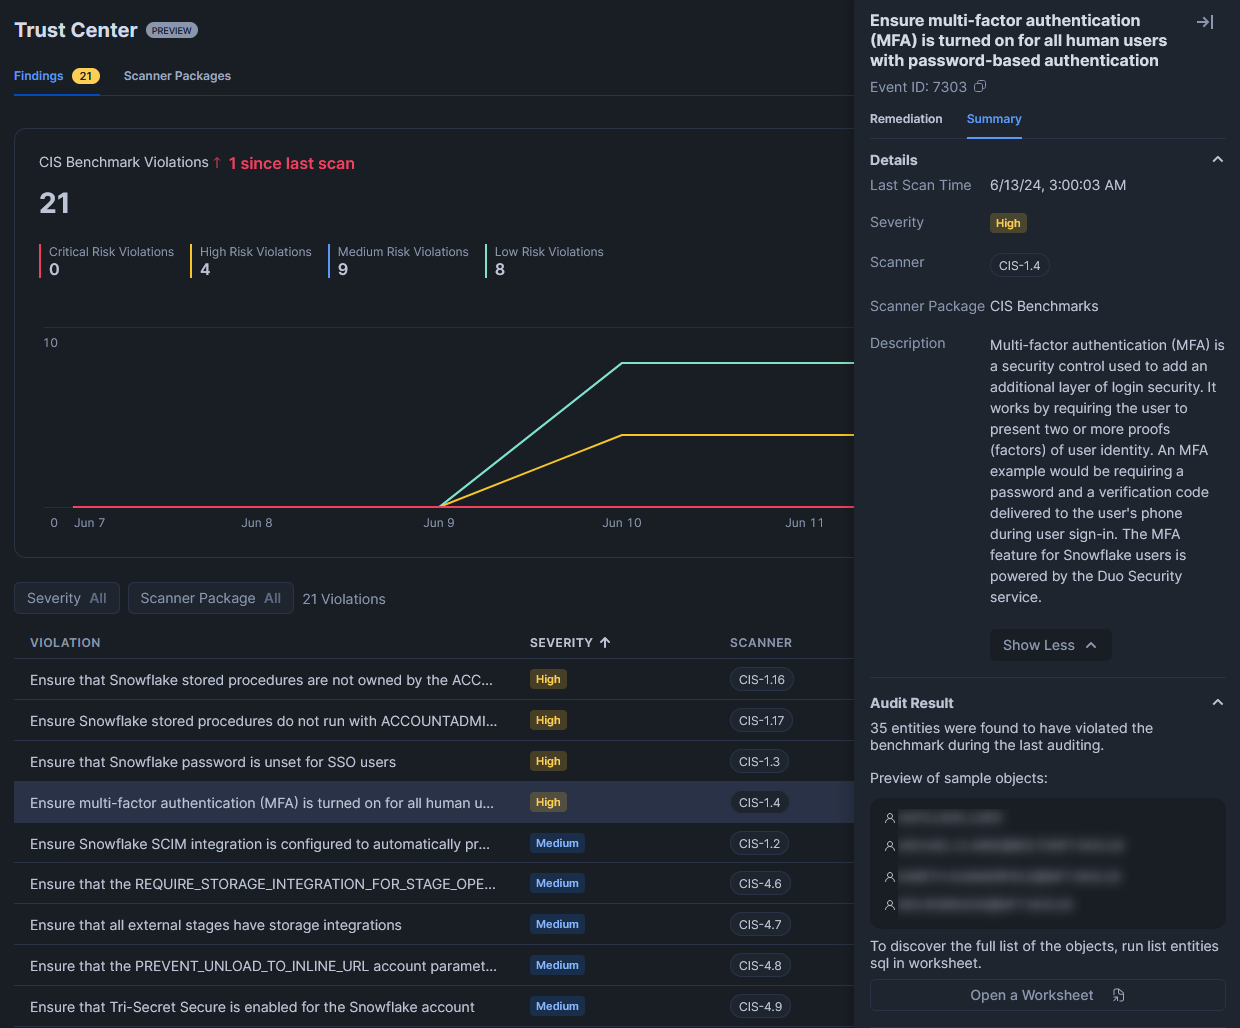
To view the object(s) that have triggered the potential risk to be flagged, navigate to the “Summary” pane. This will provide further details, including the number of objects that failed the test, along with a sample of the affected objects.
If desired, select “Open a Worksheet” at the bottom of the “Summary” pane to retrieve a query that can provide the full list of objects that failed the test.
Monitoring Costs
The final piece of the puzzle is how to monitor the costs of each scan. All of this information is stored in the shared SNOWFLAKE database, inside the SERVERLESS_TASK_HISTORY view within the ACCOUNT_USAGE schema. This table can be queried directly for granular information on all Trust Center executions with the following statement:
A few things to note about this view:
- This view is inside the shared SNOWFLAKE database and may not be available to depending on which role you are using. Full details on granting access to these views can be found here, however it should be sufficient to continue leveraging the ACCOUNTADMIN role if you are already using that when working with the Trust Center.
- This view has a latency of up to three hours, so recent executions may not be listed.
- Activity in this view is aggregated into one hour intervals and cannot show information more granular than this.
- When queried directly, this view will contain separate records for each scan instead of representing the cost of the entire package at once.
- This view contains more data that just the Trust Center scan history, so be sure to include appropriate filters.
- This view is fully documented here.
Here is an example showing some granular results:
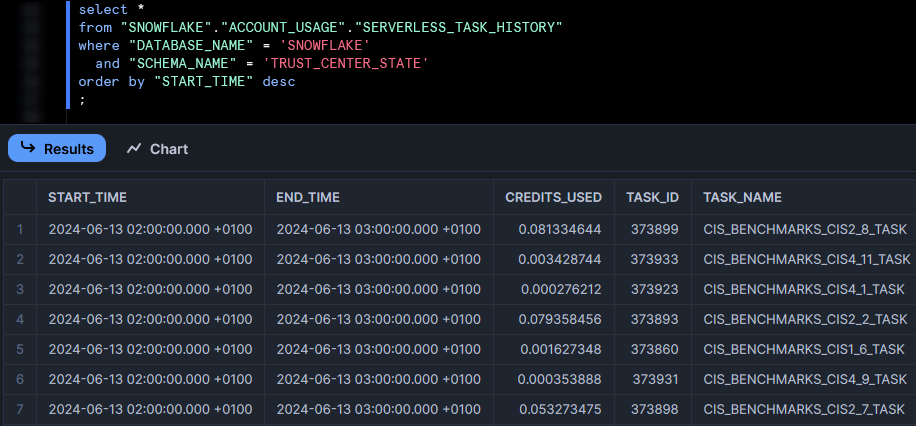
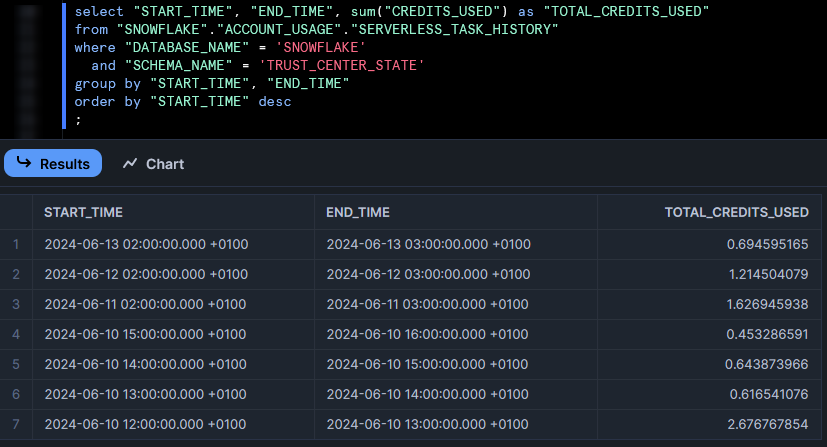
To see an aggregated view of total costs per hour across all scanners, leverage the following statement:
select "START_TIME", "END_TIME", sum("CREDITS_USED") as "TOTAL_CREDITS_USED"
from "SNOWFLAKE"."ACCOUNT_USAGE"."SERVERLESS_TASK_HISTORY"
where "DATABASE_NAME" = 'SNOWFLAKE'
  and "SCHEMA_NAME" = 'TRUST_CENTER_STATE'
group by "START_TIME", "END_TIME"
order by "START_TIME" desc
;
Here is an example showing aggregated results:
Final Comments
This new Trust Center is certainly a huge leap forward for enabling Snowflake customers to monitor their own Snowflake accounts and address security concerns. At minimum, the individual scans within a scanner package provide a great list of potential risks to keep in mind to protect your environment. Being able to see the volume of potential risks through the “Findings” tab and immediately access remediation steps is incredibly valuable. Overall, I applaud Snowflake for providing this functionality and advise all customers to leverage it.
That said, there are a few points I would advise keeping in mind:
- Whilst there is a strong list that should definitely be leveraged, it is not fully exhaustive strategy towards protecting your environment. Snowflake (and any other technologies) are only capable of protecting you if you regularly leverage these tools and stay vigilant of updates. It may be that a new potential risk is identified that is not available with the scanner package you have deployed, or is simply not covered by an existing scanner package yet. That said, the existing scanner package is already a strong place to start and will go a long way towards securing your environment.
- Extending the above point, one key point I have not seen mentioned by the Trust Center yet is that of private connectivity. Yes there are network policies here, but you can take things a step further by enabling private connectivity between your Snowflake account and your cloud service provider. More details can be found in the following articles:
- The very nature of security risks is that malicious entities are always trying to find new ways to breach an environment. It is strongly recommended to train your users in standard security best practice in addition to relying on this technology. For example, you could have the most secure technology available but it means nothing if one of your employees leaves their laptop and phone on a table in a cafe with a post-it note of their password manager credentials stuck to the laptop screen. An exaggerated example for sure, but still worth keeping in mind.
- The Trust Center, and by extension the scanner packages, are still in Public Preview. This means that the technology is still being developed in part. To protect themselves, Snowflake caveat these features in their documentation with the following statement:
Preview features are provided primarily for evaluation and testing purposes. They should not be used in production systems or with production data.
- In our internal testing we have found that these scans can be overprotective in their outputs. That is to say, some potential risks are raised that are not relevant or appropriate. These are minor flaws but worth keeping in mind. Among others, here are a couple of examples that demonstrate how each remediation step must be carefully considered before actioning:
- CIS-1.3 recommends ensuring that the password is not set for Snowflake users that leverage SSO. This is definitely a good recommendation and worth leveraging, however this risk will appear even if SSO is not enabled for your Snowflake account. If you proceed with the remediation step of removing passwords in this situation, your users will be unable to log into Snowflake at all as there is no SSO to fall back on.
- CIS-4.9 recommends ensuring that Tri-Secret Secure is enabled for the Snowflake account. This is another good recommendation where appropriate, however this risk will flag even if the Snowflake account is on a lower tier than “Business Critical,” when Tri-Secret Secure is only available for the “Business Critical” tier or higher.
We hope you find this article useful in identifying and correcting potential security risks in your Snowflake accounts. It is worth keeping in mind that the new Trust Center may be able to tell you all of the potential risks that it has identified, but it is still an automated querying process under the hood that does not have the same depth and breadth of experience as trusted Snowflake experts, such as InterWorks. If you wish for assistance in optimising your Snowflake accounts, not only tightening the security but also optimising the architecture and improving cost efficiency, our Snowflake Health Check solution is ideally positioned to support you. And if you have any requirements beyond this, I’m positive we can support you.
InterWorks is a full-service, BI and IT consulting firm specializing in data-driven business solutions. Our team’s world-class expertise will help you find the right answers. At InterWorks, our global bench brings familiarity and expertise across a wide range of technologies, analytics paradigms and industry verticals. InterWorks can help you throughout the full continuum of analytics development and data engineering needs. Whether it’s transforming datasets, applying thoughtful dashboard design and UX, going deeper with machine learning and data science, or simply deploying analytics environments, we have you covered. As a regular partner of the year among partners like Tableau, Snowflake, Matillion and more, InterWorks boasts one of the largest and most talented teams of data and analytics consultants in the world.

