
Snowflake, a leading cloud-based data warehousing platform, has become instrumental in modern data analytics and processing. However, when you connect to Snowflake, your data traverses the public internet before reaching its destination. This can raise significant security and performance concerns, particularly in sensitive industries like finance, government or healthcare. At InterWorks, we work with a wide range of clients, including companies operating in these sectors, who require extra levels of security to safeguard their sensitive data and maintain regulatory compliance. Whether facilitating large data transfers, supporting mission-critical applications, or ensuring seamless IoT communication, private connections, such as AWS PrivateLink, offer enhanced reliability and lower latency compared to the public internet.
How Can We Accomplish This?
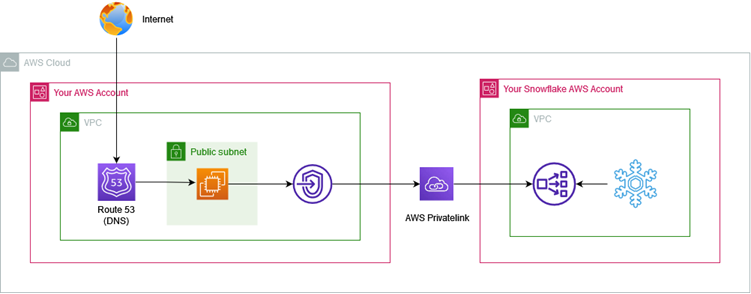
To achieve this, we’ll be using AWS Privatelink, an AWS service intended to allow direct and secure connectivity between AWS VPCs in the same AWS region without traversing the public internet. In this case, we’ll configure private connectivity between your Snowflake VPC and AWS VPCs.
Requirements:
- Snowflake Business Critical Edition (or higher) deployed in AWS
- AWS permissions for Route 53, EC2, STS, VPC Endpoints
- Both the AWS VPC and Snowflake must be deployed in the same region
What Will We Do Specifically?
In Snowflake:
- Enable AWS Privatelink
In AWS:
- Create a VPC endpoint
- Create Route 53 hosted zones and records
- Deploy an EC2 instance to test connectivity
Let’s get started!
Snowflake Configuration
The Snowflake team has done lots of the work under the hood for us. So, there are only a couple of tasks we need to do there. First, we need to enable AWS PrivateLink in Snowflake. To do so, we’ll first get a federation token from AWS. Using AWS CLI, and after having identified yourself with the right IAM credentials, run the following command:
aws sts get-federation-token --name snowflake-privatelink
This will return something like this:
{
   "Credentials": {
                …
   },
   "FederatedUser": {
       "FederatedUserId": "185...:sam",
       "Arn": "arn:aws:sts::185...:federated-user/sam"
   },
   "PackedPolicySize": 0
 }
Copy the entire token in your clipboard (including the outer {}) and make a note of the FederatedUserId as you will need them for the next step.
Next, log in to your Snowflake Business Critical instance. In a worksheet, run the following command using the information you retrieved earlier:
select SYSTEM$AUTHORIZE_PRIVATELINK ( '<aws_id>' , '<federated_token>' );
The first input is the FederatedUserId and the second is the entire token (including the {}). Snowflake should return the following response:

Lastly, run the following command. This will return the Snowflake account information necessary to configure private connectivity in AWS.
select key, value from table(flatten(input=>parse_json(system$get_privatelink_config())));
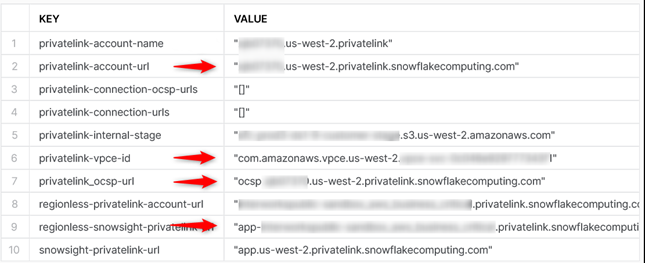
For the purposes of this article we’ll focus on the values in the items in red above. Copy them into your clipboard. They should look something like:
privatelink-vpce-id com.amazonaws.vpce.region.vpce-svc-xxxxxxxxxxxx
privatelink-account-url: accountlocator.region.privatelink.snowflakecomputing.com
privatelink_ocsp-url ocsp.xxxxxxxx.region.privatelink.snowflakecomputing.com
regionless-snowsight-privatelink-url: app-organization-account.privatelink.snowflakecomputing.com
Great. We have now: a) enabled AWS Privatelink in Snowflake, b) retrieved the relevant details to setup configure private connectivity. We are now ready to move to AWS.
AWS VPC Endpoints Configuration
In AWS, first make sure you are in the same region where Snowflake is deployed. They must be the same or else it won’t work.
Go to VPC -> Endpoints -> Create Endpoint. Give this endpoint a name and select “Other endpoint services”. Under Service name paste the value privatelink-vpce-id we obtained earlier and click Verify Service.

Scroll down and select a VPC, AZ and Subnet. Then select or create a security group that has ports 80 and 443 open.
Once created, copy the first DNS name (in red below) of the endpoint. It should be something like: vpce-xxxx.vpce-svc-xxxx.us-west-2.vpce.amazonaws.com.

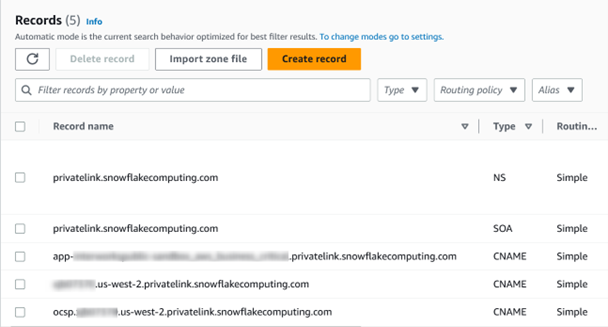
Route 53 Configuration
Next, we’ll work with AWS Route 53, an AWS DNS service that we’ll use to route traffic to our resources. In Route 53, create a new Hosted Zone with the following details:
- Domain name: privatelink.snowflakecomputing.com
- Type: Private hosted zone
- VPC ID: Choose the same ID and Region as per the VPC endpoint in the previous step
In this new hosted zone, we’ll create three records:
Record 1
- Record name: Use the first two parts of the regionless-snowsight-privatelink-url
Example highlighted: app-organization-account.privatelink.snowflakecomputing.com - Record type: CNAME
- Value: The DNS name value we copied from the VPC endpoint earlier
- TTL: 60 seconds
- Rest of the settings can be left as default
Record 2
- Record name: Use the first two parts of the privatelink-account-url value we obtained earlier. Example highlighted: region.privatelink.snowflakecomputing.com
- Record type: CNAME
- Value: Again, the DNS name value we copied from the VPC endpoint earlier
- TTL: 60 seconds
- Rest of the settings can be left as default
Record 3
- Record name: Use the first two parts of the privatelink_ocsp-url value we obtained earlier. Example highlighted: xxxxxxxx.region.privatelink.snowflakecomputing.com
- Record type: CNAME
- Value: And again, the DNS name value we copied from the VPC endpoint earlier
- TTL: 60 seconds
- Rest of the settings can be left as default
Your setup should look something like this:
Great! We now have ready all the infrastructure we need. This should allow for private connectivity between our VPC and the Snowflake VPC.
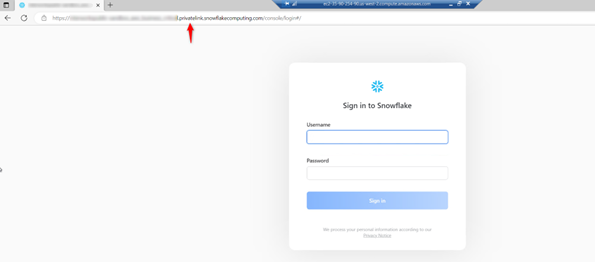
Testing the Connectivity
The proof is in the pudding. Let’s try it out using a t2.micro EC2 instance. I will use a Windows OS, so I need a security group with ports 80, 443 and 3389 open as well as key pair to establish a Remote Desktop Connection (RDC). Make sure you deploy it in the same region and AZ as per the VPC endpoint created earlier.
Once you have connected to this instance via RDC, open any browser installed and simply navigate to the regionless-snowsight-privatelink-url we obtained earlier. It should be something like: app-organization-account.privatelink.snowflakecomputing.com.
And sure enough, we can see Snowflake up and running. You can log in with your regular credentials, using it normally and knowing that you are doing so with private connectivity.
With this setup, you can perform standard operations in Snowflake knowing that the traffic between your VPC and Snowflake runs in AWS’ backbone network and therefore does not go over the public internet. Note, however, that certain Snowflake clients (e.g., SnowSQL, JDBC driver) require access to Amazon S3 to perform various runtime operations. If that traffic was to stay also on the AWS backbone, you can set up an Amazon S3 gateway endpoint in the same AWS region as the Amazon S3 bucket in question. More on this here.
If you wanted the option to have your traffic run in AWS’ backbone to be available outside of the VPC (e.g., for your employees to access Snowflake securely from their laptops), you could extend this functionality to your corporate network by performing additional configuration. That way, for example, your employees could simply connect to VPN and securely navigate to your Snowflake instance.
In conclusion, establishing a secure and private connection between Snowflake and AWS through AWS Privatelink is a critical step for organizations handling sensitive data. This robust setup not only enhances data security but also optimizes performance by bypassing the public internet. By following the steps outlined in this guide, you can confidently ensure that your data transfers, applications, and IoT communications remain reliable and compliant. As you explore the endless possibilities of Snowflake and AWS, remember that this article merely scratches the surface. Feel free to reach out to us for further assistance in maximizing the security and efficiency of your data operations with Snowflake and AWS.