
To stream/ingest data automatically from an AWS S3 bucket into Snowflake using native functionality, Snowpipe is likely the solution you’re seeking. We do have two related posts you can explore for related content:
- Configuring Storage Integrations Between Snowflake and AWS S3
- Automated Ingestion from Azure Storage into Snowflake via Snowpipe
This post, however, covers an example of a scenario where machinery/sensor or weather data is constantly generated and for example preventive maintenance can be implemented on top.
Flow Diagram
This diagram gives an illustration of the flow involved in a Snowpipe connection between Snowflake and AWS, utilizing both storage (C) and notification (H) integrations.
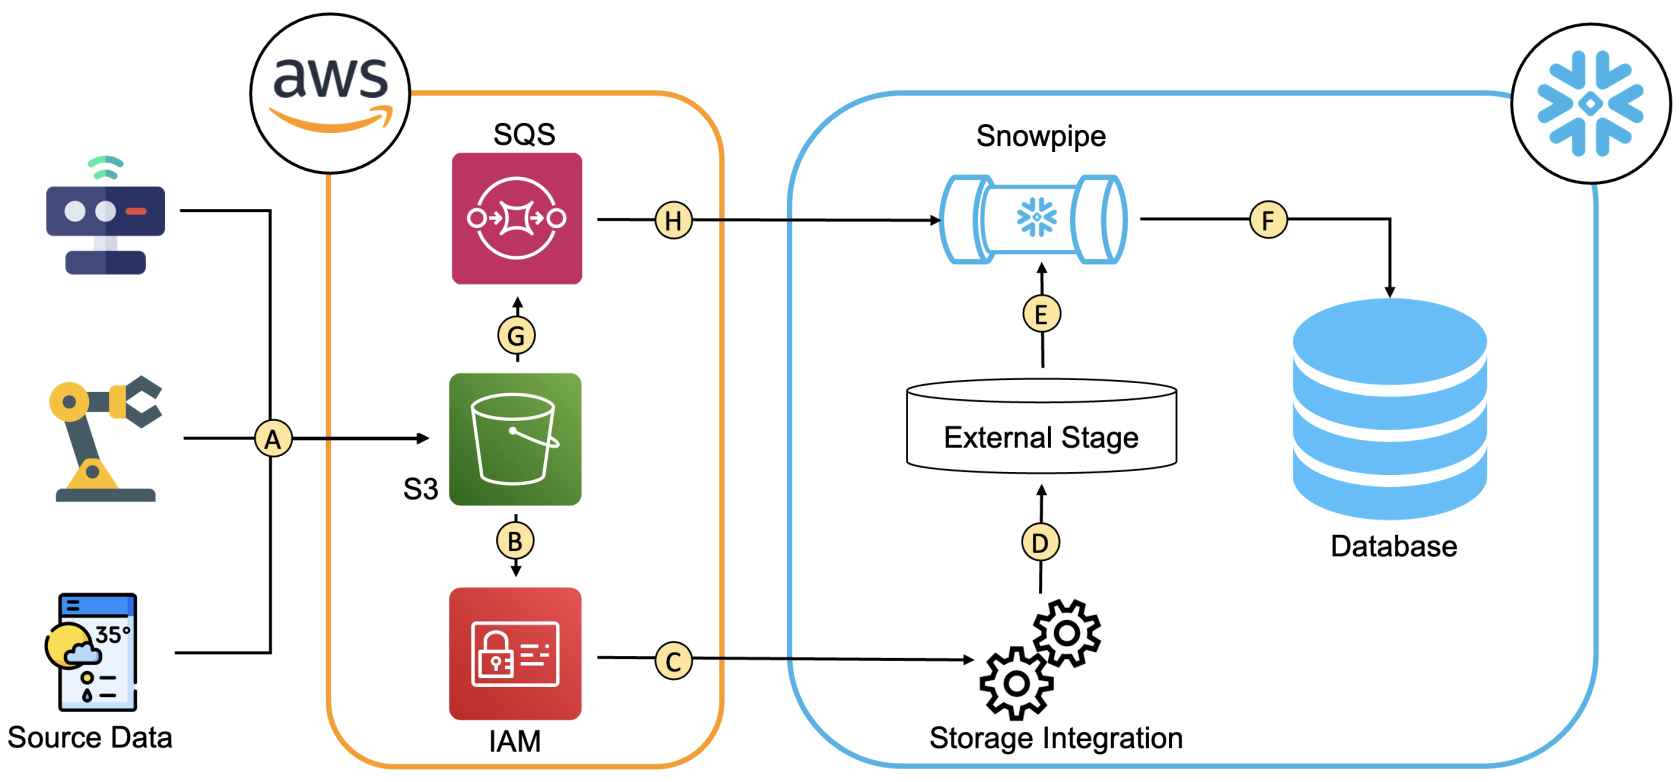
The following outline the connections between the components used for the automated ingestion.
- The data flows from the source into an S3 bucket. Multiple sources can be utilised, as well.
- An IAM role with a policy providing the permissions to List/Read/Write from the S3 bucket is used.
- The connection between the IAM role and the storage integration is established using:
- role ARN
- IAM_USER_ARN and the External_ID specified by the storage integration
- A Snowflake external stage can be created using the storage integration name, which allows access to the data in the S3 bucket through the IAM role.
- The Snowpipe uses the external stage to copy the data into a snowflake table.
- The Snowpipe is notified when new data arrives in the S3 bucket through the notification path.
Requirements
This article assumes that the following objects are already configured:
- An AWS S3 bucket
- A Snowflake user with ACCOUNTADMIN role or another role with granted CREATE INTEGRATION privileges
- A Snowflake table with a column of type VARIANT
Step 1: Configure a Storage Integrations Between Snowflake and AWS S3
This step is covered in another blog post: Configuring Storage Integrations Between Snowflake and AWS S3.
Step 2: Creating a Snowpipe
To utilize cloud messaging for triggering data loads, the Snowpipe query should have “auto_ingest = true”, as shown below:
create pipe <snowpipe_name> auto_ingest=true as
  copy into <table_name>
  from @<stage_name>
  file_format = (type = 'json');
Snowpipe copies the incoming data from the external stage created in Step 2 into a table.
Step 3: Setting Up an Event Notification for Snowpipe
The final step is to enable the bucket to notify Snowpipe when new data arrives. This can be done by executing the query “desc pipe <snowpipe_name>;”, copying the notification_channel value from the query results, and pasting it into the AWS SQS.
The following GIF shows how to set up an event notification for Snowpipe:
To approve the connection, you can upload any JSON file in the S3 bucket and then run the following SQL statement in Snowflake:
Select * from <table_name>;The query should display a table with the JSON data from the S3 Bucket. Note that Snowpipe is not a real-time solution, so there will be some delay before the data is available to query in Snowflake.
Wrap Up
This article demonstrates how to set up a Snowpipe that uses an event notification on an S3 bucket to be notified. The Snowpipe then accesses the data in that S3 bucket from an external stage via a storage integration that uses an IAM role with permissions to access the S3 bucket. That data will then be copied by Snowpipe into a Snowflake table with a column of the type VARIANT.