
Securely Loading Data into Snowflake
In a previous article, I wrote about how to configure AWS PrivateLink to work with Snowflake so that your employees can access your favourite data warehouse in a secure manner. In this article, we’ll go one step further: loading data.
But let’s first take a step back. When you transfer data into Snowflake, the storage that this platform uses is ultimately backed by the blob service of the cloud provider you selected. For example, if you launch Snowflake in AWS, its storage will be backed by S3, or in Azure Blob Storage in the case of Azure. The beauty about this setup is that we can harness some features of the cloud provider to enhance our security. For example, if we have data stored in AWS S3 and Snowflake deployed in that same cloud provider we can make a data transfer that, under the hood, is effectively just a transfer between two AWS VPCs. And that’s precisely what we’ll achieve in this article.
To do so, we’ll use AWS PrivateLink for Amazon S3. With this architecture, any requests sent to Amazon S3 occur over interface endpoints and therefore stay on the Amazon network. In our case, this means that files stored in our AWS VPC can be stored it in our AWS S3-based Snowflake instance.
And we’ll do all of that securely. Using such technologies allows us to transfer our data without exposing it to the public internet. This enhances security by reducing the potential exposure to external threats and, in turn, it helps to create a private, isolated connection between your AWS resources and Snowflake.
General Requirements:
- Snowflake Business Critical Edition (or higher) deployed in AWS
- Foundational understanding of AWS and IAM permissions to create infrastructure
- AWS and Snowflake must be in the same region.
Required pre-existing infrastructure:
You will need the infrastructure outlined in this article up and running, which in essence is:
- Privatelink authorized in Snowflake
- AWS VPC endpoint created for Snowflake
- AWS Route 53 hosted zones for Snowflake Computing (including several records in it)
What Will We Do Specifically in This Article?
In AWS:
- Create a VPC endpoint for S3 for Snowflake’s internal stage
- Create a DNS for this new endpoint using Route 53
- Deploy an EC2 instance to securely load a CSV file into Snowflake
Let’s get started!
Snowflake Internal Stage
In your Snowflake Account, run the following command to retrieve its Internal Stage details:
select key, value from table(flatten(input=>parse_json(system$get_privatelink_config())));
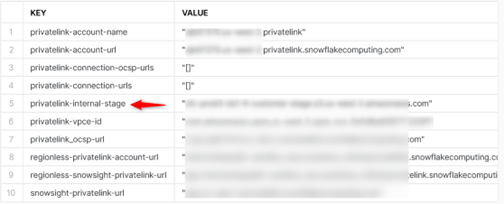
Make a note of this (in red above). It should look something like sfc-XXXXXXXX.s3.REGION.amazonaws.com
AWS VPC Endpoints Configuration
In AWS, first make sure you are in the same region where Snowflake is deployed. Then go to VPC -> Endpoints.
Here you should already have one VPC endpoint targeting the Snowflake VPC (See above requirements).
If we already have one endpoint, why do we need a second one? In very plain terms, the first VPC Endpoint (the one created in the previous article) handled the traffic between the AWS and Snowflake VPCs. However, S3 is a service that is not technically used within a VPC and so its traffic does not pass through VPC resources. That’s why standard networking features of AWS such as NACLs and security groups don’t apply to S3. For this reason, we need to provision a resource to handle traffic to privately access S3. In sum, both VPC endpoints do the same thing but for traffic at different points.
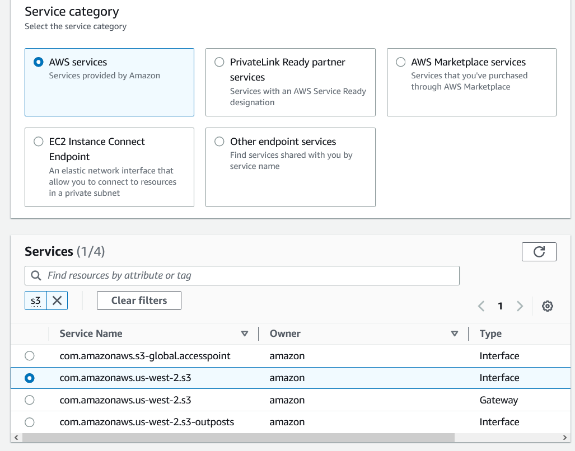
We’ll now create another VPC endpoint in the same region and subnet. Give this endpoint a name (Snowflake Private S3 in my case) and select AWS Services. Then search S3 and select the Interface type in the region.
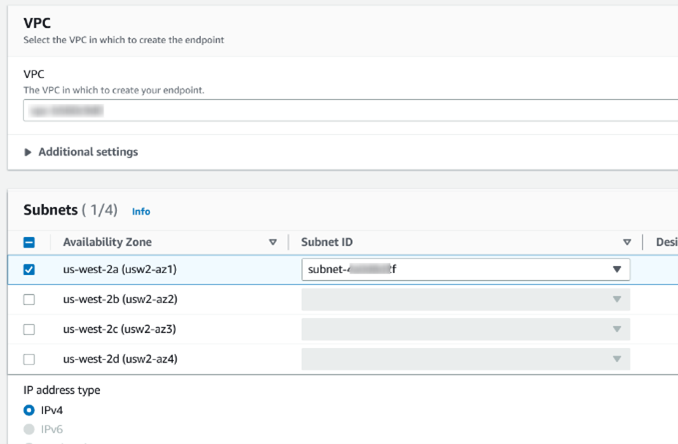
Scroll down and select the same VPC and subnet you used for the other endpoint, then choose IPv4:
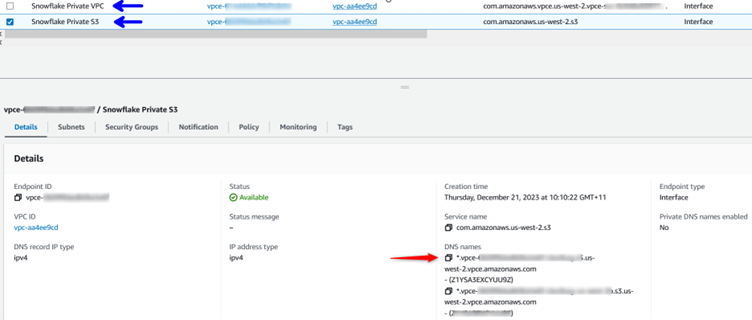
Under security groups, I will choose the same group I used in the other endpoint (so they both have the same group). Under Policy leave “Full access.” Now you should have two VPC endpoints (in blue). I need to make a note of the DNS name of the one we just created (in red):
Open a new AWS window and head to Route 53. Create a new Hosted Zone as follows:
- Domain name: S3 followed by your AWS region. In my case s3.us-west-2.amazonaws.com
Type: Private hosted zone. - VPC ID: Choose the same ID and Region as per the other VPC endpoint you created.
In this new hosted zone create a record with the following details:
- Record name: Use part of name of the privatelink-internal-stage you retrieved from Snowflake, highlighted here: sfc-XXXXXXXX.s3.REGION.amazonaws.com
- Record type: CNAME
- Value: A concatenation of two values. First the same bit used above sfc-XXXXXXXX followed by the DNS of the VPC endpoint for S3 created in the previous step. All combined it should be something like: sfc-XXXXXXXX.vpce-xxxxxxxxxx.s3.REGION.vpce.amazonaws.com
You can leave the rest as it stands and click Create Records.
Loading the Data Securely
Let’s launch an instance in the same region and AZ as per the VPC endpoint created earlier.
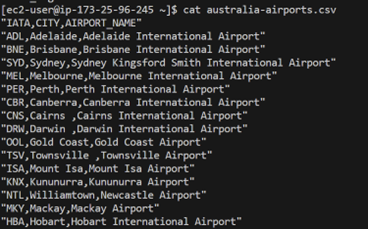
This instance has to initially have access to the public internet so that we can install SnowSQL (info and installation process here). In this virtual machine, I have also created a small CSV file with details about some airports in Australia.
Once SnowSQL is installed and my CSV file is ready, I update the EC2 security group outbound rules to restrict access only the security groups of both my VPC endpoints.

This setup will prevent my instance to send any traffic to the public internet. Whilst this is not strictly necessary, it’s good networking practice. Now I will use SnowSQL to connect to Snowflake’s privatelink. To do so, I need to use the following command:
snowsql -a accountlocator.REGION.privatelink -u username -d database -w warehouse -r role

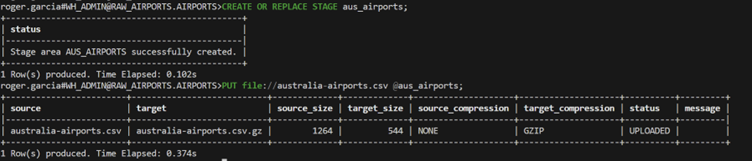
If after inputting your password you can connect to this URL, it means that PrivateLink setup has been configured correctly. I have now connected securely to the data warehouse. From this point, I can simply create a destination for my file in Snowflake and upload it, knowing that this operation will not be trespassing the public internet:
CREATE OR REPLACE STAGE aus_airports;
put file://australia-airports.csv @RAW_AIRPORTS.AIRPORTS.%dim_australia_airports;
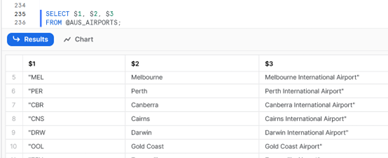
Now the file has been uploaded I can access Snowflake (I will use the Browser this time) to verify that my new contents are there. And sure enough, I see a list of Australian airports:
Now the real fun begins! I encourage you to replicate these steps in your own environment. Dive into the console, explore the intricacies and witness the power of a seamless, private connection between AWS and Snowflake. And of course, if you have any questions, please feel free to give us a shout if you need help making the most of out of your Snowflake or AWS implementation.