
This series takes you from zero to hero with the latest and greatest cloud data warehousing platform, Snowflake.
Earlier in this series we have discussed how to load data into Snowflake using several different methods: Snowflake’s user interface, the SnowSQL command line tool and Python.
These three methods all perform the same task of loading data into Snowflake; however, they increase in complexity and functionality as we progress down the list. This post will go a step further and demonstrate how we can leverage Python to achieve much faster bulk data loading into Snowflake. This method can be used to bulk load data in any combination of internal and external stages.
Disclaimers
Before we get started, it is worth stating that every data-loading situation is different, and the approach in this post may not be the best fit for your particular scenario; however, we have seen great success with this method when working with our clients. I would strongly recommend testing this approach on a subset of your data first to determine whether it is suitable before kicking off a full data load. I would also recommend the same testing for any data-loading method you may be considering. Nobody wants to burn through a bunch of credits before realising that a method is not suitable, so testing on a subset is always advised.
Also, this post leans more heavily into Python than previous posts and using some more advanced Python functionality. Whilst you should be able to copy and paste the code to meet your own needs, it is advised to have some familiarity with a programming language to fully understand the code. Before we get started loading our data, let’s run through some tips.
Optimal File Format for Loading Data
When loading data into Snowflake, the file format can make a huge difference. Whilst it may be easier to use other file formats depending on your use case, Snowflake is usually much faster at ingesting data stored in a structured CSV format. To support this argument, please see the table below comparing CSV files to Parquet and ORC. This table has been sourced from Snowflake’s community article on How to Load Terabytes into Snowflake:
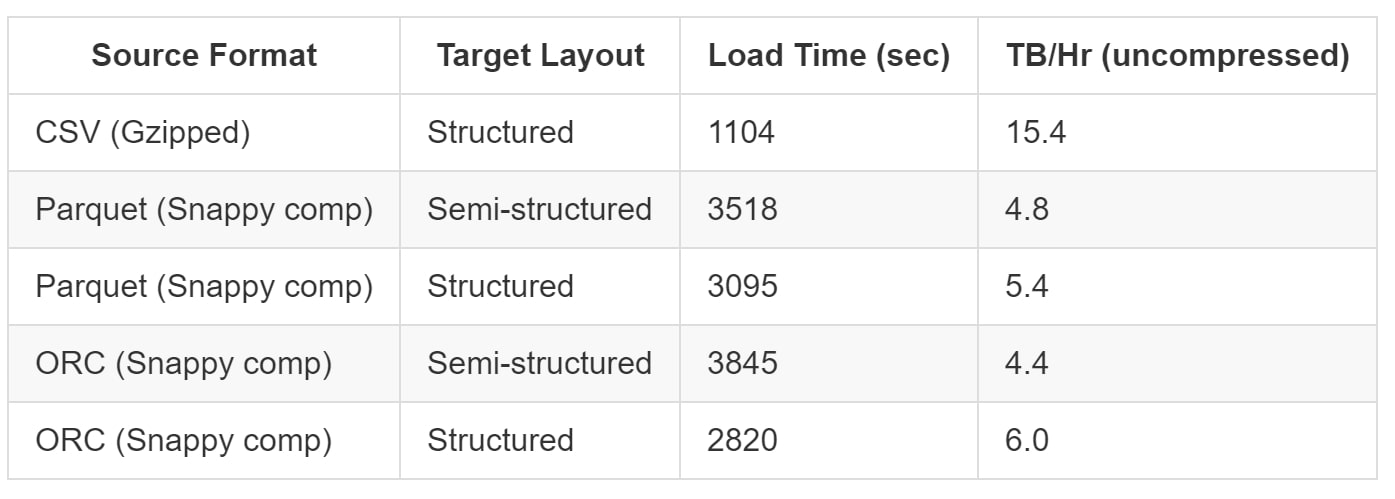
As you can see, structured CSV files can load up to 3x faster than Parquet files. When dealing with large data volumes, this can have a drastic effect on both your loading time and the amount of credits used by the warehouse.
To make life simpler, when preparing data to load, I would recommend constructing CSV files that use text qualifiers and escape characters. This goes a long way towards avoiding potential errors.
Optimal File Size for Loading Data
When bulk loading data, Snowflake performs best with compressed files that are 10MB-100MB. It is common for datasets to be too large to fit into a single file of this size, so most loading scenarios require the data to be divided into multiple files. Similarly, files that are less than 10MB when compressed may be combined into larger files. This is discussed further in Snowflake’s documentation on File Size Recommendations.
Structured Staging
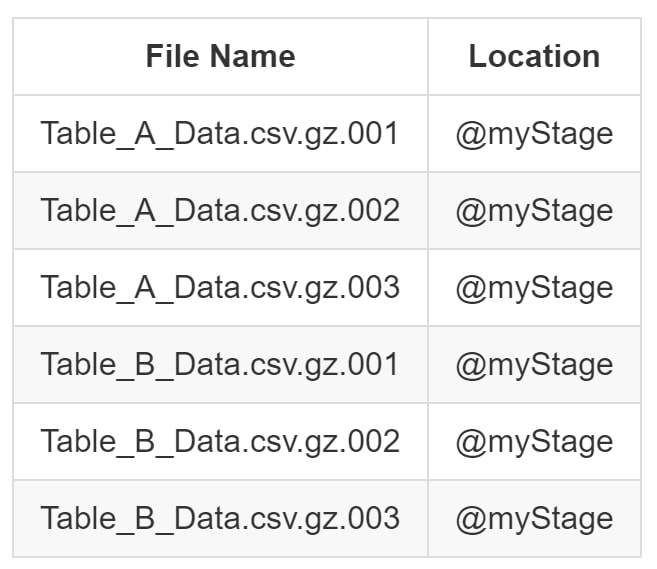
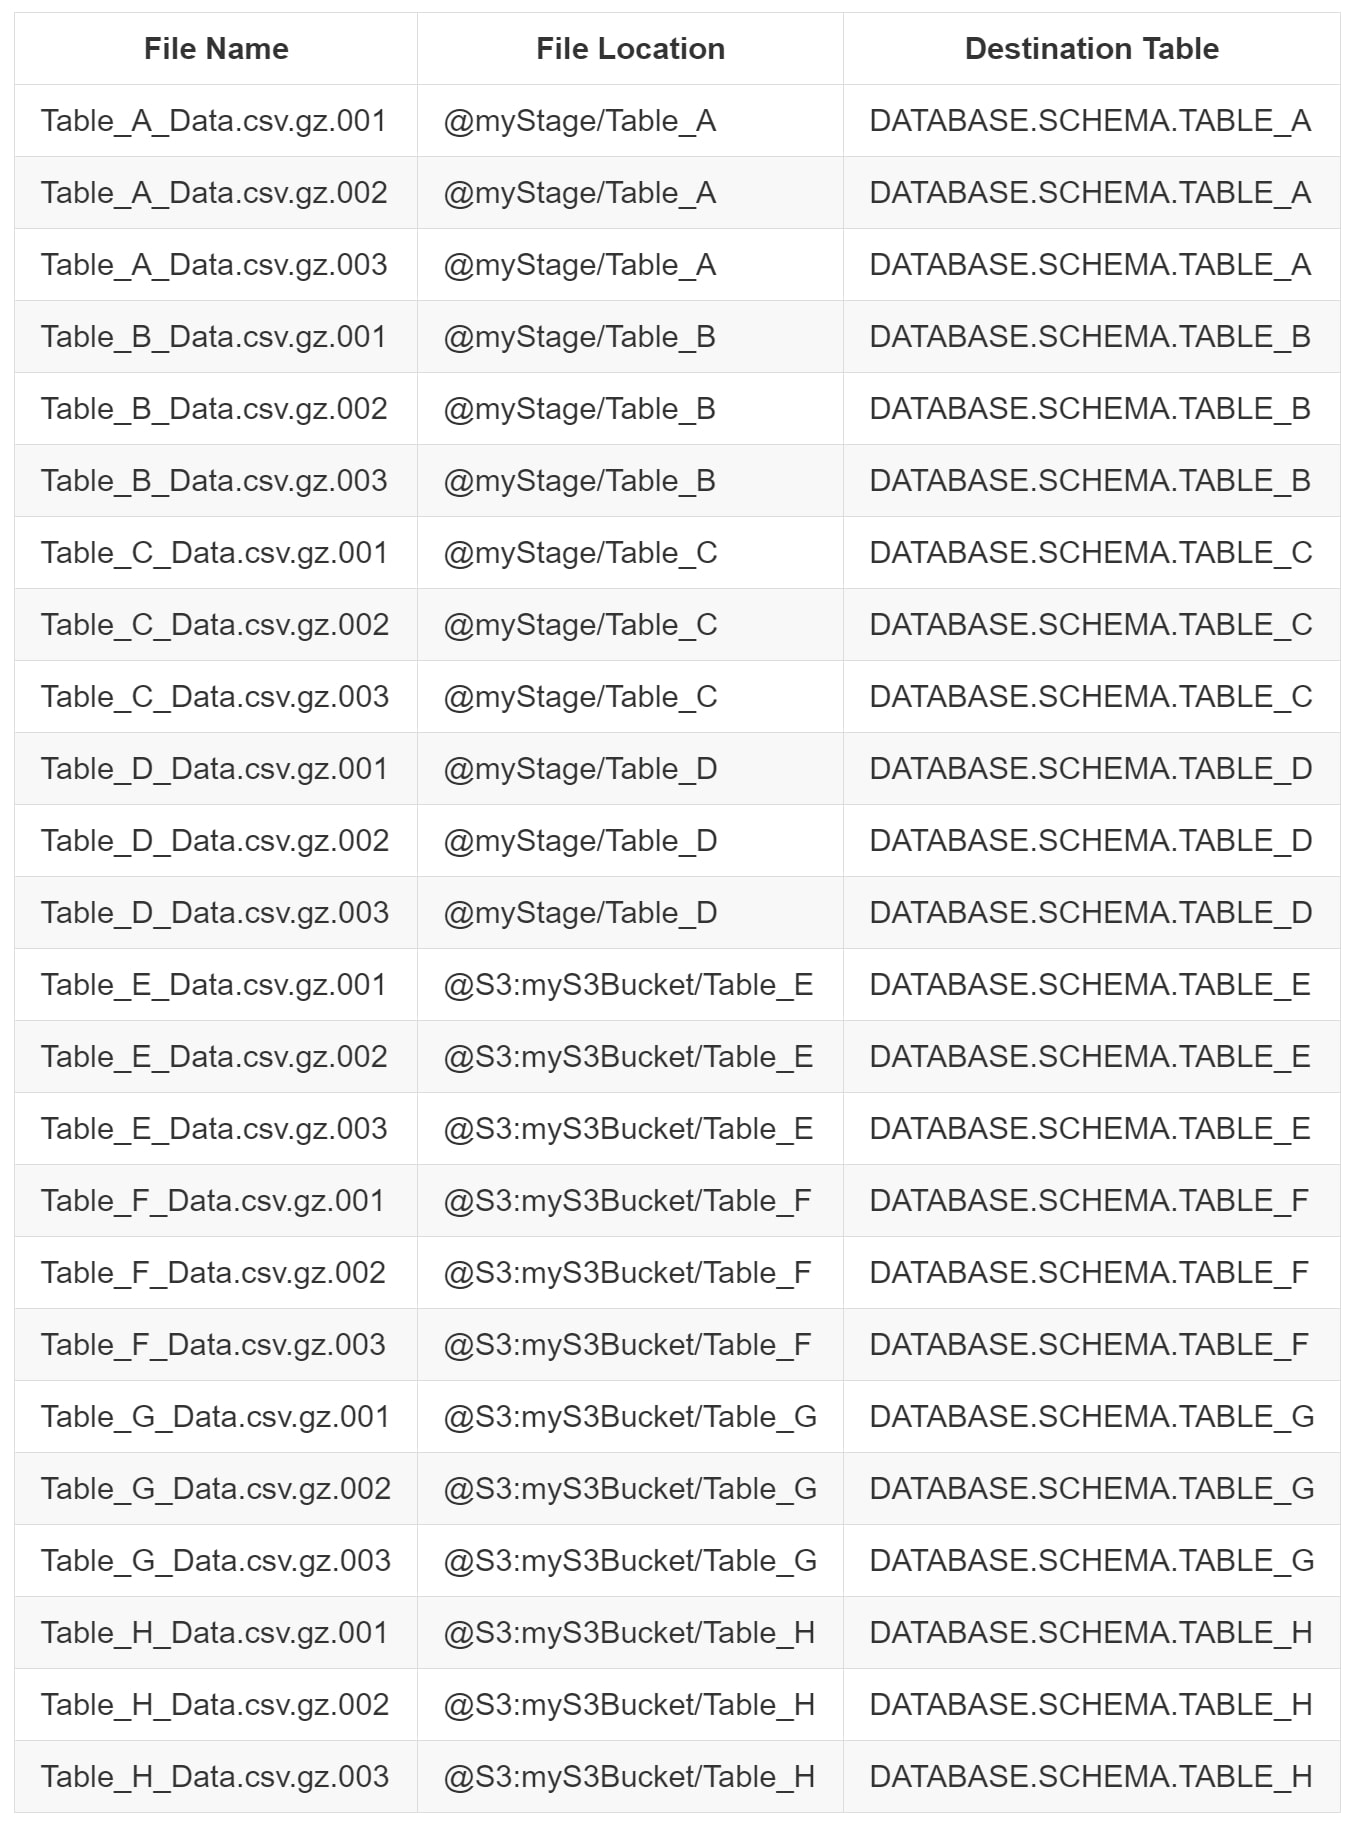
Whilst it is possible to store data for multiple tables in the same area in a stage, this is not recommended. Snowflake provides some great functionality to use specific file names or regular expressions to identify which files should be loaded into which table. However, this functionality still reduces the performance of the loading process. It is faster and simpler to ensure the files for each table are stored in their own directory within your stage. For example, consider the following list of files stored in a Snowflake stage called myStage:
When attempting to load these files into Tables A and B respectively, it is necessary to use a parameter in the COPY INTO statement: either PATTERN or FILES. For larger volumes of files, this creates a large overhead in the loading process. We can see examples of these loading scripts below:
-- Load Table A using PATTERN
COPY INTO DATABASE.SCHEMA.TABLE_A
FROM @myStage
  PATTERN = 'Table_A.*[.]csv[.]gz.*'
;

-- Load Table B using FILES
COPY INTO DATABASE.SCHEMA.TABLE_B
FROM @myStage
  FILES = ['Table_B_Data.csv.gz.001', 'Table_B_Data.csv.gz.002', 'Table_B_Data.csv.gz.003']
;
Instead of resorting to these methods, it is more performant to store each file for each table in its own subdirectory within the stage. For internal stages, this is achieved by modifying the PUT command to include the subdirectory:
PUT 'FILE://<path_to_file>/<filename>' @DATABASE.SCHEMA.myStage/<path>
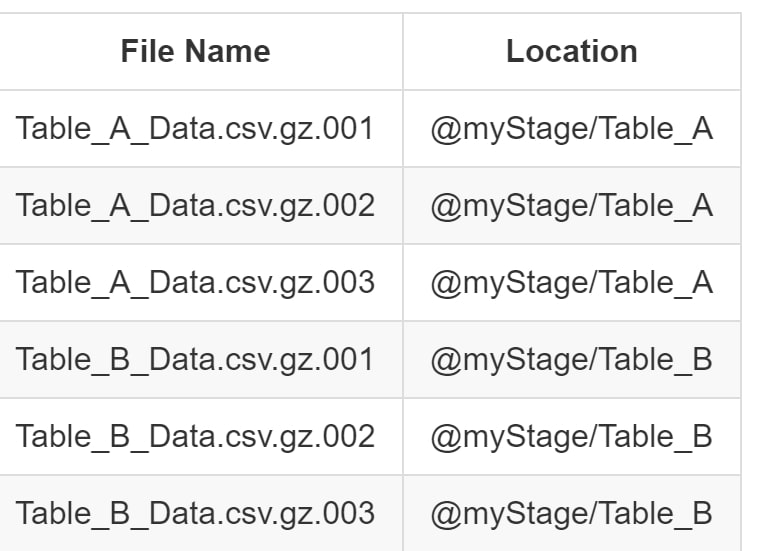
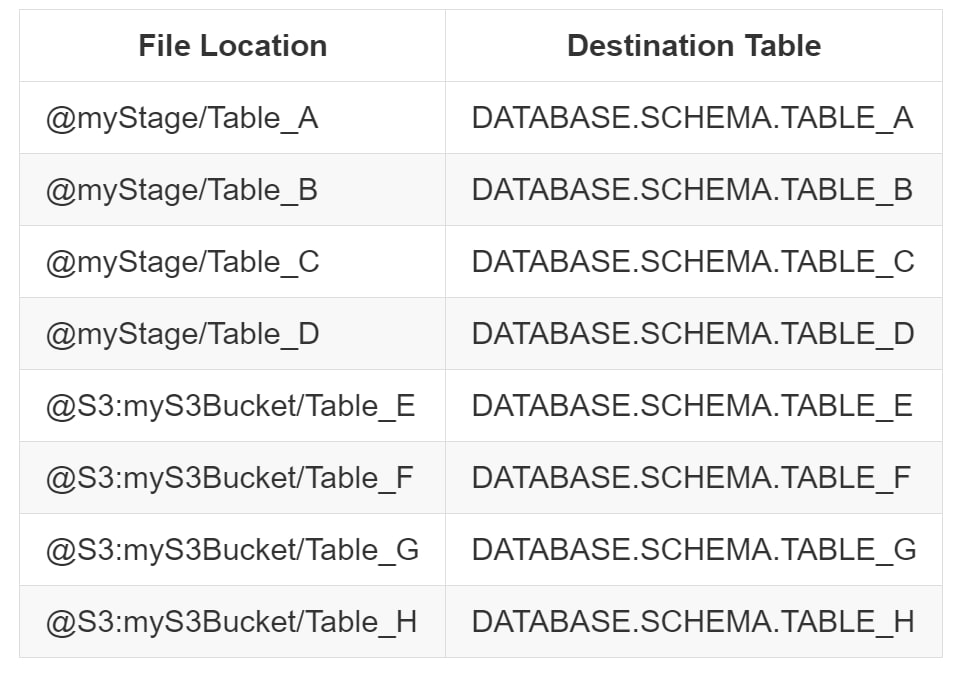
With this approach, our files can be stored as follows:
With this simple change, we can now load the files into our tables by directly referencing the path in the FROM clause of our COPY INTO statement:
-- Load Table A
COPY INTO DATABASE.SCHEMA.TABLE_A
FROM @myStage/Table_A
;
-- Load Table B
COPY INTO DATABASE.SCHEMA.TABLE_B
FROM @myStage/Table_B
;
Not only is this subdirectory approach optimal for data ingestion into Snowflake, it is also a good practice for general data storage.
An Overview of Multi-Threaded Loading
Whilst Snowflake is designed for elastic warehouses that can be scaled up on demand, as data volumes increase, we often see extra-small (XS) warehouses are faster and cheaper overall, provided your data is prepared and your load is executed in the right way. When loading compressed files that are only 100MB, Snowflake’s largest and smallest warehouses will both load the file incredibly quickly. A common approach when loading large quantities of files is to use a larger warehouse as this supports more threads for the load (a.k.a. more files loading simultaneously). However, as the data volume increases, this will eventually result in queuing regardless of warehouse size if loading in a single session (one large SQL script full of COPY INTO commands).
Imagine the set of COPY INTO commands as a bucket, and the warehouse as a hole in the bucket. Regardless of whether the hole is the size of a small coin or the size of a drink coaster, if you pour water into the bucket faster than it falls through the hole, the bucket will start to fill. This mentality applies to data loading as well, and eventually, even the largest Snowflake warehouse will not be able to load everything simultaneously, and commands in a session will begin to queue. If the script first loads files into Table A and then loads files into Table B, none of the files will load into Table B until after Table A is finished loading.
To avoid this issue, one option is to break down the loading script into smaller scripts and run them simultaneously. For example, we could have a script that loads the files into Table A and a separate script that loads the files into Table B. If we run both of these scripts together in different sessions, this reduces the previous queuing issue, and both tables will load simultaneously. If both scripts use the same warehouse then there still may be a resource contention; however, this will be reduced, especially if using multi-cluster warehouses that separate the sessions into multiple versions of the same warehouse.
Faster and More Efficient with Multiple Threads
With this approach, it is possible to use multiple small (XS) warehouses to load large sets of data into multiple tables, either by using a multi-cluster warehouse or by using multiple different warehouses depending on your Snowflake edition. Since we are only using XS warehouses, the credit consumption per warehouse is very low.
The approach of executing multiple sessions simultaneously is referred to as using multiple threads, or multi-threading. Whilst a direct comparison usually finds a larger warehouse and a smaller warehouse to be around the same cost due to the execution speed, data loading through this method is usually faster and cheaper due to the greater control over the warehouses and the removal of a single large queue of COPY INTO commands. If one set of files is taking longer to load, instead of holding up the rest of the data load, it keeps running in its own session whilst the other sets of files load elsewhere in their own sessions.
If we take a look at the query history in Snowflake, we can expect to see something similar to the following screenshot. Here, we can see that our tables are all loading at the same time. This specific screenshot is using a single XS multi-cluster warehouse to ensure that there is no resource contention—thus, no queuing:
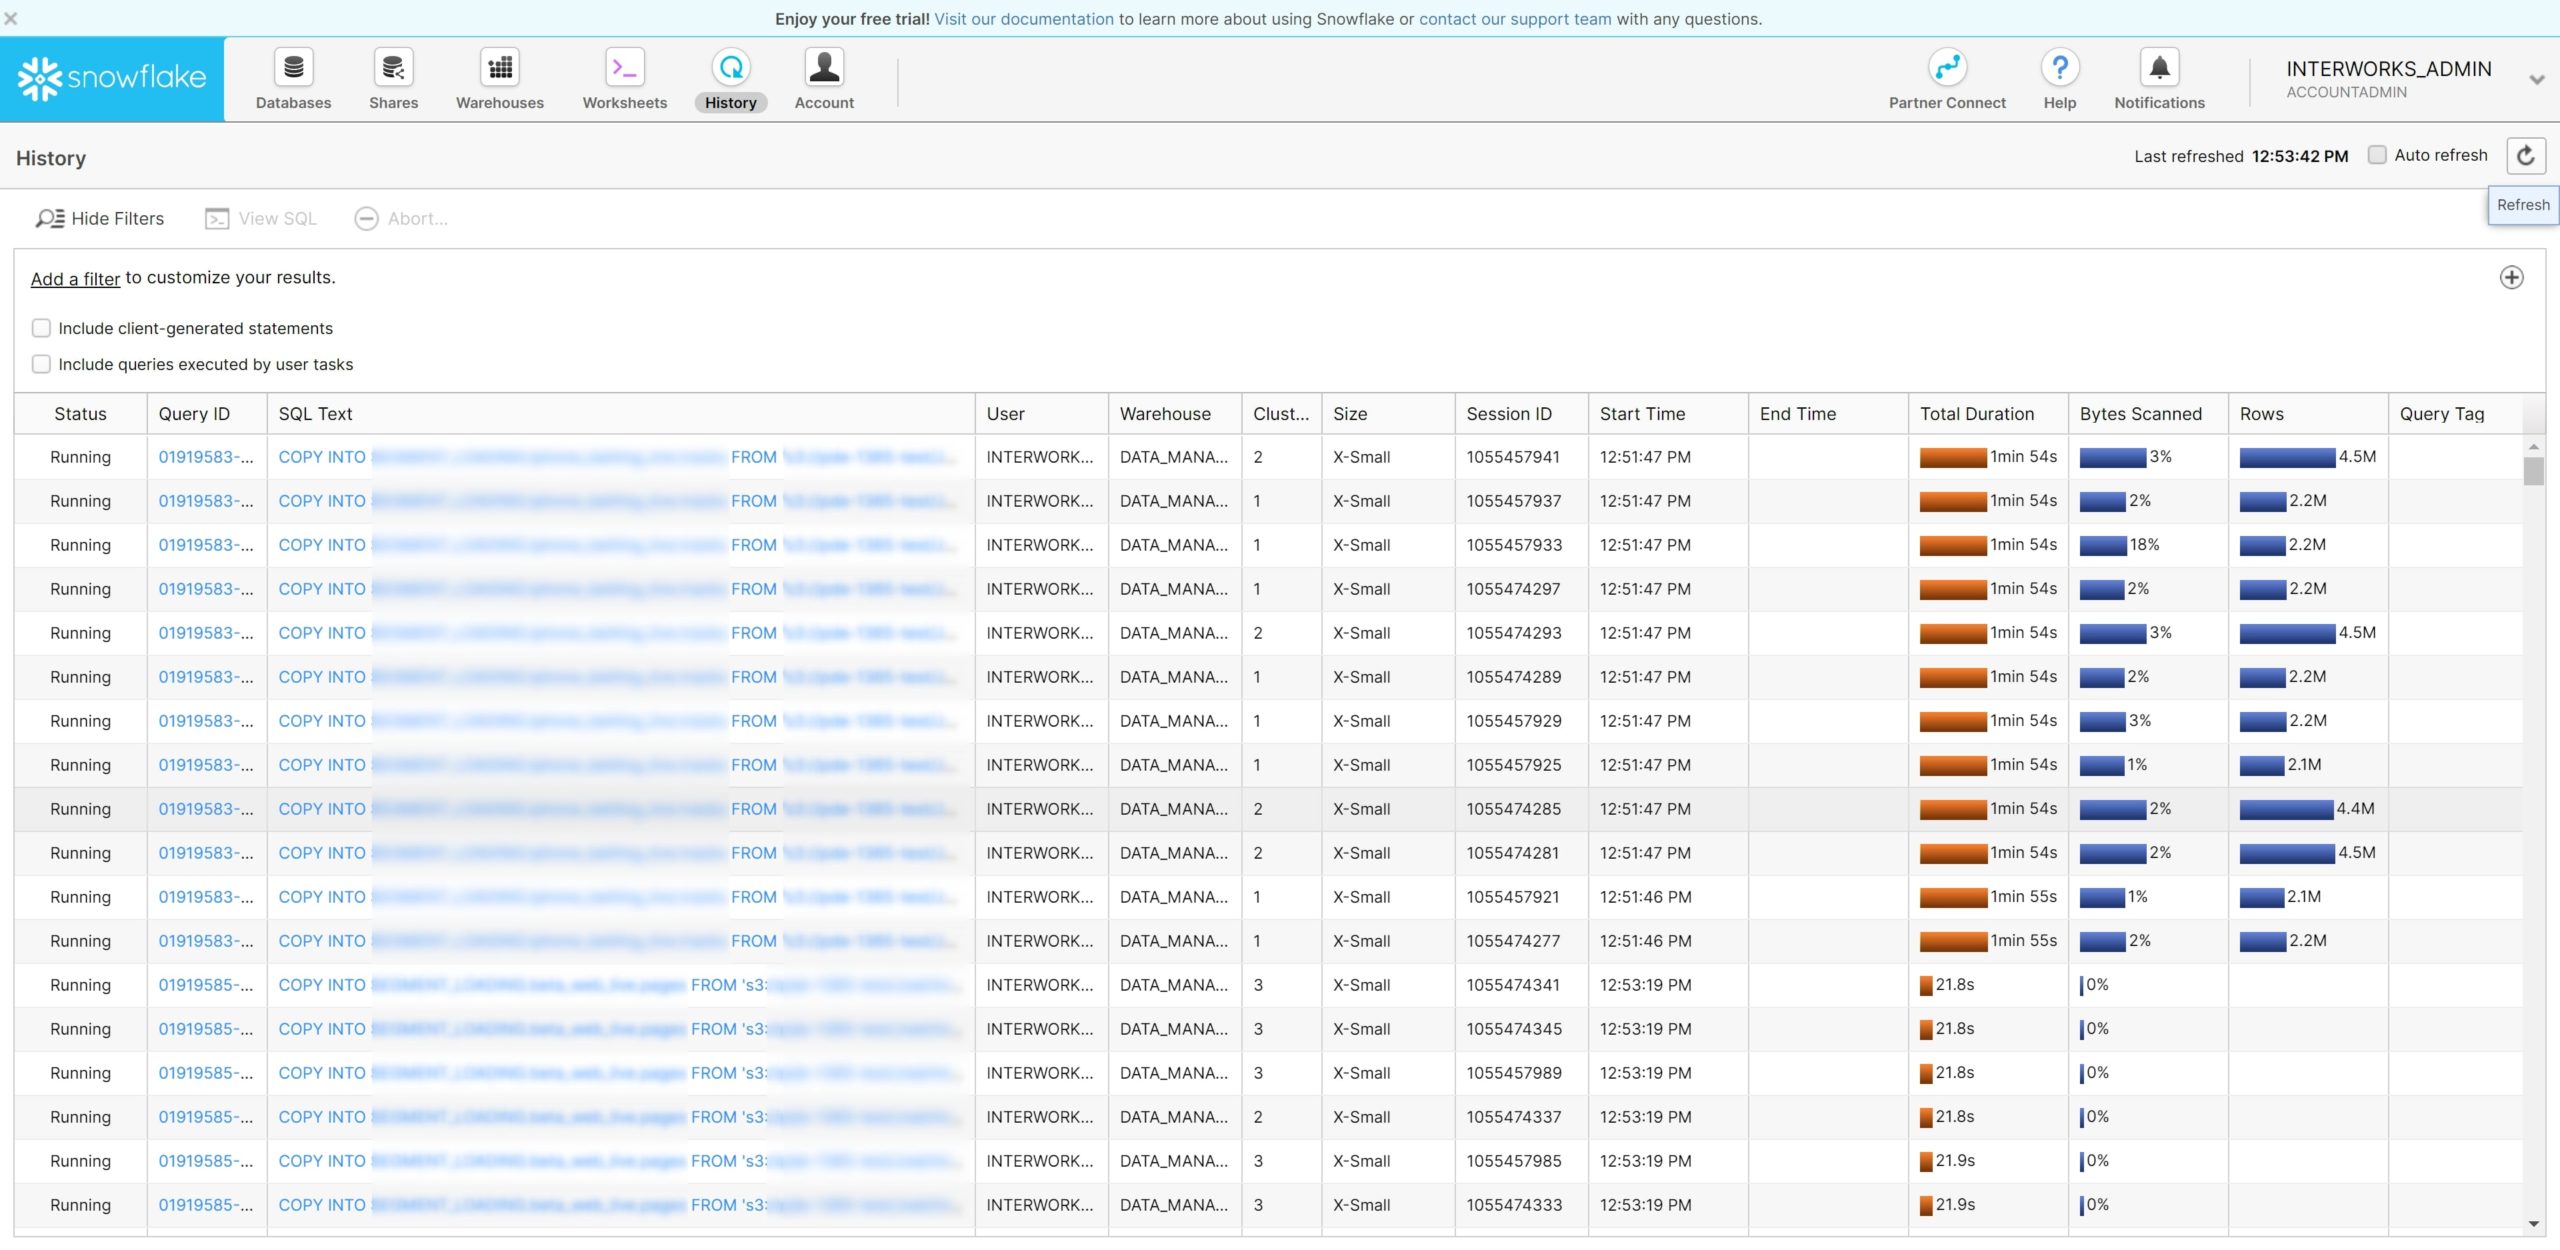
Above: Multiple simultaneous loads in history
Our Example Scenario
Now, let’s begin the demonstration of multi-threaded bulk loading into Snowflake using Python. For this example, we will bulk load sets of data stored in an Amazon S3 bucket and sets of data stored in an internal stage. To make things easier we assume that all of these files have the same file format; however, this does not have to be the case in a real-world scenario:
The COPY INTO Statement
To begin with, we define our COPY INTO statement. We use the standard structure:
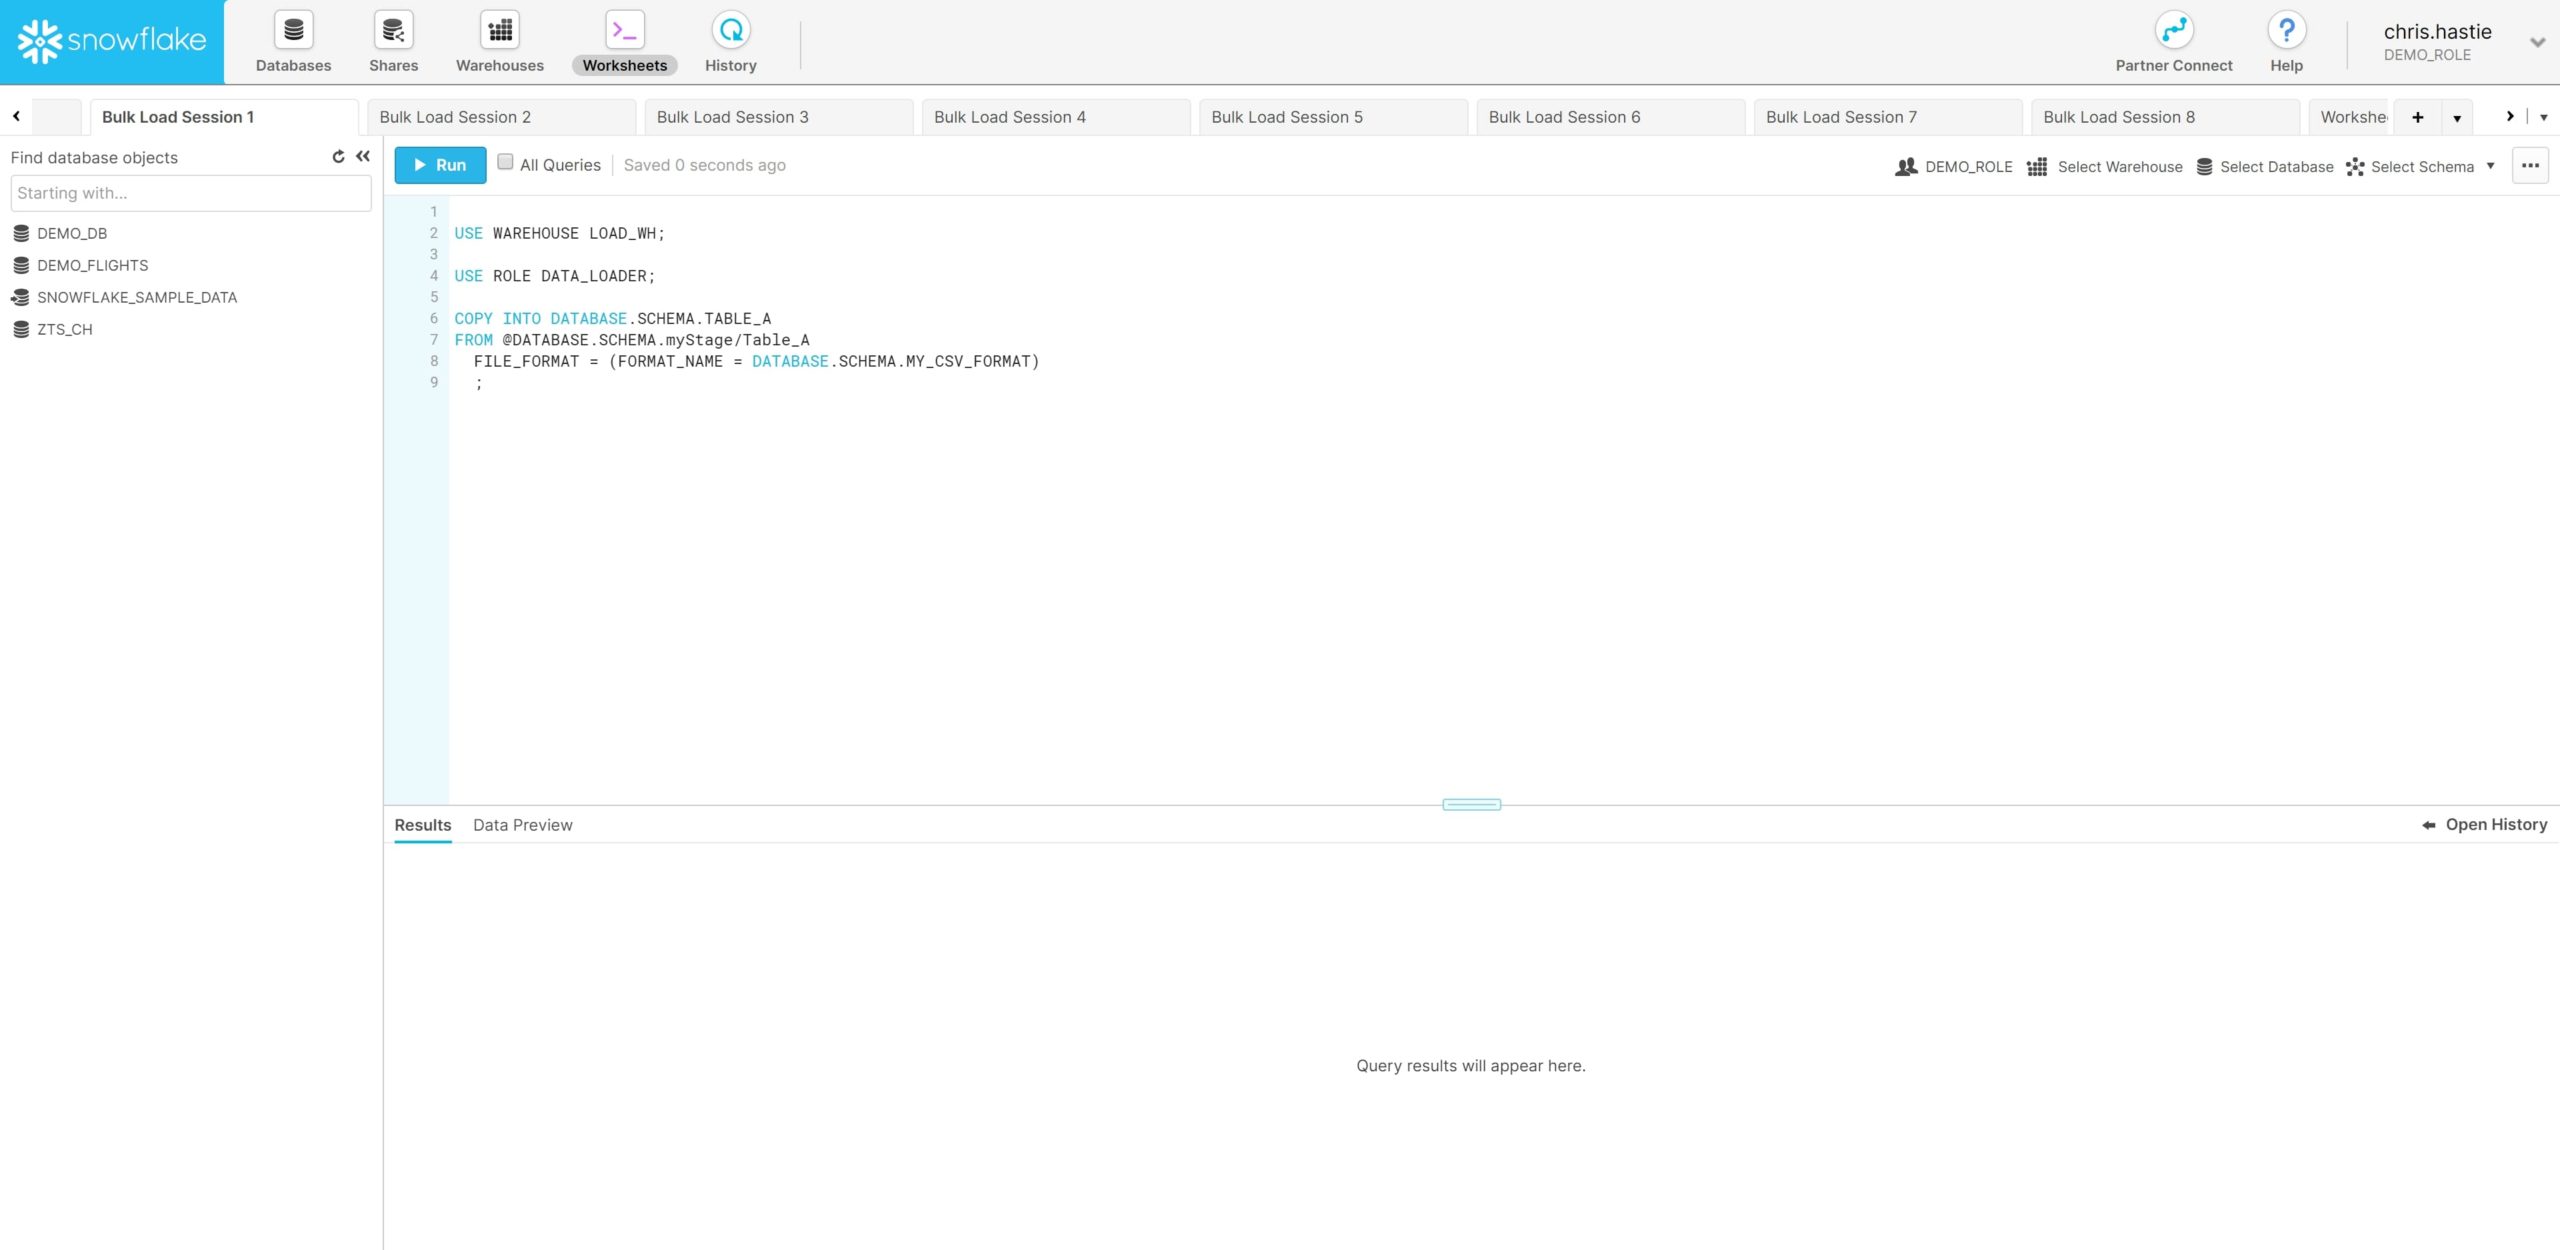
COPY INTO <TABLE>
FROM @<Stage>
  FILE_FORMAT = (FORMAT_NAME = DATABASE.SCHEMA.MY_CSV_FORMAT)
  ;
For example, the script for Table A would be:
COPY INTO DATABASE.SCHEMA.TABLE_A
FROM @myStage/Table_A
  FILE_FORMAT = (FORMAT_NAME = DATABASE.SCHEMA.MY_CSV_FORMAT)
  ;
Variables List for Automation
As the only difference in each COPY INTO statement is the table and the path, we can automate this using Python. The first step is to provide Python with a clear list of variables. We are loading tables A through H, so we want to set up variables that provide the necessary details to load each of those tables:
The simplest way to do this would be to construct a list in Python:
variablesSimpleList = [
  ['DATABASE.SCHEMA.myStage/Table_A', 'DATABASE.SCHEMA.TABLE_A'],
  ['DATABASE.SCHEMA.myStage/Table_B', 'DATABASE.SCHEMA.TABLE_B'],
  ['DATABASE.SCHEMA.myStage/Table_C', 'DATABASE.SCHEMA.TABLE_C'],
  ['DATABASE.SCHEMA.myStage/Table_D', 'DATABASE.SCHEMA.TABLE_D'],
  ['S3:myS3Bucket/Table_E', 'DATABASE.SCHEMA.TABLE_E'],
  ['S3:myS3Bucket/Table_F', 'DATABASE.SCHEMA.TABLE_F'],
  ['S3:myS3Bucket/Table_G', 'DATABASE.SCHEMA.TABLE_G'],
  ['S3:myS3Bucket/Table_H', 'DATABASE.SCHEMA.TABLE_H']
]
Depending on your use case, it may be easier to import this list from a spreadsheet or generate it automatically whilst uploading the files to their respective stages/paths.
More Easily Understood Automation
Whilst the variables list is the simplest way, I would prefer to contain these variables in a more structured format so that the members can be easily identified:
variablesList = [
  {
    'sourceLocation': 'DATABASE.SCHEMA.myStage/Table_A',
    'destinationTable': 'DATABASE.SCHEMA.TABLE_A'
  },
  {
    'sourceLocation': 'DATABASE.SCHEMA.myStage/Table_B',
    'destinationTable': 'DATABASE.SCHEMA.TABLE_B'
  },
  {
    'sourceLocation': 'DATABASE.SCHEMA.myStage/Table_C',
    'destinationTable': 'DATABASE.SCHEMA.TABLE_C'
  },
  {
    'sourceLocation': 'DATABASE.SCHEMA.myStage/Table_D',
    'destinationTable': 'DATABASE.SCHEMA.TABLE_D'
  },
  {
    'sourceLocation': 'S3:myS3Bucket/Table_E',
    'destinationTable': 'DATABASE.SCHEMA.TABLE_E'
  },
  {
    'sourceLocation': 'S3:myS3Bucket/Table_F',
    'destinationTable': 'DATABASE.SCHEMA.TABLE_F'
  },
  {
    'sourceLocation': 'S3:myS3Bucket/Table_G',
    'destinationTable': 'DATABASE.SCHEMA.TABLE_G'
  },
  {
    'sourceLocation': 'S3:myS3Bucket/Table_H',
    'destinationTable': 'DATABASE.SCHEMA.TABLE_H'
  }
]
Though it may be more effort to construct the variables list as above, it makes the code itself much simpler as we can directly reference the sourceLocation and destinationTable for each member of the list. We can construct this variablesList from the original variablesSimpleList using the following code:
# Define an empty list to populate with variables
variablesList = []

# Loop through the members of variablesSimpleList and add them to variablesList
# This script assumes the first entry of each member of variablesSimpleList is the sourceLocation,
# and that the second entry is the destinationTable.
for [sourceLocation, destinationTable] in variablesSimpleList:
    variablesList.append(
        {
            'sourceLocation': sourceLocation,
            'destinationTable': destinationTable
        }
    )
Automatically Generate COPY INTO Statements
With our list of variables, we can construct our COPY INTO statements automatically using the following code:
# Define an empty list to populate with COPY INTO statements
copyIntoStatements = []

# Loop through the members of variablesList and construct the COPY INTO statements
# Use .format() to replace the {0} and {1} with variables destinationTable and sourceLocation
for member in variablesList:
  copyIntoStatements.append(
    '''
    COPY INTO {0}
    FROM @{1}
      FILE_FORMAT = (FORMAT_NAME = DATABASE.SCHEMA.MY_CSV_FORMAT)
      ;
    '''.format(member['destinationTable'], member['sourceLocation'])
  )
Once we have created this list of COPY INTO statements, we can verify the list with a quick print command:
for statement in copyIntoStatements:
    print(statement)
This should provide the following string:
COPY INTO DATABASE.SCHEMA.TABLE_A
FROM @DATABASE.SCHEMA.myStage/Table_A
  FILE_FORMAT = (FORMAT_NAME = DATABASE.SCHEMA.MY_CSV_FORMAT)
  ;

COPY INTO DATABASE.SCHEMA.TABLE_B
FROM @DATABASE.SCHEMA.myStage/Table_B
  FILE_FORMAT = (FORMAT_NAME = DATABASE.SCHEMA.MY_CSV_FORMAT)
  ;

COPY INTO DATABASE.SCHEMA.TABLE_C
FROM @DATABASE.SCHEMA.myStage/Table_C
  FILE_FORMAT = (FORMAT_NAME = DATABASE.SCHEMA.MY_CSV_FORMAT)
  ;

COPY INTO DATABASE.SCHEMA.TABLE_D
FROM @DATABASE.SCHEMA.myStage/Table_D
  FILE_FORMAT = (FORMAT_NAME = DATABASE.SCHEMA.MY_CSV_FORMAT)
  ;

COPY INTO DATABASE.SCHEMA.TABLE_E
FROM @S3:myS3Bucket/Table_E
  FILE_FORMAT = (FORMAT_NAME = DATABASE.SCHEMA.MY_CSV_FORMAT)
  ;

COPY INTO DATABASE.SCHEMA.TABLE_F
FROM @S3:myS3Bucket/Table_F
  FILE_FORMAT = (FORMAT_NAME = DATABASE.SCHEMA.MY_CSV_FORMAT)
  ;

COPY INTO DATABASE.SCHEMA.TABLE_G
FROM @S3:myS3Bucket/Table_G
  FILE_FORMAT = (FORMAT_NAME = DATABASE.SCHEMA.MY_CSV_FORMAT)
  ;

COPY INTO DATABASE.SCHEMA.TABLE_H
FROM @S3:myS3Bucket/Table_H
  FILE_FORMAT = (FORMAT_NAME = DATABASE.SCHEMA.MY_CSV_FORMAT)
  ;
Stop Automation, Not Efficiency
So far, we have used a few Python commands to automatically generate a set of COPY INTO commands. If we wanted to, we could end our Python journey here. We could take the list we have created, copy and paste it into a script in Snowflake, select a role and warehouse, then execute the script. This would not be an optimal way of loading the data, but we have at least removed some of the initial work involved by automatically generating our COPY INTO statements rather than manually preparing each one.
Another approach we could take, which would be far more efficient for data loading, is to open up eight Snowflake session windows (one per COPY INTO statement) and execute these simultaneously by manually flicking to each one and executing them. This approach may include some manual effort to kick off each script, but this still achieves a more efficient bulk data load:
Above: Multiple Snowflake session windows
Using this approach, we can still look at the query history in Snowflake and see results similar to this screenshot where our tables are all loading at the same time. As stated earlier, this specific screenshot is using a single XS multi-cluster warehouse to ensure that there is no resource contention and no queuing:
From this point on, this post becomes more technical and deals with more complex Python. We are not getting too much more complex, but if you need to take a walk, grab a coffee or just look away from the screen for a bit, now is a good time.
Threading in Python
Before we get started on Snowflake specifics, let’s first review how multiple threads work in Python. Threading is a method of executing multiple scripts simultaneously from the same code by informing Python to execute particular blocks of code (a.k.a. “threads”) at the same time. For example, let’s consider the following function, which takes an input number and prints it 10 times. In each print statement, both the input number and the print iteration are printed. There is a one-second delay between each print statement:
# Define myFunction(inputNumber), is a simple function which prints the inputNumber variable 10 times.
# In each print command, both the inputNumber and the print iteration are printed.
def myFunction(inputNumber) :
  import time
  for printIteration in range(0, 10):
    print('Printing the number {0}, print iteration {1}'.format(inputNumber, printIteration))
    time.sleep(1) # Wait 1 second
We can test our function by executing the following two lines of code:
myFunction(1)
myFunction(2)
If we execute these two lines, Python will execute them in sequence. First myFunction(1) will be executed, then myFunction(2). The result we see is:
Printing the number 1, print iteration 0
Printing the number 1, print iteration 1
Printing the number 1, print iteration 2
Printing the number 1, print iteration 3
Printing the number 1, print iteration 4
Printing the number 1, print iteration 5
Printing the number 1, print iteration 6
Printing the number 1, print iteration 7
Printing the number 1, print iteration 8
Printing the number 1, print iteration 9
Printing the number 2, print iteration 0
Printing the number 2, print iteration 1
Printing the number 2, print iteration 2
Printing the number 2, print iteration 3
Printing the number 2, print iteration 4
Printing the number 2, print iteration 5
Printing the number 2, print iteration 6
Printing the number 2, print iteration 7
Printing the number 2, print iteration 8
Printing the number 2, print iteration 9
So, what if we wanted to run these two functions in parallel instead of in sequence? This is where threading comes in. Consider the following code. This is more complex than any other Python we have touched in this blog series to date; however, it is not too complex once you understand the objective:
# First import the threading module to support this functionality
import threading

# Define the threads class called myThread.
# This class is an object which stores all the necessary details for the thread.
# Specifically, we include a threadID so that we can identify individual threads.
# When executed, each thread will announce that it is starting, execute myFunction(),
# then announce that it is exiting.
class myThread (threading.Thread):
   def __init__(self, threadID):
      threading.Thread.__init__(self)
      self.threadID = threadID
   def run(self):
      print('Starting thread {0}'.format(self.threadID))
      myFunction(self.threadID)
      print('Exiting thread {0}'.format(self.threadID))
The above statement defines a class called myThread, which is an individual code thread that can be executed. We see that myThread takes an input called threadID, then executes myFunction(threadID). Now that this is defined, we can create two occurrences of myThread with the following code:
thread1 = myThread(1)
thread2 = myThread(2)
Note that, at this stage, we have only defined occurrences of myThread called thread1 and thread2. We have not executed these threads. We must execute them with the start command:
thread1.start()
thread2.start()
If we execute these two lines of code, we see something different from our previous attempt of executing myFunction(1) and myFunction(2). Indeed, this time, the two statements will run in parallel, and the resulting print outputs will overlap:
Starting thread 1
Printing the number 1, print iteration 0
Starting thread 2
Printing the number 2, print iteration 0
Printing the number 1, print iteration 1
Printing the number 2, print iteration 1
Printing the number 1, print iteration 2
Printing the number 2, print iteration 2
Printing the number 1, print iteration 3
Printing the number 2, print iteration 3
Printing the number 1, print iteration 4
Printing the number 2, print iteration 4
Printing the number 1, print iteration 5
Printing the number 2, print iteration 5
Printing the number 1, print iteration 6
Printing the number 2, print iteration 6
Printing the number 1, print iteration 7
Printing the number 2, print iteration 7
Printing the number 1, print iteration 8
Printing the number 2, print iteration 8
Printing the number 1, print iteration 9
Printing the number 2, print iteration 9
Exiting thread 1
Exiting thread 2
Now that we have discussed an example of threading (where multiple scripts are executed in parallel), let’s think about how this applies to Snowflake.
Connecting to Snowflake via Python
First, let’s remind ourselves how to establish a connection to Snowflake via Python. The following function can be used to establish a connection:
import snowflake.connector as sf

def sfConnect (
    sfPswd = '',
    sfUser = '',
    sfAccount = ''
) :
    import getpass

    # Request user password if not provided already
    if sfPswd == '' :
        import getpass
        sfPswd = getpass.getpass('Password:')

    # Test the connection to Snowflake
    try:
        sfConnection = sf.connect(
            user=sfUser,
            password=sfPswd,
            account=sfAccount
        )
        sfq = sfConnection.cursor()
        sfq.close()
        sfConnection.close()
    except:
        print('Connection failed. Check credentials')

    sfConnection = sf.connect(
        user=sfUser,
        password=sfPswd,
        account=sfAccount
    )

    print('Connection established')

    return sfConnection
If we execute the above function and pass the correct credentials, we can establish a connection to Snowflake and begin executing queries. In the following code, we establish our Snowflake connection, then run commands to use a specific role and warehouse in our connection:
# Establish connection
sfConnection = sfConnect(sfUser = '', sfAccount = '', sfPswd = '') ## Make sure you insert the right login credentials

# Use the role called MY_ROLE
sfConnection.cursor().execute('USE ROLE MY_ROLE')

# Use the warehouse called MY_WAREHOUSE
sfConnection.cursor().execute('USE WAREHOUSE MY_WAREHOUSE')
Creating a Function to Load a Table in Python
Recalling earlier sections of this post, we have already established that we can store destinations and sources in a list called variablesList and can use the entries in this list to construct a load statement for Snowflake. With this as a starting block, we can create a function that establishes a connection to Snowflake, uses a desired role and warehouse, then executes a given command:
# define the function that will be executed within each thread
def sfExecuteInSnowflake (
    sfQuery,
    sfRole = 'DATA_LOAD_ROLE',
    sfWarehouse = 'DATA_LOAD_WAREHOUSE'
) :
    # Establish connection
    ## Make sure you insert the right login credentials below.
    sfConnection = sfConnect(sfUser = 'mySnowflakeUser', sfAccount = 'mySnowflakeAccount', sfPswd = 'mySnowflakePassword')

    # Use role defined in function input
    sfConnection.cursor().execute('USE ROLE {0}'.format(sfRole))

    # Use warehouse defined in function input
    sfConnection.cursor().execute('USE WAREHOUSE {0}'.format(sfWarehouse))

    # Increase the session timeout if desired
    sfConnection.cursor().execute('ALTER SESSION SET STATEMENT_TIMEOUT_IN_SECONDS = 86400')

    # Execute the query sfQuery in Snowflake
    sfConnection.cursor().execute(sfQuery)
This function will be executed by each thread, passing in the necessary parameters.
Creating and Executing Threads to Bulk Load Data in Snowflake
We now define a new thread class suited to our needs:
# First import the threading module to support this functionality
import threading

# Define the threads class called sfExecutionThread.
# This class is an object which stores all the necessary details for the thread.
# Specifically, we include a threadID so that we can identify individual threads.
# When executed, each thread will announce that it is starting, execute sfExecuteInSnowflake(),
# then announce that it is exiting.
class sfExecutionThread (threading.Thread):
   def __init__(self, threadID, sqlQuery):
      threading.Thread.__init__(self)
      self.threadID = threadID
      self.sqlQuery = sqlQuery
   def run(self):
      print('Starting {0}: {1}'.format(self.threadID, self.sqlQuery))
      sfExecuteInSnowflake(self.sqlQuery)
      print('Exiting {0}: {1}'.format(self.threadID, self.sqlQuery))
Now that we have a thread object we can use to execute a desired query in Snowflake, all that remains is to create each thread and execute it. For this, we return to our previous list of copyIntoStatements. By looping through this list, we can construct a new list comprising of threads that are ready to execute the COPY INTO statements in Snowflake:
# Create the empty list of threads
threads = []

# Define a counter which will be used as the threadID
counter = 0

# Loop through each statement in the copyIntoStatements list,
# adding the sfExecutionThread thread to the list of threads
# and incrementing the counter by 1 each time.
for statement in copyIntoStatements:
    threads.append(sfExecutionThread(counter, statement))
    counter += 1
With this, we achieve a list of threads that are ready to be executed. We can execute each thread by using one final loop:
# Execute the threads
for thread in threads:
    thread.start()
After executing the above to start all of our threads, we can look at the query history in Snowflake and see results similar to this screenshot where our tables are all loading at the same time. As stated earlier, this specific screenshot is using a single XS multi-cluster warehouse to ensure that there is neither resource contention nor queuing:
Above: Multiple simultaneous loads in history
The Complete Script to Bulk Load Data in Snowflake with Multiple Threads
Below, I have included the full script, which can be used as a starting point to replicate the process in your own environment:
# First import the threading module to support this functionality
import threading

# Second import the Snowflake module
import snowflake.connector as sf

def sfConnect (
    sfPswd = '',
    sfUser = '',
    sfAccount = ''
) :
    import getpass

    # Request user password if not provided already
    if sfPswd == '' :
        import getpass
        sfPswd = getpass.getpass('Password:')

    # Test the connection to Snowflake
    try:
        sfConnection = sf.connect(
            user=sfUser,
            password=sfPswd,
            account=sfAccount
        )
        sfq = sfConnection.cursor()
        sfq.close()
        sfConnection.close()
    except:
        print('Connection failed. Check credentials')

    sfConnection = sf.connect(
        user=sfUser,
        password=sfPswd,
        account=sfAccount
    )

    print('Connection established')

    return sfConnection

# Define the threads class called sfExecutionThread.
# This class is an object which stores all the necessary details for the thread.
# Specifically, we include a threadID so that we can identify individual threads.
# When executed, each thread will announce that it is starting, execute sfExecuteInSnowflake(),
# then announce that it is exiting.
class sfExecutionThread (threading.Thread):
   def __init__(self, threadID, sqlQuery):
      threading.Thread.__init__(self)
      self.threadID = threadID
      self.sqlQuery = sqlQuery
   def run(self):
      print('Starting {0}: {1}'.format(self.threadID, self.sqlQuery))
      sfExecuteInSnowflake(self.sqlQuery)
      print('Exiting {0}: {1}'.format(self.threadID, self.sqlQuery))

# Define the function that will be executed within each thread
def sfExecuteInSnowflake (
    sfQuery,
    sfRole = 'DATA_LOAD_ROLE',
    sfWarehouse = 'DATA_LOAD_WAREHOUSE'
) :
    # Establish connection
    ## Make sure you insert the right login credentials below.
    sfConnection = sfConnect(sfUser = 'mySnowflakeUser', sfAccount = 'mySnowflakeAccount', sfPswd = 'mySnowflakePassword')

    # Use role defined in function input
    sfConnection.cursor().execute('USE ROLE {0}'.format(sfRole))

    # Use warehouse defined in function input
    sfConnection.cursor().execute('USE WAREHOUSE {0}'.format(sfWarehouse))

    # Increase the session timeout if desired
    sfConnection.cursor().execute('ALTER SESSION SET STATEMENT_TIMEOUT_IN_SECONDS = 86400')

    # Execute the query sfQuery in Snowflake
    sfConnection.cursor().execute(sfQuery)

# Define the list of variables which determine the data that will be loaded
variablesList = [
  {
    'sourceLocation': 'DATABASE.SCHEMA.myStage/Table_A',
    'destinationTable': 'DATABASE.SCHEMA.TABLE_A'
  },
  {
    'sourceLocation': 'DATABASE.SCHEMA.myStage/Table_B',
    'destinationTable': 'DATABASE.SCHEMA.TABLE_B'
  },
  {
    'sourceLocation': 'DATABASE.SCHEMA.myStage/Table_C',
    'destinationTable': 'DATABASE.SCHEMA.TABLE_C'
  },
  {
    'sourceLocation': 'DATABASE.SCHEMA.myStage/Table_D',
    'destinationTable': 'DATABASE.SCHEMA.TABLE_D'
  },
  {
    'sourceLocation': 'S3:myS3Bucket/Table_E',
    'destinationTable': 'DATABASE.SCHEMA.TABLE_E'
  },
  {
    'sourceLocation': 'S3:myS3Bucket/Table_F',
    'destinationTable': 'DATABASE.SCHEMA.TABLE_F'
  },
  {
    'sourceLocation': 'S3:myS3Bucket/Table_G',
    'destinationTable': 'DATABASE.SCHEMA.TABLE_G'
  },
  {
    'sourceLocation': 'S3:myS3Bucket/Table_H',
    'destinationTable': 'DATABASE.SCHEMA.TABLE_H'
  }
]

# Define an empty list to populate with COPY INTO statements
copyIntoStatements = []

# Loop through the members of variablesList and construct the COPY INTO statements
# Use .format() to replace the {0} and {1} with variables destinationTable and sourceLocation
for member in variablesList:
  copyIntoStatements.append(
    '''
    COPY INTO {0}
    FROM @{1}
      FILE_FORMAT = (FORMAT_NAME = DATABASE.SCHEMA.MY_CSV_FORMAT)
      ;
    '''.format(member['destinationTable'], member['sourceLocation'])
  )

# Create the empty list of threads
threads = []

# Define a counter which will be used as the threadID
counter = 0

# Loop through each statement in the copyIntoStatements list,
# adding the sfExecutionThread thread to the list of threads
# and incrementing the counter by 1 each time.
for statement in copyIntoStatements:
    threads.append(sfExecutionThread(counter, statement))
    counter += 1

# Execute the threads
for thread in threads:
    thread.start()
Summary
So, here we are with a complete Python script to create multiple threads that can be executed simultaneously to execute COPY INTO statements in Snowflake. I hope that you have found this post informative and helpful.
Whilst we have focused heavily on how this approach can be used to bulk load data, the applications for this approach can spread much further. One way could be to improve the number of dynamic elements, i.e. including the file format as a third variable. I challenge you to try out this method in your own environment and measure the results yourself; I’d be keen to hear about your progress in the comments section, so please drop a line with your findings. Thanks for reading!