
As you may be aware, Snowflake has a cool feature which allows its standard functionality to be extended through the use of external functions. Among several other capabilities, this includes the ability to leverage Azure Functions within Snowflake. This unlocks a whole new realm of possibility and flexibility for the Snowflake platform, and allows users to apply complex business functions to their data directly within Snowflake.
Why Choose an External Function Over a Snowpark-Based Stored Procedure or Function?
Of course, Snowflake has recently released Snowpark and this has also unlocked a whole new realm of possibility, and I have covered that extensively in my Snowflake with Python series; however, there is a critical component that is lacking where Snowpark-based functionality is concerned: external connectivity.
In its current form, Snowpark-based stored procedures and functions cannot access external resources during execution. You can prepare them in advance by providing all the additional files that you want at time of creation, but you cannot access the “outside world” using the functionality itself. For example, you cannot send a request to an API or connect to outside data sources. This is where external functions can step in and provide a lot of value.
In this blog, we will walk through how to set up some simple Python functions within Azure Function Apps and configure them as external functions in Snowflake. This post assumes you already have an Azure environment and a basic understanding of how to navigate it. Be prepared, this process can take some time to set up and this post is quite lengthy, so you may wish to approach it in stages instead of consuming it all at once.
API Knowledge Disclaimer
If you are unfamiliar with APIs and how they work, don’t worry. This post will not explain APIs and how they work; however, it also will not expect any knowledge of this kind and you should still be able to follow along and set up your own integrations.
Our Basic Sample Functions
Before we get started, let’s have a quick run through of the different functions that we are going to set up today.
Sum
We will begin by setting up a simple SUM function. It will retrieve one or more numbers as an input and output the total sum of these numbers. For example:
SUM(4, 5, 6) = 4 + 5 + 6 = 15
This function is already possible in Snowflake using a different syntax; however, this gives us a simple way to test that our integration is working correctly.
Product
Going slightly further, we will also set up a simple product function. Again it will retrieve one or more numbers as an input, and the output will be the total product of these numbers. For example:
PRODUCT(4, 5, 6) = 4 * 5 * 6 = 120
Again, this function is already possible in Snowflake using a different syntax; however, this gives us a simple way to test that our integration is working correctly for multiple functions.
UK Flood Warning Measurements
After setting up the two sample functions above in this post, a follow-up post will go through how to add new external functions to the framework that we have set up. This post will use a more complex example that leverages an API. Specifically, The UK government has a public facing API which contains data on flood monitoring measurements across various stations in the UK, documented here. We will set up an API call which retrieves the latest measurements for a given station and call this as a function within Snowflake to pull readings for a set of stations in Northern Manchester. Before we can do this though, we need to go through this first post to set up a framework for integrating Azure functions with Snowflake.
Integration Between Azure and Snowflake
Before we can begin on our more complex flood warning measurements example, or even our two simpler examples, let us first consider the general data flow for an external function being called from Snowflake.
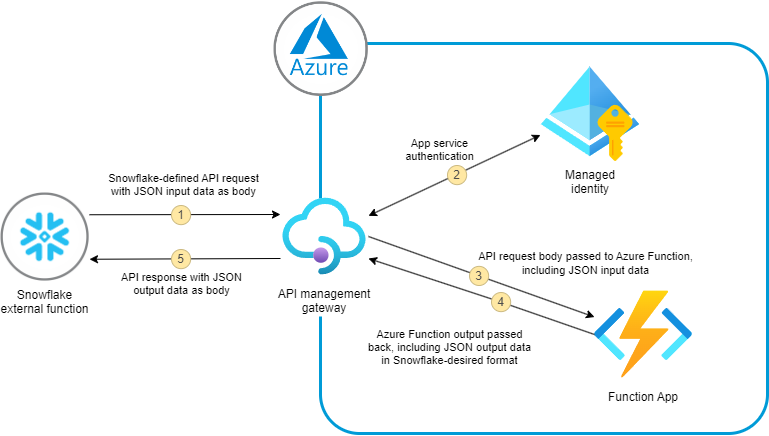
As we can see in this diagram, there are four key components to a Snowflake external function leveraging Azure Function:
- A Snowflake external function object
- An Azure API management gateway that facilitates the integration by exposing the Azure Function to Snowflake (API stands for Application Programming Interface)
- Authorised managed identity for the app service
- An Azure Function
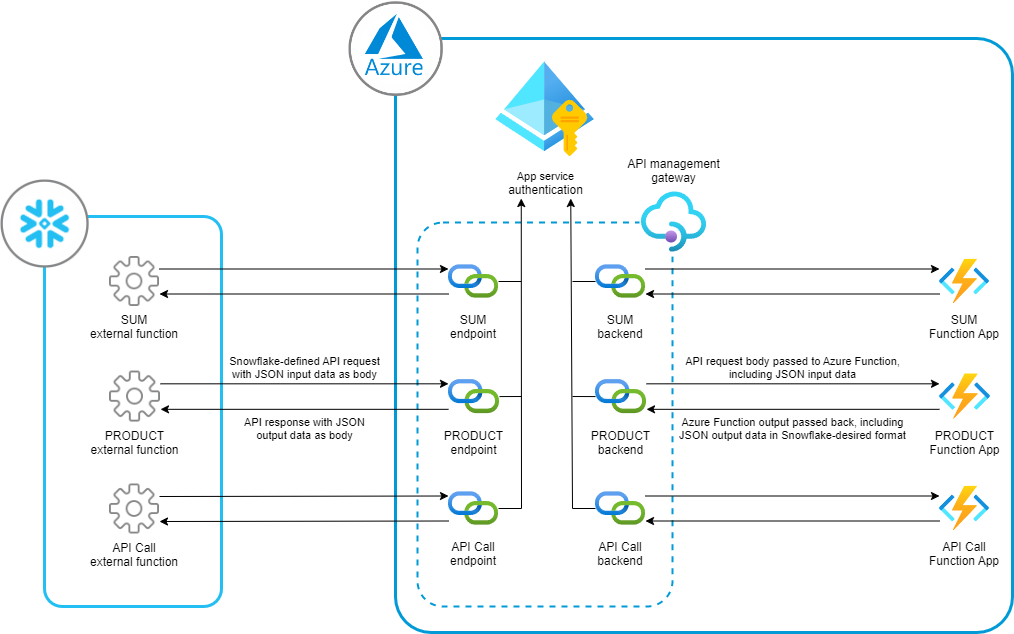
Above is a high-level diagram for a single external function setup. Our specific goal today is to set up 3 external functions, which makes our diagram more complex:
To set up our examples as simply as possible, we are going to complete the following steps:
- Create an Azure API management gateway to expose the Azure functions to Snowflake
- Create an Azure functions app containing a function for each of our examples
- Configure the Azure functions app to leverage app service authentication
- Configure the Azure API management gateway to support the Azure functions as endpoints
- Create a Snowflake API integration object and configure it to access the Azure API management gateway using the app service authentication
- Create and test some external function objects in Snowflake
- Secure the Azure API management gateway to only allow requests via Snowflake
I personally believe the setup is simplest when following this order as it results in the least amount of back and forth whilst allowing us to set up all of our functions under a single functions app and API management gateway. If you are more experienced with Azure, you are more than welcome to play around with this setup to make it fit your own requirements.
Note that we create the Azure API management gateway first as it takes some time for Azure to deploy it.
Step-by-Step Guide to Setting up Our Two Simple Example Functions
We will begin by setting up and configuring our two simple example functions: SUM and PRODUCT. Once we have these set up and working, adding new functions becomes much simpler and allows us to focus on the complexity of the function rather than the complexity of the underlying architecture.
1. Creating an Azure API Management Gateway
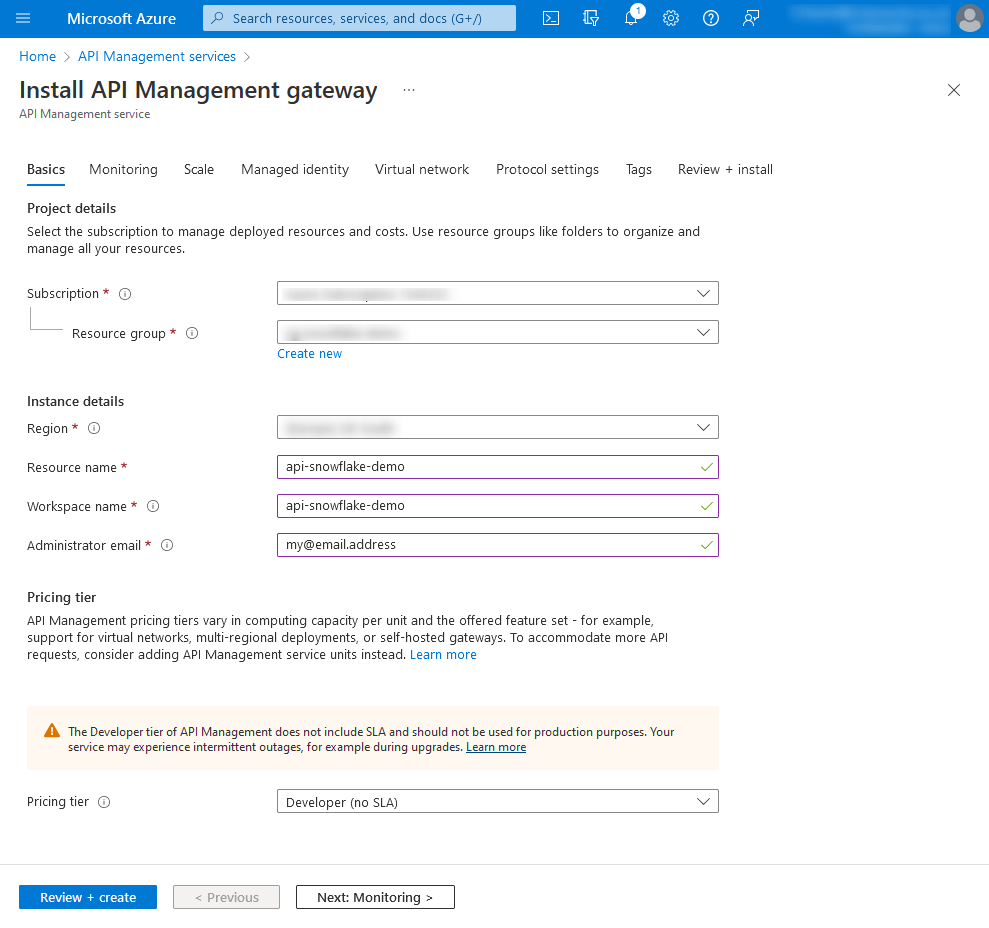
Before diving into the external functions themselves, we create an Azure API management gateway which will be used to expose our Azure functions to Snowflake. You may wish to leave this step until after you have created and tested your Azure functions; however, I like to do this step first as Azure may take an hour to deploy a new API management gateway and I’d rather it do that in the background whilst I’m working on the Azure functions.

Provide the basic information, leaving your pricing tier as Developer (no SLA) unless you wish for otherwise, and click Review and create.
 You may find it easier to record your API management gateway for later reference in a text file or similar.
Our important demo variables so far:
API Management gateway: api-snowflake-demo
2. Configuring your Azure Functions
There are plenty of ways to create an Azure Functions App. My personal favourite is to leverage the integration with Visual Studio Code (VSCode) as the development environment aligns really well with Azure functionality. The purpose of this post is not to run through Python itself or Azure functions so I will not go into significant detail here. However, this section will detail how to leverage the demos in InterWorks’ Example Snowflake Azure External Functions Git repository through VSCode; as a short cut to deploying the functions in Azure. This is covered in step 2c. Deploying Azure Functions using VSCode.
Before we do this, let’s discuss the specific requirements for a Snowflake external function and the code for our specific examples.
2a. How Snowflake External Functions Transfer Data
Before we can define an Azure function to work with Snowflake, we need to understand how the data is transferred between Snowflake and our function. This determines how the function should expect to retrieve any input variables. This is best understood using an example, so consider the following query and resulting table from Snowflake:
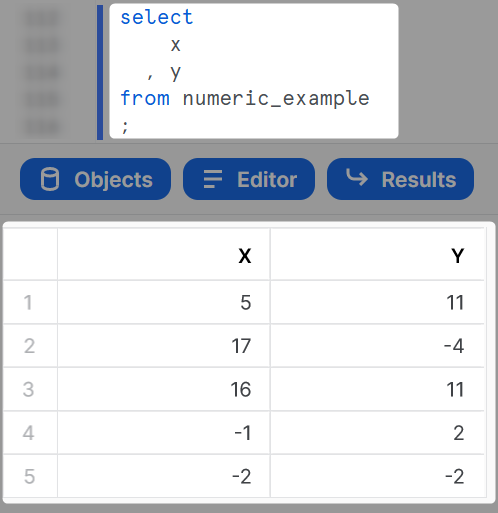
As we can see here, any SELECT query in Snowflake outputs not only the requested columns but also a row number. Our query selects two columns, X and Y, and outputs both of these along with a row number. Our full output is five rows, each comprised of three columns.
Before we continue, if you are not familiar with JSON data structures then you may wish to review our Introduction to Semi-Structured JSON Data Formats.
Using arrays, we can right this tabular output a different way. Instead of outputting it as a table, we could break the rows into members of an array where each row is also its own array:
[
    [0, 5, 11]
  , [1, 17, -4]
  , [2, 16, 11]
  , [3, -1, 2]
  , [4, -2, -2]
]
There are a few things to understand here. We can see that the second two numbers in each row match our X and Y values in our table, so this makes sense. However, the first digit in each row is a bit more confusing. This is actually the row number. We can see that it increments by 1 with each row, beginning at 0 and ending at 4. This is in line with our five row output; however, we start counting at 0 instead of at 1. This is a common practice in programming and data, however if you are seeing it for the first time take a minute to absorb what is happening to ensure you understand this structure.
This JSON structure forms the basis of how Snowflake will transfer data within an API request to an API gateway. However, we are not done yet. Snowflake will wrap this JSON structure into a larger JSON requests object (which we will not go into), and it achieves this by making two changes.
First, the information is inserted into a "data" key as follows:
{
  "data" : [
      [0, 5, 11]
    , [1, 17, -4]
    , [2, 16, 11]
    , [3, -1, 2]
    , [4, -2, -2]
  ]
}
Second, this entire structure is converted into a string and inserted under another key called `”body”`:
{
  "body" : "{\"data\" : [ [0, 5, 11], [1, 17, -4], [2, 16, 11], [3, -1, 2], [4, -2, -2] ]}"
}
This is the same structure as we began with; however, it has been:
- Collapsed into a single row
- Stored under a “data” key
- Converted to a string
- Stored under a “body” key
This is the final format with which the data will be transferred from Snowflake to the API gateway.
Keep in mind that this structure is used by Snowflake both when sending and receiving data. Any external function you build in Azure must return data in this same format, and must return the same number of rows as the incoming request.
When the Azure function receives this request, it will automatically attempt to read this and will reverse those final two steps. So, if you are testing your functions directly, it is acceptable to directly send the body as a JSON object in a single row, as follows:
{"data" : [ [0, 5, 11], [1, 17, -4], [2, 16, 11], [3, -1, 2], [4, -2, -2] ]}
2b. Building an Azure Function for Snowflake-Compatible Inputs and Outputs
The key things to understand about a function designed to work with Snowflake is that it must perform the following feats:
- Read the string
"body"value of the incoming event and convert it to a JSON object - Read the
"data"value from this JSON object to gain an array of data rows - Iterate through each of these rows, performing the desired functionality on the input variables. During this iteration, build a new
"data"JSON object which will be returned by the function. Ensure this new"data"object still contains row numbers and outputs the same number of rows as it receives in the input. - Convert the
"data"JSON object to a string - Output this string in the
"body"key of the response
Below is the code for each of our two example functions in Python.
Azure Function to Perform a SUM in a Snowflake-Friendly Way
Here is the Python code which creates a Snowflake-friendly SUM function. You should be able to copy and paste this directly into your own development environment.
# Snowflake External Function - Sum

## Simply adds together the input variables
## which are expected as numbers

## Import Azure modules
import azure.functions as func
import logging

## Import necessary modules for the function
import json
import functools

## Define the main function
def main(req: func.HttpRequest) -> func.HttpResponse:

  ### Attempt to parse the body of the request as JSON
  try:
    req_body = req.get_json()
  except ValueError:
    logging.info("Failed to parse request body as JSON")
    logging.info(e)
    return func.HttpResponse(body="Failed to parse request body as JSON", status_code=400)
  else:

    try :

      #### Additional logging that is not necessary
      #### once in production
      logging.info("req_body:")
      logging.info(req_body)

      #### Retrieve the "data" key of the request body.
      #### When the request comes from Snowflake, we expect data to be a
      #### an array of each row in the Snowflake query resultset.
      #### Each row is its own array, which begins with the row number,
      #### for example [0, 2, 3] would be the 0th row, in which the
      #### variables passed to the function are 2 and 3. In this case,
      #### the function sum output would be 5.
      input_rows = req_body.get("data")

      #### Additional logging that is not necessary
      #### once in production
      logging.info("input_rows:")
      logging.info(input_rows)

      #### Iterate over input rows to
      #### perform the row-level function and
      #### store the results in a single list
      #### that is a compatible response for
      #### a Snowflake External Function
      response_list = []
      for input_row in input_rows :

        ##### Retrieve the row number
        row_number = input_row[0]

        ##### Retrieve the array of numbers to sum
        numbers_to_sum = input_row[1:]

        ##### try/except is used for error handling
        try:
          ###### Calculate the row sum
          row_sum = functools.reduce(lambda a,b : a+b, numbers_to_sum)
        except:
          row_sum = "Error"

        ##### Append the result to the list
        ##### of rows to return
        response_list.append([row_number, row_sum])

      #### Put response into a JSON dictionary,
      #### then convert it to a string for transmission
      response_json = {"data": response_list}
      response_as_string = json.dumps(response_json)

      #### Send the response
      response_headers = {"Content-Type" : "application/json"}
      return  func.HttpResponse(body=response_as_string, status_code=200, headers=response_headers)

    ### Error handling
    except Exception as e:

      logging.info(f"Manual log - Error encountered")
      logging.info(e)
      return  func.HttpResponse(body=f"Error encountered", status_code=400)
Azure Function to Perform a PRODUCT in a Snowflake-Friendly Way
Here is the Python code which creates a Snowflake-friendly PRODUCT function. You should be able to copy and paste this directly into your own development environment.
# Snowflake External Function - Product

## Simply adds together the input variables
## which are expected as numbers

## Import Azure modules
import azure.functions as func
import logging

## Import necessary modules for the function
import json
import functools

## Define the main function
def main(req: func.HttpRequest) -> func.HttpResponse:

  ### Attempt to parse the body of the request as JSON
  try:
    req_body = req.get_json()
  except ValueError:
    logging.info("Failed to parse request body as JSON")
    logging.info(e)
    return func.HttpResponse(body="Failed to parse request body as JSON", status_code=400)
  else:

    try :

      #### Additional logging that is not necessary
      #### once in production
      logging.info("req_body:")
      logging.info(req_body)

      #### Retrieve the "data" key of the request body.
      #### When the request comes from Snowflake, we expect data to be a
      #### an array of each row in the Snowflake query resultset.
      #### Each row is its own array, which begins with the row number,
      #### for example [0, 2, 3] would be the 0th row, in which the
      #### variables passed to the function are 2 and 3. In this case,
      #### the function product output would be 6.
      input_rows = req_body.get("data")

      #### Additional logging that is not necessary
      #### once in production
      logging.info("input_rows:")
      logging.info(input_rows)

      #### Iterate over input rows to
      #### perform the row-level function and
      #### store the results in a single list
      #### that is a compatible response for
      #### a Snowflake External Function
      response_list = []
      for input_row in input_rows :

        ##### Retrieve the row number
        row_number = input_row[0]

        ##### Retrieve the array of numbers to product
        numbers_to_multiply = input_row[1:]

        ##### try/except is used for error handling
        try:
          ###### Calculate the row product
          row_product = functools.reduce(lambda a,b : a*b, numbers_to_multiply)
        except:
          row_product = "Error"

        ##### Append the result to the list
        ##### of rows to return
        response_list.append([row_number, row_product])

      #### Put response into a JSON dictionary,
      #### then convert it to a string for transmission
      response_json = {"data": response_list}
      response_as_string = json.dumps(response_json)

      #### Send the response
      response_headers = {"Content-Type" : "application/json"}
      return  func.HttpResponse(body=response_as_string, status_code=200, headers=response_headers)

    ### Error handling
    except Exception as e:

      logging.info(f"Manual log - Error encountered")
      logging.info(e)
      return  func.HttpResponse(body=f"Error encountered", status_code=400)
2c. Deploying Azure Functions using VSCode
As stated above, this section will detail how to leverage the demos in InterWorks’ Example Snowflake Azure External Functions Git repository through VSCode (as a shortcut to deploying the functions in Azure). If you are choosing to deploy your Azure Functions through another method, feel free to skip this section and we will meet back at step 2d. Testing the Azure Functions.
Required VSCode Extensions
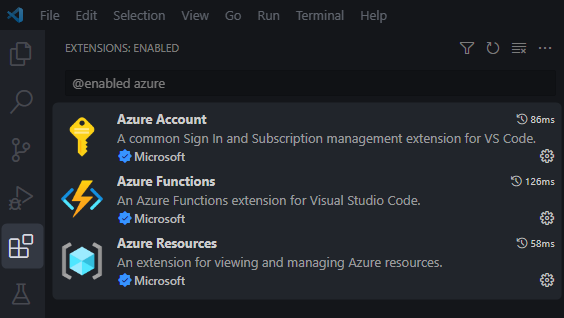
The first step is to download and install VSCode, and prepare it for our purposes. You can either leverage the entire Azure Tools extension, or cherry-pick your specific requirements. Personally, I have installed the following three extensions to meet my purposes:
- Azure Account
- Azure Functions
- Azure Resources
These can all be installed in the Extensions pane on the left side of VSCode:
Accessing InterWorks’ Example Git Repository
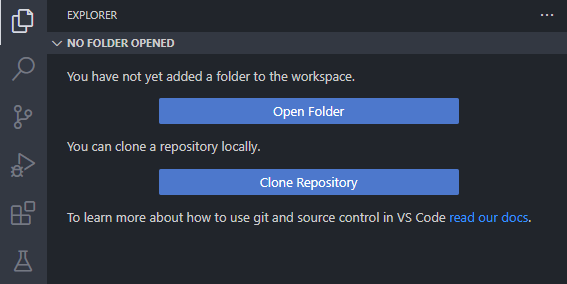
Once the extensions are installed and VSCode is restarted, our goal is to download InterWorks’ Example Snowflake Azure External Functions Git repository into a workspace project. If you have already enabled Git integration, then VSCode will allow you to clone the repository directly. Otherwise, simply download/clone the repository manually and add it to the workspace with Open Folder:
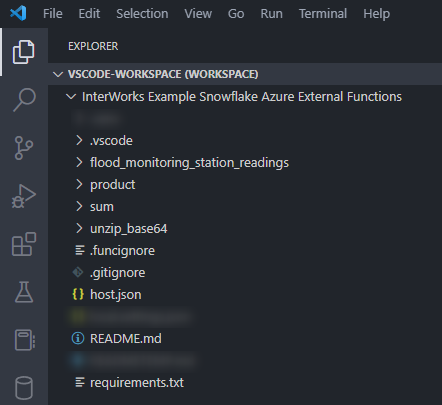
This should result in a workspace similar to the following:
If not, you can initialise this by using the command palette (Shift+Cmd+P on Mac, Shift+Ctrl+P on Windows) and executing the command Azure Functions: Initialize Project for Use with VS Code…

It now remains to create the Azure Functions App in Azure and upload our repository of functions to it. This is accomplished in a couple of steps.
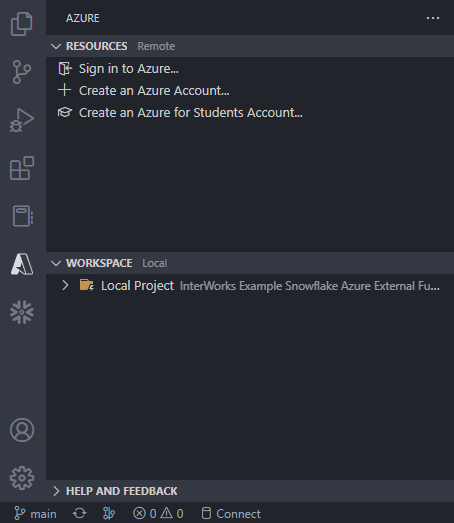
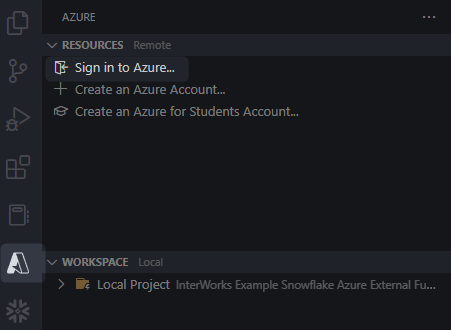
Sign in to Azure in VSCode
First, select Sign in to Azure on the Azure pane and provide your relevant details, including selecting the Azure Tenant that you wish to upload the Function App to:
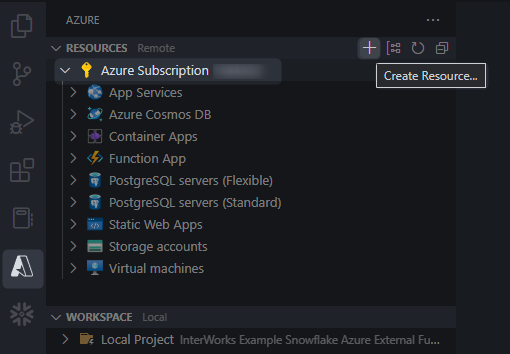
Once signed in, you should be able to see your Azure Subscription.
Creating the Azure Functions App from VSCode
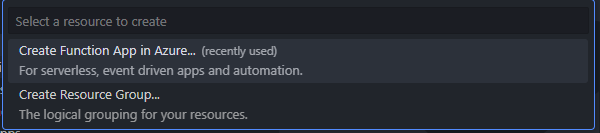
If you do not have a Functions App created already, you can create one here by select the + icon to create a new resource. The plus icon might not appear until you hover over the space where it lives!
Deploy your Function App from VSCode
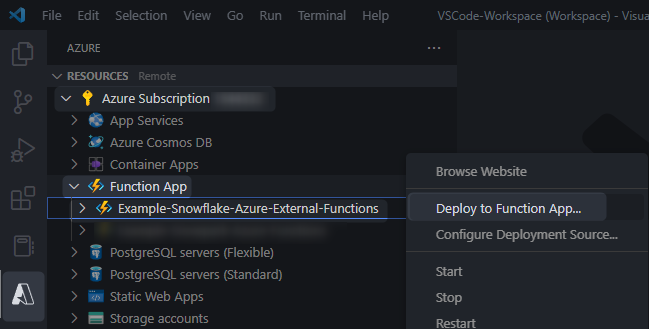
There are two ways to deploy to a Function App from the UI of VSCode. The first is to simply find the Function App under resources, right click on it and select Deploy to Function App…
The other option is to select the Deploy… icon for your local workspace. Again, the icon might not appear until you hover over the space where it lives!
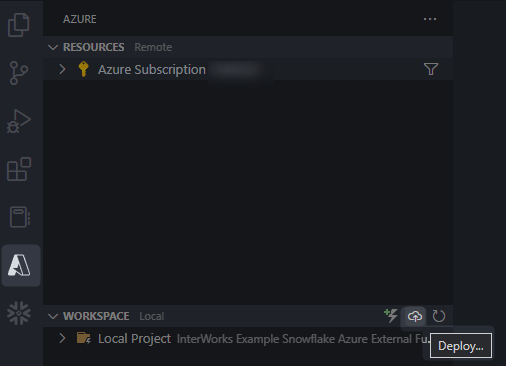
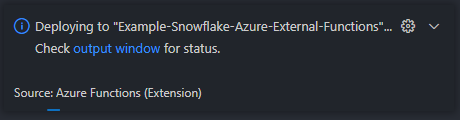
Using either of the above options, you can then deploy your function. A pop-up will appear in VSCode whilst the Function App deploys:
Once this has deployed, we can graduate to testing!
If you have used this approach then you may see additional functions than those discussed in this post. Feel free to play with them if you wish and look out for other blog posts that discuss them!
2d. Testing the Azure Functions
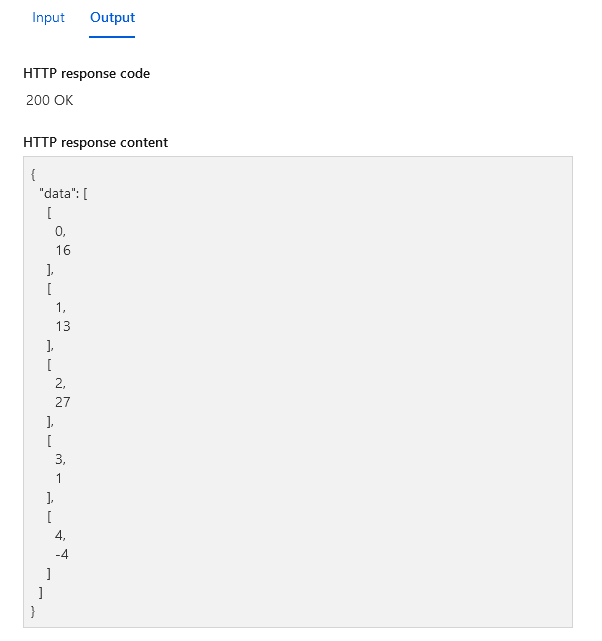
Once you have inserted this code into an Azure Function, you should be able to test it through either the Azure Portal or your development environment. As stated above, if you are testing your functions directly, it is acceptable to directly send the body as a JSON object in a single row as follows:
{"data" : [ [0, 5, 11], [1, 17, -4], [2, 16, 11], [3, -1, 2], [4, -2, -2] ]}
If you wish to test your function from within the Azure Portal, navigate to the Code + Test pane within the function and leverage the Test/Run functionality, inserting your single-row JSON into the body.
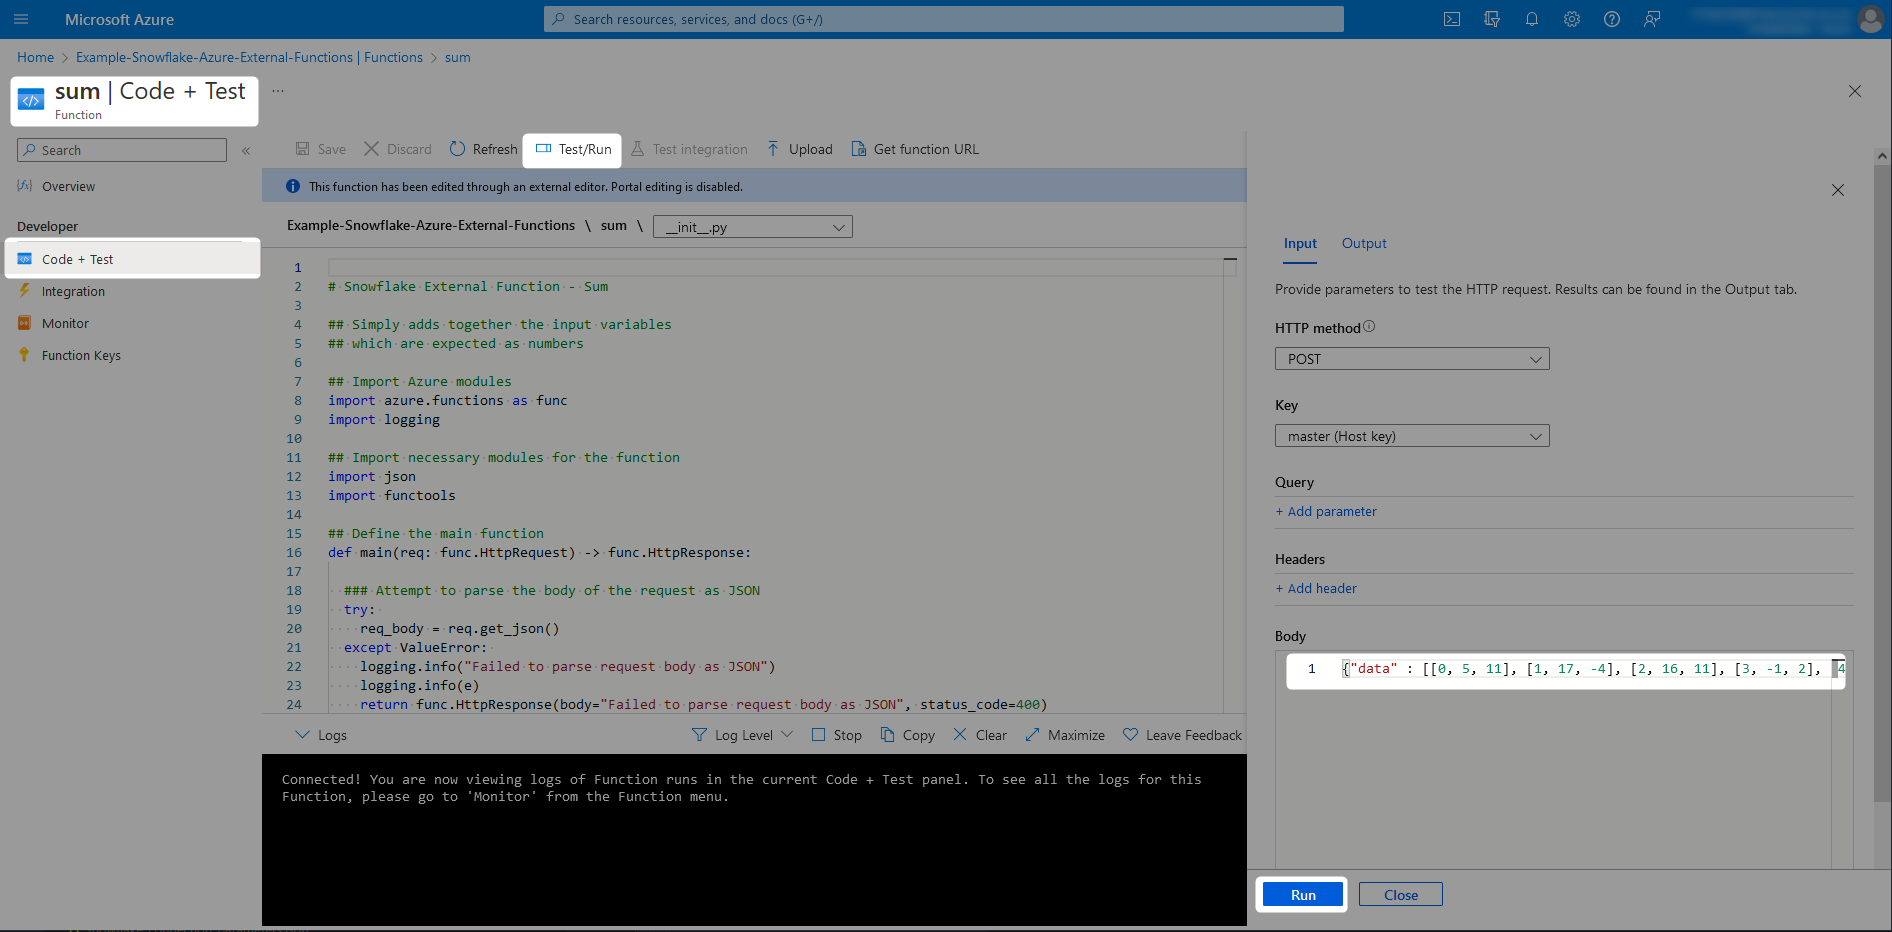
You should see a result similar to the following, depending on your inputs and which function you are testing:
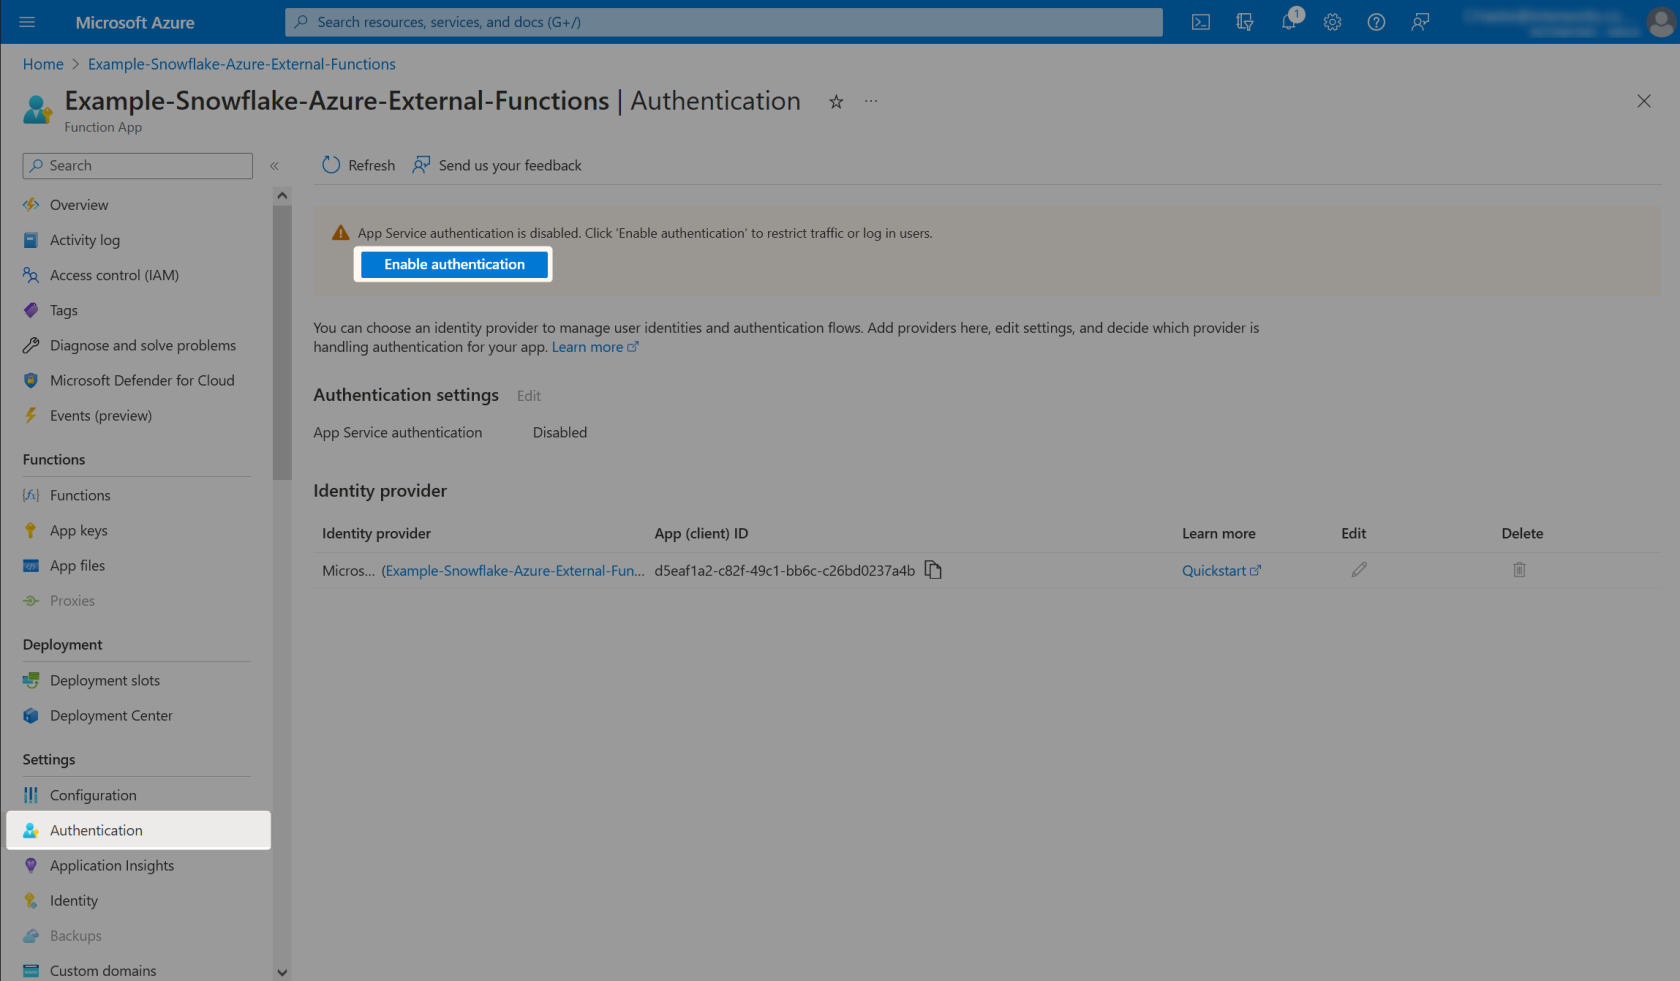
3. Configure the Azure Functions App to Leverage App Service Authentication
By default, Azure Function Apps are not secured and can be accessed directly via URL. Ideally we wish to avoid this whilst still allowing Snowflake to access the Function App via the API management gateway. To improve this security, we configure the Azure Function App to require authentication.
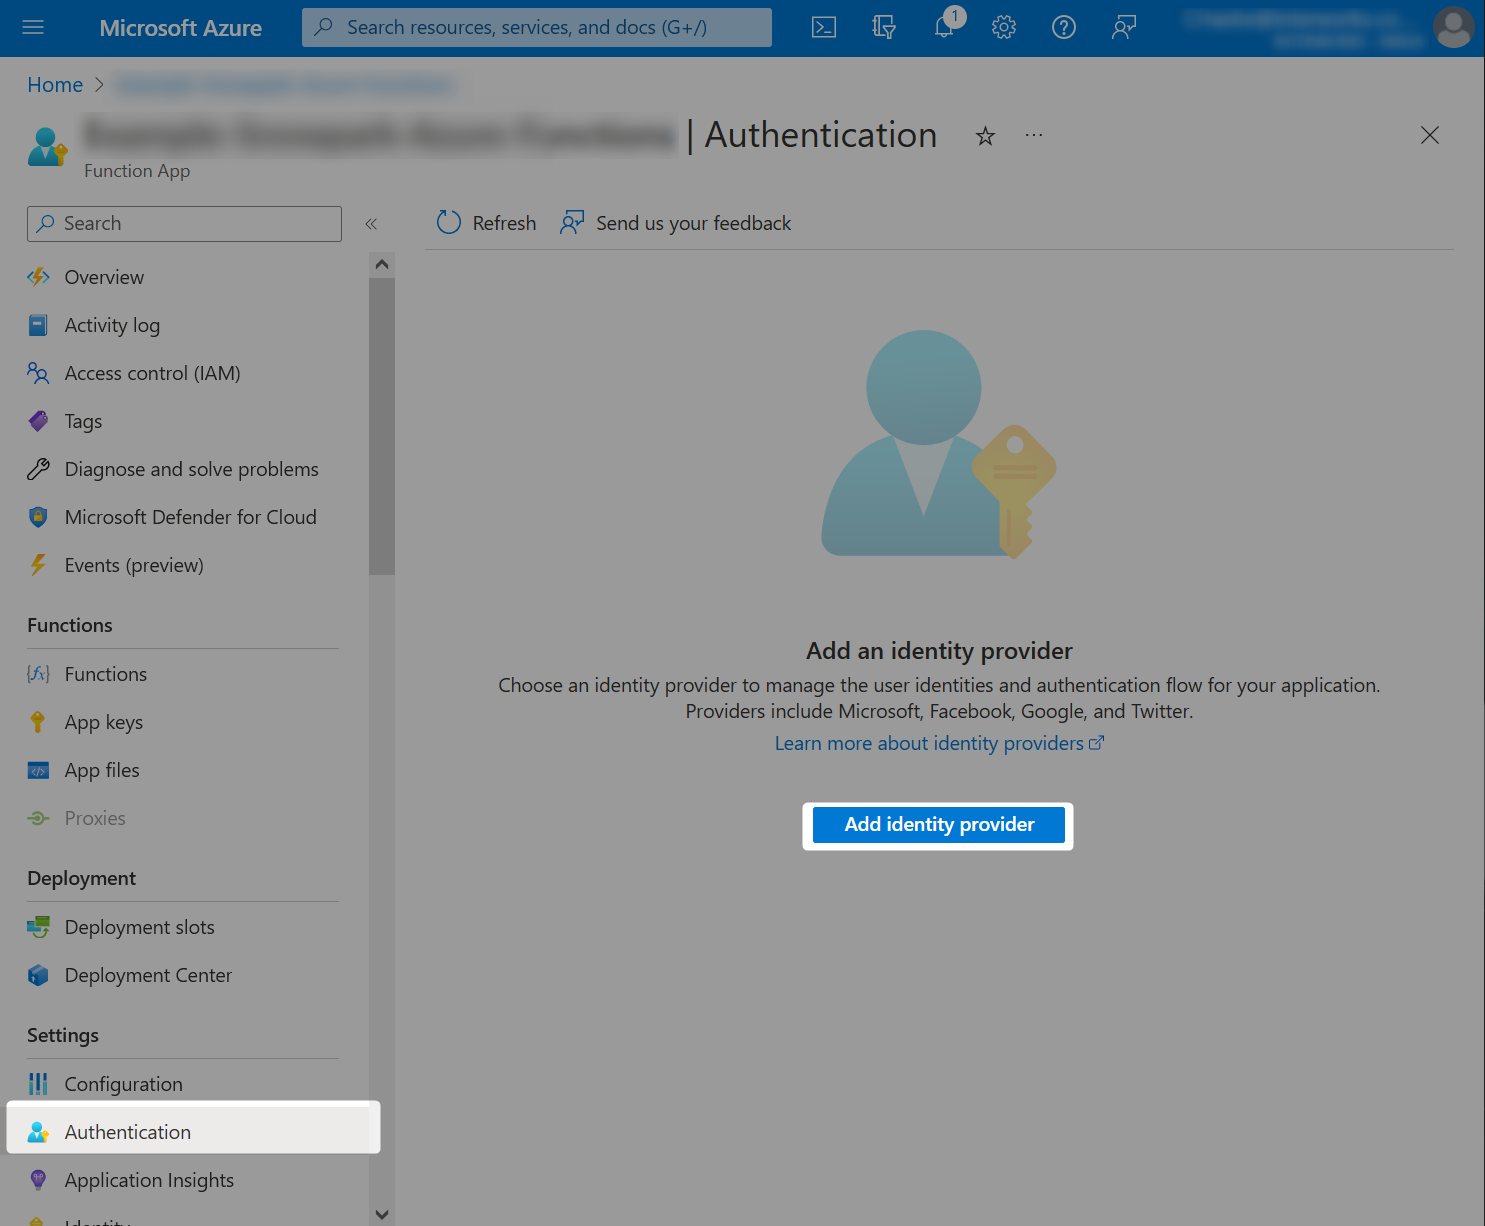
Select an identity provider and either create a new app registration or select an existing one if relevant. You should be able to follow similar settings to the following:
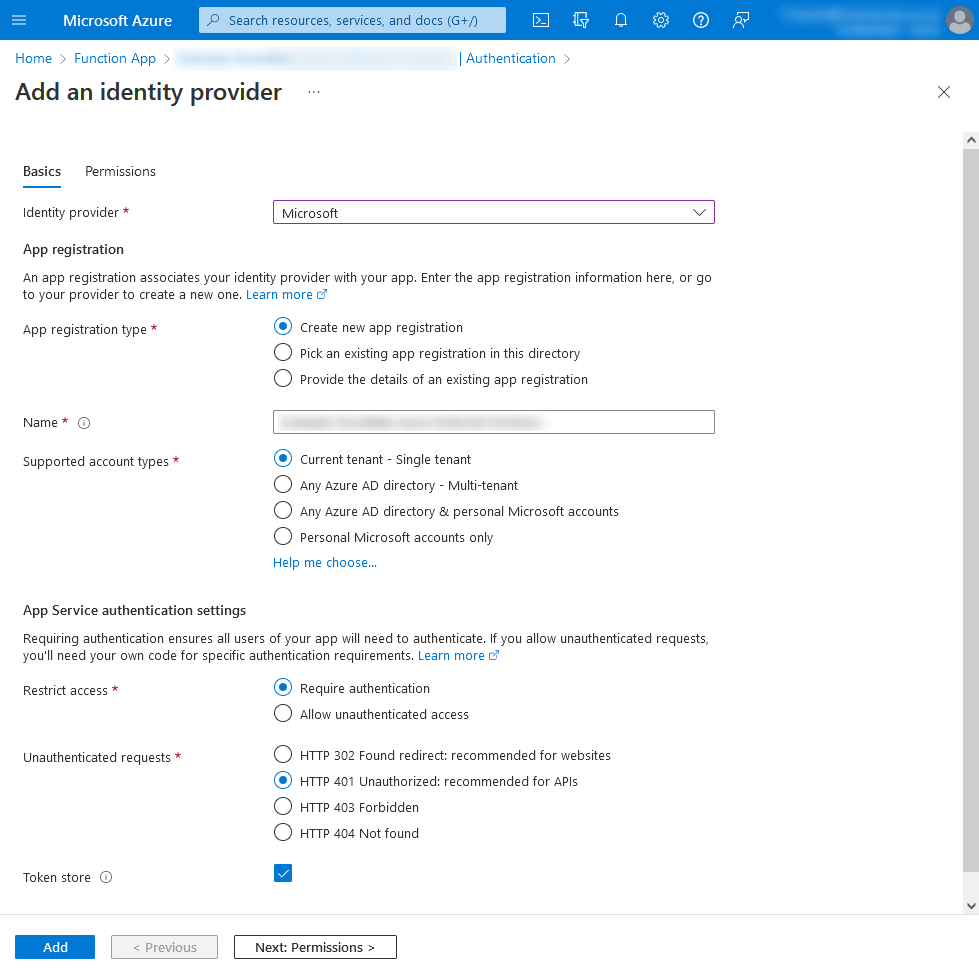
Once this is complete, you will see the identity provider listed along with an App (client) ID.
As with the API management gateway name, you may find it easier to record key details for later reference in a text file or similar. This App (client) ID is critical and should be noted down.
Our important demo variables so far:
API Management gateway: api-snowflake-demo
Azure Function App: Example-Snowflake-Azure-External-Functions
App (client) ID: a1bcd2e3-a12b-23d4-ef5g-a12bc3456d7e
Important Note
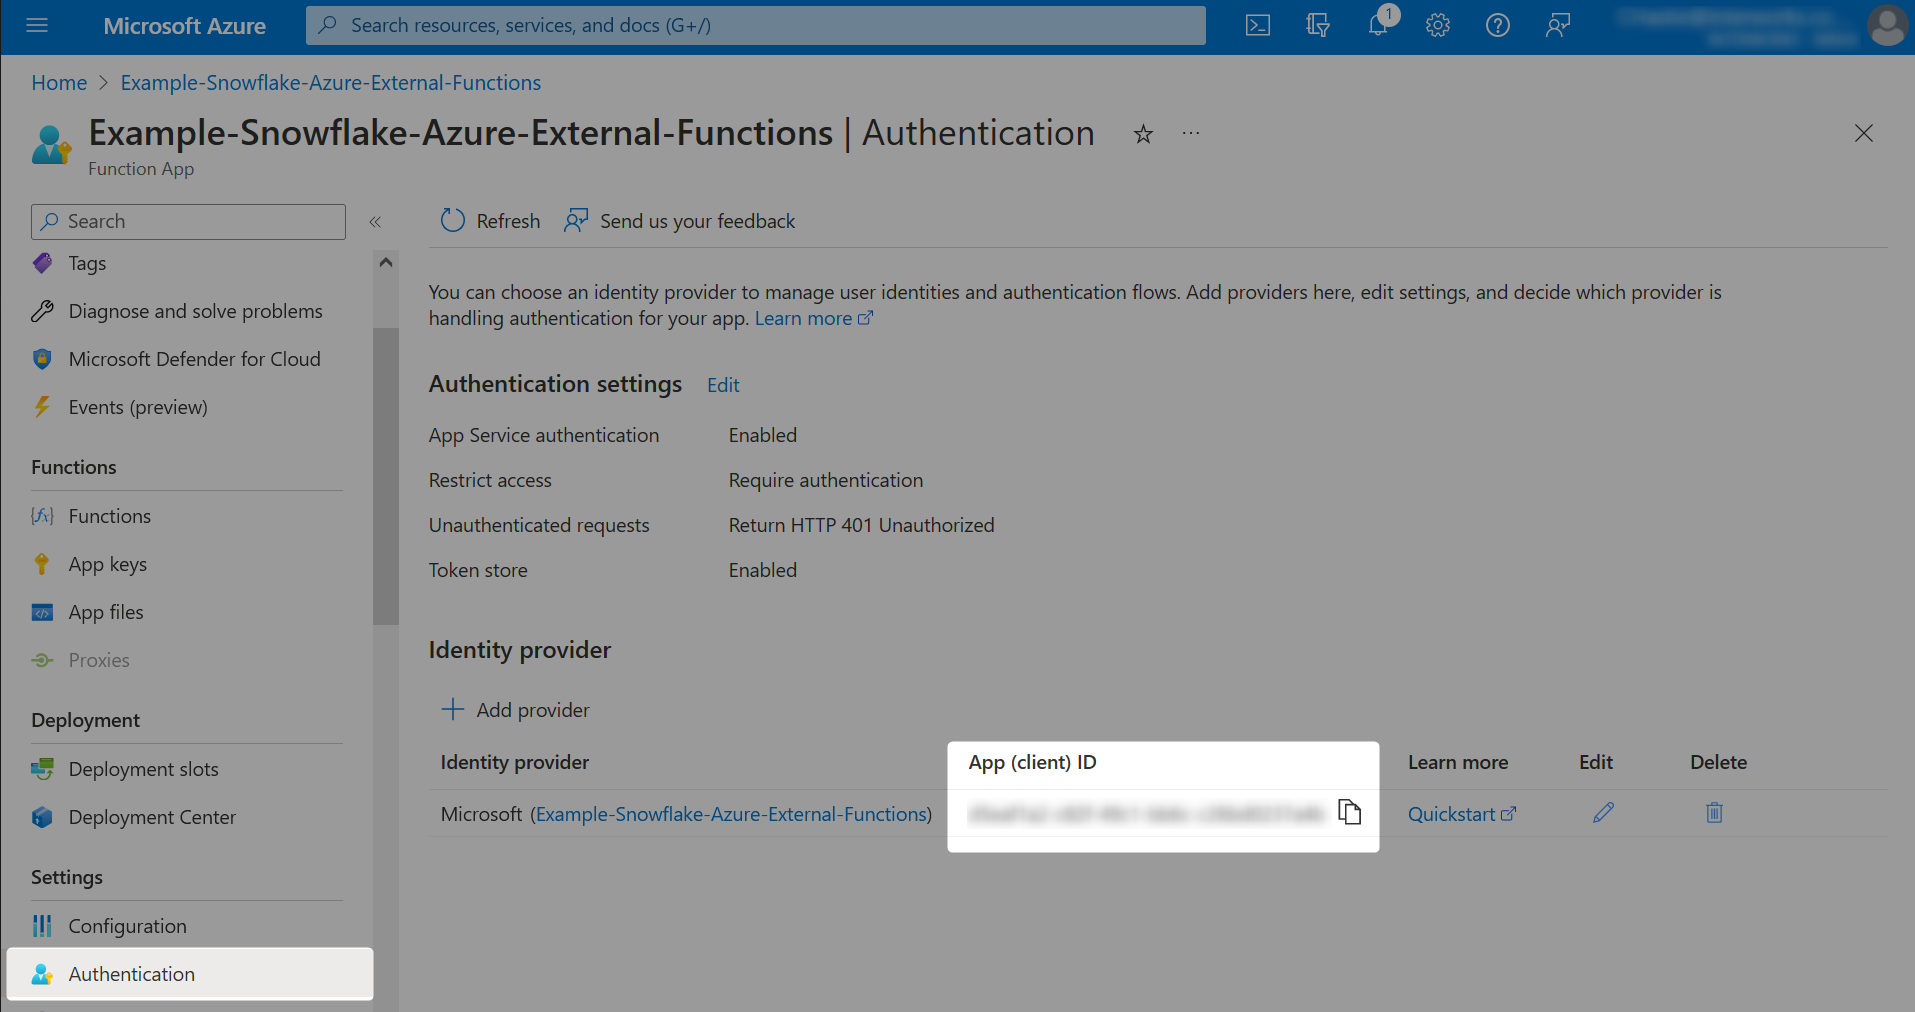
After performing the above steps, you will no longer be able to test your Azure functions directly through the Azure Portal as we did before. If you attempt this, you will be met with a 401 error stating that access is unauthorised. The intent is that it will only work when leveraged through Snowflake after we have configured the rest of the steps. If you do not wish for this, you can disable the authentication settings again as in the below screenshot:
4. Configure the Azure API management Gateway to Support the Azure Functions as Endpoints
Now that our Azure functions are deployed, tested and configured with authentication, we can expose it through our API management gateway.
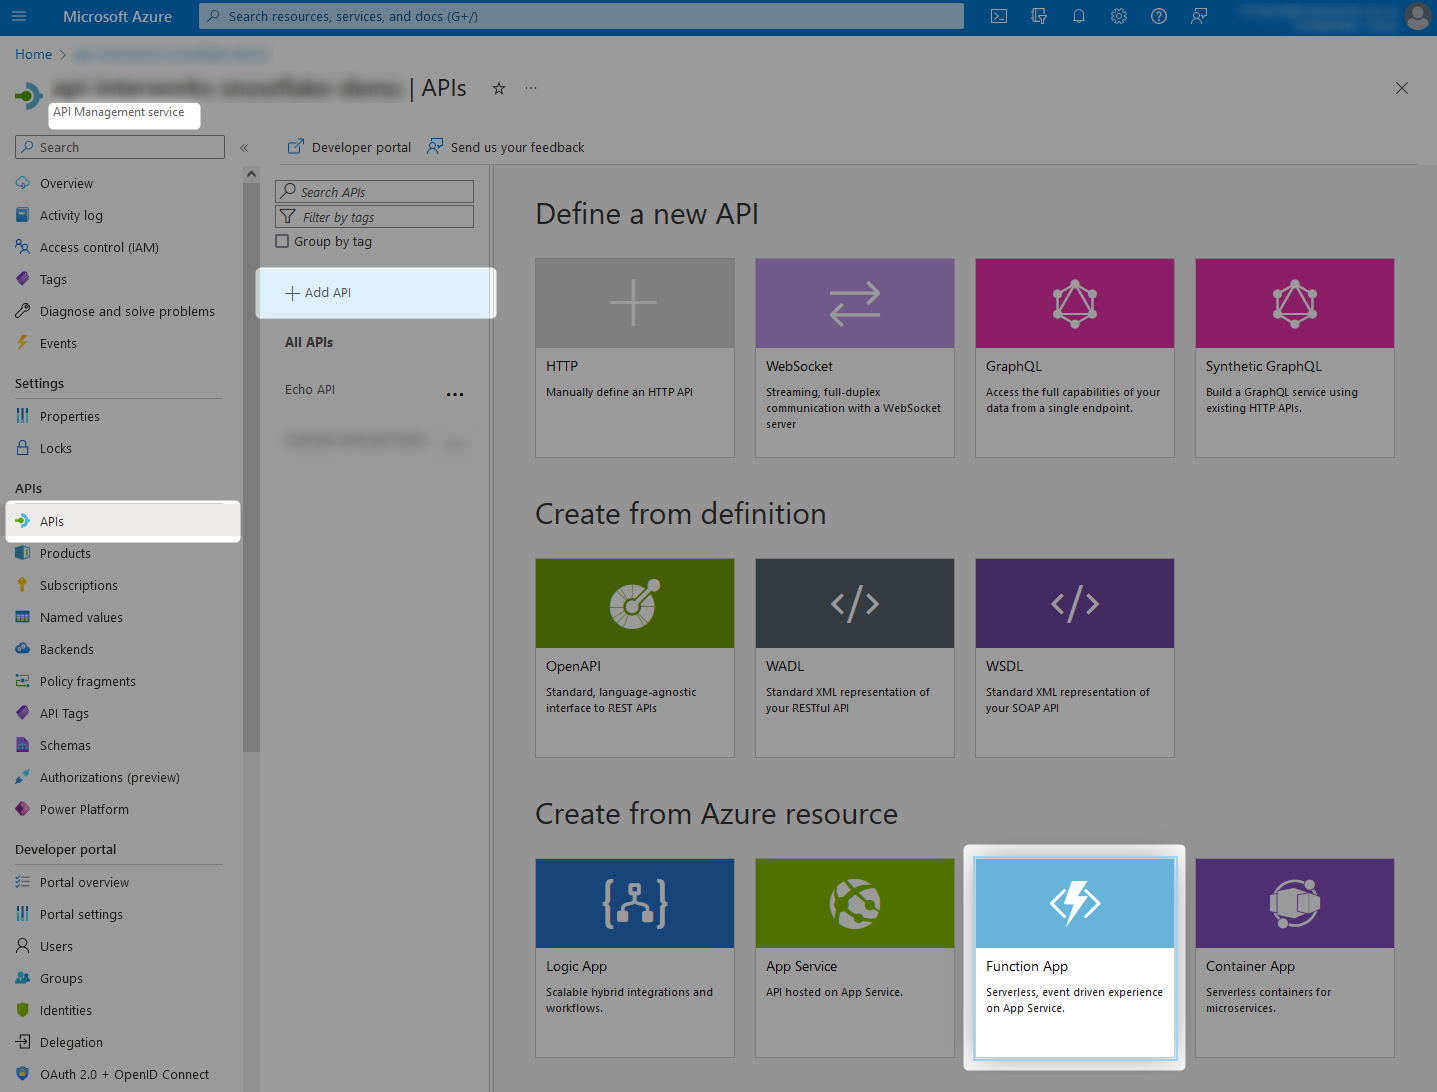
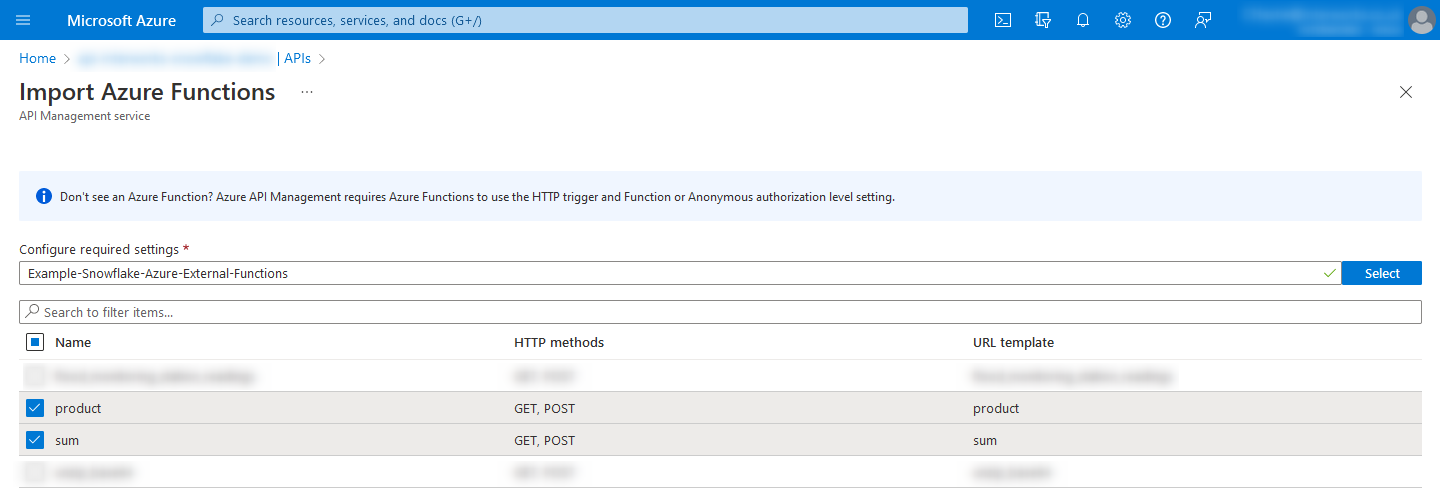
You should be able to keep with the default values and select Create; however, you are welcome to modify these if you wish. The most interesting value here in my opinion is the API URL suffix as this will be included in the URL that you pass to Snowflake. For our demonstration, this is shortened to “Example-External-Functions.”
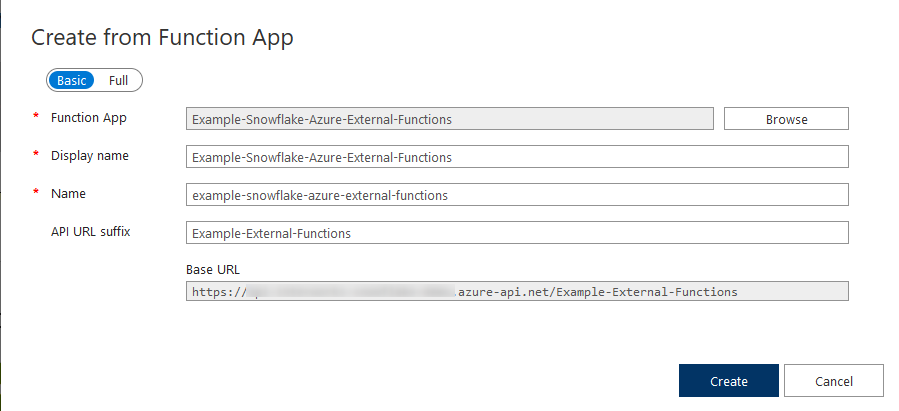
Record your API URL Suffix as one of your important variables.
Our important demo variables so far:
API Management gateway: api-snowflake-demo
Azure Function App: Example-Snowflake-Azure-External-Functions
App (client) ID: a1bcd2e3-a12b-23d4-ef5g-a12bc3456d7e
API URL suffix: Example-External-Functions
With this complete, you should see your new endpoints listed in the APIs blade of your API management service:
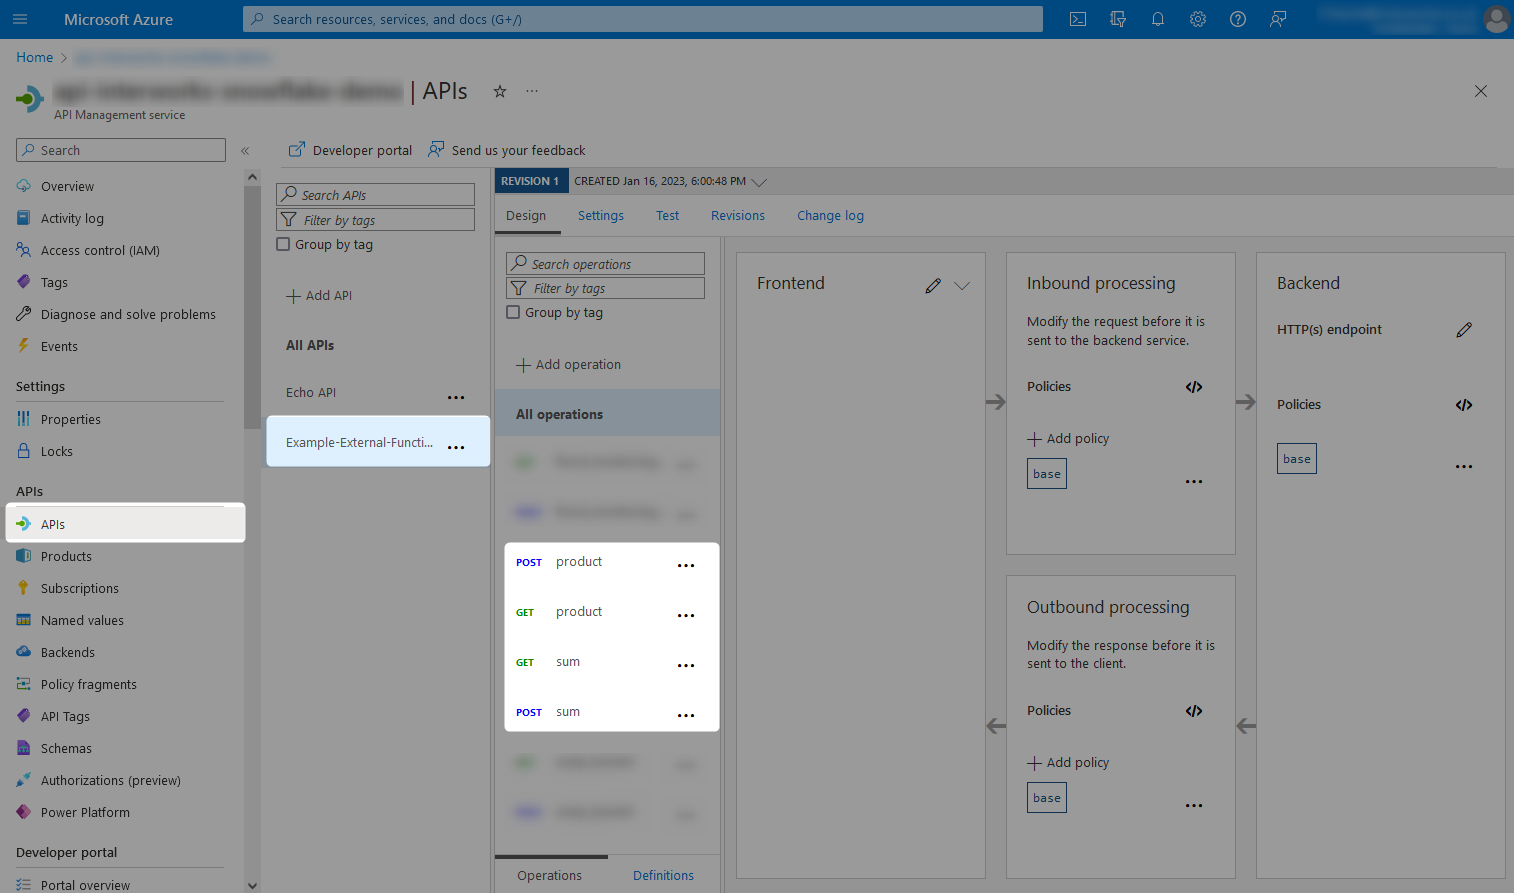
5. Create a Snowflake API Integration Object and Configure It to Access the Azure API Management Gateway Using the App Service Authentication
In order to leverage our newly managed Azure Functions, we must create a corresponding API integration in Snowflake that can authenticate into the Azure tenant and access functions through the the API management gateway.
To achieve this, we need to know the Azure Tenant ID, in addition to some of the other key variables that we have tracked.
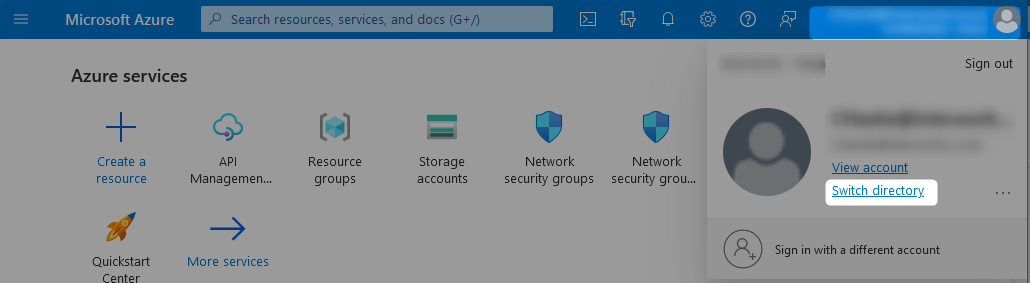
5a: Retrieve the Azure Tenant ID
There are many ways to retrieve the ID for a given Azure tenant. My personal favourite method is by attempting to switch directory within the Azure portal, as this provides the Directory ID for each Azure tenant. In this case, the Directory ID is the tenant ID that we are looking for.
The following pair of screenshots demonstrate this method:

Our important demo variables so far:
API Management gateway: api-snowflake-demo
Azure Function App: Example-Snowflake-Azure-External-Functions
App (client) ID: a1bcd2e3-a12b-23d4-ef5g-a12bc3456d7e
API URL suffix: Example-External-Functions
Azure Tenant ID: 1234a567-bc89-1ab2-3cde-4f56a789bcd1
5b: Create the API Integration Object in Snowflake
This process can only be achieved using the Snowflake
ACCOUNTADMINrole, or another role with theCREATE INTEGRATIONprivilege.
We now have the required variables to create our API integration. This is achieved by executing a SQL script within Snowflake with the following template:
CREATE API INTEGRATION API_AZURE_EXTERNAL_FUNCTIONS
  API_PROVIDER = AZURE_API_MANAGEMENT
  ENABLED = TRUE
  AZURE_TENANT_ID = '<Azure Tenant ID>'
  AZURE_AD_APPLICATION_ID = '<App (client) ID>'
  API_ALLOWED_PREFIXES = ('https://<api management gateway>.azure-api.net')
;
Entering our demo variables, we can create a new API integration called API_AZURE_EXTERNAL_FUNCTIONS with the following script:
CREATE API INTEGRATION API_AZURE_EXTERNAL_FUNCTIONS
  API_PROVIDER = AZURE_API_MANAGEMENT
  ENABLED = TRUE
  AZURE_TENANT_ID = '1234a567-bc89-1ab2-3cde-4f56a789bcd1'
  AZURE_AD_APPLICATION_ID = 'a1bcd2e3-a12b-23d4-ef5g-a12bc3456d7e'
  API_ALLOWED_PREFIXES = ('https://api-snowflake-demo.azure-api.net')
;
Executing this form of statement in Snowflake will yield the following result:
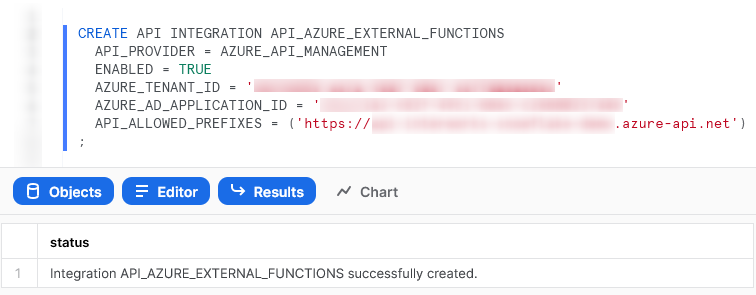
At this stage, the API integration object exists in Snowflake but it cannot access Azure. It must be authorised via Azure itself.
5c: Retrieve the Authorisation Information for the Snowflake API Integration
Snowflake helpfully provides the information we need in the output of a DESCRIBE command of the following template:
DESCRIBE API INTEGRATION <INTEGRATION_NAME>;
For example, we can execute the following statement to see the details for our new API_AZURE_EXTERNAL_FUNCTIONS API integration:
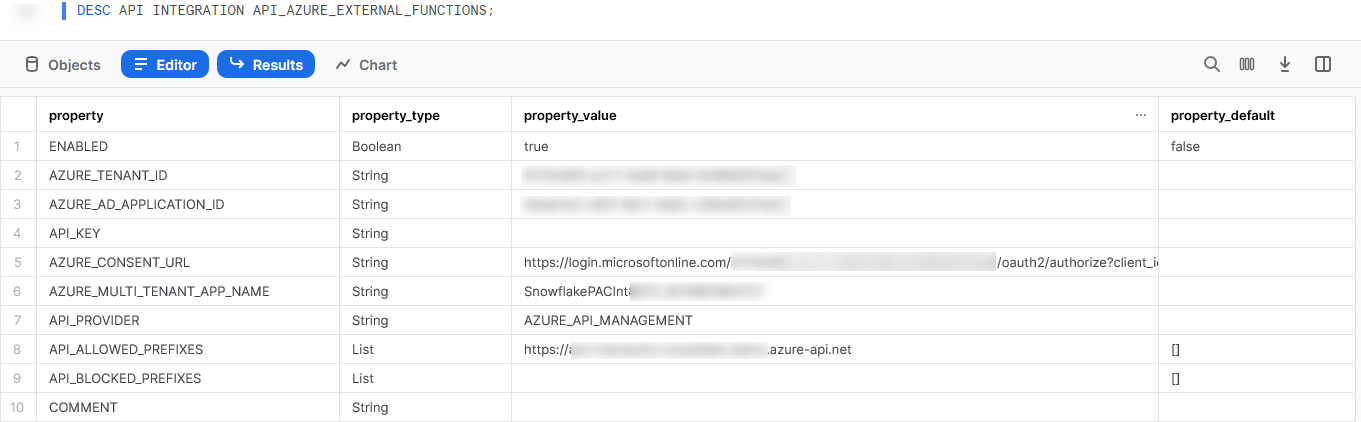
The important information that we require here are the AZURE_CONSENT_URL and the AZURE_MULTI_TENANT_APP_NAME fields. As with the previous variables, you may find it easier to record these for later reference in a text file or similar.
Our important demo variables so far:
API Management gateway: api-snowflake-demo
Azure Function App: Example-Snowflake-Azure-External-Functions
App (client) ID: a1bcd2e3-a12b-23d4-ef5g-a12bc3456d7e
API URL suffix: Example-External-Functions
Azure Tenant ID: 1234a567-bc89-1ab2-3cde-4f56a789bcd1
AZURE_CONSENT_URL: https://login.microsoftonline.com/1234a567-bc89-1ab2-3cde-4f56a789bcd1/oauth2/authorize?client_id=a1bcd2e3-a12b-23d4-ef5g-a12bc3456d7e&response_type=code
AZURE_MULTI_TENANT_APP_NAME: SnowflakePACInt2468_1234567890123
5d: Approve the Authorisation in the Azure Consent URL
Access the AZURE_CONSENT_URL whilst logged into Azure as a user with admin privileges to authenticate the API integration. After clicking on the consent URL and signing in with an administrator account, the following prompt will be displayed:
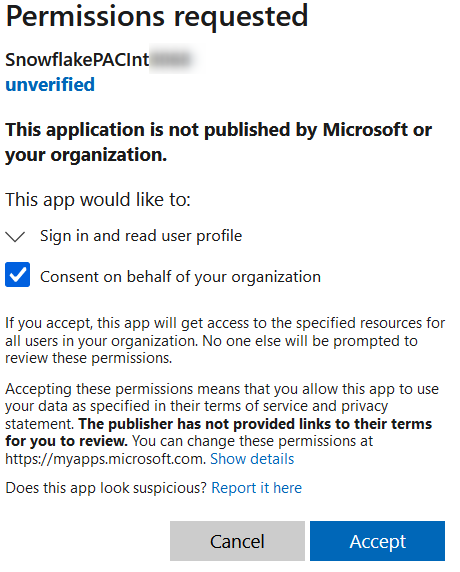
After consenting on behalf of your organisation and accepting, the app will appear under Azure AD - Enterprise applications in your tenant as shown below:

Finally, you may be prompted with the following option which you can ignore:

This has created a new service principal in your Azure tenancy with a name matching the first part of the AZURE_MULTI_TENANT_APP_NAME before the underscore. Again, you may find it easier to record these for later reference in a text file or similar.
Our important demo variables so far:
API Management gateway: api-snowflake-demo
Azure Function App: Example-Snowflake-Azure-External-Functions
App (client) ID: a1bcd2e3-a12b-23d4-ef5g-a12bc3456d7e
API URL suffix: Example-External-Functions
Azure Tenant ID: 1234a567-bc89-1ab2-3cde-4f56a789bcd1
AZURE_CONSENT_URL: https://login.microsoftonline.com/1234a567-bc89-1ab2-3cde-4f56a789bcd1/oauth2/authorize?client_id=a1bcd2e3-a12b-23d4-ef5g-a12bc3456d7e&response_type=code
AZURE_MULTI_TENANT_APP_NAME: SnowflakePACInt2468_1234567890123
Azure Service Principal for the API Integration: SnowflakePACInt2468
Unlike storage and notification integrations, which would now include an IAM step to grant specific access, this is all that is needed to allow the API integration in Snowflake to access the Azure API management service and underlying functions. This is because our API integration is acting as the App (client) ID that we determined earlier.
6. Create and Test Some External Function Objects in Snowflake
The final steps are to build and test some external functions in Snowflake.
Be sure that the role creating the external functions has been granted
USAGEon the API integration.
The template to create an external function is as follows:
CREATE [OR REPLACE] external function <database>.<schema>.<function name>(variables)
  returns variant
  api_integration = <api integration object>
as
  '<endpoint url>'
;
Following this template, we can create both of our functions:
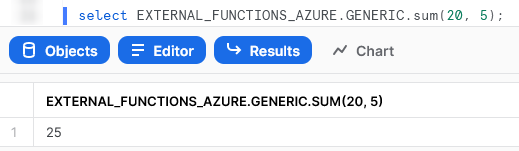
-- Sum

create [or replace] external function external_functions.generic.sum(x number, y number)
  returns variant
  api_integration = API_AZURE_EXTERNAL_FUNCTIONS
as
  'https://api-snowflake-demo.azure-api.net/Example-External-Functions/sum'
;

-- Product

create [or replace] external function external_functions.generic.product(x number, y number)
  returns variant
  api_integration = API_AZURE_EXTERNAL_FUNCTIONS
as
  'https://api-snowflake-demo.azure-api.net/example-external-functions/product'
;
Now all we need to do is test our functions to make sure they work. The simplest way to test these is to execute them directly with manual inputs.
First we manually test the SUM function:
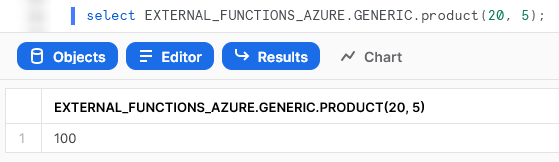
And then we manually test the PRODUCT function:
Both are working! Just for fun, let’s wrap up with a more comprehensive test. Use the following script to create a table of 500 rows, with randomly generated x and y values between -10 and 20:
CREATE OR REPLACE table external_functions.lambda.numeric_example(
    x number
  , y number
)
AS
select
    uniform(-10, 20, random()) as x
  , uniform(-10, 20, random()) as y
from table(generator(rowcount => 500))
;
The following screenshot demonstrates this test in action:
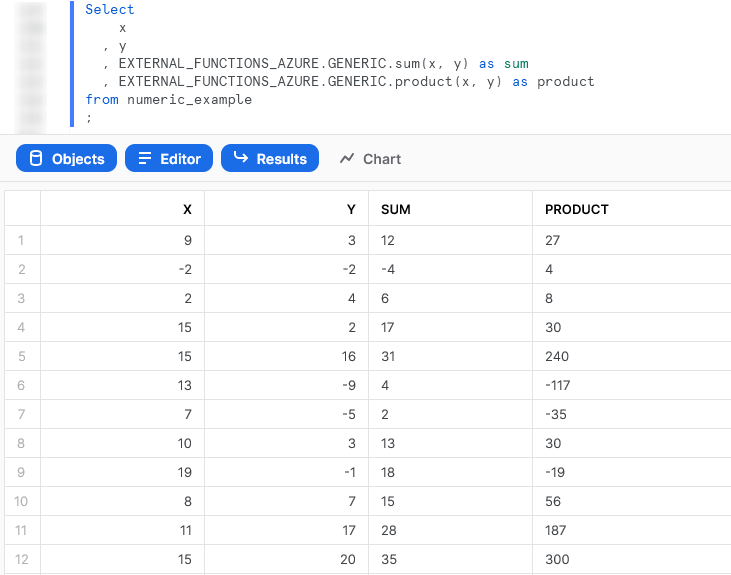
And there we have it: two external functions in Snowflake which leverage Azure Functions and work as intended. It took a while to set up; however, now that the framework is there it is much easier to add new functions.
7. Secure the Azure API Management Gateway to Only Allow Requests via Snowflake
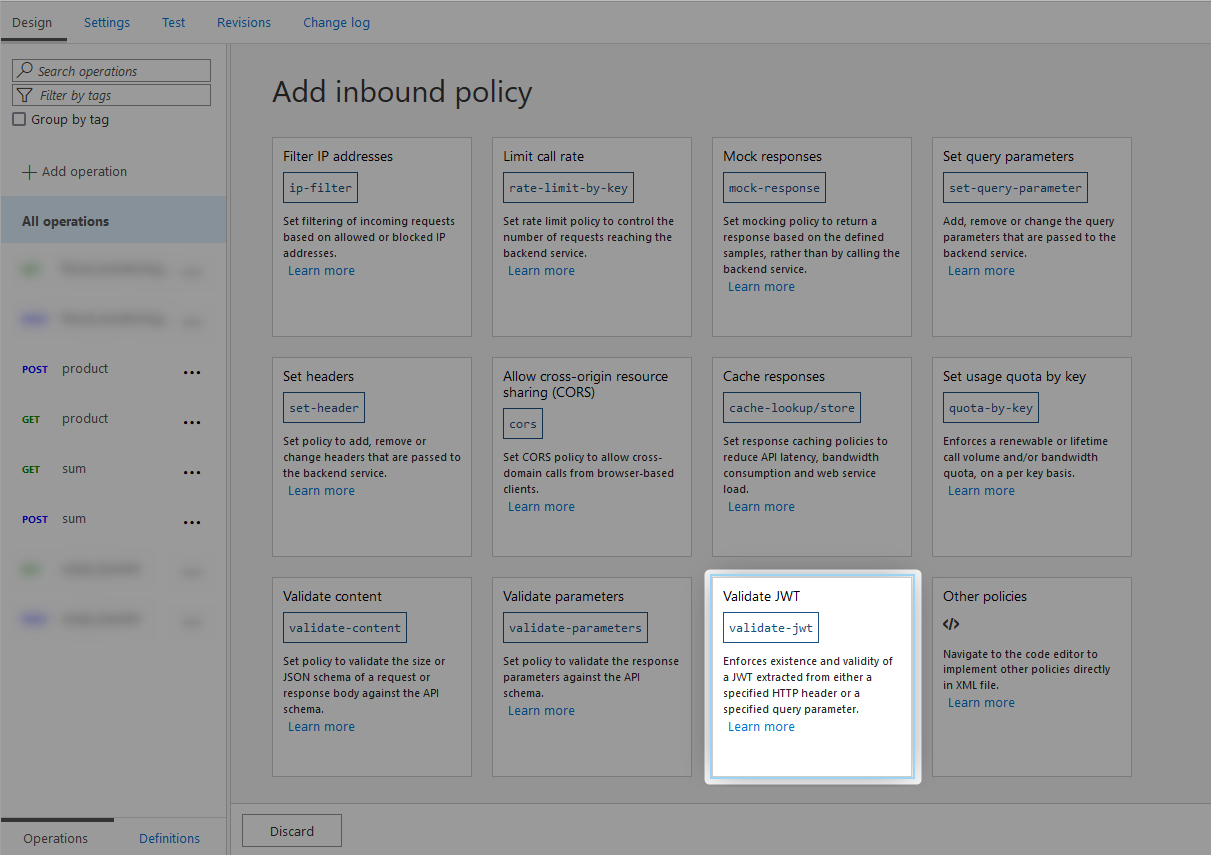
Before we wrap up, it would be wise to configure our API management service to block any traffic that does not come from Snowflake and authenticate correctly. Specifically, we will configure a validate-JWT policy, which validates the JSON Web Token (JWT) transmitted by Snowflake to the API management service.
7a. Locate the Application ID in Azure for the Snowflake API Integration’s Service Principal
To configure the inbound processing policy, one final piece of the puzzle is required. We know that the API integration in Snowflake is leveraging a specific service principal, which is recorded in our important variables as Azure Service Principal for the API Integration. Our demo value is SnowflakePACInt2468.
We require the application ID for this service principal. There are multiple ways to retrieve this, with the simplest being to navigate to the Enterprise applications area within the Azure Portal.
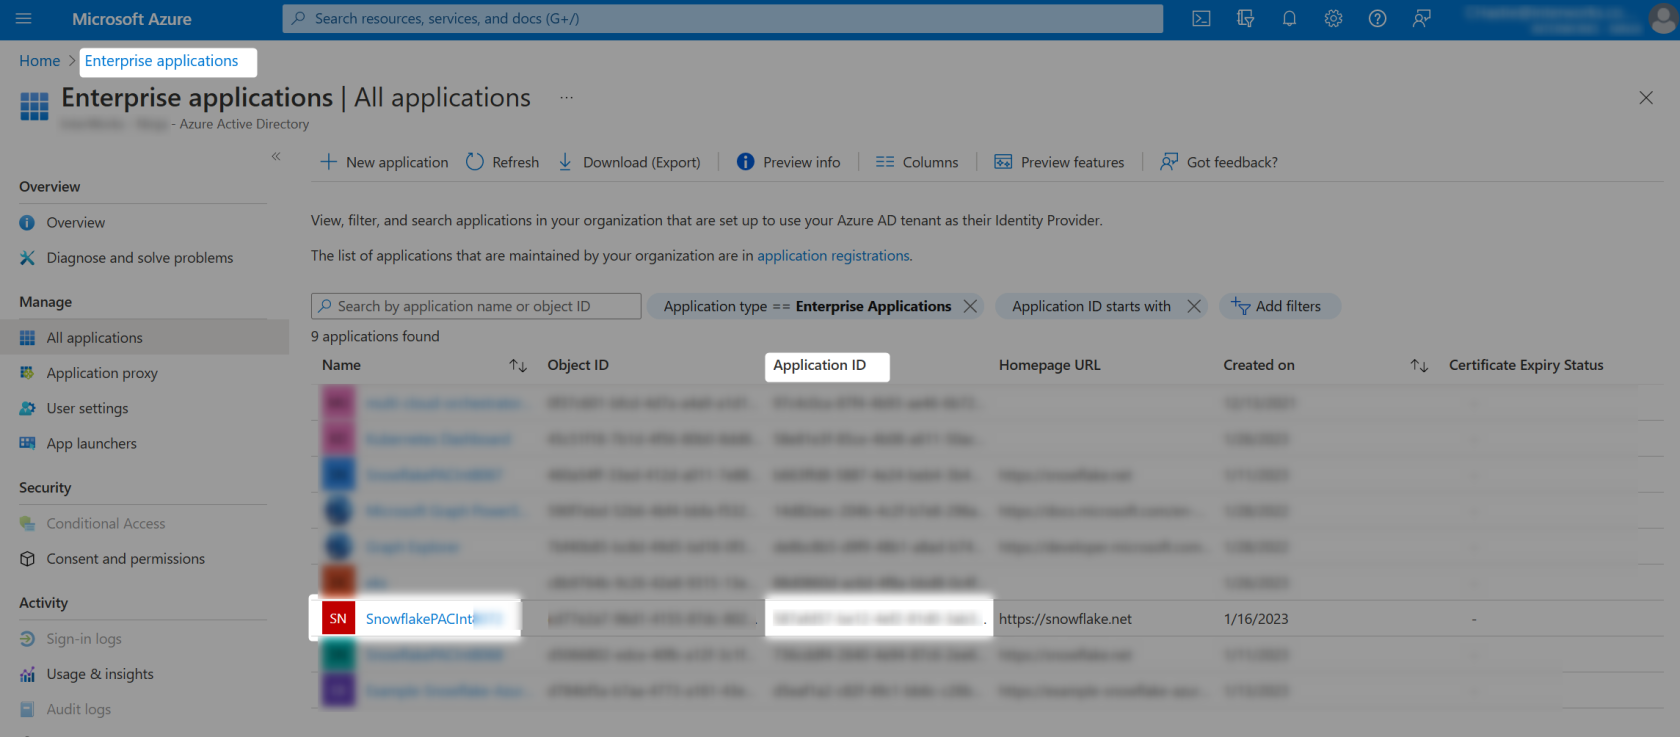
Record the service principal’s application ID as one of your important variables.
Our important demo variables so far:
API Management gateway: api-snowflake-demo
Azure Function App: Example-Snowflake-Azure-External-Functions
App (client) ID: a1bcd2e3-a12b-23d4-ef5g-a12bc3456d7e
API URL suffix: Example-External-Functions
Azure Tenant ID: 1234a567-bc89-1ab2-3cde-4f56a789bcd1
AZURE_CONSENT_URL: https://login.microsoftonline.com/1234a567-bc89-1ab2-3cde-4f56a789bcd1/oauth2/authorize?client_id=a1bcd2e3-a12b-23d4-ef5g-a12bc3456d7e&response_type=code
AZURE_MULTI_TENANT_APP_NAME: SnowflakePACInt2468_1234567890123
Azure Service Principal for the API Integration: SnowflakePACInt2468
Azure Service Principal Application ID: 123abc45-de67-8fe9-87d6-5dc432b1ab23
7b. Configuring the Inbound Processing Policy
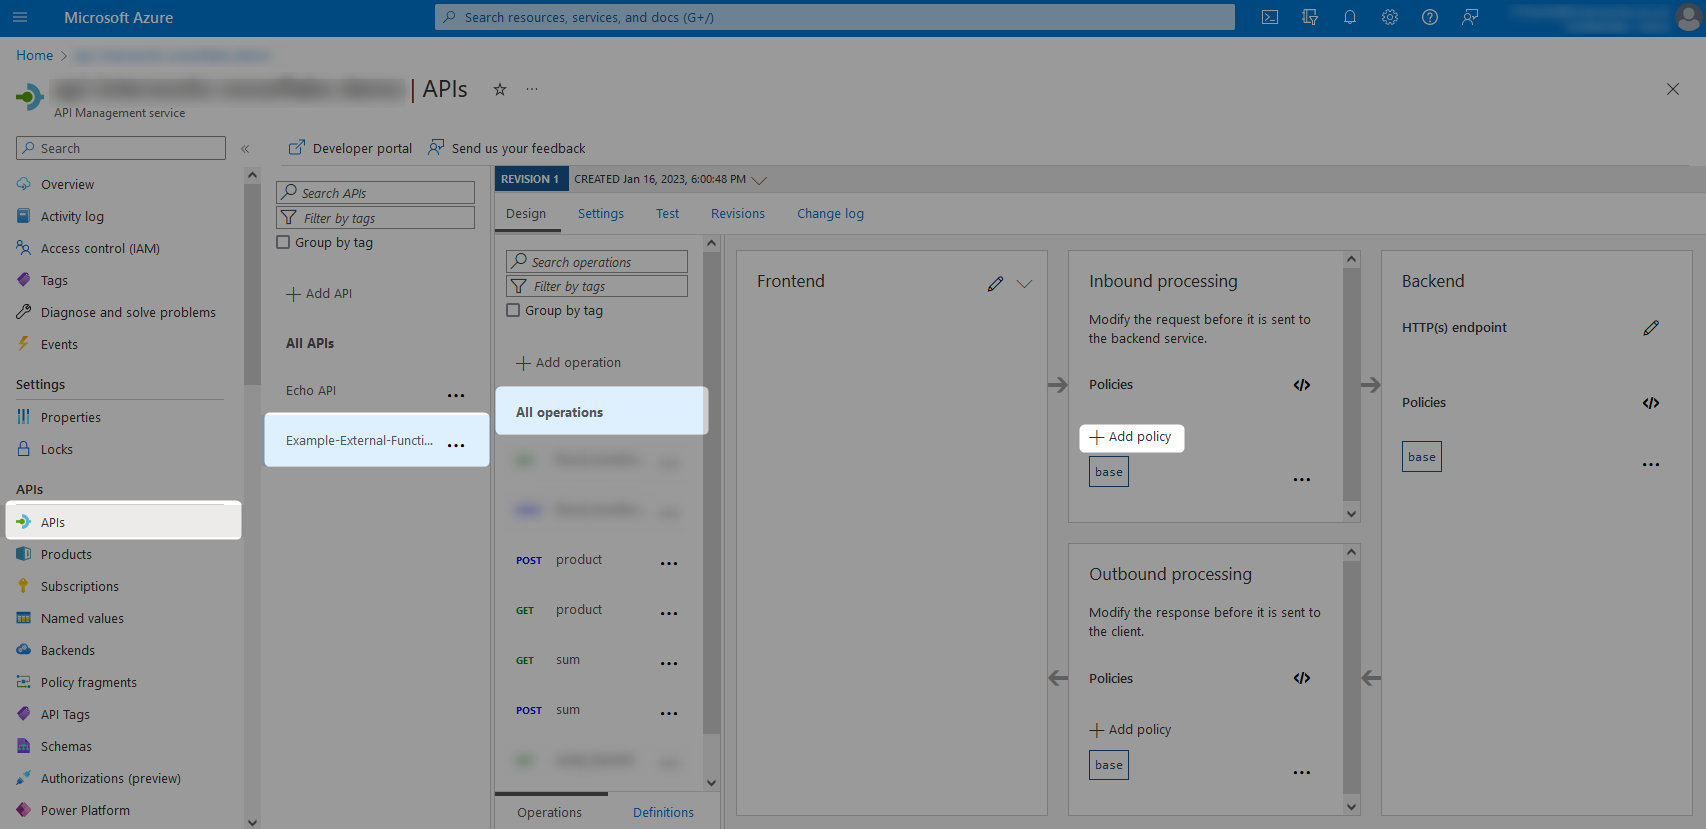
Now that we have the application ID for our service principal, navigate to your set of endpoints in the APIs pane of your API management service and select Add policy under Inbound processing. Be sure to do this for All operations instead of a specific endpoint.
This is where our important variables come into play again. Recall that our important demo variables are:
API Management gateway: api-snowflake-demo
Azure Function App: Example-Snowflake-Azure-External-Functions
App (client) ID: a1bcd2e3-a12b-23d4-ef5g-a12bc3456d7e
API URL suffix: Example-External-Functions
Azure Tenant ID: 1234a567-bc89-1ab2-3cde-4f56a789bcd1
AZURE_CONSENT_URL: https://login.microsoftonline.com/1234a567-bc89-1ab2-3cde-4f56a789bcd1/oauth2/authorize?client_id=a1bcd2e3-a12b-23d4-ef5g-a12bc3456d7e&response_type=code
AZURE_MULTI_TENANT_APP_NAME: SnowflakePACInt2468_1234567890123
Azure Service Principal for the API Integration: SnowflakePACInt2468
Azure Service Principal Application ID: 123abc45-de67-8fe9-87d6-5dc432b1ab23
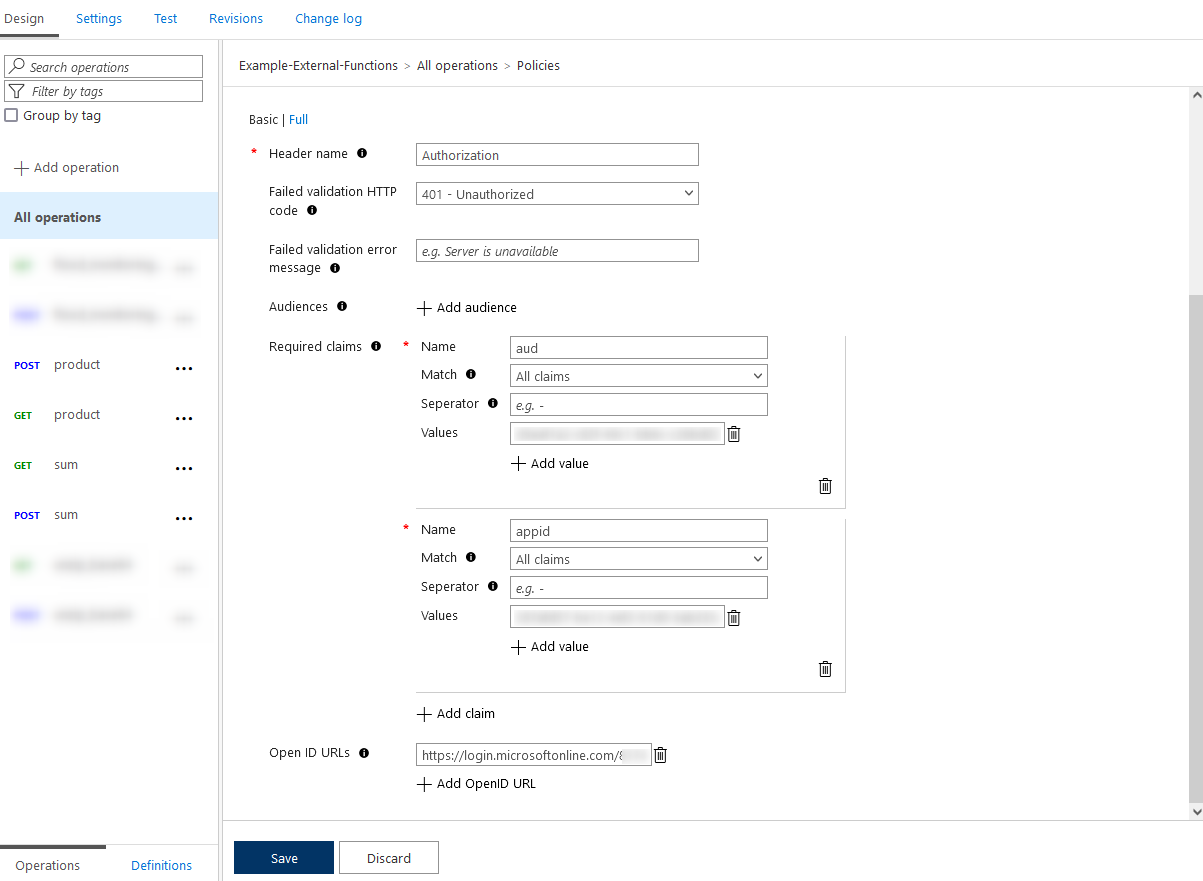
Populate the policy with the following information:
Using our demo variables, we would enter the following information:
Once this is complete, click Save. Be sure to test your external functions again in Snowflake to ensure that they are still working!
Wrap Up
I hope you’ve enjoyed this length guide to configuring Snowflake external functions with Azure. In the next post, I will run through how to add new external functions to this framework using a more complex example that leverages the UK Flood Warning Measurements API. This is a strong demonstration of the benefit of external functions against Snowpark functionality as Snowpark functionality currently cannot access the “outside world” during runtime.