This series takes you from zero to hero with the latest and greatest cloud data warehousing platform, Snowflake.
Key pair authentication is a method of authenticating with a system using a pair of keys that meet specific security requirements. The pair consists of a private key that is leveraged by the system trying to authenticate and a related public key that the authenticator uses when determining whether the private key should be granted access. Often, the private key is also combined with a passphrase to improve its security.
Why Use Key Pair Authentication
There are several reasons to set up key pair authentication for a Snowflake user:
- Keys have a much higher entropy than a standard password, so they are far harder to attack through brute force.
- When configured in the right way, key pair authentication can be far more secure than a standard username and password, especially if the private key is protected by a passphrase.
- Some technologies only connect via enhanced security methods and do not support username and password combinations, such as Snowflake’s SQL API and Snowpipe API.
- Usually, a key pair will be unique for a specific service or purpose, meaning low re-use and a low perimeter for compromise.
- Service users for specific purposes can use key pair authentication to avoid security principles such as rotating password policies to ensure the service is not interrupted (of course, it still may be worth considering key pair rotation).
Of course, there are negatives to using key pair combinations, too – not least of which being that private keys are so long they must be stored somewhere and thus are more vulnerable to attack if somebody is able to access your storage solution. In general, we would not advise setting up key pair authentication for standard user access to Snowflake but would restrict this functionality to service accounts and/or specific scripts or tools.

Prerequisites
- SECURITYADMIN privileges or higher in a Snowflake account (or comparable grants) so that you can configure a user for key pair authentication.
- The OpenSSH Client optional service must enabled on your machine, and OpenSSH must be added to your PATH environment variable. You can read how to do that here.
- The SnowSQL CLI client must be installed on your machine so that we can test the authentication.
Important Gotcha – pkcs8

Snowflake only supports RSA SSH keys with at least 2048 bits that leverage the pkcs8 format. If you are leveraging another private key, you can convert it to pkcs8 format with the following command:
ssh-keygen -p -f path\to\ssh\key -m pkcs8
For example, we could convert an existing private key called id_rsa as follows:
ssh-keygen -p -f ~\.ssh\id_rsa -m pkcs8
Similarly, we could convert a public key with the following command:
ssh-keygen -e -f path\to\ssh\key.pub -m pkcs8
For example, we could convert an existing public key called id_rsa.pub as follows:
ssh-keygen -e -f ~\.ssh\id_rsa.pub -m pkcs8
A quick and easy way to tell if your key is in the right format is to look at the start of the keys. From my understanding, keys in the correct format will begin with the characters MII, though this may just be a coincidental observation!
How to Configure Key Pair Authentication for Snowflake
Let’s start by generating our key pair and giving it a useful comment. If you enter a file name without a path, the file will be created in your current working directory. If you do not enter a file path at all and omit the -f option, you will be prompted to enter a file path. By default, the file will be stored in ~/.ssh in bash or your local user’s SSH repository in Windows.
ssh-keygen -t rsa -b 2048 -m pkcs8 -C "<Comment here>" -f path/of/output/file
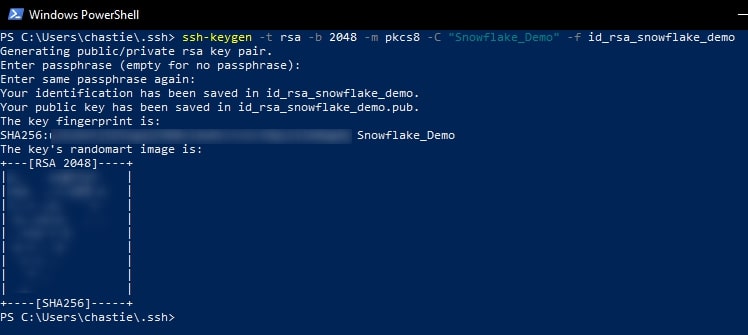
In our example, we call our file “id_rsa_snowflake_demo” and we give it the comment Snowflake_Demo:
ssh-keygen -t rsa -b 2048 -m pkcs8 -C "Snowflake_Demo" -f id_rsa_snowflake_demo
You can also add a password if you like. You will then be shown the key’s randomart image to confirm creation:

Copy the contents of the public key to your clipboard. You can read this public key with the following command:
cat path\to\ssh\key.pub
For example, our code is likely:
cat id_rsa_snowflake_demo.pub
![]()
However, when we run this we see an issue. Can you spot it in this screenshot?

This key does not appear to start with the characters MII, so I am suspicious that it is not in the pkcs8 format.
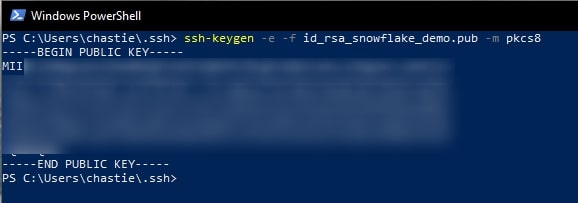
The public key must also be stored in pkcs8 format to be compatible with Snowflake, and ssh-keygen by default has not generated the public key in this format. We must convert our public key with the following command:
ssh-keygen -e -f path\to\ssh\key.pub -m pkcs8
Specifically for our example, we execute the following command:
ssh-keygen -e -f id_rsa_snowflake_demo.pub -m pkcs8
This outputs the pkcs8 format of the public key in our console, and it appears to be in the correct format as it starts with the characters MII:

Please note that there is currently an issue with ssh-keygen described here, which means that public key is not written anywhere. It is only displayed in the console, so you must copy it from here by highlighting it then right-clicking.
You can now leverage the following command in Snowflake to assign the public key to the user. Be sure to use the SECURITYADMIN role or a role with the correct privileges:
ALTER USER <USER> set rsa_public_key = "...";
When copying your key, do not include the —-BEGIN PUBLIC KEY—- and —-END PUBLIC KEY—- identifiers:

Testing the Key Pair Authentication
You can now test your authentication using SnowSQL with the following command:
snowsql -a account.region -u "<username>" --private-key-path "path/to/private/key"
After a prompt for the private key’s passphrase (if you set one up), you should be given access to Snowflake via SnowSQL:

Congratulations! You have now set up key pair authentication for a Snowflake user. You may find this useful when setting up service users, such as for a Matillion environment that uses a service user to interact with Snowflake.

