
The purpose of this post is to step through the processes involved in setting up a new Snowflake account to replicate an existing one. There are several reasons to do this, the main two being:
- Fully migrating to a new account, for example if you want your main account to be in a different region or cloud provider.
- Setting up a failover account to take over if the primary account faces issues.
Firstly, it is important that both the source account and the target account are both part of the same organisation. If this is not the case, I would recommend reaching out to Snowflake Support and asking them to align the accounts under a single organisation.
Importantly, the process described in this blog leverages Failover Groups and Account Object Replication, which are both only available for the Business Critical Edition of Snowflake.
To perform the steps in this blog post, I recommend having ACCOUNTADMIN access to both your source and target accounts. These steps would be possible without this access however the RBAC configuration would be overly complex and frustrating, in my opinion. You can use the ACCOUNTADMIN role to grant yourself the ORGADMIN role for the steps that require it.
Our Example Scenario
There are near infinite combinations of objects that you may wish to be replicating as there is not a specific limit on the number of databases, users, etc. that you may be working with. For our example scenario, we assume we have the following objects that we wish to replicate:
- Account parameters
- Users
- Roles
- Warehouses
- Resource monitors
- Security integrations
- Network policies
- Databases
- CONTROL
- RAW
- INTERMEDIATE
- PRESENTATION
We wish to migrate from the account my_source_account to the account my_target_account, which both sit in the organisation my_org. Our replication will take place every 10 minutes to keep our data fresh.
Enabling Replication
Before taking any action to physically replicate anything from one account to another, both accounts must be enabled for replication. This is a simple process that can be achieved using the ORGADMIN role from either account. The code is as follows:
-- Enable replication for source account
select system$global_account_set_parameter(
    '<organisation_name>.<source_account_name>'
  , 'ENABLE_ACCOUNT_DATABASE_REPLICATION'
  , 'true'
);

-- Enable replication for target account
select system$global_account_set_parameter(
    '<organisation_name>.<target_account_name>'
  , 'ENABLE_ACCOUNT_DATABASE_REPLICATION'
  , 'true'
);
Note that Snowflake will expect the organisation and account names to be in uppercase.
This can be confirmed by executing the following statement using the ACCOUNTADMIN role:
SHOW REPLICATION ACCOUNTS;
Configure a Failover Group
A Failover Group in Snowflake is a collection of objects which are all configured to replicate from a source account to a destination account whilst supporting failover. This means that in the case of an outage with the primary account, the secondary account objects and databases can be promoted to serve as read-write primary objects.
If your intent is to fully migrate from one Snowflake account to another, you can leverage Failover Groups to migrate your content before promoting your target account to the primary/main account.
Why Not Use a Replication Group?
A Failover Group sounds similar to a Replication Group at first; however, a Replication Group is limited to read-only access for the replicate objects and does not support critical requirements such as failover and promotion from secondary to primary.
Protecting Existing Account Objects
Account object replication is a powerful tool; however, it also carries risks. If you replicate any of the following object types, any existing objects in the target account will be dropped:
- Users
- Roles
- Resource monitors
- Warehouses
This is not an issue if you are replicating to a new/blank Snowflake account; however, it may be a concern for target accounts that already contain account objects. To protect these objects, the following important steps must be taken.
Note that we have not covered most of these steps already as they are covered lower down in this article; however, this must be stated now to avoid accidentally overwriting/dropping objects when following along with the later steps of the article.
- Create the same account objects in the source account.
- When creating the primary Failover Group in the source account (below), do not set a schedule.
- Create the secondary Failover Group in the target account (below) as usual.
- Execute the following command in the target account to syncronise the existing objects in the target account with their equivalents in the source account:
SELECT SYSTEM$LINK_ACCOUNT_OBJECTS_BY_NAME('<failover group name>');
This will create special bonds between the source and target account called “global identifiers”. Once these steps are completely, you can alter your failover group from your source account to add a schedule, using a command such as the following:
ALTER FAILOVER GROUP [ IF EXISTS ] <name>
  SET REPLICATION_SCHEDULE = '{ <num> MINUTE | USING CRON <expr> <time_zone> }'
;
What Account Properties Are Not Replicated?
It is worth noting that the following account-level properties are not replicated and will need to be migrated manually if desired:
- Each user’s worksheets and dashboards in Snowsight
- User stages
- Account-level information provided through the SNOWFLAKE shared database
- Storage integrations
The above list may not be exhaustive; however, these are the most important ones in my opinion. If you think anything should be added to this list, let me know through LinkedIn!
How to Configure the Failover Group
The Failover Group should contain every object that you wish to replicate. At time of writing, the following objects are supported:
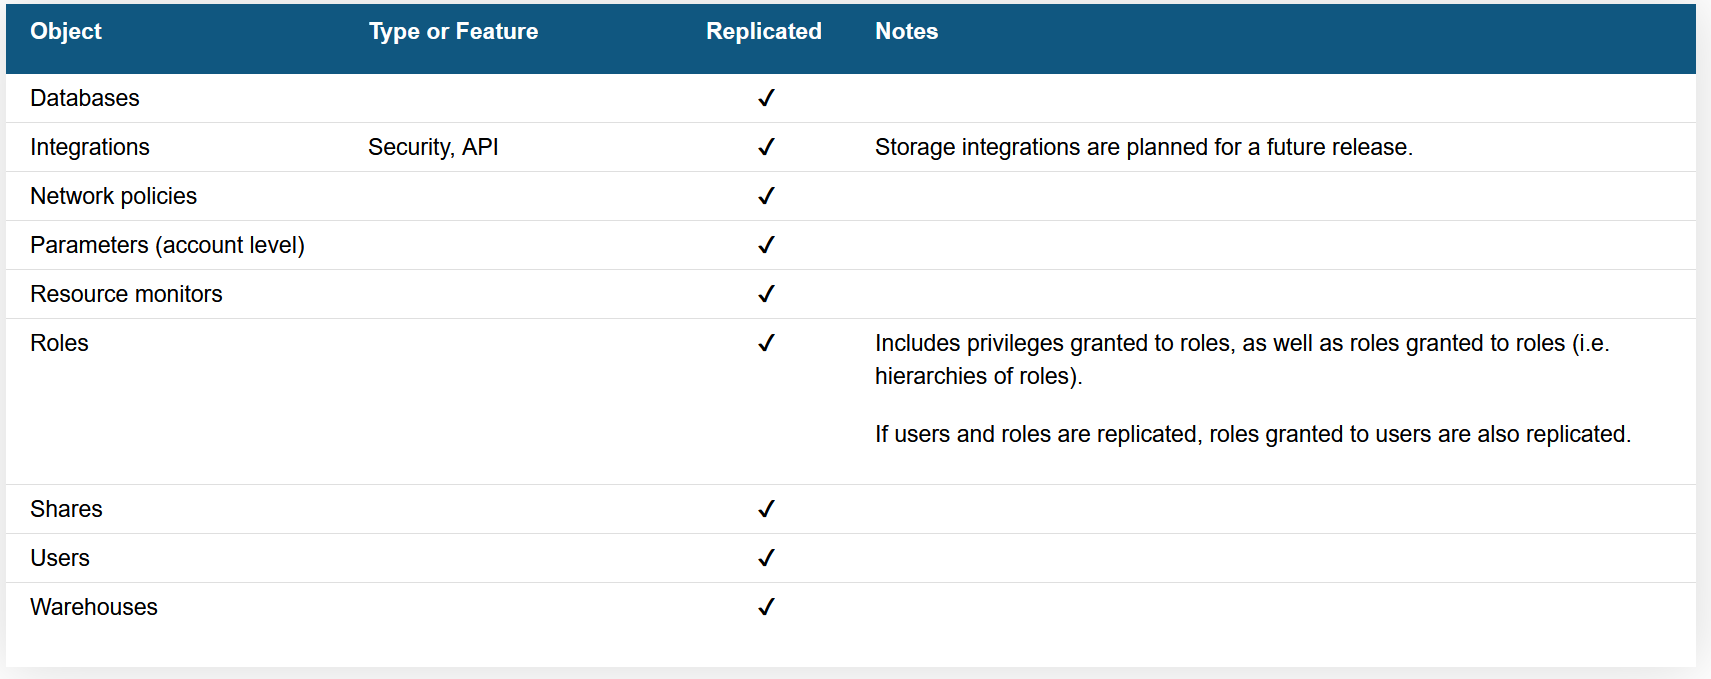
The most recent version of this table can be found in Snowflake’s documentation. Please note that “Shares” in this table relates to outbound shares.
Also, note that at time of writing, the following objects within a database cannot be replicated:
- External tables
- Stages
- Pipes
Creating the Primary Failover Group on the Source Account
We must first create the Failover Group from the source account as this will act as the Primary account for now. We do this with the ACCOUNTADMIN role, or a role that has the CREATE FAILOVER GROUP privilege. You must also have the MONITOR privilege on all source databases and the OWNERSHIP privilege on all source shares.
Here is the template code from Snowflake’s documentation:
CREATE FAILOVER GROUP [ IF NOT EXISTS ] <name>
    OBJECT_TYPES = <object_type> [ , <object_type> , ... ]
    [ ALLOWED_DATABASES = <db_name> [ , <db_name> , ... ] ]
    [ ALLOWED_SHARES = <share_name> [ , <share_name> , ... ] ]
    [ ALLOWED_INTEGRATION_TYPES = <integration_type_name> [ , <integration_type_name> , ... ] ]
    ALLOWED_ACCOUNTS = <org_name>.<target_account_name> [ , <org_name>.<target_account_name> ,  ... ]
    [ IGNORE EDITION CHECK ]
    [ REPLICATION_SCHEDULE = '{ <num> MINUTE | USING CRON <expr> <time_zone> }' ]
;
For our example, this translates to the following code:
CREATE FAILOVER GROUP FULL_REPLICATION
    OBJECT_TYPES = account parameters, users, roles, warehouses, resource monitors, integrations, network policies, databases
    ALLOWED_DATABASES = CONTROL, RAW, INTERMEDIATE, PRESENTATION
    ALLOWED_INTEGRATION_TYPES = security integrations
    ALLOWED_ACCOUNTS = my_org.my_target_account
    REPLICATION_SCHEDULE = '10 MINUTE'
;
Enabling Replication of Streams and Tasks
At time of writing, the default functionality within Snowflake is for streams and tasks to not be replicated. If you wish to correct this, you can do so at the database, replication group or account level with the following statements:
-- Database level
ALTER DATABASE <name>
    SET ENABLE_STREAM_TASK_REPLICATION = TRUE
;

-- Failover Group level
ALTER FAILOVER GROUP <name>
    SET ENABLE_STREAM_TASK_REPLICATION = TRUE
;

-- Account level
ALTER ACCOUNT <name>
    SET ENABLE_STREAM_TASK_REPLICATION = TRUE
;
For our example, we will activate this at the failover group level:
ALTER FAILOVER GROUP FULL_REPLICATION
    SET ENABLE_STREAM_TASK_REPLICATION = TRUE
;
Creating the Secondary Failover Group on the Target Account
Now that we have created the primary Failover Group from the source account, we can create the secondary Failover Group on the target account. We do this with the ACCOUNTADMIN role or a role that has the CREATE FAILOVER GROUP privilege.
Here is the template code from Snowflake’s documentation:
CREATE FAILOVER GROUP [ IF NOT EXISTS ] <secondary_name>
    AS REPLICA OF <org_name>.<source_account_name>.<name>
For our example, this translates to the following code:
CREATE FAILOVER GROUP FULL_REPLICATION
    AS REPLICA OF my_org.my_source_account.FULL_REPLICATION
;
Triggering the Replication
As we have configured a replication schedule in our Failover Group, the replication will begin automatically once the above commands are executed. If we had not provided a replication schedule, we could trigger the replication manually from the target account by executing the following command:
ALTER FAILOVER GROUP [ IF EXISTS ] <name> REFRESH;
Redirect Client Connections with Connection Objects
Now that we have our objects replicating from our source account to our target account, we can start thinking about users/applications connecting to Snowflake and how we can minimise connection issues should we require a fail over or need to fully migrate to the target account.
In Snowflake, a connection is an object that can be used to facilitate access to Snowflake in place of the standard URL. For example, we could allow users and applications to connect to Snowflake through the following URL:
https://my_org-my_connection.snowflakecomputing.com
Setting this up is similar to setting up Failover Groups as we must first create a primary connection in our source account before creating a secondary connection in our target account.
You may need to ask Snowflake Support to enable this feature for your organisation.
Configuring a Primary Connection
To configure a primary connection on the source account, we only need to execute a single SQL statement. Again, we use the ACCOUNTADMIN role.
Here is the template code from Snowflake’s documentation:
CREATE CONNECTION [ IF NOT EXISTS ] <name>
  [ COMMENT = '<string_literal>' ]
;
For our example, this translates to the following code:
CREATE CONNECTION MY_CONNECTION;
Before we can configure a seconday connection, we must add the target account to the primary connection’s list of enabled failover accounts.
Here is the template code from Snowflake’s documentation:
ALTER CONNECTION <name>
  ENABLE FAILOVER TO ACCOUNTS <organization_name>.<account_name> [ , <organization_name>.<account_name> ... ]
  [ IGNORE EDITION CHECK ]
;
For our example, this translates to the following code:
ALTER CONNECTION MY_CONNECTION
  ENABLE FAILOVER TO ACCOUNTS MY_ORG.MY_TARGET_ACCOUNT
;
It may take a few minutes for this change to propagate.
Configuring a Secondary Connection
To configure a secondary connection on the target account, we only need to execute a single SQL statement that acts as a replica of the primary connection. Again, we use the ACCOUNTADMIN role.
Here is the template code from Snowflake’s documentation:
CREATE CONNECTION [ IF NOT EXISTS ] <name>
  AS REPLICA OF <organization_name>.<account_name>.<name>
  [ COMMENT = '<string_literal>' ]
For our example, this translates to the following code:
CREATE CONNECTION MY_CONNECTION;
  AS REPLICA OF my_org.my_source_account.MY_CONNECTION
;
Testing the Client Redirect
By taking the above steps, we have created the following connection URL in our Snowflake organisation:
https://my_org-my_connection.snowflakecomputing.com
This URL can be used to allow users and applications to connect to Snowflake without specifying the account. Before instructing your users to begin leveraging this new connection string. Before modifying any service account or application connections, I would recommend testing the functionality for yourself.
To execute the test, take the following steps:
- Create a database in the source account that is not in the list of databases to be replicated by the Failover Group.
- Create a database in the target account that is not in the list of databases to be replicated by the Failover Group and does not have the same name as the test database in the source account.
- Use your connection URL to connect to Snowflake through any tool/application of your choosing, such as SnowSQL.
- Verify that the database created in step (1) is listed. If using SnowSQL, you can use
SHOW DATABASES LIKE '<name>'to return a filtered list of databases with a matching name. - In the target account, promote the connection object to primary. The code is displayed after this list of steps.
- Wait a few minutes for the connection change to propagate.
- Again, use your connection URL to connect to Snowflake through any tool/application of your choosing, such as SnowSQL.
- Verify that the database created in step (2) is listed. This confirms that your redirect has succeeded and you are now connected to your target account.
- In the source account, promote the connection object to primary again to restore the original setup.
- Drop your test databases in the source and target accounts.
Here is the template code from Snowflake’s documentation to promote an account to primary:
ALTER CONNECTION <name> PRIMARY;
For our example, this translates to the following code:
ALTER CONNECTION MY_CONNECTION PRIMARY;
Achieving Full Replication/Failover
The combination of our Failover Group and our Snowflake connection should give us everything we need to perform a full migration from one account to another. However, as stated above, some objects cannot be replicated automatically, such as storage integrations, stages, pipes and external tables. If you wish to replicate these, this will need to be done manually. This cannot be achieved if you only wish to fail over and do not wish to fully migrate, as you cannot create objects within a read-only secondary database. If you were to disable replication and create the stages, Snowflake will simply overwrite them again when it next replicates.
If performing a full migration from one account to another, where you intend to promote the target account to be the primary account, then you would naturally wish to migrate all objects across. My recommendation would be to arrange a period of down-time during which you can pause replication and ensure that all such manually-migrated objects are migrated correctly as you must promote the target account to the primary one before you can modify the databases.
You may find it beneficial to script the automated deployment/migration of such objects. I wonder what may be covered in my later articles …
Ensure that the replication is paused (i.e., there is no schedule) before promoting the target account or you will overwrite/remove any objects which have not yet been manually migrated.
Wrap Up
I hope you have found this article useful. I am aware that most users will not require this article on a regular basis, however I hope it proves useful when the time comes for anybody wishing to migrate between Snowflake accounts or simply wanting to prepare with failover capabilities.