We’ve all seen situations where, for whatever reason, we have more data than we need in a table and we want to deduplicate. There are plenty of reasons for this, from dodgy ingestion processes to deliberate intent. Without diving into the “why” of it all, my hope is to walk through some of the ways you can deduplicate data in Snowflake.
For example, let’s assume we have the following table of data:
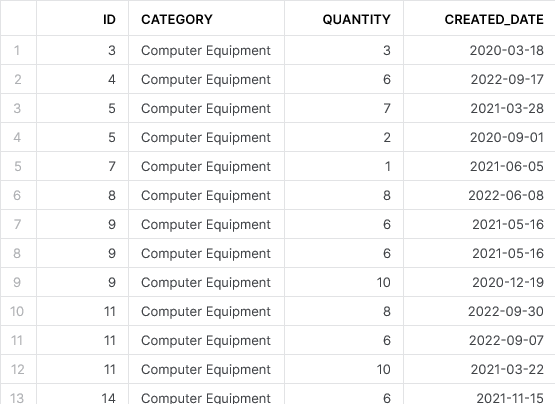
As you can see, each record has an ID field, a category, a quantity and, finally, a date for when the record was created. Already, we can see that there are duplicate entries in this table where the same ID applies to multiple rows of data.
Simply stating we wish to “deduplicate this table” is an ambiguous goal as this could mean one of many things. For example we may wish to achieve one of the following:
- Identity the unique values in a specific column of data, such as the unique categories
- Identify the count of unique IDs in the table
- Identify the unique records in the table
- Identify the count of unique records in the table
- Identify which IDs in the table have duplicate records
- Identify potential duplicate records for each ID in the table based on the created date
- Identify the latest record for each ID in the table based on the created date
- Identify all undesired duplicate records in the table that are not the latest record for the ID
- Update all records for undesired duplicate records in the table
- Delete all undesired duplicate records in the table
If any of these bullet points seem like something you would like to achieve, you’re in luck as this post will walk through how to achieve each one.
The DISTINCT Parameter
We start with the simplest of examples, where we only need to use the DISTINCT parameter in our SQL SELECT clause. The DISTINCT parameter can be used in any SQL SELECT clause to only return the unique output records. Let’s see some examples.
Identity the Unique Values in a Specific Column of Data
Our first example is a desire to see the unique values in a specific column of data. In our case, we wish to see the unique categories in our demo data table. We can do so with the following SQL statement:
SELECT DISTINCT CATEGORY
FROM DEMO_DATA
;
This outputs the following result:

As you can see, this is a quick and easy method to return the unique values. I expect most readers are already aware of this approach; however, it is important to cover it as groundwork for some of the later examples.
Identify the Count of Unique IDs in the Table
Taking this one step further, we can leverage a COUNT aggregate function to retrieve the count of unique IDs in our table and compare it to the overall record count in the table.
SELECT
COUNT(*) as RECORD_COUNT
, COUNT(DISTINCT ID) AS DISTINCT_ID_COUNT
FROM DEMO_DATA
;
This outputs the following result:

With this relatively simple statement, we have easily identified that a large fraction of our demo data uses a duplicated ID value. If our ID field was entirely unique, it would have 103 unique values to match the 103 records in our table.
It is worth noting that the COUNT aggregate function only returns the number of non-NULL records for the specified field, as stated in Snowflake’s own documentation.
Identify the Unique Records in the Table
Taking this a step further, we may wish to see the unique combinations of all fields in the table. Similar to how we can view all records of a table with a SELECT * statement, we can throw in a DISTINCT parameter to return only the unique combinations. Let’s see the code:
SELECT DISTINCT *
FROM DEMO_DATA
;
This outputs the following result:
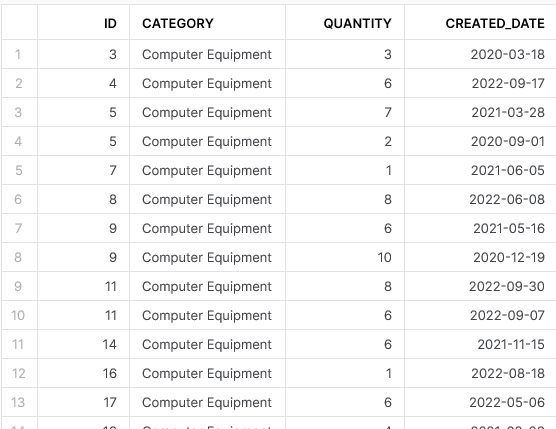
With this code, we can ensure that every returned record is unique. If you look at the original demo data at the start of this post and compare it with this result, you will notice that there used to be two records where the ID is 9 and the created date is 2021-05-16, but this latest query has only returned a single occurrence of this record.
Identify the Count of Unique Records in the Table
Using a similar method to the previous COUNT aggregate function example, we can retrieve the count of unique records in our table and compare it to the overall record count in the table.
SELECT
    COUNT(*) as RECORD_COUNT
  , COUNT(DISTINCT DEMO_DATA.*) AS DISTINCT_RECORD_COUNT
FROM DEMO_DATA
;
This outputs the following result:

There is an important thing to note here. Again, we have leveraged the general principle of DISTINCT to identify our unique records; however, we have expanded this to use the table name/alias in the form DISTINCT DEMO_DATA., which does not seem natural. We must do this as Snowflake does not naturally support COUNT(DISTINCT *) without including the table name/alias.
Identify Which IDs in the Table Have Duplicate Records
A simple way to list out all of the IDs in the table which have duplicate records is to pair a COUNT(*) aggregation with our ID field using GROUP BY, then filter on it using a HAVING clause.
SELECT
    ID
  , COUNT(*) as RECORD_COUNT
FROM DEMO_DATA
GROUP BY
    ID
HAVING RECORD_COUNT > 1
ORDER BY ID
;
This outputs the following result:
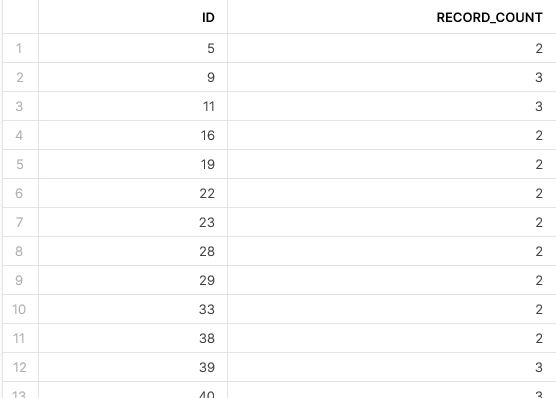
This is a straightforward way to list out all of our IDs that have duplicate records. I will not discuss this further in this post as we will move on to more advanced methods using window functions and QUALIFY clauses; however, you can read more about HAVING clauses in Snowflake’s documentation.
Going Deeper with Window Functions and QUALIFY Clauses
In my opinion, this is where this post gets interesting. The DISTINCT parameter can only get you so far before it runs out of steam, and Snowflake’s support of QUALIFY clause really expands the potential.
Understanding Window Functions and QUALIFY Clauses
Before we go into the examples, we will quickly cover the two main components here.
Window Functions
Our first component is a window function. Without going into too much detail, a window function allows you to perform calculations that take other rows of the data into consideration. This is different from a typical aggregate function where GROUP BY is involved as a window function will output the result for every record instead of grouping them together.
Example Using MAX
It’s easier to introduce window functions using an example. Let’s assume that we want to know the latest created date in our data for each category. We can achieve this with a standard aggregate function, like so:
SELECT
    CATEGORY
  , MAX(CREATED_DATE)
FROM DEMO_DATA
GROUP BY
    CATEGORY
;
This outputs the following result:

As we can see, we only have one record in our output per category as the result has been aggregated. With a window function, our intention is not to aggregate the records but instead to determine the result for each row. In short, we still wish to see the latest created date for the category; however, we also wish to see the other details for the individual row.
Consider the following query:
SELECT
    *
  , MAX(CREATED_DATE) OVER (
      PARTITION BY CATEGORY
    ) AS LATEST_CREATED_DATE
FROM DEMO_DATA
;
This outputs the following result:
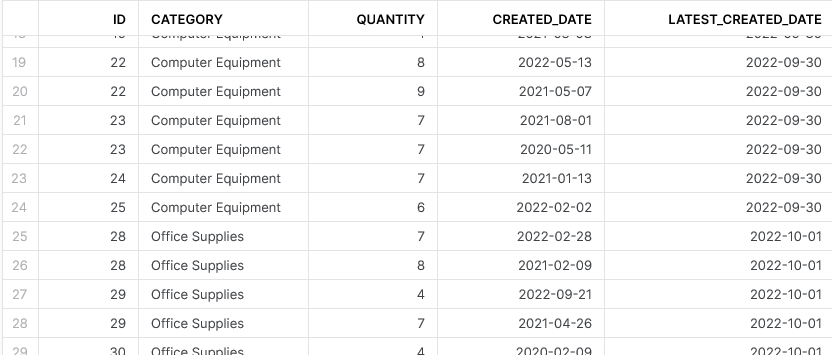
As you can see, we have not aggregated to only four output records but our new LATEST_CREATED_DATE field still contains the maximum CREATED_DATE value for each category.
Generic Form
The above example is a useful introduction; however, it is not relevant to our deduplication scenarios. Before we proceed, let us consider the typical form for a window function:
MY_FUNC() OVER (
  PARTITION BY FIELD_A, FIELD_B, ...
  ORDER BY FIELD_X, FIELD_Y, ...
)
The above is a simple example of converting the function called MY_FUNC() from a normal function into a window function.
The PARTITION BY clause allows us to perform our function on a specific set of records in our data. Think of this similarly to the field(s) that you would wish to GROUP BY in a standard aggregation.
The ORDER BY clause allows us to sort the data within the partition. This is useful when performing functions like RANK() and ROW_NUMBER(), which take the order into account.
Depending on the function, you may or may not need to provide one or both of these clauses.
Window functions are capable of more that the form in this example; however, this is sufficient to serve our purposes for this blog. Let’s break this down into its parts. You can read more about window functions in Snowflake’s documentation.
QUALIFY Clauses
Our second component is a QUALIFY clause. In simple terms, a QUALIFY clause allows you to filter on the results of a window function, in a similar way to how a WHERE clause allows you to filter on row-level values and a HAVING clause allows you to filter on aggregate values. You can read more about QUALIFY clauses in Snowflake’s documentation.
Leveraging Window Functions and QUALIFY Clauses for Data Deduplication
Now that we understand a bit more about window functions and QUALIFY clauses, we can leverage them to determine to support our deduplication efforts.
Identify Potential Duplicate Records for Each ID in the Table Based on the Created Date
First, we will cover how we can identify potential duplicates using a window function. By using the popular ROW_NUMBER() window function, with the ID as our partition and the created date as our ordering field, we can number our records based on how recent they are. The most recent record for each ID will have the number 1, with any earlier records numbered 2, 3, etc.
Consider the following query:
SELECT
    *
  , row_number() over (
      PARTITION BY id
      ORDER BY created_date desc
    ) as occurrence_id
FROM DEMO_DATA
ORDER BY
    id
  , occurrence_id
;
This outputs the following result:
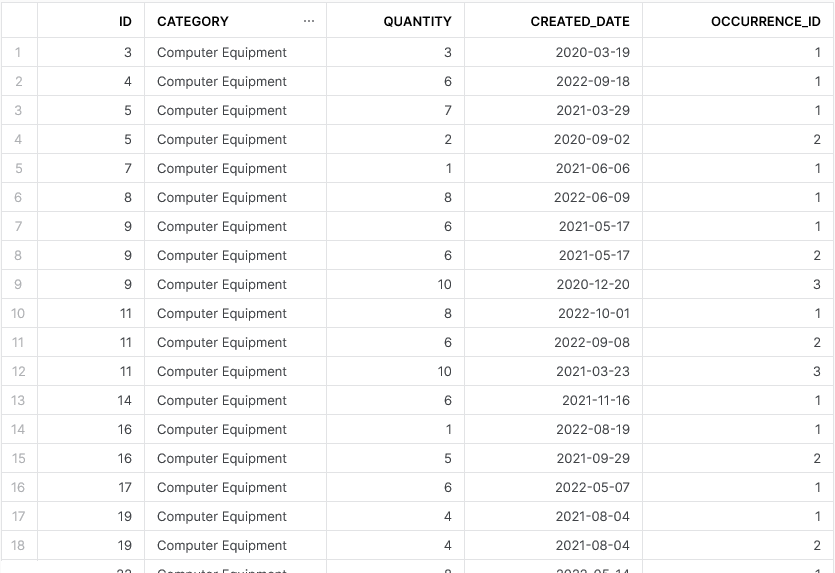
As you can see, we have created a new field called OCCURRENCE_ID which identifies our potential duplicates as intended.
Identify the Latest Record for Each ID in the Table Based on the Created Date
Now that we now how to construct our OCCURRENCE_ID ,which identifies potential duplicates, we can filter on it using a QUALIFY clause. By filtering for the value 1, we ensure we only retrieve values which are the most recent entry for each ID.
SELECT
    *
  , row_number() over (
      PARTITION BY id
      ORDER BY created_date desc
    ) as occurrence_id
FROM DEMO_DATA
QUALIFY occurrence_id = 1
ORDER BY
    id
  , occurrence_id
;
This outputs the following result:
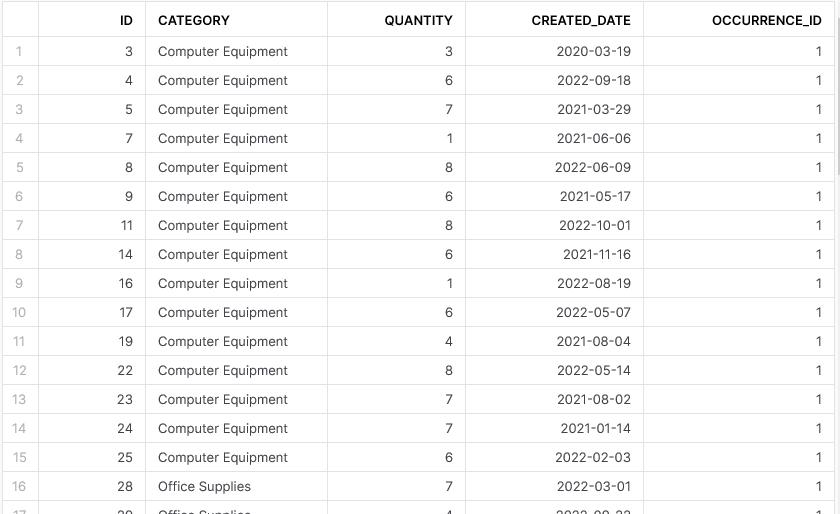
This is powerful on its own; however, the OCCURRENCE_ID field in the output is now a bit useless as we know it will always have the value 1. We could build a nested query to perform the same functionality without selecting this field in the final output; however, it is easier to execute the QUALIFY clause on the window function directly instead of creating it under SELECT first:
SELECT *
FROM DEMO_DATA
QUALIFY row_number() over (
    PARTITION BY id
    ORDER BY created_date desc
) = 1
ORDER BY id
;
This outputs the following result:
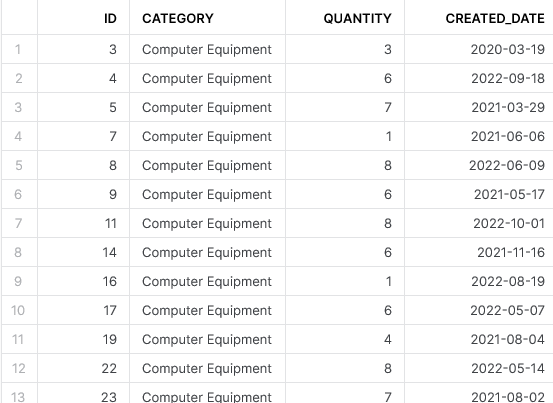
And so we have built a query which selects only the most recent records in our table based on the ID and the created date. This is already useful functionality, and yet the blog still continues for a few more sections. Indeed, it is useful to be able to quickly deduplicate to retrieve the “desired” records as we have done here; however, it can be equally useful to select the duplicates themselves and to perform various actions to them.
Identify All Undesired Duplicate Records in the Table That Are Not the Latest Record for the ID
Before we can perform any action on our undesired duplicate records, we first must be able to identify them. For this, we change our QUALIFY clause slightly to return any value greater than 1. As the value 1 represents a desired value (i.e. the most recent record for that ID), by filtering to values greater than 1 we are filtering for any record that is not the most recent record for that ID.
SELECT
    *
FROM DEMO_DATA
QUALIFY row_number() over (
    PARTITION BY id
    ORDER BY created_date desc
) > 1
ORDER BY id
;
This outputs the following result:
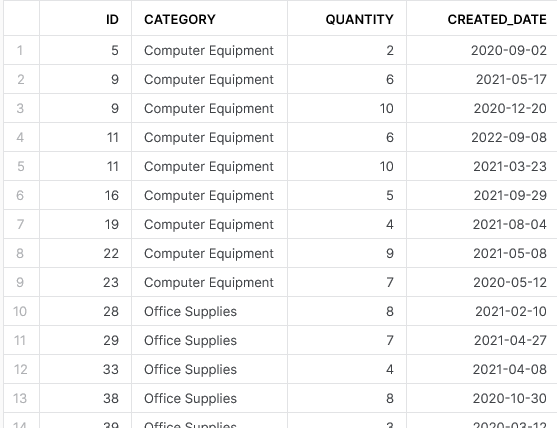
It is not immediately clear that these are only the duplicates. If you look at the original demo data at the start of this post and compare it with this result, you will notice that there used to be a record where the ID is 5 and the created date is 2020-03-29. This latest query, however, has only returned the value for 2020-09-02, which we would consider an undesired duplicate.
Update All Records for Undesired Duplicate Records in the Table
Now that we know we can identify our undesired duplicate records, we can actually update them directly.
For the sake of clarity, I would like to state that best practice is not to update an existing field of dimensional data as a duplicate flag. Ideally we would have a separate field for STATUS or EXPIRED_FLAG or similar; however, this post is only intended to display the functionality and I do not wish to overcomplicate matters with discussions of best practice and table alterations.
By pairing a standard UPDATE statement with a subquery that leverages our QUALIFY clause, we can modify the category field in our data to the value “EXPIRED_RECORD.”
UPDATE DEMO_DATA
  SET DEMO_DATA.CATEGORY = 'EXPIRED_RECORD'
FROM (
  SELECT distinct
      ID
    , CREATED_DATE
  FROM DEMO_DATA
  QUALIFY row_number() over (
    PARTITION BY id
    ORDER BY created_date desc
  ) > 1
) as undesired_records
where DEMO_DATA.ID = undesired_records.ID
  and DEMO_DATA.CREATED_DATE = undesired_records.CREATED_DATE
;
After executing this query, a standard SELECT * outputs the following result:
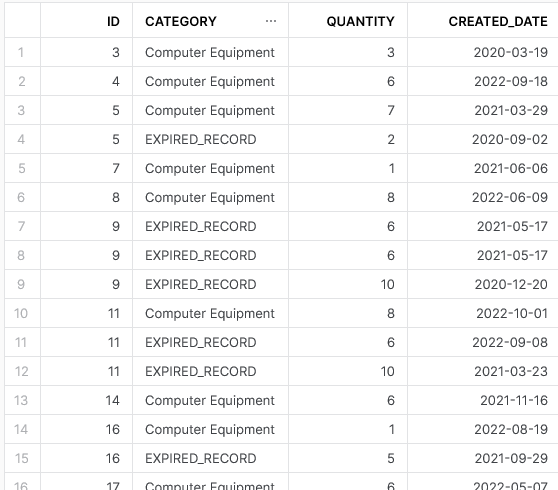
As I stated above, ideally we would use a separate field called STATUS or EXPIRED_FLAG or similar to support this; however, this shows the functionality easily enough and we can now see our duplicates clearly.
Delete All Undesired Duplicate Records in the Table
Our final challenge is to delete all of the undesired records from the table. We could cheat here and simply delete all records where the category is “EXPIRED_RECORD,” but there’s no fun in that. Instead, we will pair a standard DELETE statement with a USING subquery that leverages our QUALIFY clause.
DELETE FROM DEMO_DATA
USING (
  SELECT distinct
      ID
    , CREATED_DATE
  FROM DEMO_DATA
  QUALIFY row_number() over (
    PARTITION BY id
    ORDER BY created_date desc
  ) > 1
) as undesired_records
where DEMO_DATA.ID = undesired_records.ID
  and DEMO_DATA.CREATED_DATE = undesired_records.CREATED_DATE
;
After executing this query, a standard SELECT * outputs the following result:
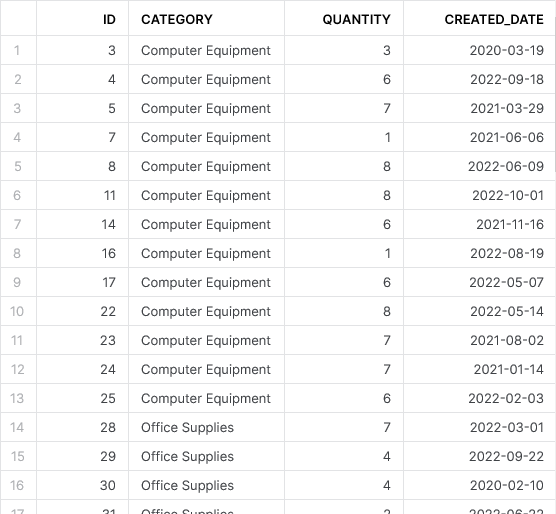
There we have it. As you can see from the results of our final standard SELECT * query, we no longer have any duplicates in our data.
Wrap Up
I hope you found this little journey through deduplication useful. A common tactic I use within my data pipelines is to maintain all records in my RAW tables, including any duplicates, and build views that leverage QUALIFY clauses to access deduplicated or “up-to-date” data. This is valuable as the historic values be useful based on your use-case and may not always simply be “undesired duplicates,” though they served that role well for this post.

