Tableau Deep Dives are a loose collection of mini-series designed to give you an in-depth look into various features of Tableau Software.
We’ve created manual sets, and we’ve created computed sets. Now we are going to extend the functionality of our sets once again by using two sets to create a combined set. This allows us to create additional analysis to compare, contrast or even combine the membership of different sets. By combining sets, we are creating a completely new third set.
Combining Sets
Before we can combine sets, we must first make sure that we are choosing sets that are based on the same dimension. For instance, if one set is based on the top 100 most profitable customers and a second set is based on all customers in California, we could create a combined set. We could not create a combined set if instead of most profitable customers, we considered most profitable products instead.
This is key: The sets to be combined must be based on the same dimension. It doesn’t matter if one set is computed and the other is manual or if one set is a Top 100 and the other is a set built by conditions, so long as they use the same dimension.
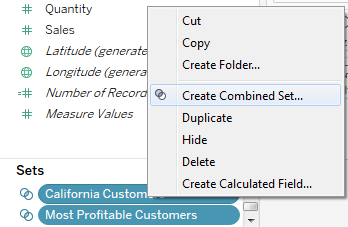
Once both sets are created, hold the CTRL button and select them both in the Sets section of the Data pane. Right-click and select Combine Sets.

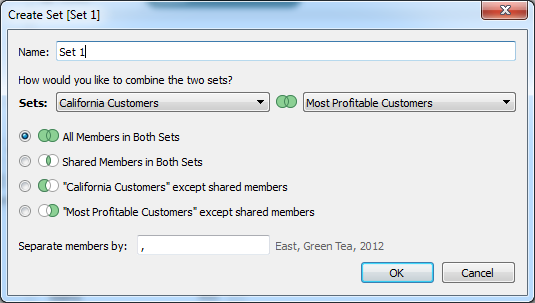
This brings up the Combined Set dialogue box:

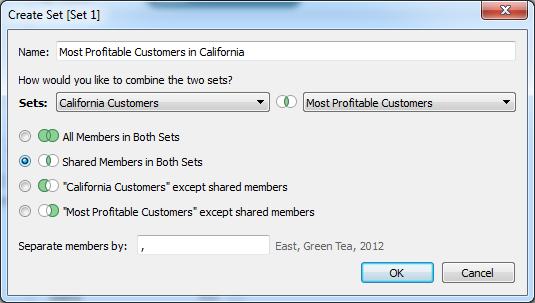
First, we need to name our new combined set. I’ll name it “Most Profitable Customers in California.” Next, I need to decide how my two underlying sets are going to interact in my combined set. I get four options portrayed by four different Venn diagrams:
- All Members: The combined set will include all members from each set. This is a union of both sets. In this example, all California customers as well as the top 100 most profitable customers.
- Shared Members: The combined set will only include members that exist in both sets. This is an intersection of both sets. For example, only California customers that are also in the top 100 most profitable.
- Except Shared: The final two options allow you to exclude shared members in either set, one for the set in the left-hand drop-down menu and the other option for the right-hand drop-down menu. This is the set difference of the selected set compared to the other. For example, I could have all California customers except those customers that fall in the top 100 most profitable. Alternatively, I could have my top 100 most profitable customers except any that are in California.
For my example, I’ll select Shared Members or members that exist in both sets:

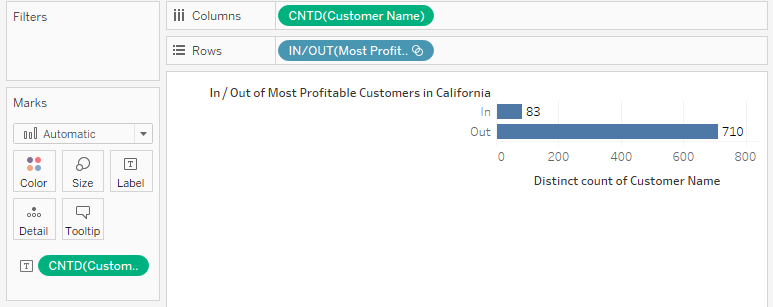
Let’s use this newly created, combined set in my view. One set had the top 100 most profitable customers and the other set had 577 customers that ordered from California. Showing the members IN the intersection of the two sets gives the following result (83 customers):

We can now use this combined set just as we would any other set that we had created.
What’s Next?
In our next article, we’ll explore how we can use sets with calculated fields. If you have any comments or questions, please leave them in the space provided below. Until next time!

