
As Snowflake has developed over the years, we have seen the introduction of more and more table types, and it isn’t always immediately clear what the differences are and when they should be used. Today, I hope to shed some light on this by outlining the following table types and their nature:
- Permanent tables
- Temporary tables
- Transient tables
- External tables
- Dynamic tables
Permanent Tables
Snowflake permanent tables are your standard database tables. They are Snowflake’s default table type and can be created with the common CREATE TABLE syntax, with no additional properties.
CREATE TABLE STORE (STORE_ID NUMBER, STORE_NAME STRING);
Being the most used and default type of table in Snowflake, permanent tables support features such as Fail-safe and Time Travel, which are useful when in need to recover lost data. Permanent table data contribute to the storage charges that Snowflake bills your account.
Temporary Tables
Snowflake temporary tables are tables that only exist within the current session. Once the session ends, the table and its data will be deleted and they are not recoverable, either by the user who created it or by Snowflake. Temporary tables are useful for storing non-permanent, transitory data like ETL data and session-specific data and they are not visible to other users or sessions.
The data stored in the temporary table will contribute to the overall storage charges that Snowflake bills your account. For large temporary tables that are created in longer sessions (i.e., over 24 hours), Snowflake recommends dropping these tables once they are no longer used in order to avoid unexpected storage costs.
Because temporary tables belong to a session, they are not bound by the same uniqueness requirements as other table types and you might run into naming conflicts. Temporary tables can have the same name as a permanent table in the same schema. When creating a temporary table with the same name as a permanent table, the existing table will be effectively hidden. When creating a table with the same name as a temporary table, the newly created table is hidden by the temporary table.
You can create a temporary table by using the CREATE TABLE command with the TEMPORARY (or TEMP) keyword, for example:
CREATE TEMPORARY TABLE TEMP_TABLE (COL1 NUMBER, COL2 STRING);
Transient Tables
Transient tables are tables that persist until explicitly dropped. They are available to all users with the correct privileges. The main difference between transient and permanent tables is that transient tables do not have a Fail-safe period as well as having a lower Time Travel retention period of 0 or 1 day (default is 1). Transient tables are designed for transitory data that needs to be maintained beyond the current session (unlike temporary tables).
Data in transient tables will contribute to the overall storage costs, however, there will be no Fail-safe costs as they do not make use of Snowflake’s Fail-safe feature.
To create a transient table, you can specify the TRANSIENT keyword when creating the object:
CREATE TRANSIENT TABLE TRANSIENT_TABLE (COL1 NUMBER, COL2 STRING);
You can also create transient databases and schemas. Tables created in a transient schema and schemas created in a transient database are transient by definition.
The same syntax applies to databases and schemas:
CREATE TRANSIENT DATABASE TRANSIENT_DATABASE;
CREATE TRANSIENT SCHEMA TRANSIENT_DATABASE.TRANSIENT_SCHEMA;
External Tables
Snowflake external tables allow you to query data that is stored in a data lake outside Snowflake in your cloud storage provider. They allow you to access and analyse data residing in various file formats, such as CSV, JSON, Parquet, Avro and more, without needing to load the data into Snowflake’s internal storage.
External tables are read-only, meaning you cannot perform certain DML operations on them such as INSERT, DELETE and UPDATE. However, you can create views against external tables as well as use them for queries and join operations.
Since the data is stored outside Snowflake, querying an external table can be slower than querying a table that is stored in Snowflake. You can improve the performance of a query that looks into an external table by creating a Materialised View (Enterprise Edition feature) based on the external table. A particularly strong use-case is to point an external table at a set of often-changing semi-structured data files and using a materialised view to flatten and parse the semi-structured data into a structured, tabular format for users to query.
In order to create an external table, first you need to create a named stage (CREATE STAGE) that points to an external location where your data files are staged (for example, an S3 Bucket). For this example, we’ll be creating a stage that points to an S3 bucket called table-types containing files which contain data for players in the FIFA 2023 video-game.
CREATE STAGE MY_STAGE
URL = 's3://table-types/'
STORAGE_INTEGRATION = MY_STORAGE_INTEGRATION;
Here, we used a storage integration for authentication with AWS. You can read more about Storage Integrations and how to set them up here: Configuring Storage Integrations Between Snowflake and AWS S3
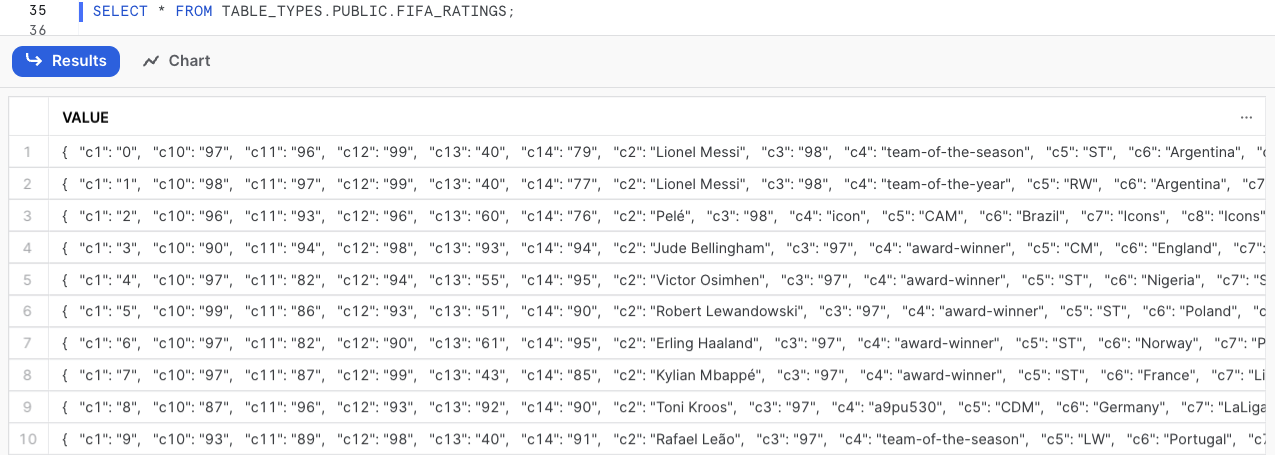
Once the stage is created, you can create your external table by running a CREATE EXTERNAL TABLE command. This method is great when you don’t know the schema of the files, the table will be created with one column as VARIANT with each row of your CSV file as a JSON Object. This VARIANT column’s name is VALUE and can be referenced when querying your external table.
CREATE EXTERNAL TABLE FIFA_RATINGS
WITH LOCATION = @MY_STAGE/
FILE_FORMAT = (TYPE = CSV SKIP_HEADER = 1);
SELECT * FROM TABLE_TYPES.PUBLIC.FIFA_RATINGS;
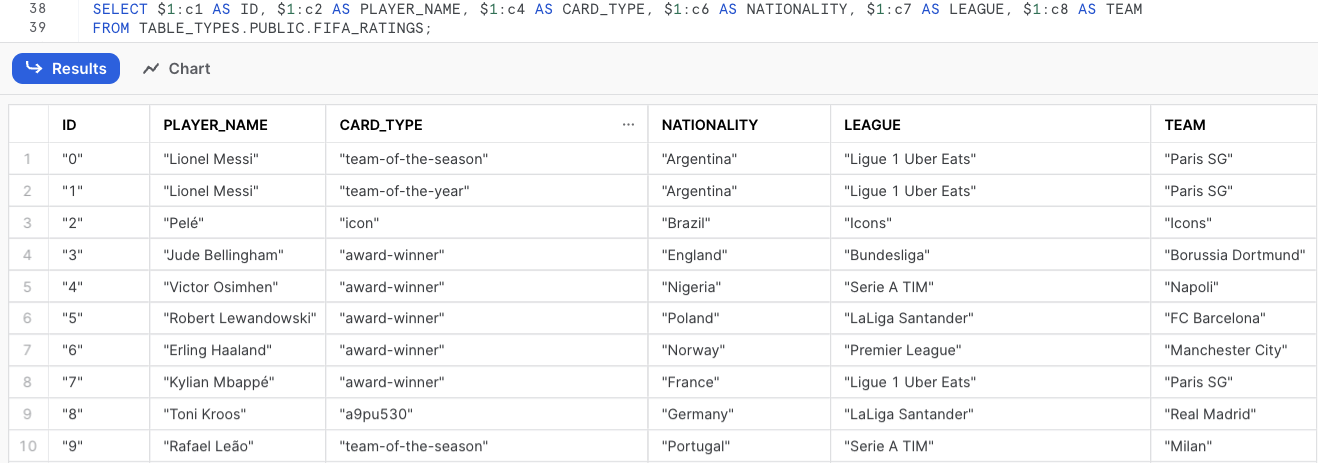
You can select different columns by specifying $1:c(colNumber) or the column name VALUE:c(colNumber) in your SELECT statement, for example:
SELECT
    $1:c1 AS ID
    ,$1:c2 AS PLAYER_NAME
    ,$1:c4 AS CARD_TYPE
    ,$1:c6 AS NATIONALITY
    ,$1:c7 AS LEAGUE
    ,$1:c8 AS TEAM
FROM TABLE_TYPES.PUBLIC.FIFA_RATINGS;

-- OR

SELECT
    VALUE:c1 AS ID
    ,VALUE:c2 AS PLAYER_NAME
    ,VALUE:c4 AS CARD_TYPE
    ,VALUE:c6 AS NATIONALITY
    ,VALUE:c7 AS LEAGUE
    ,VALUE:c8 AS TEAM
FROM TABLE_TYPES.PUBLIC.FIFA_RATINGS;
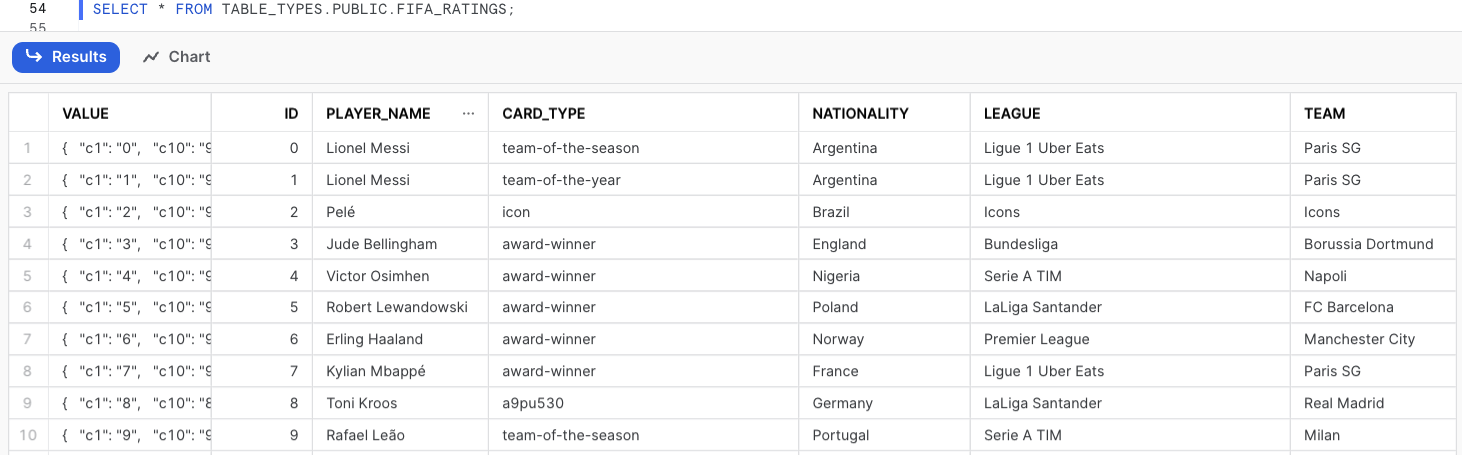
If you know the schema of the files, you can then specify column names when creating the external table.
CREATE OR REPLACE EXTERNAL TABLE FIFA_RATINGS (
ID NUMBER AS (VALUE:c1::NUMBER)
,CARD_TYPE VARCHAR AS (VALUE:c4::VARCHAR)
,PLAYER_NAME VARCHAR AS (VALUE:c2::VARCHAR)
,NATIONALITY VARCHAR AS (VALUE:c6::VARCHAR)
,LEAGUE VARCHAR AS (VALUE:c7::VARCHAR)
,TEAM VARCHAR AS (VALUE:c8::VARCHAR)
)
LOCATION = @MYSTAGE/
FILE_FORMAT = (TYPE = CSV SKIP_HEADER = 1);
Note that by default, the VALUE column containing the JSON object will be the first column of your table:
You can learn more about External Tables in my blog post: Snowflake External Tables: Connect Efficiently to Your Data Lake
Dynamic Tables
Dynamic tables are a type of table in Snowflake that automate the way to transform your data for consumption. In dynamic tables, data transformations can be defined on the table creation, and Snowflake will manage the pipeline automatically. Instead of creating a separate target table and write code to transform your data in that table, you can create a dynamic table as your target table and write your transformation in the table definition as a SQL statement.
Because the definition of a dynamic table is determined by the SQL statement, you cannot insert, update or delete the rows. The automated refresh process that manages the pipeline will materialise the query results into a dynamic table.
The following is a simple example that creates a dynamic table that joins two tables together and apply a simple UPPER function in one of the columns:
create or replace dynamic table MY_DYNAMIC_TABLE
  target_lag = '1 hour'
  warehouse = MY_WAREHOUSE
as
  select
      a.COL_1
    , UPPER(a.COL_2) AS COL_2
    , b.COL_3
  from MY_SOURCE_TABLE_A as a
    join MY_SOURCE_TABLE_B as b
      on a.MY_JOIN_KEY = b.MY_JOIN_KEY
  where a.MY_FILTER_FIELD = 'MY_FILTER_VALUE'
;
On the example above, you can specify the query results you want to see. This can replace stream and tasks by specifying how often you’d like the data to refresh under the TARGET_LAG property.
At InterWorks, we’re very happy with the release of dynamic tables as it matches a declarative pipeline pattern that we have desired for years and partially achieved using views in the past. My colleague Mike Oldroyd wrote an article on this back in 2020: “A Better Alternative to Algorithms in Business Intelligence.”
Dynamic tables provide a reliable mechanism for automatic incremental data updates. However, if the underlying process encounters challenges in determining how to perform this incremental refresh, such as when an unsupported expression is used in the query, it will resort to a full refresh instead. It’s worth noting that warehouse credits are only consumed for incremental refresh when new data is available.
Another noteworthy feature of dynamic tables is their snapshot isolation capability. This means they always maintain data consistency, ensuring that their content reflects the outcome that the defining query would have generated at a specific point in the past.
My colleague Tinju has written an outstanding blog post about Dynamic tables. To delve deeper into this topic, I encourage you to explore the content by following this link: “Snowflake Dynamic Tables: Automatic Declarative Data Transformation Pipelines.”
Wrap Up
When you are working with data that is only needed for a short period of time, temporary tables can be very useful. These tables are designed to hold transitory data that only needs to exist within the current session and will be deleted afterwards to save on storage costs.
When working with data that is intended to be kept for a longer period of time than the current session, using transient tables is a viable option. Although it is important to note that while this approach may be useful for maintaining the data beyond the current session, it does not offer the benefits of Fail-safe that permanent tables do.
When creating your fact and dimension tables, it is highly recommended to use permanent tables. These tables offer a number of advantages, including the ability to travel back in time and recover previous states of the data in cases where errors or other issues arise. Additionally, permanent table data can be recovered with Fail-safe by the Snowflake team.
External tables are a great way to access data that is stored outside of Snowflake. By using external tables, you can easily query your data without having to move it into Snowflake. This can be especially useful if you have a large amount of data in your external storage. However, it’s important to be aware of the limitations in performance that can come with using external tables. Since the data is not stored in Snowflake, query times can be higher as we need to retrieve it from your cloud storage provider.
Dynamic tables are an excellent solution for simplifying the process of tracking data dependencies and managing data refresh. They can be used without requiring you to write code, and they allow you to avoid the complexity of streams and tasks. However, it’s crucial to note certain limitations that exist. For instance, when constructing pipelines with streams and tasks, it’s common to incorporate stored procedures and external functions. Unfortunately, these functionalities are not accessible when creating your pipeline with dynamic tables.
Thank you for reading about the various table types in Snowflake. I hope you found this overview helpful in understanding their differences and how to use them effectively. With this knowledge, you can make informed decisions when choosing which table type to use, unlocking new possibilities for your data-driven projects. Happy exploring!