
In this blog post, we will dive into the realm of Snowflake External Tables, a feature redefining data management and analysis. If you find yourself grappling with massive datasets, complex data structures or ever-increasing data volumes, you’re not alone. In this age of information abundance, businesses face unprecedented challenges in efficiently storing, processing and accessing data. Fortunately, Snowflake’s approach to External Tables offers a solution that empowers organisations to effortlessly integrate, query and analyse data from external sources without compromising on performance or scalability. This allows you to follow a data lake approach to your data files whilst still leveraging them through Snowflake and exposing transformed data to end users. We will be discussing the following:
- Creating a File Format
- Creating an External Stage
- Creating an External Table
- Performance optimisation, including partitioning and materialized views
- Refreshing External Table metadata and refresh history
Creating a File Format
Snowflake File Format Objects are configurations that define how data is organised and stored in files within Snowflake. They specify the structure and encoding of data files, enabling Snowflake to efficiently read, write and process data in various formats like CSV, JSON, Parquet, Avro and more. File Format Objects allow users to customise settings such as field delimiters, compression options, character encoding and handling of null values, ensuring compatibility with different data sources and optimising storage and query performance. We will be creating a file format to handle our News Articles JSON data. Since our files are structured to each contain the full file contents as a list, we leverage the STRIP_OUTER_ARRAY option to break each list member into an individual record.
CREATE OR REPLACE FILE FORMAT MY_JSON_FILE_FORMAT
    TYPE = 'JSON'
    STRIP_OUTER_ARRAY = TRUE
;
Creating an External Stage
The next step involves creating an external stage (using CREATE STAGE) that establishes a connection to an external location housing your data files, such as an S3 Bucket. Since we know our files in the stage are JSON, we can specify the file format that we created above when creating the stage.
CREATE STAGE MY_STAGE
    URL = 's3://ext-table-example-wp/'
    STORAGE_INTEGRATION = MY_STORAGE_INTEGRATION
    FILE_FORMAT = MY_JSON_FILE_FORMAT
;
In this case, we employed a storage integration to facilitate authentication with AWS. To learn further details about Storage Integrations and their setup procedures, you can refer to the following resources:
- For AWS Storage Integrations: Configuring Storage Integrations Between Snowflake and AWS S3.
- For Azure Storage Integrations Configuring Storage Integrations Between Snowflake and Azure Storage.
Creating an External Table
Once the file format and the stage are created, we can create our external table. For this example, we will start by creating a very simple external table that does nothing more than directly access the data in the files.
CREATE OR REPLACE EXTERNAL TABLE NEWS_ARTICLES
WITH LOCATION = @MY_STAGE/
FILE_FORMAT = MY_JSON_FILE_FORMAT
;
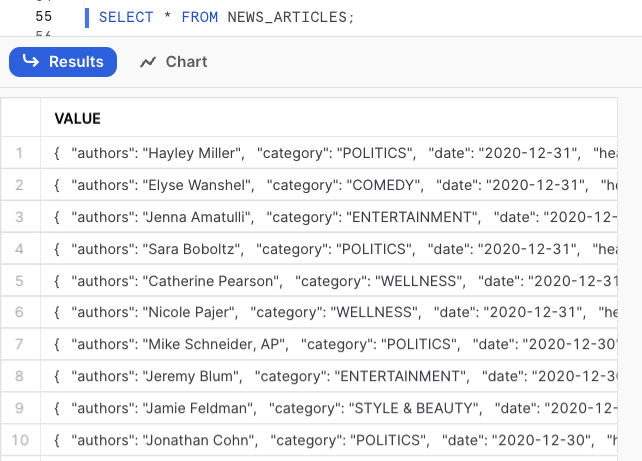
On the example above, your external table will be created with the contents of your JSON file. This means your external table will have one column called VALUE and a row for each object that your JSON file contains. We can query specific attributes by using the $1 notation, for example:
SELECT $1:authors AS AUTHORS ,$1:category AS CATEGORY ,$1:date AS PUBLISHED_DATE ,$1:headline AS HEADLINE ,$1:link AS WEBSITE_URL ,$1:short_description AS SHORT_DESC FROM NEWS_ARTICLES ;

This can be an extremely useful way to validate the data of your external table. You can also create external tables specifiying the fields that you’d like to use with the $1 notation on your create external table statement. This method of creating external tables is useful when you know what your schema looks like. In this example, we’ll be re-creating the NEWS_ARTICLES table:
CREATE OR REPLACE EXTERNAL TABLE NEWS_ARTICLES (
    AUTHOR STRING AS ($1:authors::STRING)
    ,CATEGORY STRING AS ($1:category::STRING)
    ,PUBLISHED_DATE DATE AS ($1:date::DATE)
    ,HEADLINE STRING AS ($1:headline::STRING) ,LINK STRING AS ($1:link::STRING)
    ,SHORT_DESC STRING AS ($1:short_description::STRING)
)
WITH LOCATION = @MY_STAGE/
FILE_FORMAT = MY_JSON_FILE_FORMAT
;
Another great feature of external tables is the ability to load data using a PATTERN. Imagine your S3 bucket contained data from sales and customers in a single folder called sales-and-customers. For sales, your files are named sales_001 to sales_009 and your customer files are named customer_001 to customer_009. In this case, if you want to create an external table with only customer data, you can use the PATTERN property in your CREATE EXTERNAL TABLE statement, for example:
CREATE OR REPLACE EXTERNAL TABLE PATTERN_TESTING
WITH LOCATION = @MY_STAGE/sales-and-customers
PATTERN = '.*customer_.*[.]json'
FILE_FORMAT = MY_JSON_FILE_FORMAT
;
Performance Optimisation
As the data resides outside Snowflake, querying an external table may result in slower performance compared to querying an internal table stored within Snowflake. However, there are two ways to enhance the query performance for external tables. Firstly, when creating your External Table, you can improve performance by adding partitions. Alternatively, you can also create a Materialised View (Enterprise Edition Feature) based on the external table. Both approaches offer optimisations to expedite data retrieval and analysis from external tables.
Partitioning Your External Table
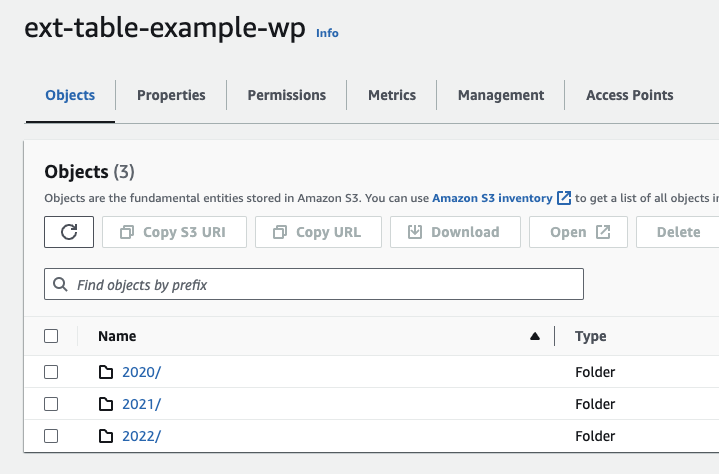
Partitioning your external tables is highly advisable, and to implement this, ensure that your underlying data is structured with logical paths incorporating elements like date, time, country or similar dimensions in the path. For this example, we will be partitioning news articles based on their published year. In this S3 bucket, I created three different folders, one for each year that will be used for partitioning. Each folder has a JSON file inside with multiple news articles for each year.
The JSON files inside the folder are structured in the following way:
[
    {
       "link": "<url>",
       "headline": "<headline>",
       "category": "<category",
       "short_description": "<short description>",
       "authors": "<authors>",
       "date": "2020-01-01"
    },
    {...}
]
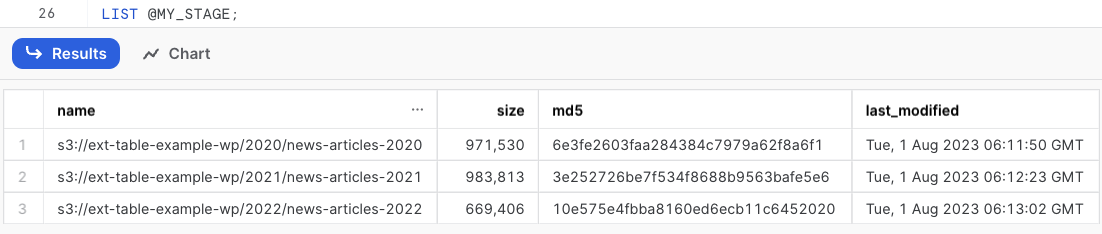
As mentioned above, ensure that your underlying data is structured with logical paths. We can verify the logical path by listing the contents of the stage:
LIST @MY_STAGE;
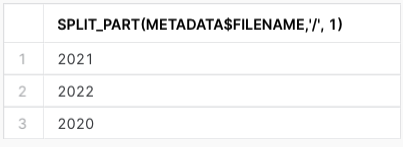
Given we structured the file path with a folder for each year, we can use SPLIT_PART(METADATA$FILENAME,'/', 1) to generate our partitions. To confirm what our partitions look like, we can use the following SELECT statement:
SELECT DISTINCT
    SPLIT_PART(METADATA$FILENAME,'/', 1)
FROM @MY_STAGE
;
Now we can create our external table with the partition on the year:
CREATE OR REPLACE EXTERNAL TABLE NEWS_ARTICLES_WITH_PARTITION (
    AUTHOR STRING AS ($1:authors::STRING)
    ,CATEGORY STRING AS ($1:category::STRING)
    ,PUBLISHED_DATE DATE AS ($1:date::DATE)
    ,HEADLINE STRING AS ($1:headline::STRING)
    ,LINK STRING AS ($1:link::STRING)
    ,SHORT_DESC STRING as ($1:short_description::STRING)
    ,FILE_PARTITION STRING AS (SPLIT_PART(METADATA$FILENAME,'/', 1))
)
PARTITION BY (FILE_PARTITION)
WITH LOCATION = @MY_STAGE/
FILE_FORMAT = MY_JSON_FILE_FORMAT
;
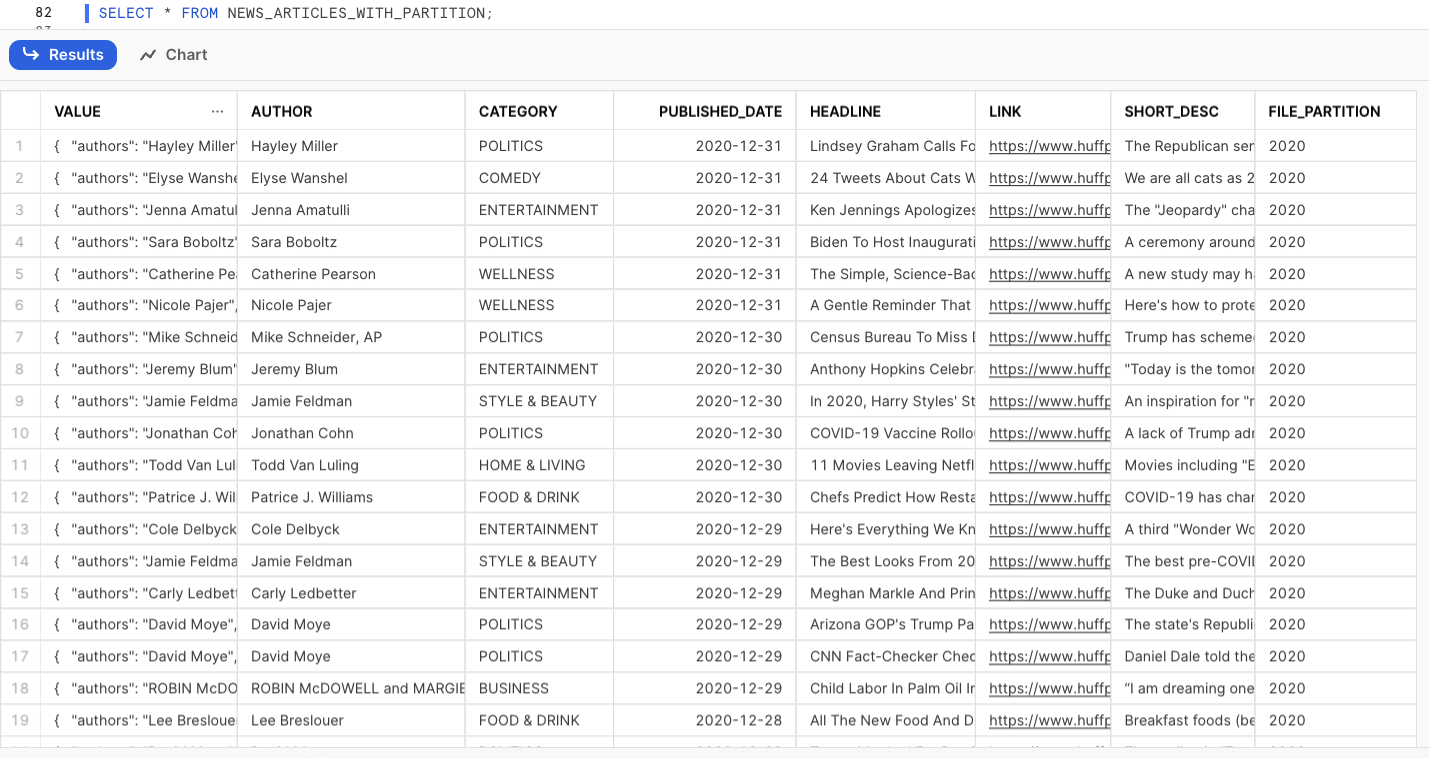
Note that by default, the VALUE column containing the JSON object will be the first column of your table. We can then run a simple SELECT statement and check the query profile to understand what impact the partitions had in the query performance. When analysing the query profile, we can see that we scanned 0.93mb and only one partition out of 3 that exist.
SELECT * FROM NEWS_ARTICLES_WITH_PARTITION WHERE FILE_PARTITION = '2020';
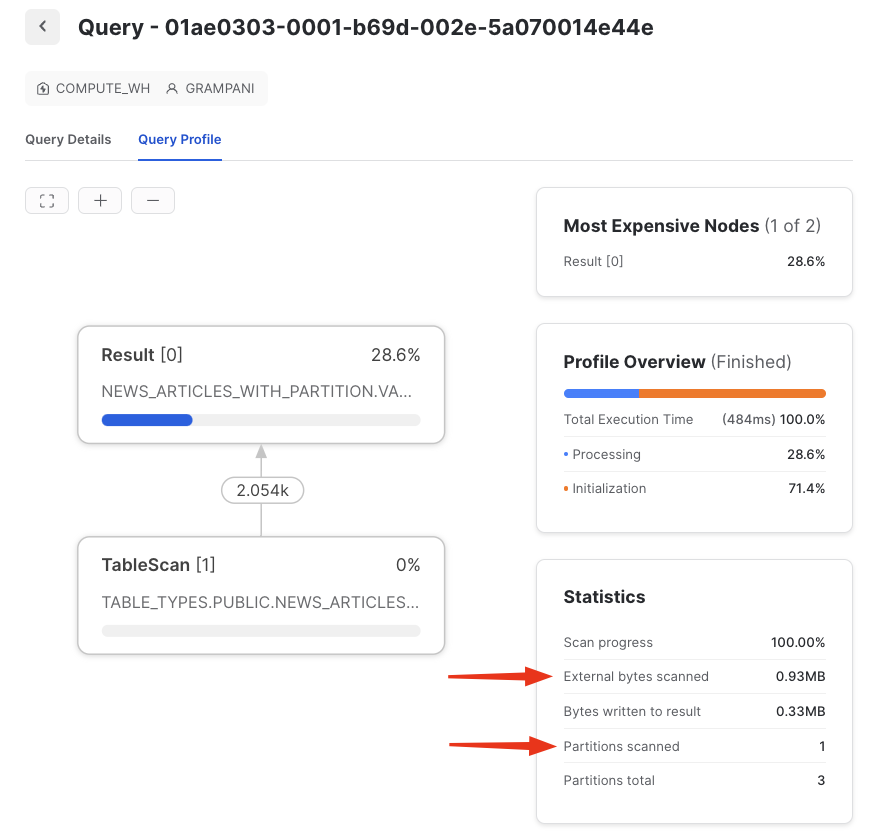
To compare the performance of a partitioned table versus a non-partitioned table, we can query the table we created in the previous section without a partition called NEWS_ARTICLES_WITHOUT_PARTITION using the YEAR function on the published date for filtering, and we can see that we scanned 2.5mb and all the partitions (the whole dataset):
SELECT * FROM NEWS_ARTICLES_WITHOUT_PARTITION WHERE YEAR(PUBLISHED_DATE) = '2020';

Partitions in this specific example will not make a difference since the dataset is small, however, it can yield massive improvements when querying larger datasets.
Materialized Views (Enterprise Edition Feature)
A materialized view is an optimised and pre-computed data set that stems from a query specification (the SELECT statement in the view definition) and is stored for future use. By pre-computing the data, querying a materialized view is considerably faster compared to executing the same query against the base table from which the view is derived. This performance advantage becomes especially significant when dealing with complex and frequently executed queries.
Materialized views excel at speeding up resource-intensive operations such as aggregation, projection and selection, particularly when these operations are performed regularly on vast datasets. Their ability to store and present pre-processed data allows for quicker access and minimises the need for repeated, computationally expensive calculations.
The example above works well for simple JSON structures; however, it can become cumbersome when your JSON objects have nested elements. In cases like this, using a materialized view to flatten and parse the semi-structured data into a structured, tabular format for users to query can be extremely beneficial. For example, imagine a file with the randomly generated JSON below:
[
{
    "id": "64cb14c1037b347e044ffc52",
    "email": "sonya_lowe@zensor.ovh",
    "username": "sonya90",
    "profile": {
      "name":
      "Sonya Lowe",
      "company":
      "Zensor",
      "dob": "1990-07-04",
      "address": "12 Girard Street, Wacissa, Colorado",
      "location": {
        "lat": -70.917534,
        "long": 60.715719
      },
      "about": "Ex commodo tempor et laboris aute et do eiusmod deserunt est adipisicing ipsum. Esse nostrud labore veniam nisi sit aute in Lorem non est."
    },
    "apiKey": "cffbe3b8-d9f9-46d1-92cc-4e1ac51b32b5",
    "roles": [
      "member",
      "admin" ], "createdAt": "2014-10-05T00:11:09.421Z", "updatedAt": "2014-10-06T00:11:09.421Z" }, {...} ]
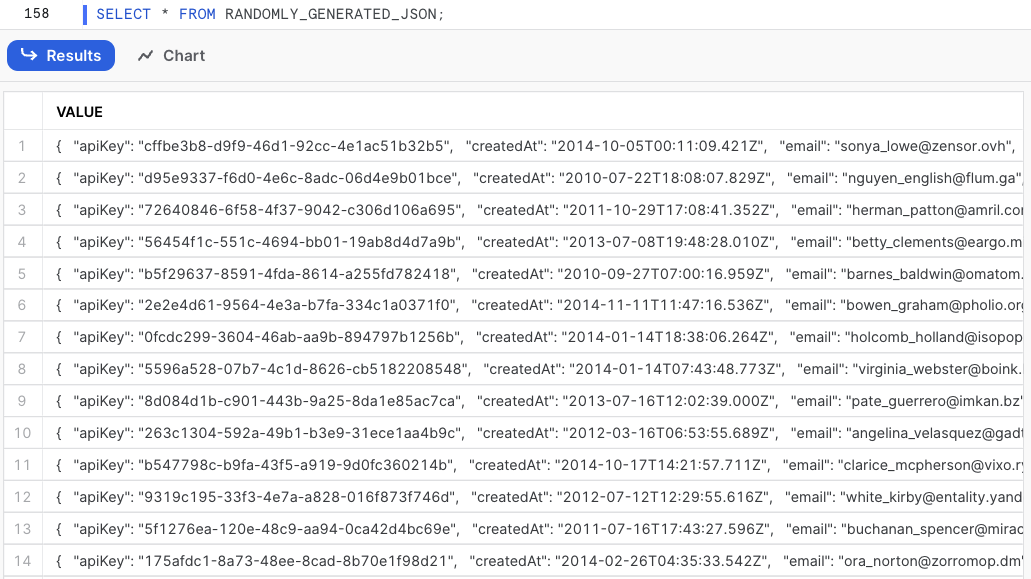
In this case, we can use the stage we created in the previous sections called MY_STAGE. One of the advantages of utilizing external tables lies in the ability to leverage subdirectories. This allows us to create distinct tables from various files located in different folders within your external storage system. By utilizing subdirectories, we can efficiently organize and manage data, facilitating seamless access and analysis across multiple datasets. In my S3 bucket, I created a folder called users containing the JSON file we want to use to create our table. The logical path with the JSON file now looks like this: s3://ext-table-example-wp/users/random-generated-json. When creating our external table, we just need to reference the folder name when specifying the location, as follows:
CREATE OR REPLACE EXTERNAL TABLE RANDOMLY_GENERATED_JSON
WITH LOCATION = @MY_STAGE/users
FILE_FORMAT = MY_JSON_FILE_FORMAT
;
Once we have this data loaded in our external table, we can create the Materialized View to flatten and parse the data:
CREATE OR REPLACE MATERIALIZED VIEW USERS_JSON AS
SELECT
    $1:profile.name AS NAME
    ,$1:email AS EMAIL
    ,$1:username AS USERNAME
    ,$1:profile.company AS COMPANY
    ,$1:profile.dob AS DATE_OF_BIRTH
    ,$1:profile.address AS ADDRESS
    ,$1:profile.location.lat AS LATITUDE
    ,$1:profile.location.long AS LONGITUDE
    ,$1:roles AS ROLES FROM RANDOMLY_GENERATED_JSON
;
This example serves as a simplified representation of semi-structured data handling. In reality, real-world semi-structured datasets can be remarkably more intricate and deeply nested.
Refreshing Your External Table Metadata
When creating your external table, you can set the parameter AUTO_REFRESH to TRUE. This automatically refreshes the metadata when new or updated data files are available in the stage you used when creating your external table. For example:
CREATE OR REPLACE EXTERNAL TABLE RANDOMLY_GENERATED_JSON
WITH LOCATION = @JSON_STAGE/
FILE_FORMAT = MY_JSON_FILE_FORMAT
AUTO_REFRESH = TRUE
;
It’s important to note that setting AUTO_REFRESH to TRUE is not supported if you created your external table with manually added partitions (for example, when PARTITION_TYPE = USER_SPECIFIED). When an external table is created, its metadata is refreshed automatically once unless REFRESH_ON_CREATE = FALSE. To ensure that Snowflake is notified when new or updated data becomes available for reading into the external table metadata, it is essential to set up an event notification for your storage location. You can learn more about how to set up these event notifications in the following resources:
- For Event Notifications in AWS: Automated Ingestion from AWS S3 into Snowflake via Snowpipe.
- For Event Notifications in Azure: Automated Ingestion from Azure Storage into Snowflake via Snowpipe.
Please be aware that when working with Azure and GCP, AUTO_REFRESH = TRUE will only work if the INTEGRATION parameter in your CREATE EXTERNAL TABLE statement is specified, for example:
CREATE EXTERNAL TABLE YOUR_EXTERNAL_TABLE
WITH LOCATION = @YOUR_EXTERNAL_STAGE
FILE_FORMAT = YOUR_FILE_FORMAT
INTEGRATION = YOUR_INTEGRATION_NAME
;
In addition to modifying the AUTO_REFRESH attribute, you have the option to manually trigger the refresh of external tables. This can be achieved by executing the command ALTER EXTERNAL TABLE <table_name> REFRESH on the specific table for which you wish to update the data.
Metadata Refresh History
EXTERNAL_TABLE_FILE_REGISTRATION_HISTORY
The EXTERNAL_TABLE_FILE_REGISTRATION_HISTORY table function is a great feature to use when in need to retrieve information about the metadata of an external table. It will return results for the external table owner (i.e. the role with the OWNERSHIP privilege on the external table), or a higher role or a role that has the USAGE privilege on the database and schema that contain an external table and any privilege on the external table. The information returned includes files that were added or removed as part of a metadata refresh and any errors found when refreshing the data:
SELECT * FROM
TABLE(INFORMATION_SCHEMA.EXTERNAL_TABLE_FILE_REGISTRATION_HISTORY(TABLE_NAME=>'MYTABLE'));
Be aware that this table function cannot retrieve information until the external table is refreshed.
AUTO_REFRESH_REGISTRATION_HISTORY
Users with the ACCOUNTADMIN role or a role featuring the global MONITOR USAGE privilege can leverage the AUTO_REFRESH_REGISTRATION_HISTORY table function. This function allows you to retrieve the history of data file registrations in metadata for designated objects, along with the corresponding credits billed for these operations. Note that this function returns billing activity within the last 14 days. The syntax is as follows (all arguments are optional):
SELECT * FROM TABLE(INFORMATION_SCHEMA.AUTO_REFRESH_REGISTRATION_HISTORY(
  DATE_RANGE_START=>TO_TIMESTAMP_TZ('2023-08-05 12:00:00.000 -0700'),
  DATE_RANGE_END=>TO_TIMESTAMP_TZ('2023-08-05 12:30:00.000 -0700'),
  OBJECT_TYPE=>'EXTERNAL_TABLE')
  )
;
Wrap Up
Thank you for taking the time to learn more about Snowflake’s External Tables! With the ever-growing complexity and volume of data, Snowflake steps in as the ultimate problem solver, seamlessly integrating and analysing data from various sources while maintaining top-notch performance. From setting up the basics like file formats and external stages, to the more advanced creation and optimization of external tables, we’ve covered it all. We even explored performance enhancement tactics like partitioning and materialized views, and delved into the mechanics of refreshing external table data – a way of ensuring your data stays up to date. As we navigate the dynamic landscape of data management, Snowflake’s External Tables shine as a versatile tool, bridging the gap between efficient storage and comprehensive data analysis.