
Welcome to our journey into the world of AWS automation! In this blog post, we’ll be exploring how to automate the start and stop times of Amazon EC2 instances using a combination of AWS services: Lambda, EventBridge and Simple Notification Service (SNS). Managing EC2 instances manually can be time-consuming and prone to errors, but with the power of automation, we can streamline these processes and improve efficiency. Join us as we dive into the steps involved in setting up scheduled start and stop times for EC2 instances, along with the added bonus of receiving real-time notifications about instance state changes. Let’s harness the capabilities of AWS to simplify and enhance our instance management workflows!
AWS Lambda
AWS Lambda is a serverless computing service provided by Amazon Web Services (AWS). It allows you to run code without provisioning or managing servers. With Lambda, you can upload your code and AWS takes care of provisioning and scaling the infrastructure to execute that code in response to incoming requests or events. Lambda supports multiple programming languages such as Node.js, Python, Java and more, making it versatile for a wide range of applications. For this blog post, we’ll be writing our code using Python.
Creating Your IAM Policy and Role
Before we create our Lambda function, we need to first create an IAM policy and role to grant Lambda the necessary permissions to interact with EC2 instances, including the ability to start and stop them. Although this step is not mandatory, creating specific roles and policies is the best practice here as we’re gonna be interacting between different AWS services.
Step 1: Create your IAM Policy
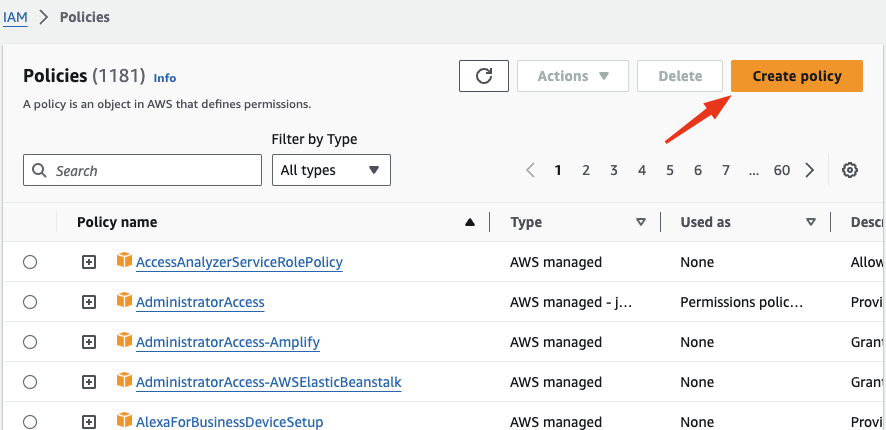
Begin by accessing the IAM service on your AWS management console. Once there, navigate to the Policies section and proceed to create a new policy:
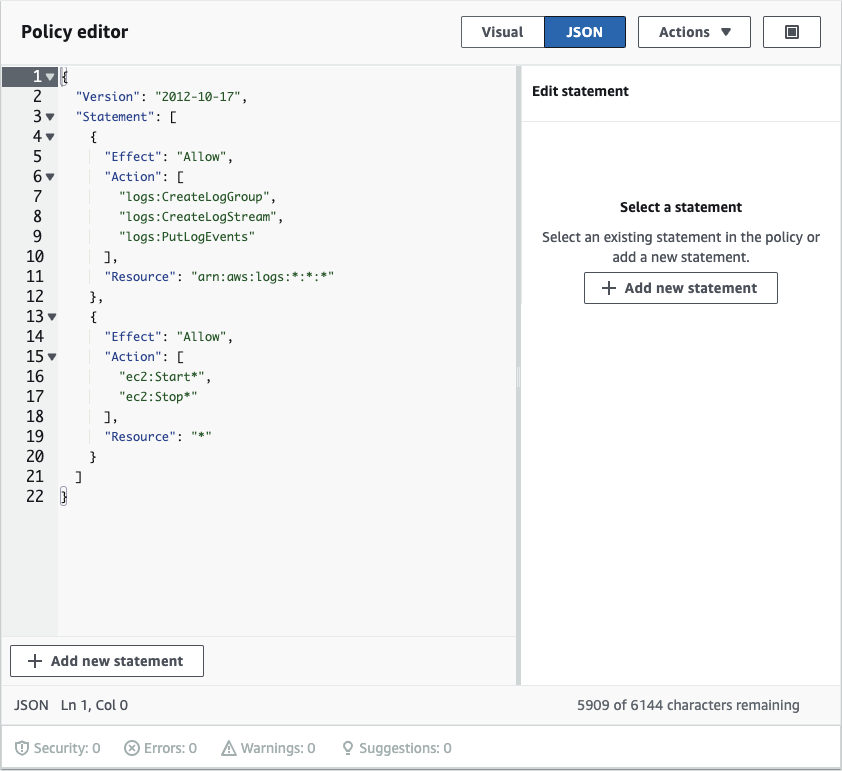
Within the Policy editor, you have the option to select either the Visual or JSON editor. In this instance, we’ll opt for the JSON editor. The JSON code we’ll incorporate into this policy will grant permissions specifically to start and stop EC2 instances:
{
  "Version": "2012-10-17",
  "Statement": [
    {
      "Effect": "Allow",
      "Action": [
        "logs:CreateLogGroup",
        "logs:CreateLogStream",
        "logs:PutLogEvents"
      ],
      "Resource": "arn:aws:logs:*:*:*"
    },
    {
      "Effect": "Allow",
      "Action": [
        "ec2:Start*",
        "ec2:Stop*"
      ],
      "Resource": "*"
    }
  ]
}
After adding the code to your policy editor, it should look like this:
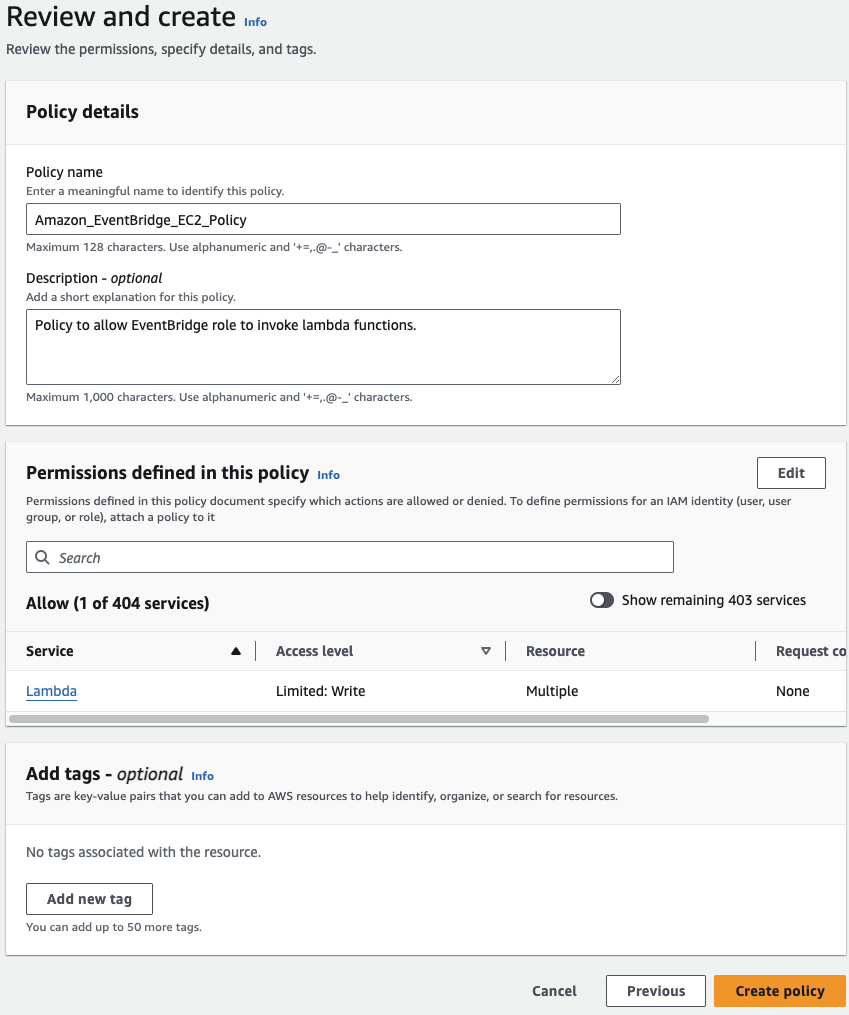
Click Next, name your Policy accordingly and give it a meaningful description, then click on Create Policy:
After you’ve successfully created the policy, the next step is to create the role that the Lambda function will utilise to initiate the start and stop actions on the EC2 instance.
Step 2: Create Your IAM Role
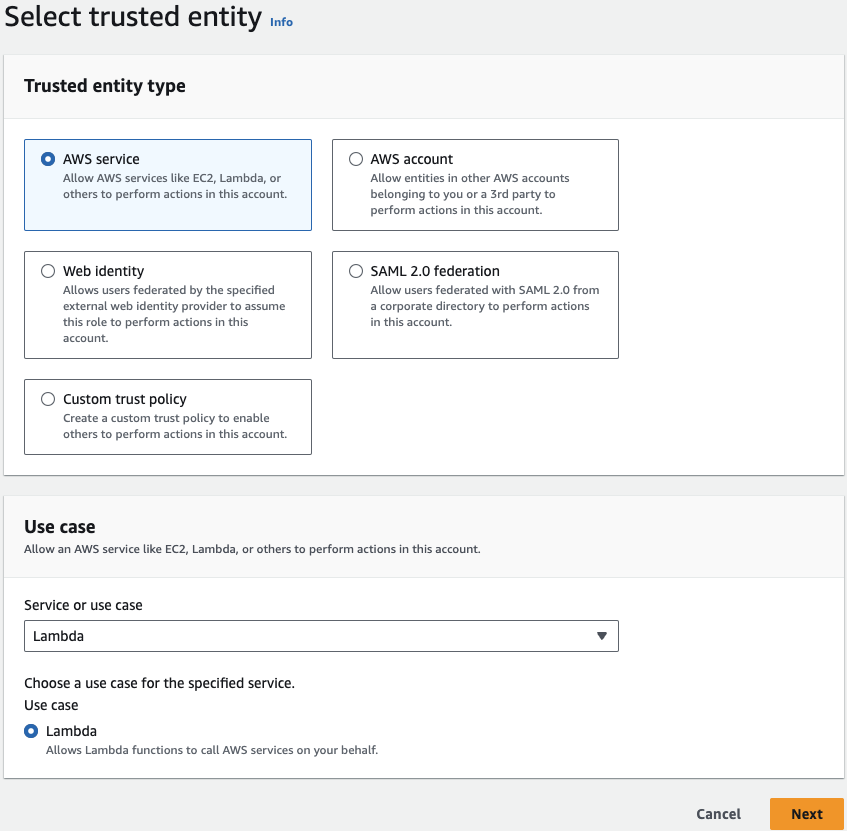
Return to the IAM console and navigate to the Roles section. Click on Create Role. Select AWS service as the trusted entity type, then choose Lambda as the service before proceeding to the next step:
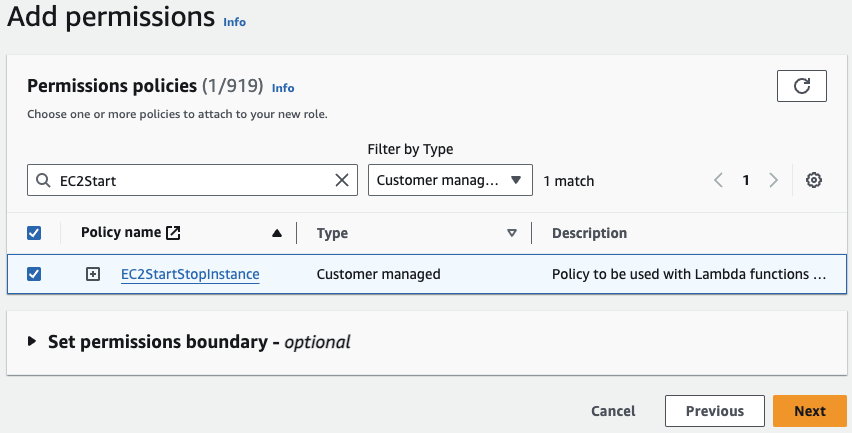
In the subsequent page, you’ll have the opportunity to attach the previously created policy to this role. Simply search for the policy by its name, select it and proceed by clicking Next:
Make sure to give your role a meaningful name and description, and click Create Role. Now, we’re ready to move on to creating your Lambda functions.
Creating Your Lambda Functions
We will create two functions: one to start your EC2 instance and another to stop it. Let’s begin by creating the function to start your EC2 instance.
Step 1: Creating Your Lambda Function to Start an EC2 Instance
Firstly, navigate to your AWS Lambda service and click on Create Function:
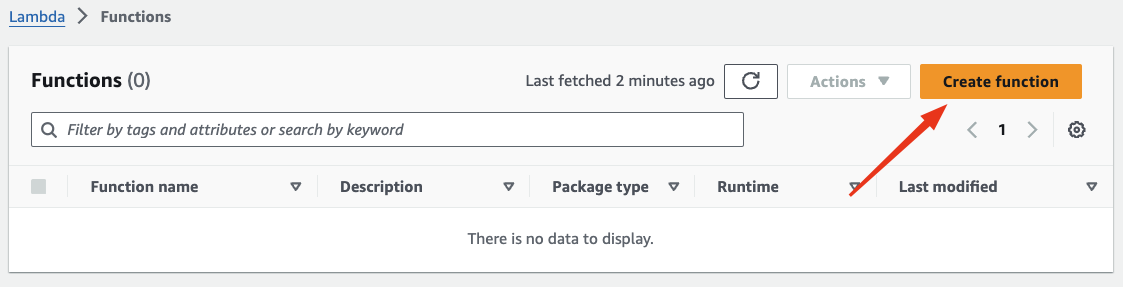
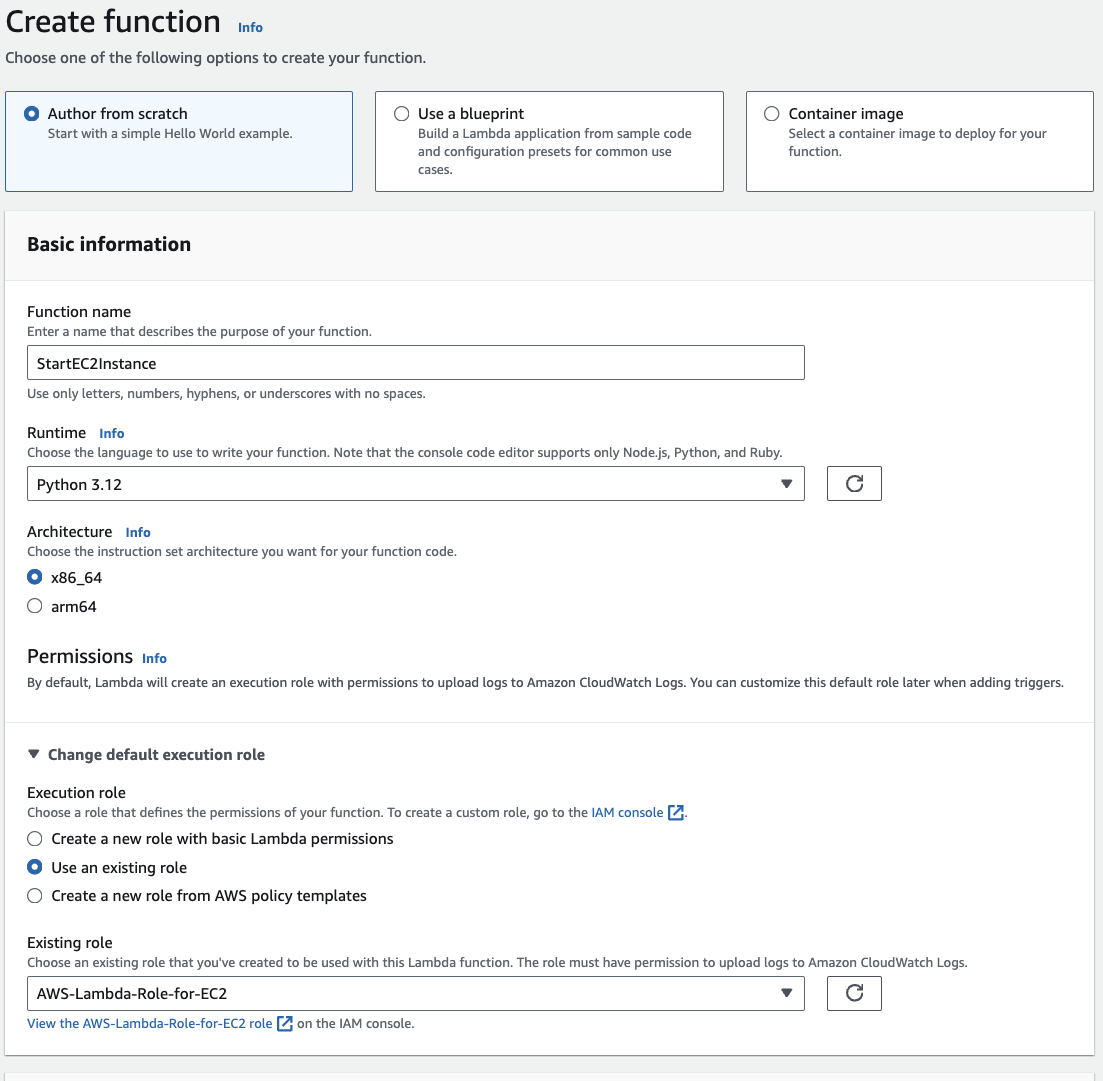
On the Create Function page, you can choose between Author from scratch, Use a blueprint or Container Image. Since we have the code for this function, we’ll select Author from scratch. For this example, we’ll write the function in Python, although there are other programming languages available to choose from. Assign a name to your function, select Python as the runtime and leave the architecture as x86_64 (default). Next, click on Change default execution role and choose the role we created in the previous step. Finally, click on Create Function:
Step 2: Updating Your Lambda Function Code
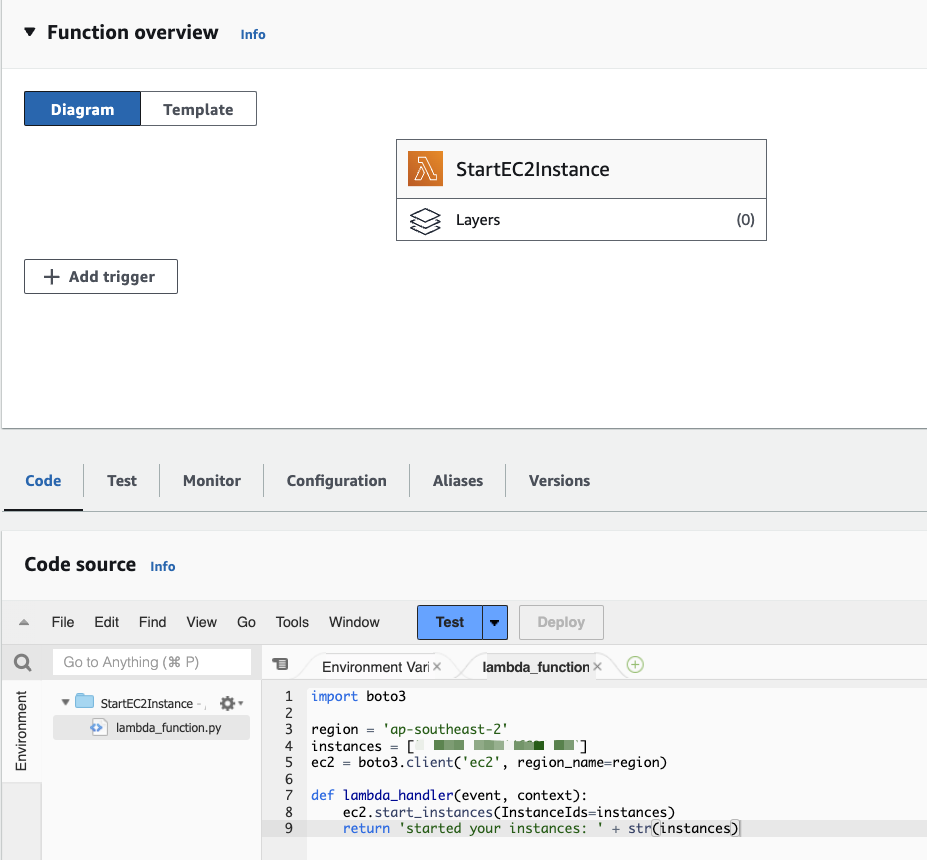
After creating the function, a page displaying more details about the function will open. On this page, we can edit the Python code for the Lambda and include the code necessary to start the instance. Navigate to the Code tab and update the lambda_function.py file with the following Python code:
import boto3

region = 'us-west-1' # Your AWS region here
instances = ['i-123456789', 'i-987654321'] # Your instance or instances ID, can be used to start more than one instance at a time
ec2 = boto3.client('ec2', region_name=region)

def lambda_handler(event, context):
    ec2.start_instances(InstanceIds=instances)
    return 'started your instances: ' + str(instances)
You can test your function by clicking on Test and creating a new test event. Ensure to click Deploy to update your function code.
Step 3: Creating Your Lambda Function to Stop an EC2 Instance
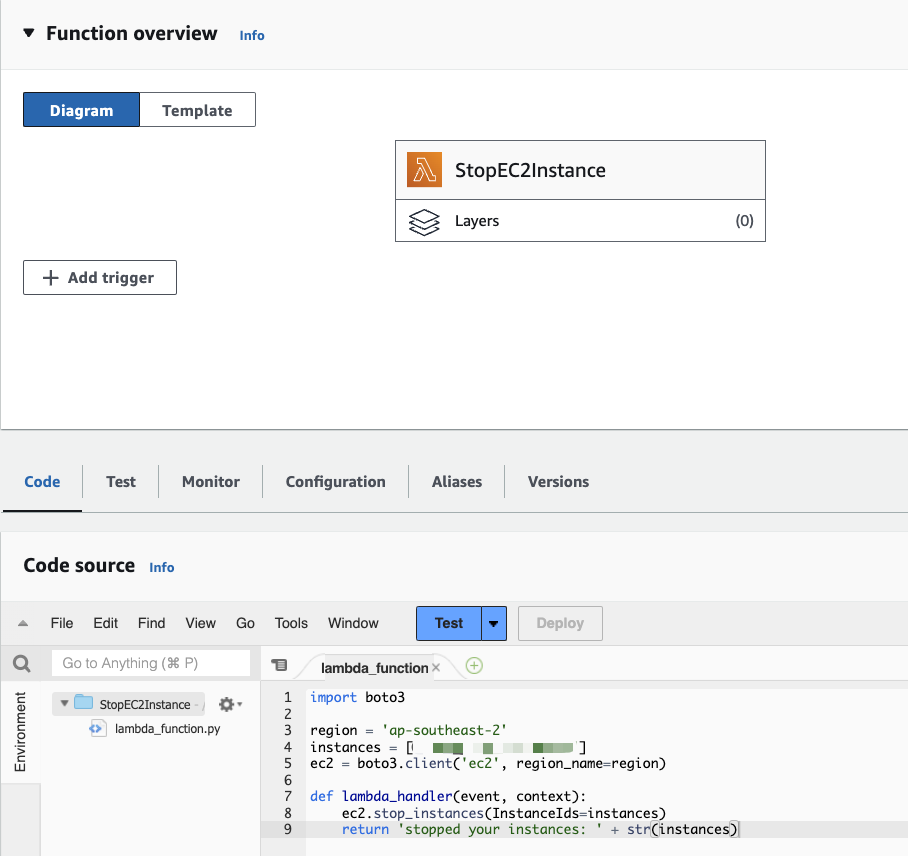
Now, repeat the same process to create another Lambda function to stop the instance. You can name it StopEC2Instance. The code will be similar to the StartEC2Instance function, but this time, we’ll modify it to stop the instance.
import boto3

region = 'us-west-1' # Your AWS region here
instances = ['i-123456789', 'i-987654321'] # Your instance or instances ID, can be used to stop more than one instance at a time
ec2 = boto3.client('ec2', region_name=region)

def lambda_handler(event, context):
    ec2.stop_instances(InstanceIds=instances)
    return 'stopped your instances: ' + str(instances)
That should conclude the setup process for your Lambda functions. The next step is to configure your AWS EventBridge schedule.
AWS EventBridge Schedules
EventBridge is a powerful integration tool designed to streamline rule management and scheduling tasks. It operates as a serverless service, leveraging events to facilitate seamless communication and automation across various AWS services and third-party applications. With EventBridge, you can efficiently orchestrate workflows, trigger actions and respond to events in real-time, enhancing the flexibility and scalability of your system architecture.
We will be using EventBridge schedules to invoke the Lambda functions we created to start and stop your EC2 Instance.
Creating your IAM Policy and Role
Similarly to your Lambda setup, the first step is to be creating the IAM Policy and Role for this to work.
Step 1: Create Your IAM Policy
Navigate to your IAM service, choose Policy and click Create policy. Choose JSON and add the following code:
{
    "Version": "2012-10-17",
    "Statement": [
        {
            "Effect": "Allow",
            "Action": [
                "lambda:InvokeFunction"
            ],
            "Resource": [
                "arn:aws:lambda:<aws-region>:<account-id>:function:StartEC2Instance:*",
                "arn:aws:lambda:<aws-region>:<account-id>:function:StartEC2Instance",
                "arn:aws:lambda:<aws-region>:<account-id>:function:StopEC2Instance:*",
                "arn:aws:lambda:<aws-region>:<account-id>:function:StopEC2Instance"
            ]
        }
    ]
}

Replace with the specific AWS Region you are operating in, and replace with your account ID. After the function: , specify the name of your Lambda function. You can locate your account ID by clicking on your profile in the top-right corner then selecting Account ID. Ensure to copy the numbers without the dashes. In summary, if your region is us-west-1, your account ID is 12345, your functions are named StartEC2Instance and StopEC2Instance, then your code for the Resource section will be as follows:
"Resource": [
                "arn:aws:lambda:us-west-1:12345:function:StartEC2Instance:*",
                "arn:aws:lambda:us-west-1:12345:function:StartEC2Instance",
                "arn:aws:lambda:us-west-1:12345:function:StopEC2Instance:*",
                "arn:aws:lambda:us-west-1:12345:function:StopEC2Instance"
]
Click on Next, provide a meaningful name and description for this policy, then proceed to click on Create policy. Once we attach this policy to the role we’ll create subsequently, it will enable the scheduler to invoke the Lambda function:
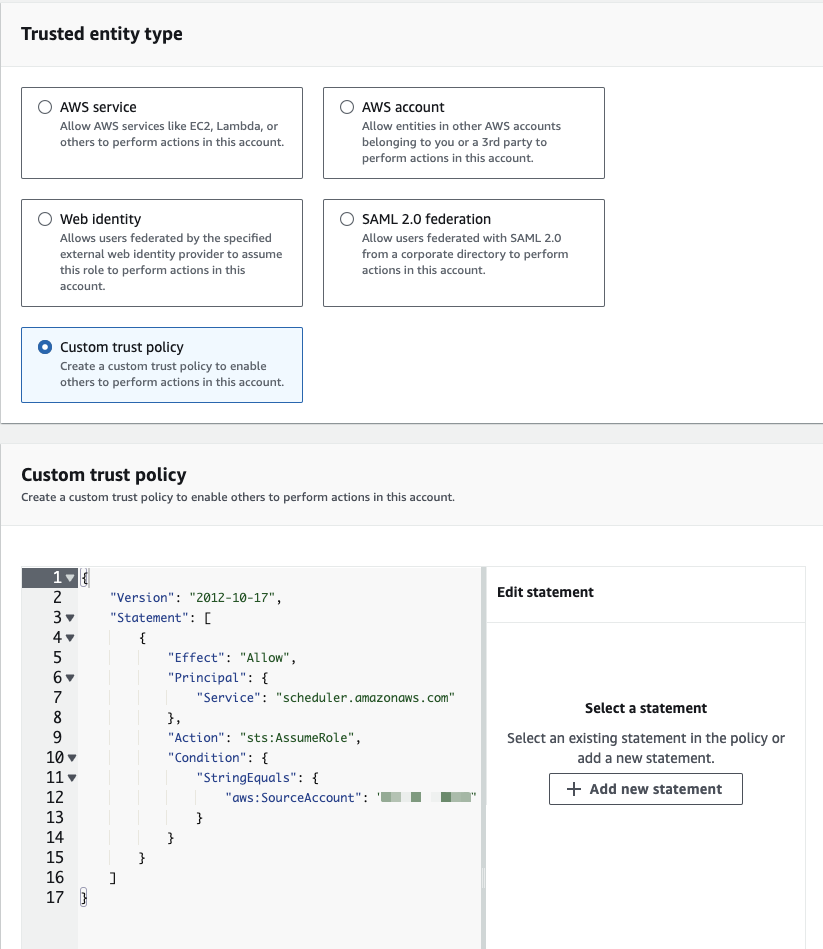
Step 2: Create Your IAM Role
After creating this policy, proceed to create the role needed for our EventBridge schedule. Navigate to your IAM Roles page and click on Create Role. Select Custom Trust Policy and input the following trust policy into the JSON Editor, replacing with your Account ID. Then, click on Next:
{
    "Version": "2012-10-17",
    "Statement": [
        {
            "Effect": "Allow",
            "Principal": {
                "Service": "scheduler.amazonaws.com"
            },
            "Action": "sts:AssumeRole",
            "Condition": {
                "StringEquals": {
                    "aws:SourceAccount": "<account-id>"
                }
            }
        }
    ]
}
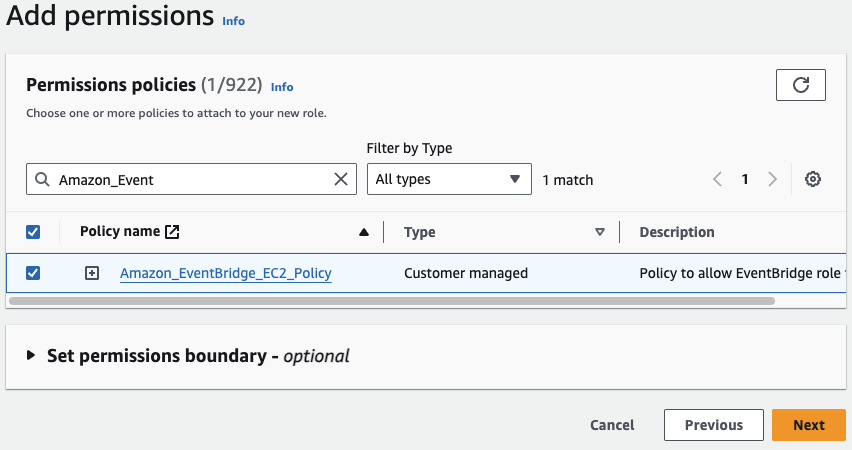
Select the policy we just created to add to your role and click Next:
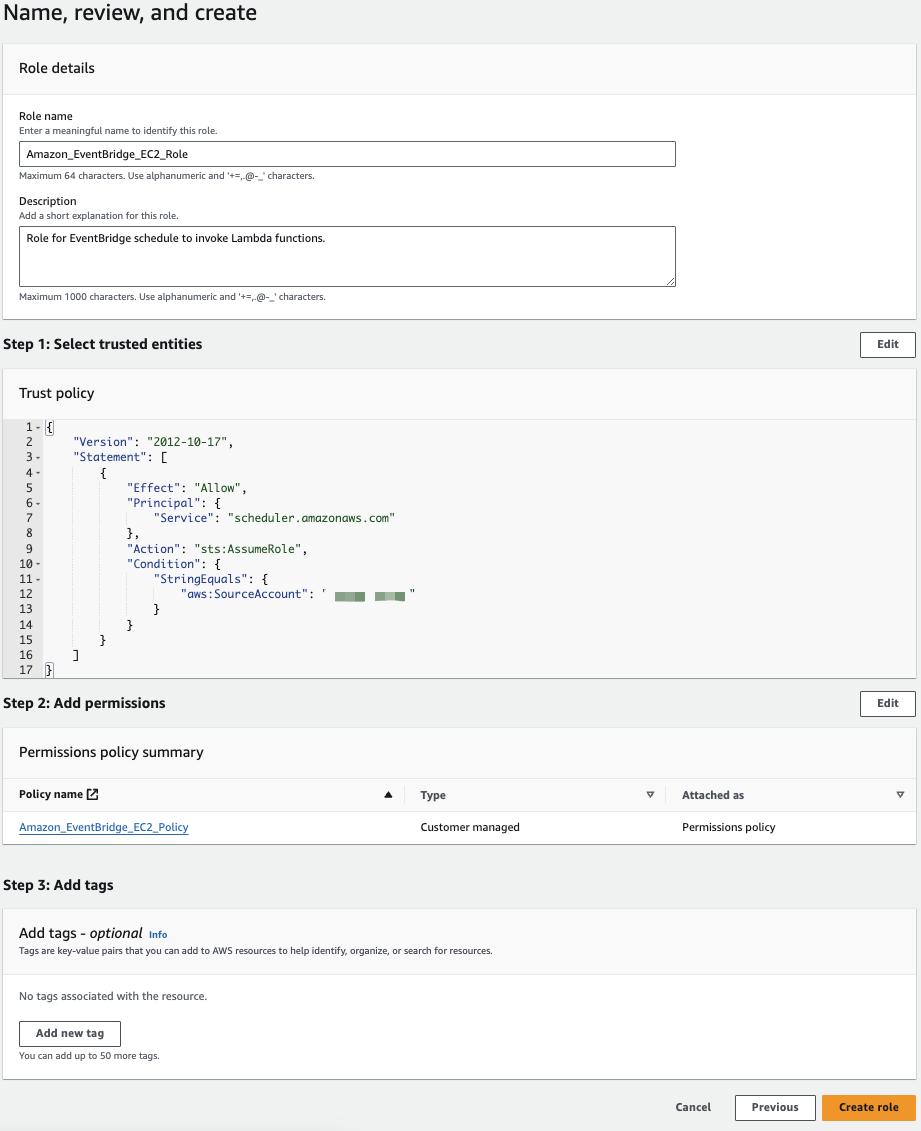
Give your role a meaningful name and description, then create your role:
Creating Your EventBridge Schedule
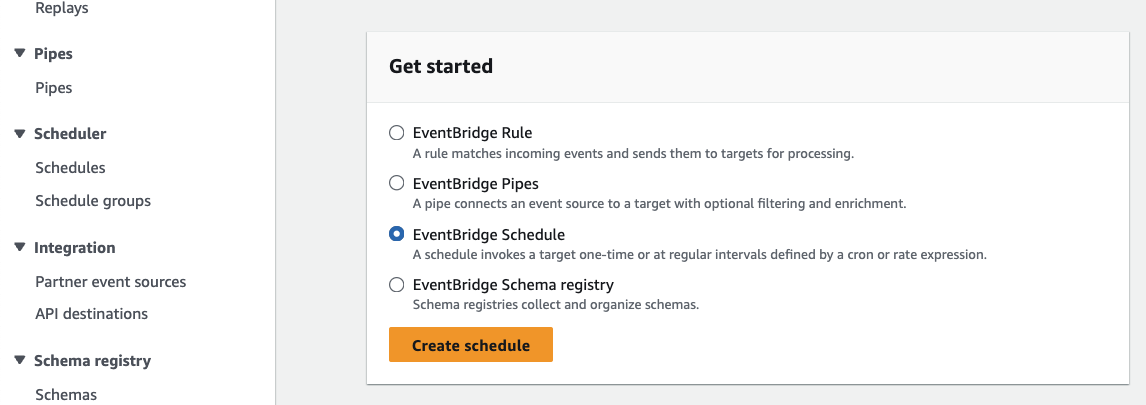
Once your policy and role are created, we can then create our schedules. Head to Amazon EventBridge and, within the Get Started section, choose EventBridge Schedule, then click on Create Schedule. Alternatively, you can navigate to the side panel and select Scheduler > Schedules:
Step 1: Schedule Pattern
The process of creating a schedule involves four steps. Firstly, let’s define the schedule details. Provide a name and description for the schedule. In this scenario, we’ll configure it as a recurring schedule to start the EC2 instance at 9am Australia/Perth time every weekday. Recurring schedules utilise Cron expressions. For an understanding of Cron expressions, refer to this link Your schedule pattern should look like this:

You can also set up a timeframe for this schedule, but for this example we’ll start the schedule straight away, running it indefinitely. Click Next to select your schedule target.
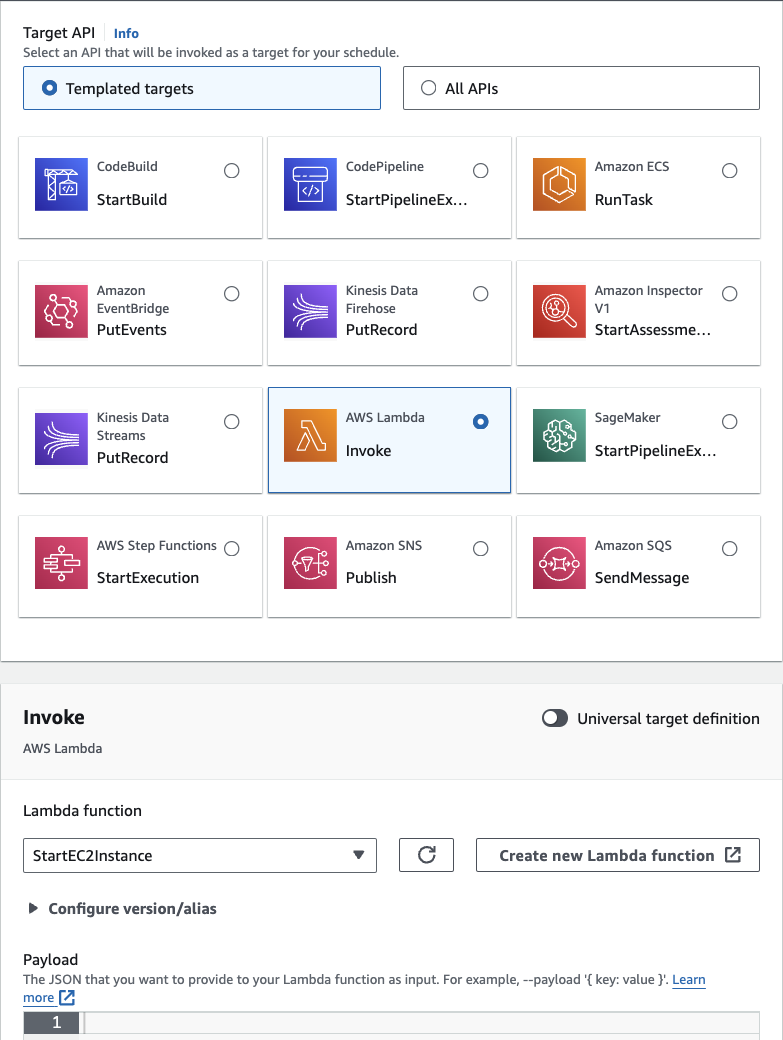
Step 2: Select Target
On this step, we will choose AWS Lambda Invoke and select our StartEC2Instance function from the dropdown menu. No additional configuration is required at this stage. Simply proceed by clicking Next to configure our schedule settings:
Step 3: Schedule Settings
For the schedule settings, keep most options unchanged. Scroll down to the Permissions section and choose Use existing role. Select the role we previously created for the EventBridge schedule, then click Next:

Step 4: Review and Create Schedule
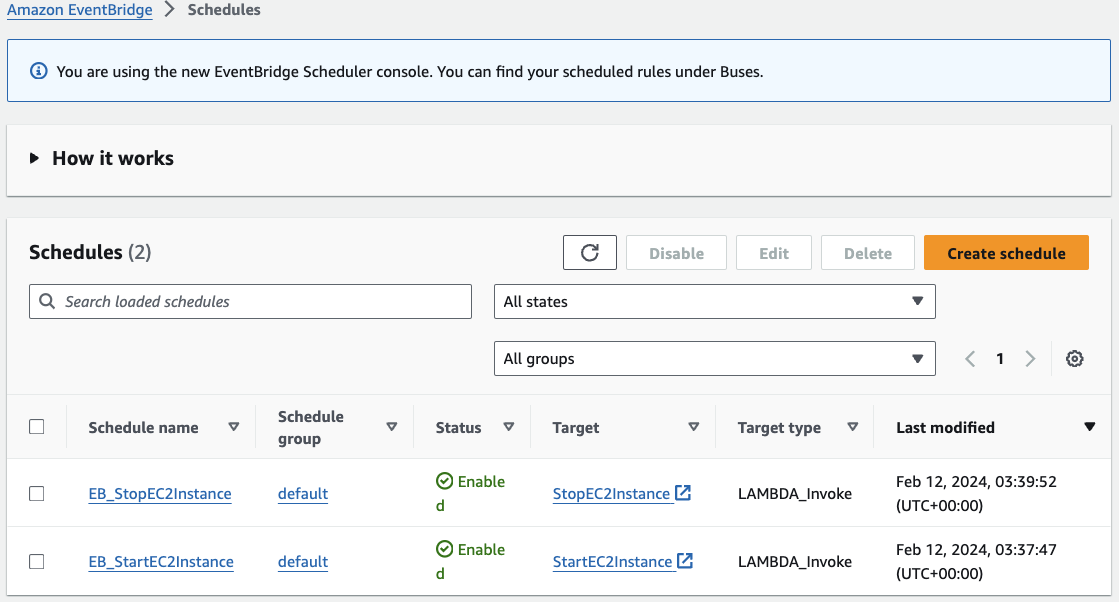
Review the schedule configuration and click on Create Schedule. After creating the schedule, you’ll find it listed under the schedules section of your AWS EventBridge service. Repeat the same steps to create your schedule for stopping the EC2 instance, based on the desired timing. Your Schedules page should resemble the following:
Congratulations! You now have an EC2 instance configured to start up and shut down according to your desired schedule. This approach can effectively reduce costs by only incurring compute charges while the machine is active.
To enhance this solution further, we can leverage AWS Simple Notification Service (SNS) and EventBridge to send notifications informing us when the instance has started or stopped.
AWS Simple Notification Service
Amazon Simple Notification Service (SNS) is a fully managed messaging service provided by AWS. It enables you to send messages or notifications to a large number of subscribers via various delivery protocols such as HTTP, HTTPS, Email, SMS and more.
For this example, we’ll create both a topic and a subscription. A topic serves as a communication channel where messages are published, while a subscription defines how and where messages from the topic are delivered.
Step 1: Create your SNS Topic
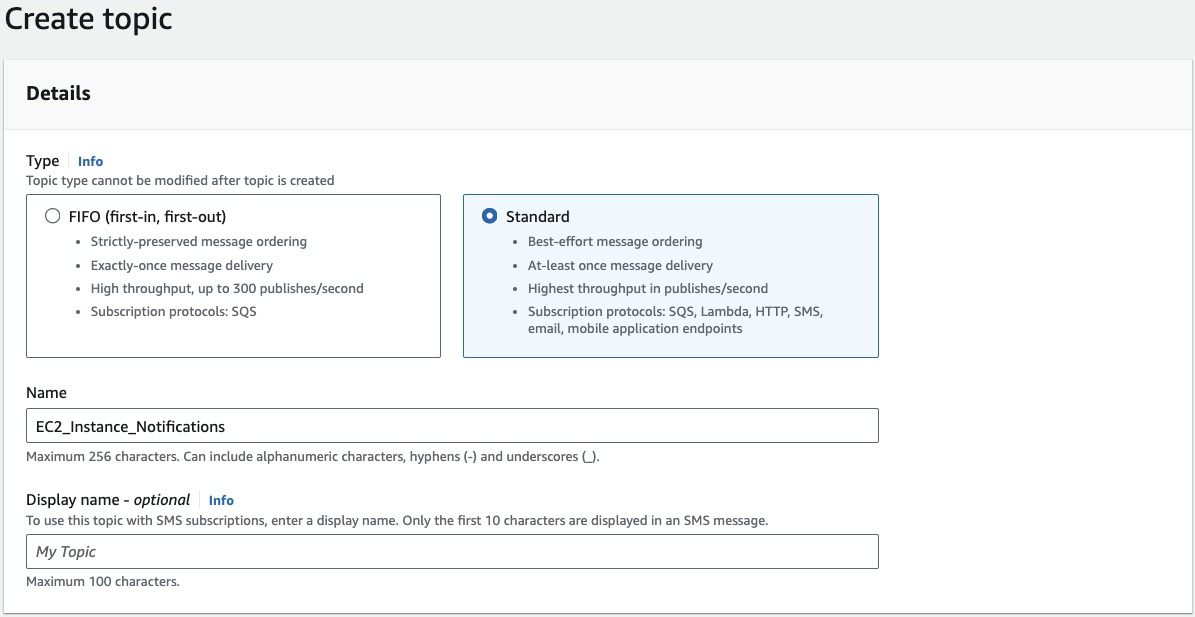
Go to your AWS SNS service and select Create topic. Choose the topic type as Standard and assign it a name. Keep all other settings as default, then click on Create Topic:
Step 2: Create your SNS Subscription
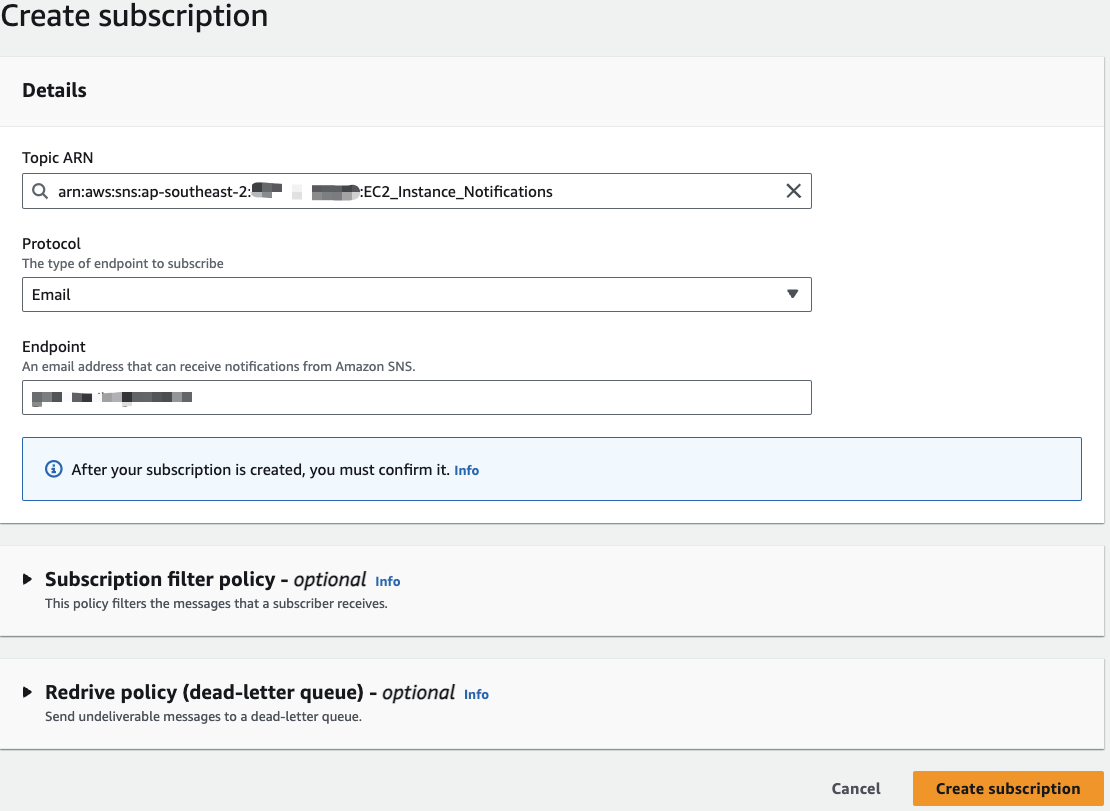
After creating your topic, proceed to add subscriptions. Click on the topic you created, then select Create subscription:
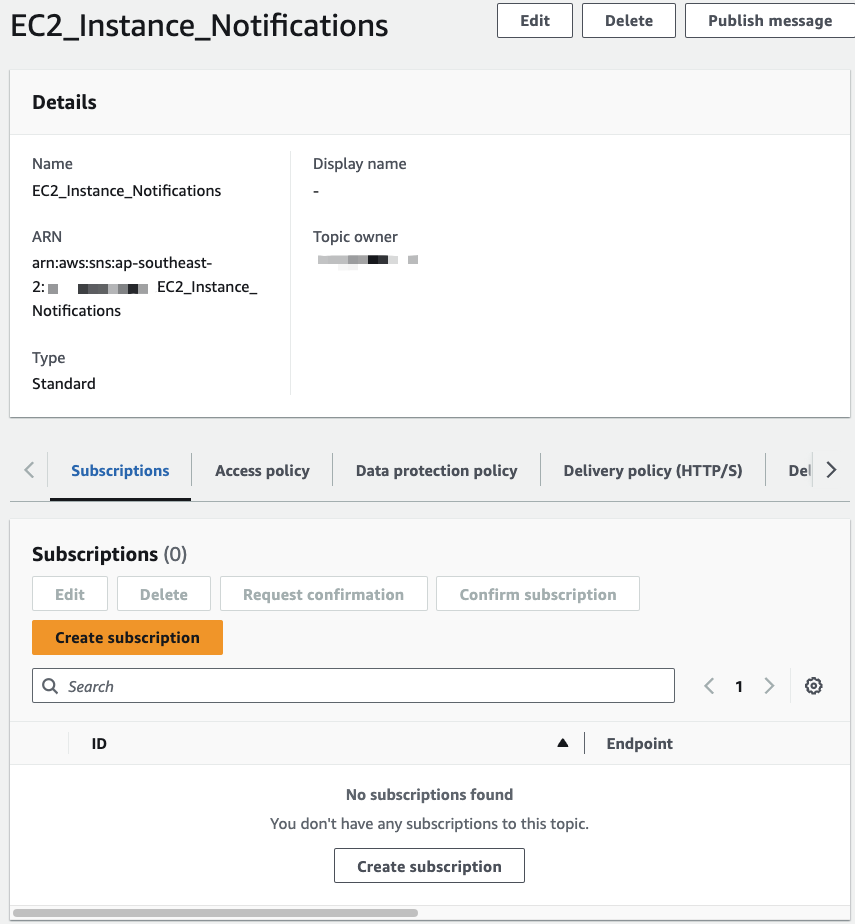
In the Create Subscription page, choose the Topic ARN corresponding to the topic you just created. For this example, we’ll set up email notifications, so select Email as the protocol, input your email address as the endpoint and then click on Create Subscription:
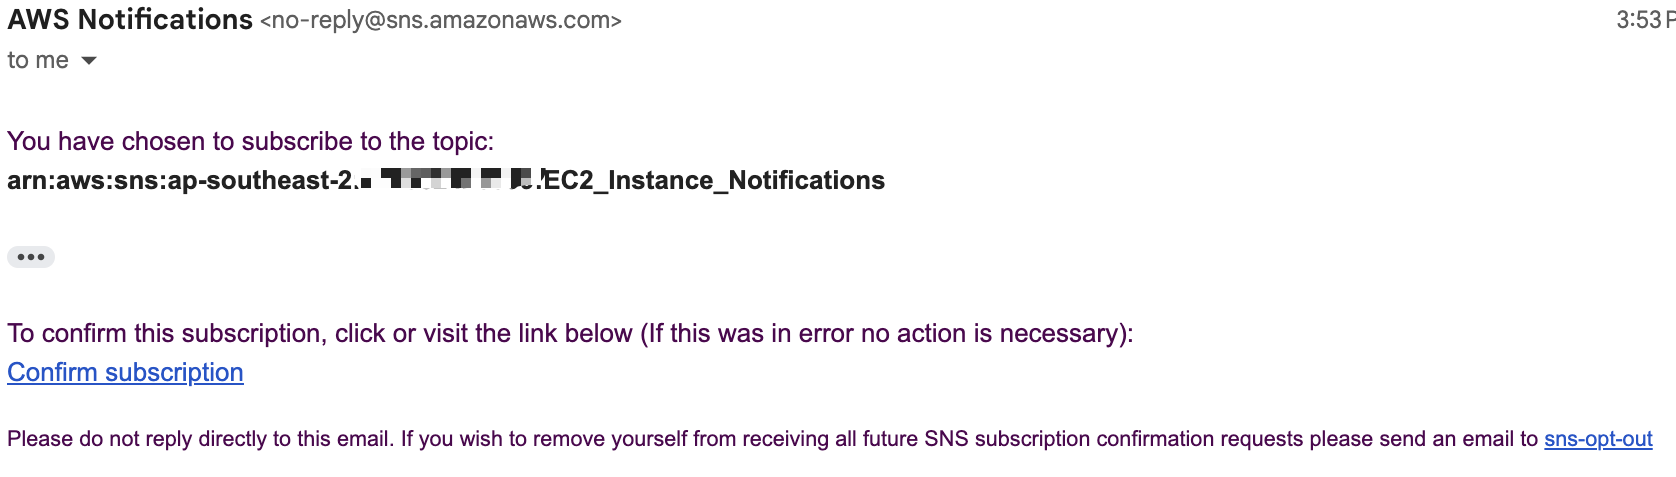
Once your subscription is created, you will have to confirm it in your email address before you start receiving notifications:
After confirming the subscription, we can proceed to create our EventBridge rule to notify us of any instance state changes.
AWS EventBridge Rules
Previously, we used EventBridge schedules to set up the start and stop times for our instance. This time, we’ll use EventBridge rules to alert us of any changes in the instance state.
EventBridge rules are essentially event-matching criteria that define the conditions under which events are routed and processed. They enable us to specify triggers for specific events or patterns of events, allowing for automated responses or notifications based on predefined criteria.
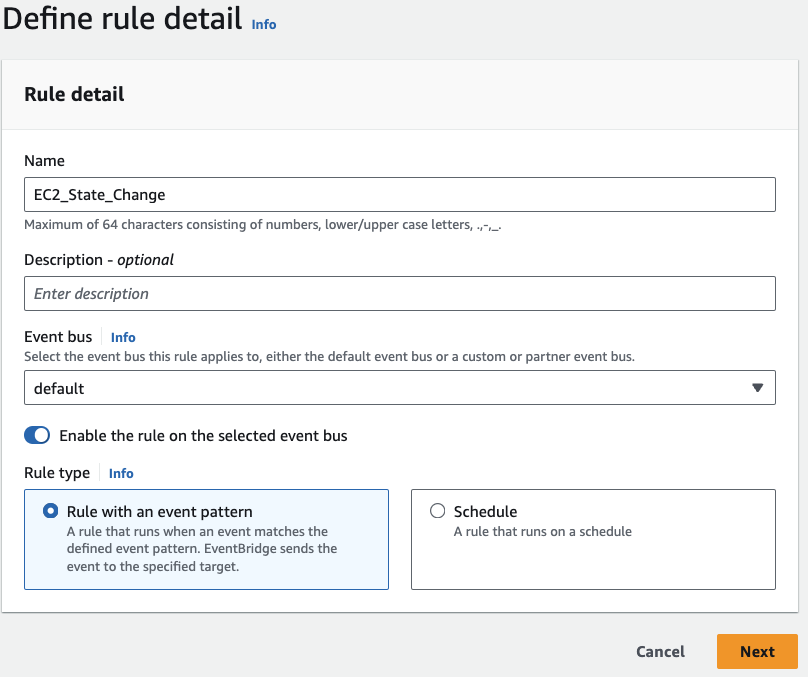
Step 1: Rule Detail
Head to your EventBridge service, and following a similar process to creating our schedule, choose Rule and click on Create Rule. Provide a name for the rule, select Rule with an event pattern as the rule type and proceed by clicking Next:
Step 2: Event Pattern
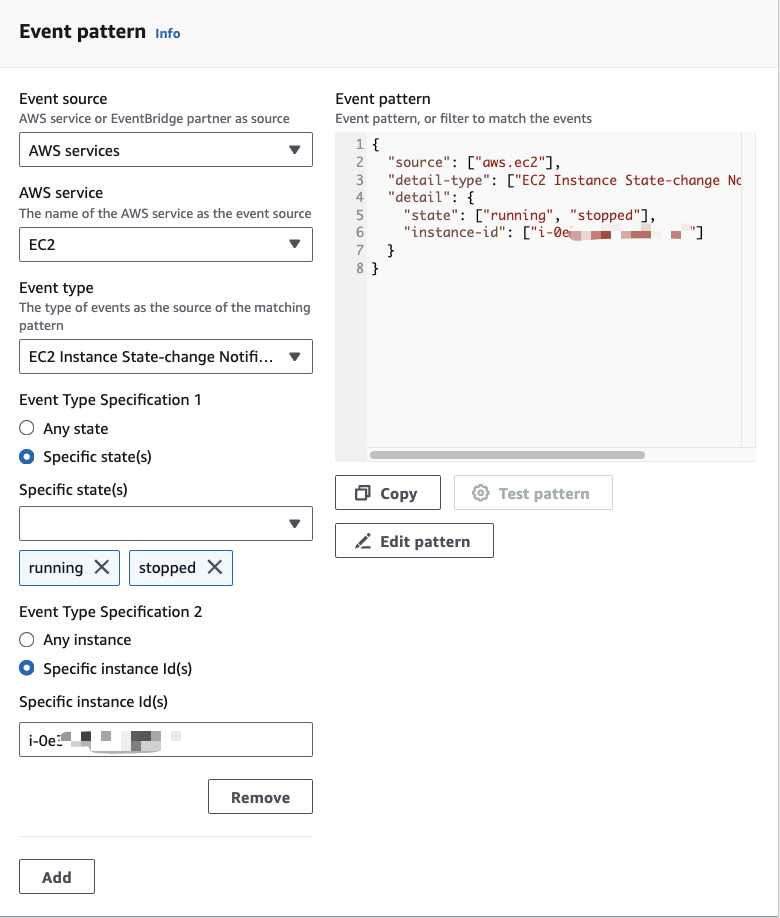
On the subsequent page, navigate to Event Pattern, keeping the Event source as AWS Services and selecting EC2 as the AWS Service. Choose EC2 Instance State-change Notification. Under Event Type Specification 1, choose Specific state(s) and select both running and stopped. For Event Type Specification 2, choose Specific instance Id(s) and input your Instance ID. Alternatively, you can leave it as Any instance if you wish to track multiple or all of your instances. Finally, click on Next:
Step 3: Target
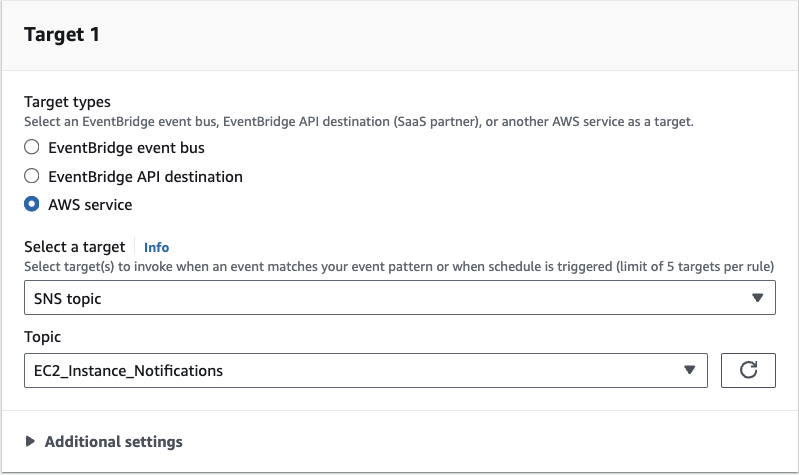
Choose AWS service as the Target and select SNS Topic. From the dropdown menu, choose the topic we created in SNS:
Expand the Additional Settings, change the target input to Input Transformer then click on Configure input transformer.
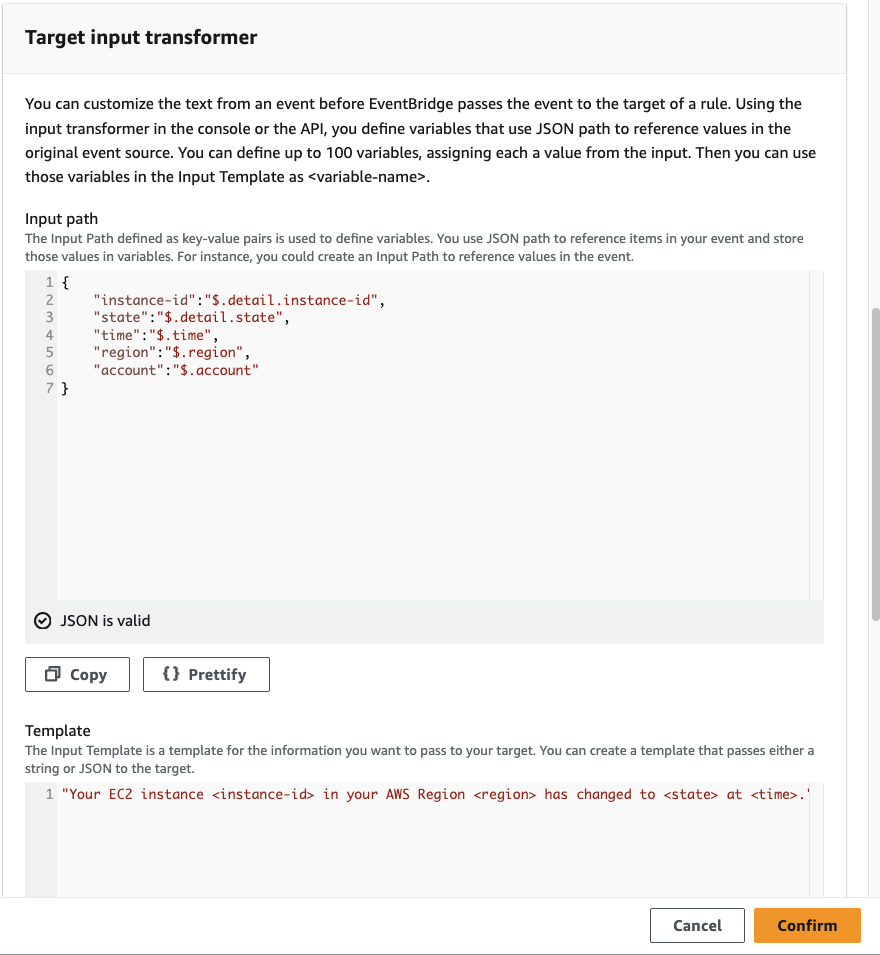
Step 4: Configure Input Transformer
On the Configure input transformer pop-up, scroll down to Target input transformer and input the following:
{
  "instance-id":"$.detail.instance-id",
  "state":"$.detail.state",
  "time":"$.time",
  "region":"$.region",
  "account":"$.account"
}
On the Template part, write down the message you’d like to receive once the instance state has changed, for example:
"Your EC2 instance <instance-id> in your AWS Region <region> has changed to <state> at <time>."
Click Confirm on the pop-up dialog and then proceed by clicking Next. Since we’re not configuring any tags, you can click Next again on the following page. In the final step of this process, review your settings and then select Create Rule to finalise the setup.
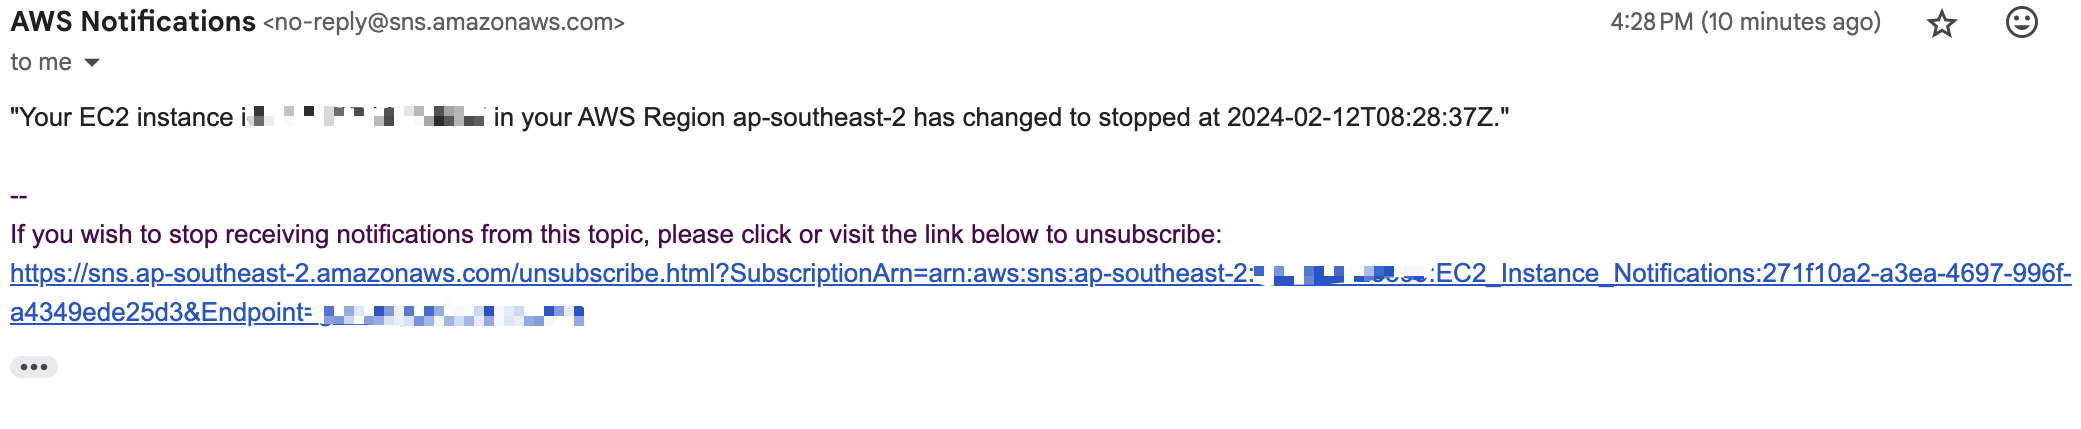
Now your rule is created, and you should get an email notification whenever you instance state changes to running or stopped!
An Example Use Case: Optimising Costs with EC2 Instance Management for Matillion ETL
Matillion ETL is a data integration tool designed to transform raw data into ready-to-use formats, making it valuable for analytics and business intelligence. It is specifically built to leverage the power and scalability of cloud data warehouses like Snowflake, Amazon Redshift, Google BigQuery and Microsoft Azure Synapse Analytics.
In wrapping up our discussion on automating EC2 instance management, it’s crucial to consider how these strategies directly impact the operational costs of running an ETL tool like Matillion ETL. When deploying Matillion ETL, whether on AWS or Azure, the cost implications of your chosen setup cannot be overlooked. Specifically, for AWS EC2 instances using Matillion’s minimum requirement of 2 vCores, the operational expenses are directly tied to Matillion credits, which vary by your license type.
For instance, under the basic edition, each Matillion credit is priced at $2.00. This price increases to $2.50 for the advanced edition, and for those utilising the enterprise edition, the cost per credit is $2.70. Given that each core per hour consumes one credit, a minimum-spec EC2 instance for Matillion would entail an expenditure of two credits hourly. More information on pricing can be found at Matillion Pricing.
This pricing model underscores the importance of the automation techniques discussed in this post. By efficiently controlling the startup and shutdown times of your Matillion instance, you can significantly mitigate costs. This approach ensures that you maximise the value derived from your allocated Matillion credits without exceeding your budget.
In essence, the integration of AWS Lambda and Amazon EventBridge to manage your Matillion ETL instances is not just a technical enhancement – it’s a cost-effective strategy ensuring that every credit counts.
Summary
In this blog post, we’ve delved into the realm of AWS automation to streamline the management of Amazon EC2 instances. Through the use of AWS Lambda, EventBridge and Simple Notification Service (SNS), we’ve developed a robust solution for scheduling instance start and stop times. By creating Lambda functions, configuring IAM roles and policies and setting up EventBridge schedules, we’ve established a reliable system for automating instance management tasks. Additionally, by integrating SNS, we’ve enhanced our solution with real-time notifications of instance state changes. This approach not only optimises resource utilisation but also improves operational efficiency, making EC2 instance management a breeze.