
This blog post is Human-Centered Content: Written by humans for humans.
In the field of data engineering, it sometimes feels like new tools are being introduced merely for the sake of novelty, only to have the exact same benefits and pitfalls as the previous new, shiny tool. When I first heard about “dlt” (data load tool), I will admit that I was a bit skeptical.
Why would I learn how to use yet another tool to load data from source to destination? Aren’t there already dozens of viable tools out there that already do this pretty well (Matillion, Fivetran, Openflow, Airflow, etc.)?
What is dlt, Anyway?
To clear any confusion right off the bat, I am not talking about Delta Live Tables within Databricks — these are completely separate entities (which just happen to use the exact same three letter acronym).
dlt stands for Data Load Tool. In their own words, dlt is an “open-source Python library that loads data from various, often messy data sources into well-structured datasets (https://dlthub.com/docs/intro)”. It was first launched in 2023, and it has only grown in popularity over the past few years.
dlt utilizes Python to create code-first pipelines, which has certain advantages:
- Easier debugging of complex ingestion pipelines
- More adaptability and customization
- Simple Git integration and version control
- Easier integration of LLM tools (e.g. Claude Code), which allow for rapid development
Oh, and did I mention that it’s completely, 100% free?
In ELT terms, dlt is the Extract and the Load. The raw data is loaded into a data warehouse, where other code-first tools (such as dbt) can be used to Transform the data into its final form. This structure of dlt + dbt can provide a powerful and flexible framework for the entire ELT process.
But there is a large chasm that lies between theory and practice. I’ll walk you through a simple step-by-step guide to create your very first dlt pipeline from raw API source data into Snowflake. So, let’s cross over!
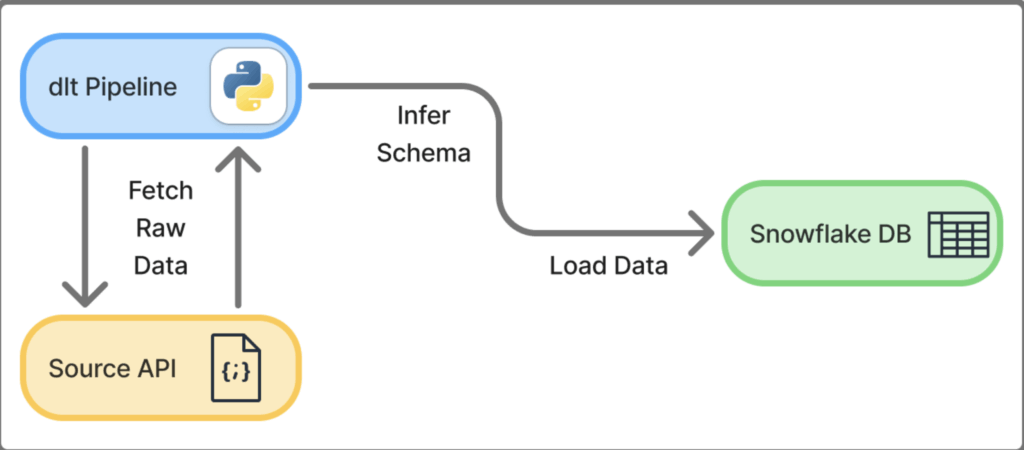
Step 0: Pipeline Overview
- Source: Data from example API in JSON format
- Destination: Snowflake Tables
- One Database, one Schema, three Tables
- Method: Run dlt Python pipeline in VS Code terminal to extract data from source (API) and load it into destination (Snowflake database)
Step 1: Setting Up Environments
Snowflake Instance — Free Trial Account
- Log in to an existing Snowflake account, or create a 30-day Free Trial Account.
- We need to create a destination for our data to land, so we will create a database called “
dlt_practice_db.” Make a note of the database name, because we will need it in the “my_first_pipeline.py” file.-
create database dlt_practice_db;
-
- That’s all we need to do in Snowflake manually!
- The schemas and tables will be named by us in the dlt pipeline, and they will be populated in Snowflake upon initial run of the dlt pipeline.
Visual Studio Code — Virtual Python Environment
VS Code is the IDE we will be using for this example, but feel free to use your code editor of choice. Below are the recommended dltHub installation steps on a Windows machine.
- First, ensure that you have both VS Code and Python installed on your machine.
- Create a project folder called dlt_practice, then open that folder using VS Code.
- Open the VS Code Terminal (Terminal -> New Terminal).
- Set up and activate a virtual environment for your Python project in your dlt_practice folder.
- Create a new virtual environment in your working This will create a ./venv directory where your virtual environment will be stored:
uv venv --python 3.10
- Activate the virtual environment:
.venv\Scripts\activate
- After activating, your terminal should be prefixed with
(dlt_practice) PS C:\[...]\dlt_practice
- Create a new virtual environment in your working This will create a ./venv directory where your virtual environment will be stored:
- Install dlt library in the virtual environment (this may take a couple minutes):
uv pip install "dlt[snowflake]"
- Initialize the project
- Since our source is a REST API and our destination is Snowflake, we can run this command to initialize the project:
dlt init rest_api snowflake
- Since our source is a REST API and our destination is Snowflake, we can run this command to initialize the project:
- After initializing the project, our folder structure should now look like this:
dlt_practice/
├── rest_api_pipeline.py    ← executable python file
├── .dlt/
    ├── config.toml         ← holds non-sensitive configuration settings
    └── secrets.toml        ← Snowflake credentials will live here: "<configure me>"
├── .venv/                  ← virtual environment packages/libraries/etc
├── .gitignore              ← to prevent credentials/etc from being committed to Git
└── requirements.txt        ← shows exactly which packages need to be installed on future deployments
Step 2: Snowflake Authentication With dlt
For the purposes of this demo, we are placing our snowflake credentials in secrets.toml. In real-world production environments, you should follow security best practices such as using environment variables, a secrets manager (e.g. AWS Secrets Manager or Azure Key Vault), or Snowflake key-pair authentication. But for now, we’ll just hard-code values in secrets.toml.
Note: Never commit
secrets.tomlto Git. Add.dlt/to your.gitignorefile when using version control if it wasn’t automatically added with thedlt init [...]command.
Add your Snowflake credentials to secrets.toml, filling in the correct values. If you ran dlt init [...] earlier, then all you need to do is modify all of the "<configure me>" values:
[destination.snowflake.credentials]
database = "DLT_PRACTICE_DB"       # name of Step 1 Snowflake database
password = "your_password"
username = "your_username"
host = "your_account_identifier"	# ex: “ABCDEFG-HJK01234” (see note below)
warehouse = "COMPUTE_WH"           # default warehouse on trial accounts
role = "ACCOUNTADMIN"		     # determines ownership of schema/tables
- How to find your Account Identifier in Snowflake UI:
- Click on your initials in the bottom left
- Click “Account” (next to cloud platform logo and account name).
- Click “View Account Details.”
- Locate and copy the Account Identifier (should be in format “ABCDEFG-HJK01234”)
Step 3: Create the Pipeline
We are going to create a new python file in our project called my_first_pipeline.py — this is an extremely simple example, so we are not going to touch pagination, authentication or chaining requests today (see dlthub’s RESTClient documentation to learn more).
For now, simply paste in the following code into this newly created file:
my_first_pipeline.py
import dlt
import requests


# -------------------------------------------------------
# SOURCES
# A "resource" is one endpoint / one table worth of data.
# The @dlt.resource decorator tells dlt "this is a data source".
# "yield" sends records one at a time to dlt — think of it
# like returning data lazily rather than all at once.
# -------------------------------------------------------

@dlt.resource(name="users", write_disposition="replace")
def get_users():
    """Fetches all users from JSONPlaceholder."""
    response = requests.get("https://jsonplaceholder.typicode.com/users")
    response.raise_for_status()  # raises an error if the request failed
    yield response.json()        # yield the list of user dicts to dlt

@dlt.resource(name="posts", write_disposition="replace")
def get_posts():
    """Fetches all posts from JSONPlaceholder."""
    response = requests.get("https://jsonplaceholder.typicode.com/posts")
    response.raise_for_status()
    yield response.json()

@dlt.resource(name="comments", write_disposition="replace")
def get_comments():
    """Fetches all comments from JSONPlaceholder."""
    response = requests.get("https://jsonplaceholder.typicode.com/comments")
    response.raise_for_status()
    yield response.json()


# -------------------------------------------------------
# PIPELINE
# This is the runner. It connects your resources to a destination.
# - pipeline_name:  just a label, also used for internal state tracking
# - destination:    where data goes — "snowflake", "duckdb", etc
# - dataset_name:   the schema your tables will live in inside Snowflake
# -------------------------------------------------------

pipeline = dlt.pipeline(
    pipeline_name="jsonplaceholder_pipeline",
    destination="snowflake",
    dataset_name="raw"
)


# -------------------------------------------------------
# RUN
# Pass your resources to pipeline.run() as a list.
# dlt will infer the schema, create the tables, and load the data.
# -------------------------------------------------------

if __name__ == "__main__":
    load_info = pipeline.run([get_users(), get_posts(), get_comments()])
    print(load_info)  # shows what was loaded, row counts, any errors
- Note about the
dlt.pipeline(...) function:dataset_name = "raw"is where you are declaring the schema name to be “RAW” within your Snowflake database which you created. You could name this whatever you like (e.g. “example_api_data_bronze”).destination = "snowflake"is how the code knows to reference the secrets.toml file for proper Snowflake credentials.
Step 4: Execute the Pipeline
- In the VS Code Terminal (still in virtual env), simply run the python file:
-
python my_first_pipeline.py
-
- The run may take a couple minutes, and terminal output should look something like this:
-
(dlt_practice) PS C:\Users\[...]\dlt_practice> python my_first_pipeline.py
Pipeline jsonplaceholder_pipeline load step completed in 16.05 seconds
1 load package(s) were loaded to destination snowflake and into dataset raw
The snowflake destination used snowflake://USERNAME:***@ABCDEFG-HJK12345/DLT_PRACTICE location to store data
Load package 1772577252.651164 is LOADED and contains no failed jobs
-
Step 5: Validate Results in Snowflake
- In your Snowflake Database Explorer, navigate to the
DLT_PRACTICE_DBdatabase.- Before the run:
- This database only contains the default Snowflake schemas: INFORMATION_SCHEMA and PUBLIC.
- After the run:
- Verify the creation of one schema in the database named
RAW - Verify the creation of multiple tables within
DLT_PRACTICE_DB.RAW

-
show tables in schema dlt_practice_db.raw;
------------------------------------------

select * from dlt_practice_db.raw.users;

select * from dlt_practice_db.raw.posts;

select * from dlt_practice_db.raw.comments;

select * from dlt_practice_db.raw._dlt_loads;

select * from dlt_practice_db.raw._dlt_pipeline_state;

select * from dlt_practice_db.raw._dlt_version;
- Verify the creation of one schema in the database named
- Before the run:
- Notes:
- You may notice our run actually created six tables, not just three! This is because every dlt run has metadata that is stored in the “_DLT” tables.
- dlt automatically inferred column names and data types from the raw JSON data, and loaded it into Snowflake as flattened tabular data. This is the default behavior, but it is fully customizable if so desired.
Step 6: Experiment with Additional Features
Congratulations on creating your very first dlt pipeline into Snowflake!
Here are some ideas to experiment with as you venture forward with dlt:
- Add a fourth resource, this one for /todos
- https://jsonplaceholder.typicode.com/todos
- Explore the three dlt metadata tables, and try to understand what they show:
_DLT_LOADS_DLT_PIPELINE_STATE_DLT_VERSION
- Try creating a new Snowflake role called DLT_LOADER_ROLE
- Run the pipeline so that this role performs the loads
- Instead of overwriting data on every run, try appending rows, and then check how it affects the output in Snowflake.
write_disposition="replace"write_disposition="append"write_disposition="merge"
- Try writing to multiple schemas within the same database — create a second
dlt.pipeline().- Create a “RAW_JSON” target schema for a raw JSON dump.
- Create a “FLATTENED” target schema for the inferred tabular data.
- Try finding your own API or source, and creating a new pipeline for that data.
- Here is a GitHub repository containing hundreds of public APIs.
- Research incremental loading of data in dlt.
- Very useful in the real world, where you often want to only fetch new data on each run.
- Try to run pipeline using Snowflake’s Snowpark Container Services (SPCS)
- This would allow you to seamlessly run your pipeline all within your Snowflake environment.
- Authentication types
- Try setting up key pair authentication or OAuth authentication.
- Instead of Snowflake, try loading into DuckDB, Databricks, or any other destination
- dlt is incredibly flexible and simple when it comes to changing destinations, which means you are not tied to a specific data warehousing tool when you create your pipelines.
Conclusion
If you followed along up to this point and tried your hand at some mini experiments, you are undoubtedly aware of the powerful flexibility of dlt. I found it remarkably refreshing to move away from clunky drag-and-drop user interfaces of the past and embrace the future of data ingestion: code-first solutions.
Now that you have added another data ingestion tool to your toolbelt, you must use it wisely. Because remember, the best tool for the job always depends on the full context of the situation. Practical data engineering relies on your ability to know when to wield a hammer, and when to wield a screwdriver.
Never stop learning.