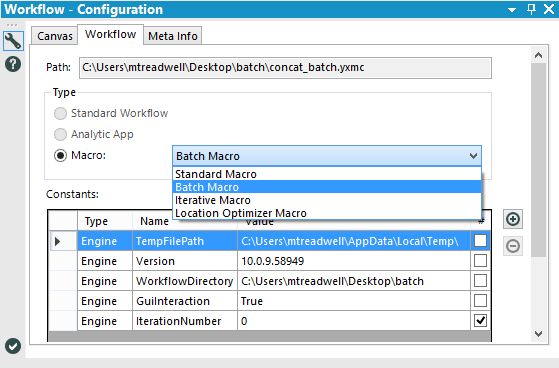
The ability to create macros that can be shared and used in other workflows as tools is one of the greatest features of Alteryx. Each macro works like a user-defined function that you would create in another language, like R. A standard macro takes a data stream input, performs a series of actions, and then outputs the data stream. On the Workflow – Configuration tab, you might have noticed that Alteryx has several types of macros. It is easy enough to simply save your workflow as a macro (.yxmc) file, but it must be configured properly in order to work like a macro. I am going to discuss batch macros, how to configure them and why you would need to use one.
I will assume that the reader already has a basic understanding of the default favorite tools and standard macros in Alteryx.

I’ve included two attached files so that you can follow along: a simple batch macro (concat_batch.yxmc) and a workflow that uses the macro (simple_batch.yxmd). The macro is simple; it takes an incoming data stream and concatenates the two columns. The only way it is different from a standard macro is that (1) it is saved as a batch macro and (2) it utilizes a constant not available to standard macros: IterationNumber. See the configuration window pictured above for reference.
If you are familiar with standard macros in Alteryx you may find the attached workflow a bit surprising after looking at the batch macro file. The batch macro has one Macro Input; but on the workflow, the tool has two inputs: D and ¿.

Configuring a Batch Macro
The input on the workflow represented by the inverted question mark is the control parameter input for the batch macro. There is a Control Parameter Tool in the Interface palette and it can be used to create batch macros. In fact, if you drag a Control Parameter Tool onto the canvas then Alteryx will automatically convert your workflow into a batch macro. However, using the Control Parameter Tool is only necessary for advanced batch macros. If you leave the tool out of your workflow, then your batch macro will still have a control input and will behave in a default manner; filtering your data into groups for batch processing. Let’s explore:

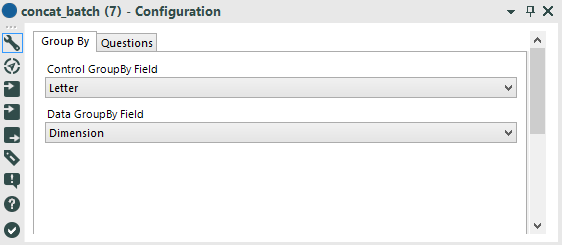
Open the simple_batch.yxmd workflow and you will see a text input streaming in to both inputs of the batch macro. Letter Input should be streaming into the control parameter (¿) input and Dimension Input should be streaming into the data (D) input. Click on the batch macro tool and you should see that “Control GroupBy Field” and “Data GroupBy Field” are both set to [Letter] and [Dimension], respectively. In the Questions tab, the fields should be mapped accordingly.
Take a look at both Letter and Dimension input data and then run the module. There are seven records output. All of the dimension values “A” have a batch value of “1” and “2” for “B.”

Because the control parameter had two input rows from Letter Input there were two batches run. On the first batch the rows in the Dimension Input were filtered such that [Dimension] was equal to the first row of [Letter] (“A” in this case) in the Letter Input, [Dimension] == [Letter]. So, all the rows with [Dimension] == “A” were processed through the macro, then the same was done for [Dimension] == “B.”

Now, change the module settings and examine the results again. Connect “Dimension Input” to both data (D) and control (¿). Additionally, set [Dimension] as the GroupBy. Run the module and check that the output has 34 records and 10 different batches. The control input has 10 rows which corresponds to 10 batches. Each batch is filtered [Dimension] == [Dimension] for 4 batches of 4 A’s (16), 3 batches of 3 B’s (9) and 3 batches of 3 C’s (9). 16 + 9 + 9 = 34.
A batch macro performs action on your data one group at a time as defined by the control input and combines the output with a union. Split, apply and combine.

