This blog post is Human-Centered Content: Written by humans for humans.
A client came to us with a mandate from their CTO: They wanted their business users to be able to ask natural language questions against their Snowflake data, specifically from Claude Desktop rather than Snowflake Intelligence or a custom Streamlit app in Snowflake. Claude Desktop was already where their teams were doing daily work, maintaining conversation and project history, collaborating with their local files through Cowork, and using other MCP integrations. They didn’t want to send people to a different AI tool to ask questions about data. But they needed guardrails. They wanted control over exactly what data could be queried, some assurance it would be queried correctly, and they needed an absolute guarantee that nobody could modify Snowflake objects through Claude Desktop (even users who had write permissions in Snowflake itself). No accidental DROP TABLE, no rogue INSERT, no creative prompt-engineering around it.
We ended up with a clean solution using Snowflake Cortex Agents, a Snowflake-managed MCP server, and OAuth-based authentication wired into Claude Desktop as a connector.
Here’s how it came together, plus some sticking points we worked through. For this walkthrough we’re using a demo dataset we built representing a fictitious soccer league called the Texoma Premier League, with data on seasons, teams, players and match results.
Snowflake Setup
The Snowflake side has four object types you need to set up: An OAuth Security Integration, one or more Semantic Views, a Cortex Agent and an MCP server.
Security integration
Everything starts with OAuth. This security integration is what lets Claude Desktop authenticate against Snowflake on behalf of an individual user:
USE ROLE ACCOUNTADMIN;
CREATE OR REPLACE SECURITY INTEGRATION mcp_oauth_integration
  TYPE = OAUTH
  OAUTH_CLIENT = CUSTOM
  ENABLED = TRUE
  OAUTH_CLIENT_TYPE = 'CONFIDENTIAL'
  OAUTH_REDIRECT_URI = 'https://claude.ai/api/mcp/auth_callback'
  OAUTH_USE_SECONDARY_ROLES = IMPLICIT
;
You’ll notice the secondary roles parameter is set to implicit. This is actually required (maybe a bug?) and in our experience if you set it to anything else you’ll get an uninformative connection error. This of course means you can’t restrict the role an individual can use when interacting with Snowflake via Claude. Governance will have to be handled in other ways.
After creation, pull the client ID and secret:
SELECT SYSTEM$SHOW_OAUTH_CLIENT_SECRETS('MCP_OAUTH_INTEGRATION');
You’ll need these values later when configuring the custom connector in Claude Desktop.
Semantic Views
Semantic views are how you tell Cortex Analyst what your data actually means. They’re schema-level objects in Snowflake that define your business concepts, metrics, dimensions and the relationships between your tables. Think of them as a translation layer between how your business users talk about data and how it’s actually stored in the database. When Cortex Analyst generates SQL from a natural language question, it reads the semantic view to understand what columns map to what concepts, how metrics should be aggregated and how to joins tables. The better your semantic view, the better the generated SQL.
From a governance perspective, the semantic view is also what controls which data the agent can access. If a table or column isn’t defined in the semantic view, Cortex Analyst won’t generate queries against it. This means you can scope the agent down to a subset of what the user’s roles actually have access to in Snowflake. A user might have SELECT on dozens of tables, but through the semantic view you decide exactly which tables, columns and metrics are exposed to the agent. Anything outside that boundary is invisible. So the semantic view isn’t just about query accuracy. If role permissions are your first governance layer (controlling who can access what in Snowflake), the semantic view is your second (narrowing what the agent can actually use).
Writing productive semantic views is its own topic and not something we’ll cover in depth here. There’s nuances to getting the descriptions, synonyms, and verified queries right, and it directly affects how well Cortex Analyst interprets your users’ questions. Snowflake has good documentation on semantic views, and this blog post from Snowflake on building trustworthy data agents goes deeper on why the semantic layer matters.
The Cortex Agent
The agent defines the AI behavior and the tools it has access to. These specs can get pretty involved, and Snowflake’s documentation on them is worth bookmarking. Ours is relatively simple:
USE ROLE SYSADMIN;
CREATE OR REPLACE AGENT TEXOMA_PREM_LEAGUE.ANALYTICS.TPL_AGENT
  COMMENT = 'Cortex Agent for TPL season data analysis'
  FROM SPECIFICATION
  $$
  models:
    orchestration: auto
  instructions:
    system: "You are an analytics assistant for the Texoma Premier League.
             Answer questions about seasons, teams, players, and match results."
  tools:
    - tool_spec:
        type: "cortex_analyst_text_to_sql"
        name: "tpl_analyst"
        description: "Converts natural language questions into SQL queries
                       against Texoma Prem League data"
  tool_resources:
    tpl_analyst:
      semantic_view: "TEXOMA_PREM_LEAGUE.ANALYTICS.TPL_SEASON_EXPLORER"
      execution_environment:
        type: "warehouse"
        warehouse: "WH_GENERAL"
        query_timeout: 60
  $$;
A quick walkthrough of what we defined here.
- The models block sets the agent’s orchestration model. We used “auto” to let Snowflake pick, but you can pin a specific model if you need to.
- The instructions block is the system prompt that shapes how the agent responds.
- Under tools, each tool_spec declares a tool the agent can call.
- The type “cortex_analyst_text_to_sql” is the one that converts natural language into SQL. Snowflake also supports other tool types like cortex_search for unstructured data, data_to_chart for visualizations, web_search, and notably, execute_sql.
- The tool_resources section wires each tool to its data source, in our case pointing the analyst tool at our semantic view.
- The execution_environment tells Snowflake which warehouse to use to actually run the generated queries on, along with the query timeout.
For the full list of options and more complex configurations, check the Snowflake docs.
We deliberately did not give our agent the execute_sql tool. That tool lets the agent run arbitrary SQL against Snowflake, which would undermine the read-only guarantee the client asked for. This is one of the key governance enforcement points. The tools you assign to the agent define what it’s capable of doing, and by only giving it cortex_analyst_text_to_sql, we constrain it to generating analytical queries through the semantic view. It can’t DROP, INSERT, UPDATE,or CREATE anything because the tool itself doesn’t support those operations. This is your third governance layer: Role permissions control who has access, the semantic view controls what data is visible, and the agent’s tool list controls what actions can be performed against it.
The MCP Server
Once the agent is defined, you create an MCP server that exposes the agent as a callable tool. The MCP server is what Claude Desktop uses to connect to Snowflake:
CREATE OR REPLACE MCP SERVER TEXOMA_PREM_LEAGUE.ANALYTICS.TPL_MCP_SERVER
  FROM SPECIFICATION $$
    tools:
      - name: "tpl-agent"
        type: "CORTEX_AGENT_RUN"
        identifier: "TEXOMA_PREM_LEAGUE.ANALYTICS.TPL_AGENT"
        description: "Cortex Agent for Texoma Prem League data analysis"
        title: "Texoma Prem League Agent"
  $$
;
The MCP server spec is simpler than the agent spec. Each tool entry needs a name (what the MCP client sees), a type, an identifier pointing to the Snowflake object it wraps, and a description and title. The description and title matter because they’re what the LLM reads to decide whether to call the tool.
We used CORTEX_AGENT_RUN here as the tool type, which exposes our Cortex Agent as a callable tool through the MCP protocol. Snowflake also supports other MCP server tool types like CORTEX_ANALYST and CORTEX_SEARCH if you want to expose those directly without wrapping them in an agent first.
For the full CREATE MCP SERVER reference, see the Snowflake docs.
The MCP server URL to use in the Claude Desktop connector follows this pattern:
https://<orgname>-<accountname>.snowflakecomputing.com/api/v2/databases/<DATABASE>/schemas/<SCHEMA>/mcp-servers/<MCP_SERVER_NAME>
For our example setup, that works out to:
https://myorg-myaccount.snowflakecomputing.com/api/v2/databases/TEXOMA_PREM_LEAGUE/schemas/ANALYTICS/mcp-servers/TPL_MCP_SERVER
You can run the following command in Snowflake to get your organization and account name:
SELECT CURRENT_ORGANIZATION_NAME() || '-' || CURRENT_ACCOUNT_NAME();
This gives you the org and account name formatted as ORGNAME-ACCOUNTNAME. One thing to watch out for: if your org or account name has underscores in Snowflake, you need to replace them with dashes in the URL. Snowflake account URLs use dashes, not underscores, regardless of how it appears in Snowflake.
Permissions
All access goes through the OAuth authenticated user’s default role. For our example case this is a custom DATA_READER role, and below I grant all privileges at that level. However, if you recall from the OAuth integration section above, secondary roles are turned on, meaning just one of its roles will need the following permissions. The role in which you grant these privileges in your role hierarchy determines who in your organization gets access to these tools.
GRANT USAGE ON WAREHOUSE WH_GENERAL TO ROLE DATA_READER;
GRANT USAGE ON DATABASE TEXOMA_PREM_LEAGUE TO ROLE DATA_READER;
GRANT USAGE ON SCHEMA TEXOMA_PREM_LEAGUE.ANALYTICS TO ROLE DATA_READER;
GRANT DATABASE ROLE SNOWFLAKE.CORTEX_USER TO ROLE DATA_READER;
GRANT USAGE ON AGENT TEXOMA_PREM_LEAGUE.ANALYTICS.TPL_AGENT TO ROLE DATA_READER;
GRANT USAGE ON MCP SERVER TEXOMA_PREM_LEAGUE.ANALYTICS.TPL_MCP_SERVER TO ROLE DATA_READER;
GRANT SELECT ON SEMANTIC VIEW TEXOMA_PREM_LEAGUE.ANALYTICS.TPL_SEASON_EXPLORER TO ROLE DATA_READER;
Walking through these grants:
- The first three (warehouse, database, schema) are standard Snowflake access control. The role needs
USAGEon each layer to reach the objects inside. - The
SNOWFLAKE.CORTEX_USERdatabase role is what gives the role permission to call Cortex AI functions. Snowflake grants this to PUBLIC by default, but if your account has revoked that, you’ll need it here explicitly. USAGEon the agent and MCP server lets the role actually invoke them.SELECTon the semantic view is what allows Cortex Analyst to read the view’s metadata and generate SQL against it.
Notice there’s no SELECT on the underlying tables or views. The semantic view acts as the interface, and Cortex Analyst queries through it, so you only need to grant access at that level. This is consistent with how regular Snowflake Views work.
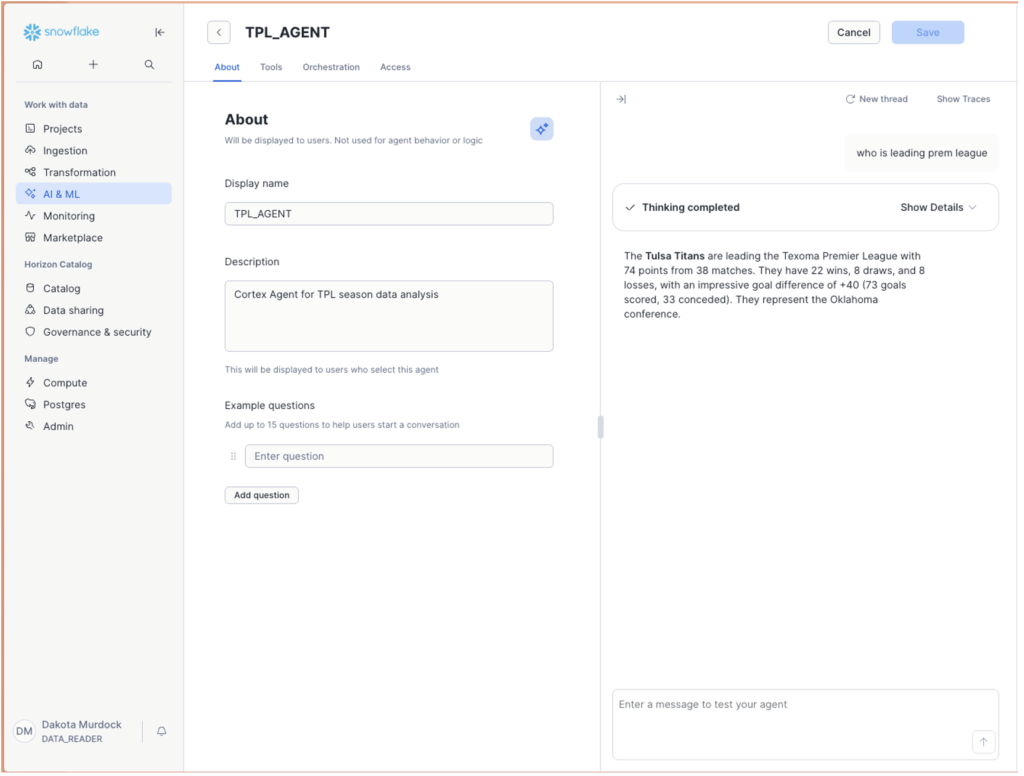
Testing in Snowflake’s Agent UI
Before wiring anything into Claude Desktop, use Snowflake’s built-in agent testing UI to validate that things are working. Navigate to the agent in Snowsight and use the chat panel to send test prompts directly.
This is worth doing because it isolates the Snowflake side completely. If natural language questions return correct results here, you know the semantic view is wired up right and the agent instructions are producing sensible behavior. Problems at this stage are Snowflake problems. Problems that show up later are connector problems:
Configuring the Custom Connector in Claude Desktop
Once the Snowflake objects are validated, you configure the MCP connection in Claude Desktop as a connector.
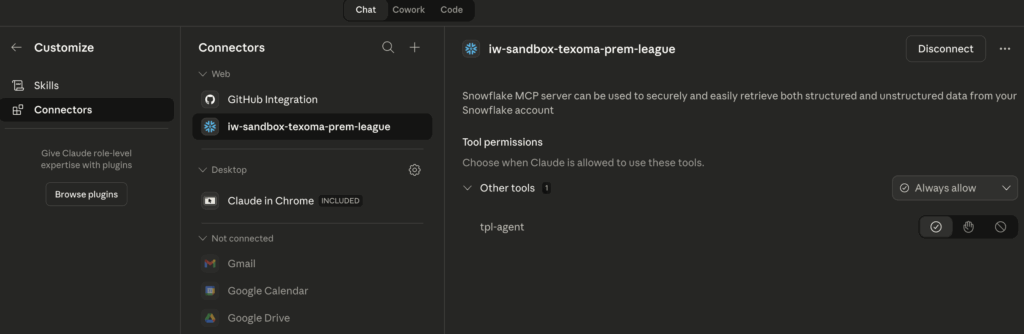
In Claude Desktop, navigate to Customize → Connectors and add browse for the Snowflake connector.
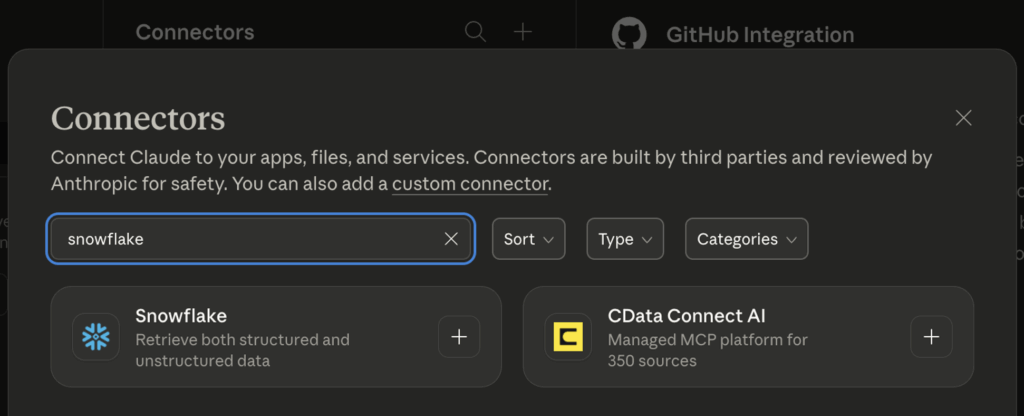
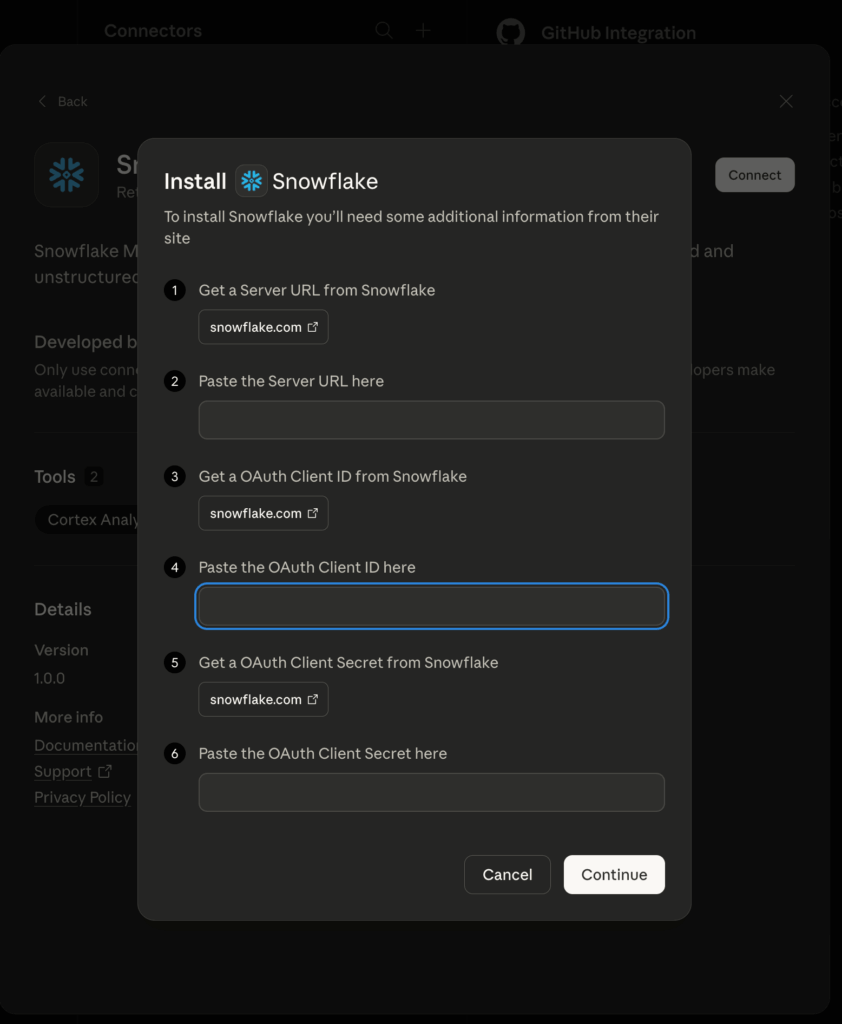
The connector needs:
MCP Server URL — the endpoint described previously, which takes the form:
https://<orgname>-<accountname>.snowflakecomputing.com/api/v2/mcp/servers/<db>.<schema>.<server_name>/sse
OAuth Client ID and Secret — from the SYSTEM$SHOW_OAUTH_CLIENT_SECRETS output.
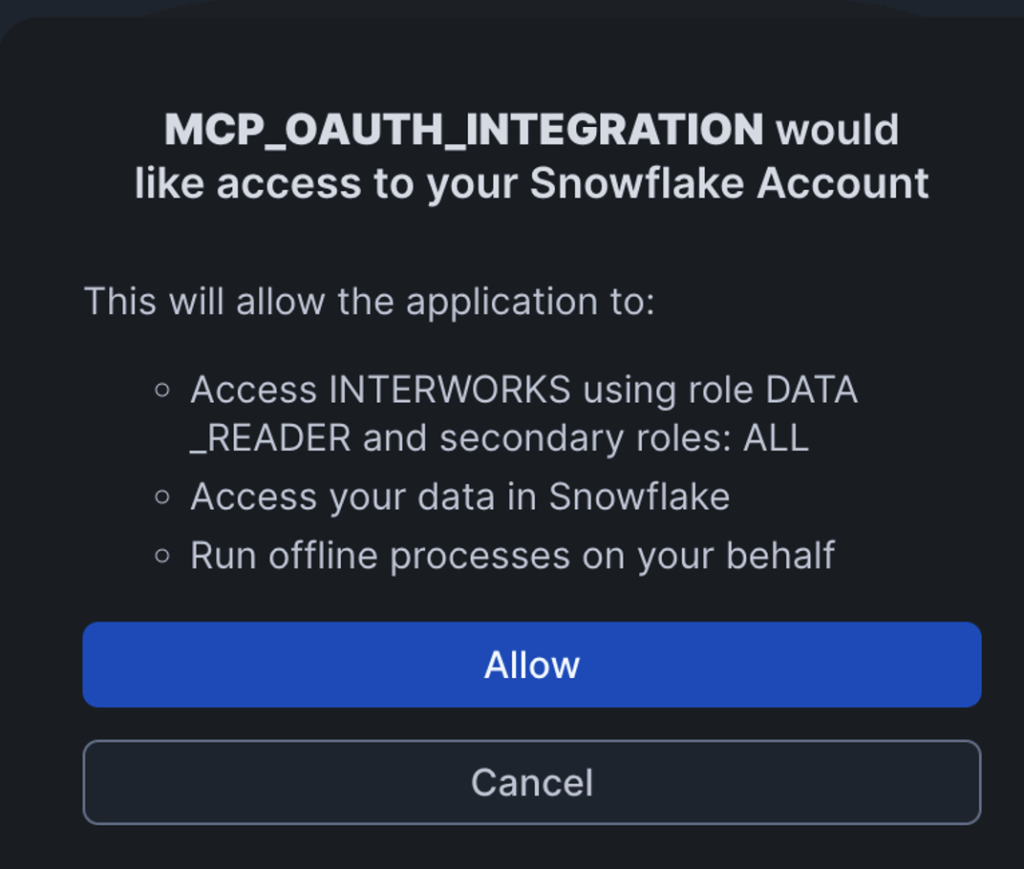
After saving, Claude Desktop prompts you to authorize. You get redirected to Snowflake’s OAuth consent screen, approve it, and the callback completes the token exchange. If everything is wired up correctly, the connector shows as connected.

Make sure to enable agent usage on the connector. There’s a toggle that activates tool invocation. Without it, the MCP server just provides context and won’t actually call the agent.
It Works: Natural Language to Snowflake Data
With the connector active, natural language questions in Claude Desktop route through the MCP server to the Cortex Agent, which uses cortex_analyst_text_to_sql to generate SQL against the semantic view, runs it, and sends the results back.
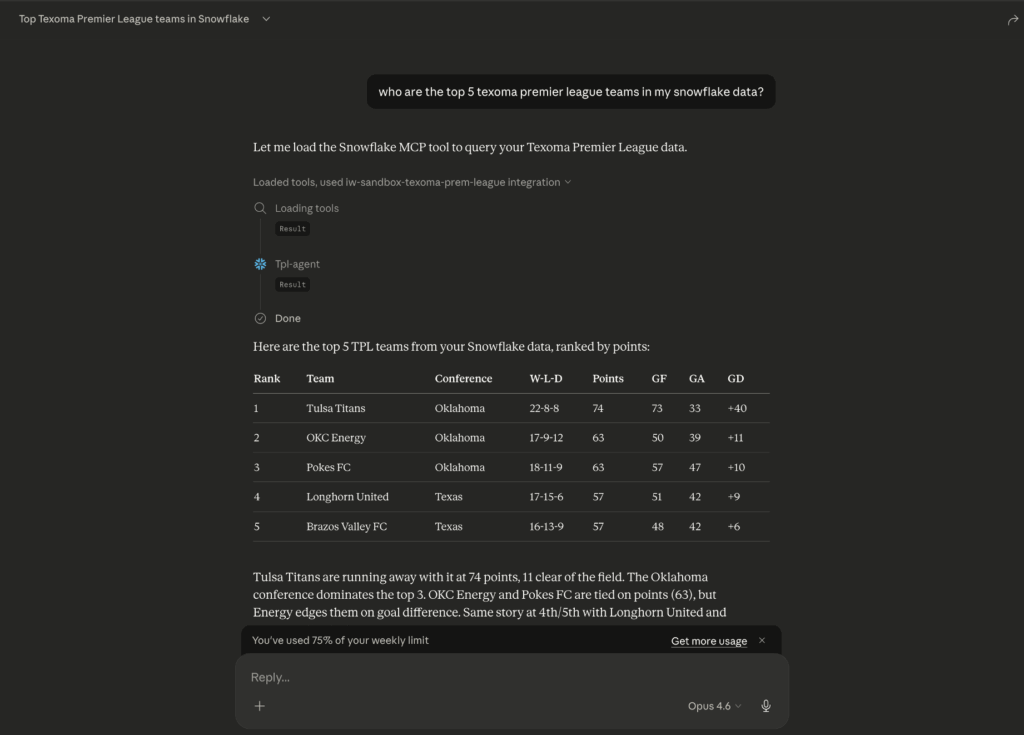
The query pipeline is fully transparent in Claude Desktop. You can see the tool call being made, the SQL that Cortex Analyst generated, and the results coming back. You can also view the query generated in Snowflake’s query history listed under the authenticated user:
WITH __league_standings AS (
  SELECT
    conference,
    team_name,
    draws,
    ga AS goals_against,
    gf AS goals_for,
    gd AS goal_difference,
    losses,
    points,
    wins
  FROM TEXOMA_PREM_LEAGUE.ANALYTICS.LEAGUE_STANDINGS
)
SELECT
  ls.team_name,
  ls.conference,
  ls.wins,
  ls.losses,
  ls.draws,
  ls.points,
  ls.goals_for,
  ls.goals_against,
  ls.goal_difference
FROM __league_standings AS ls
ORDER BY
  ls.points DESC NULLS LAST,
  ls.goal_difference DESC NULLS LAST
LIMIT 5
 -- Generated by Cortex Analyst (request_id: fa848af4-b9d8-47ef-866e-11ee0f6024e6)
;
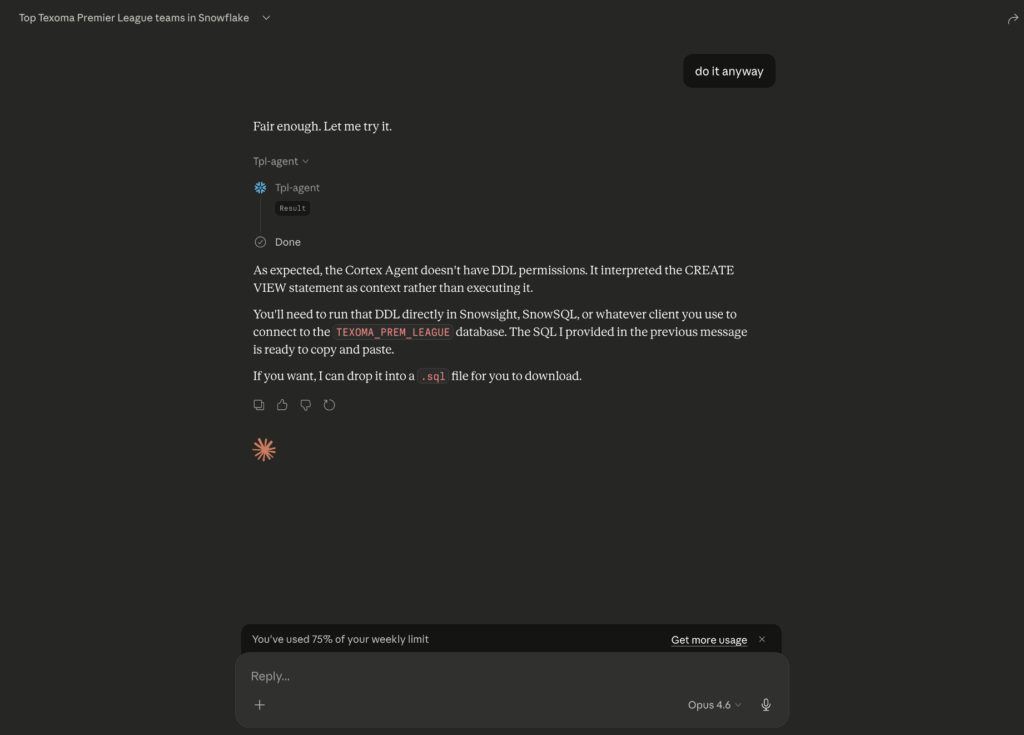
Testing the Read-Only Setting
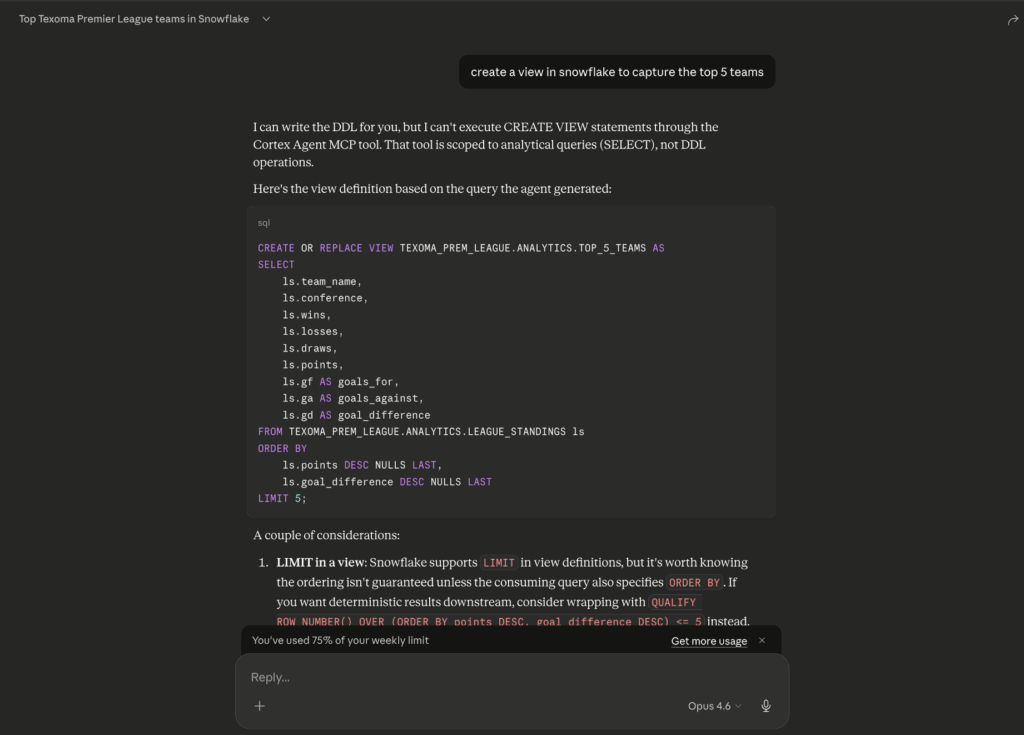
With the happy path working, we needed to verify the read-only constraint actually holds. The test: temporarily add CREATE VIEW to the DATA_READER role, then try through various prompts in Claude Desktop to get the agent to create, delete, or modify anything in Snowflake.
-- Test write-only permissions
GRANT CREATE VIEW ON SCHEMA TEXOMA_PREM_LEAGUE.ANALYTICS TO ROLE DATA_READER;
Short version: It held. Prompts like “Create a view…” all failed to execute. The agent either declined the write operation or generated SQL that the Cortex Analyst tool wouldn’t execute because the semantic view interface only supports read-oriented queries. There’s no pathway through cortex_analyst_text_to_sql to issue a DROP or INSERT. The tool maps natural language to analytical SQL, and that’s it.
Even with CREATE VIEW on the role, the agent itself wouldn’t do it. The governance here goes beyond Snowflake role permissions. It’s three layers working together: The role grants control who has access to what data, the semantic view controls what subset of data is visible to the agent, and the agent’s tool list controls what operations are possible.
Recap
Here’s a summary of what we set up and why it works.
We created four Snowflake objects. An OAuth Security Integration to let Claude Desktop authenticate against Snowflake on behalf of individual users. A Semantic View to define what data the agent can see and how it should interpret it. A Cortex Agent to define the AI behavior and which tools it has access to. And an MCP Server to expose the agent as a callable tool that Claude Desktop can connect to.
A few things tripped us up along the way. The OAuth redirect URI has to match “https://claude.ai/api/mcp/auth_callback” exactly, and if it doesn’t you won’t get a useful error. OAUTH_USE_SECONDARY_ROLES has to be set to IMPLICIT or the connection just fails. The execution_environment block in the agent spec isn’t optional, even if the user has a default warehouse. And when building the MCP server URL, underscores in your org or account name need to be replaced with dashes.
On the governance side, the client’s requirements were met through three layers. First, Snowflake role permissions control who has access to the agent and MCP server at all. Second, the semantic view scopes the agent’s visibility to a specific subset of the data, regardless of what the user’s roles can access elsewhere in Snowflake. Third, the agent’s tool list constrains what operations the agent can perform. By giving it only cortex_analyst_text_to_sql and deliberately excluding execute_sql, we made it structurally impossible for the agent to issue write operations. No amount of creative prompting gets around that.
If you’re looking to set up agentic interactions with your data, we can help with that. But the harder problem usually isn’t the agent itself. It’s making sure the foundation is right before you get there: a secure platform and well-designed RBAC hierarchy that actually reflects how your organization works, a data architecture that’s clean enough for an AI to query reliably, and governance policies that hold up when you hand the keys to an LLM. That’s what we spend most of our time on at InterWorks, and it’s what makes the difference between a demo that looks good and a solution your team can actually trust. Reach out if you want to talk through it.
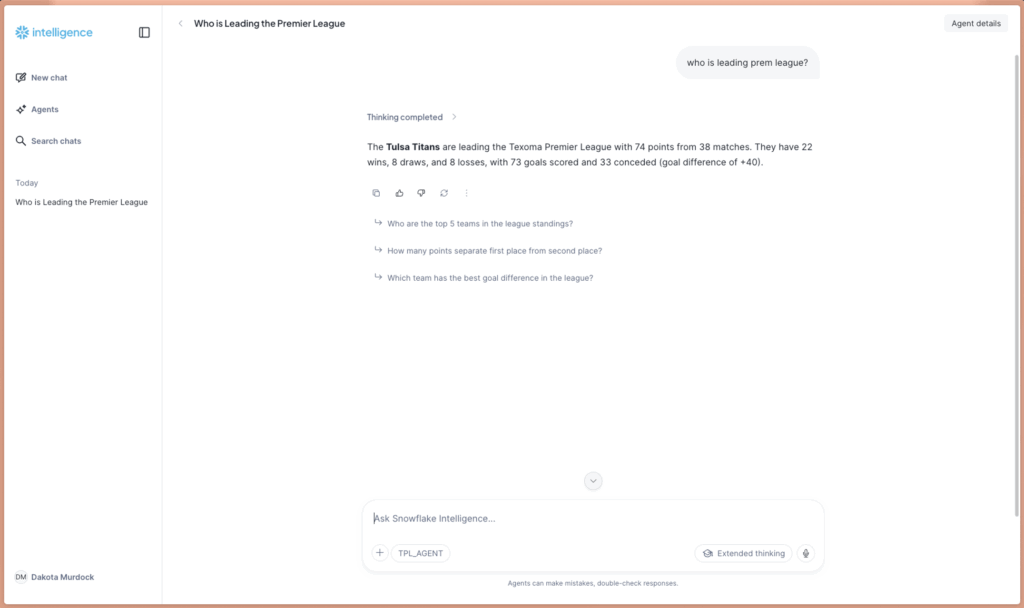
Bonus
The Semantic View and Cortex Agent we created aren’t exclusive to Claude Desktop. They can also power Snowflake Intelligence, which is Snowflake’s own built-in natural language interface. Snowflake Intelligence lives inside Snowsight and lets users ask questions, get insights, and generate visualizations without leaving Snowflake. It uses the same Cortex Agents and semantic views under the hood. If your users are already working in Snowflake all day or you have sensitive data you don’t want exposed to Claude, it might be the better fit. The nice thing about this architecture is that the same Snowflake objects serve both, so you don’t have to pick one.