
Recently, Dell released the PowerEdge VRTX – a complete solution platform for small to medium businesses. You can read more at http://www.dell.com/us/business/p/poweredge-vrtx/pd.
Currently, the PowerEdge VRTX does not support ESXi version 5.5. If you are planning on upgrading to this in the future using the VSphere Update Manager, it is necessary to install VMware’s image as instances have been documented with update issues when using vendor specific media. This article discusses the installation of VMware’s ESXi 5.1 image on the VRTX while overcoming issues with storage configuration.
The environment for an out-of-the-box PowerEdge VRTX is as follows:
- (2) M620 Blade Servers
- PERC 8 Controller (included and installed from factory)
- VMware ESXi 5.1 installation media
After a fresh installation of the software, configuration of the CMC and the creation of a virtual disk, the host was unable to recognize a storage controller. Therefore, it would not allow any type of storage to be provisioned. To remedy the situation, it was necessary to retrieve specific drivers that will enable the host to communicate properly with the VRTX.
The files needed for this instance were the mpt2sas and the megaraid_sas drivers. You will need access to the ESXi shell and SSH enabled for this to work. More specifically, the following two can be found here: https://my.vmware.com/web/vmware/info/slug/datacenter_cloud_infrastructure/vmware_vsphere/5_1#drivers_tools
- scsi-mpt2sas-16.00.00.00.1
- scsi-megaraid-sas-06.801.52.00
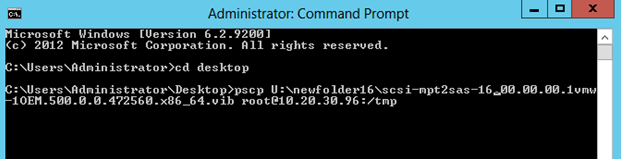
You can install these by using PSCP and PuTTY. Copy the files to a host using PSCP and perform the install in PuTTY. I have included the commands below. They will need to be adjusted to your specific situation as necessary.
PSCP U:newfolder16scsi-mpt2sas-16.00.00.00.1vmw-OEM.500.0.0.472560.x86_64.vib root@10.20.30.96:/tmp
esxcli software vib install -v /tmp/scsi-mpt2sas-16.00.00.00.1vmw-1OEM.500.0.0.472560.x86_64.vib

NOTE: Upon completion, a prompt for reboot will be displayed. Do this to complete the installation of the drivers. If this is not the case, it may be due to the signature of the .vib file. You will need to change the acceptance level of the host (see command below) and or place the host into maintenance mode.
esxcli software acceptance set --level=
After the successful installation and reboots of the host systems, the storage controller will now be visible under the storage controller submenu of the host. Provisioning of the storage can take place.