
This blog post is AI-Assisted Content: Written by humans with a helping hand.
A practical guide to restricting rows, protecting columns and enforcing both.
Sigma gives you two complementary tools for controlling who sees what in your data: Row-level security (RLS), which controls which rows a user can see, and column-level security (CLS), which controls which columns a user can see. Used together, they let a single data model or workbook safely serve very different audiences, internal teams, external partners, and multi-tenant customers without duplicating your data or your logic.
This guide walks through both features end to end: How to implement them, the formulas behind them, how they behave when multiple rules overlap, and how to decide between teams/users and user attributes as your access model.
The Last Mile of Access Control: Where RLS and CLS Sits in Sigma’s Security Stack
Security in a data analytics platform is rarely one setting — it’s a stack of controls, each narrower than the one above it. At the top sits system-level access, managed in Sigma’s Administration portal: This is where admins define account types, assign users to teams and optionally connect an organization’s own identity provider (IdP) for authentication instead of relying solely on Sigma’s built-in user management.
Beneath that is content access, the Can view/Can explore/Can edit levels applied when sharing workspaces, folders and documents, plus page-level visibility within a workbook. This same layer governs embedded content too: An embed user is still a real Sigma user subject to those same document permissions, though page visibility in a secure embed is driven by team assignment rather than set per user. Sigma’s own documentation is clear that page visibility is cosmetic, not a security control, restricting data still requires RLS or CLS underneath, whether the content is embedded or viewed directly in Sigma.
RLS and CLS security live one level further down, inside that data layer. Once a user already has access to a table, RLS decides which of its rows they’re allowed to see, filtering row by row based on who’s asking, rather than requiring a separate, hand-maintained copy of that table for every audience. Column-level security, sits at that exact same layer, restricting columns instead of rows.
For both RLS and CLS, you need Can Edit or Can Explore access on the document to configure the rules.
Row-Level Security (RLS)
What is RLS?
Row-level security restricts access to data based on the characteristics of the person viewing it. Rather than maintaining separate copies of a table for each audience, you build one filter formula that evaluates differently depending on who is looking at it; each viewer sees only the rows for which that formula resolves to true. RLS can be applied to a table in a data model, and it protects every workbook downstream of that data: Configure it once, and it applies everywhere the table is used.
The Three Ways to Implement RLS
Sigma supports three approaches to writing the RLS rule itself. All three follow the same basic pattern: Add a column with a formula that evaluates to true/false, then filter on it.
1. User attribute value (recommended)
Assign a user attribute (e.g. Region) to your users or teams, then compare it to a column value:
CurrentUserAttributeText("Region") = [Store Region]
This is Sigma’s recommended default because the mapping of “who gets what” lives entirely in attribute assignment (Sigma’s Administration portal), separate from your formula. As a result, adding a new user attribute (e.g. Region) or a new user never requires touching the data model. However, renaming or deleting attributes breaks existing formulas silently. If you rename or delete a user attribute that an RLS formula references, that formula evaluates to null rather than raising an error, which is worth auditing before you clean up unused attributes. This caution is also valid for CLS.
2. Team membership
Match the viewer’s team directly to a column:
CurrentUserInTeam([Team Name])
In this context, is important to remember that team names are case-sensitive.
3. User email address
Match the viewer’s email directly to a column:
[Salesperson Email] = CurrentUserEmail()
Because RLS is just a Boolean formula, you use or/and to control whether multiple conditions behave as a union or an intersection. For example, to let salespeople see their own leads but let sales managers see everything:
( [Salesperson Email] = CurrentUserEmail() ) or ( CurrentUserInTeam("Sales Manager") )
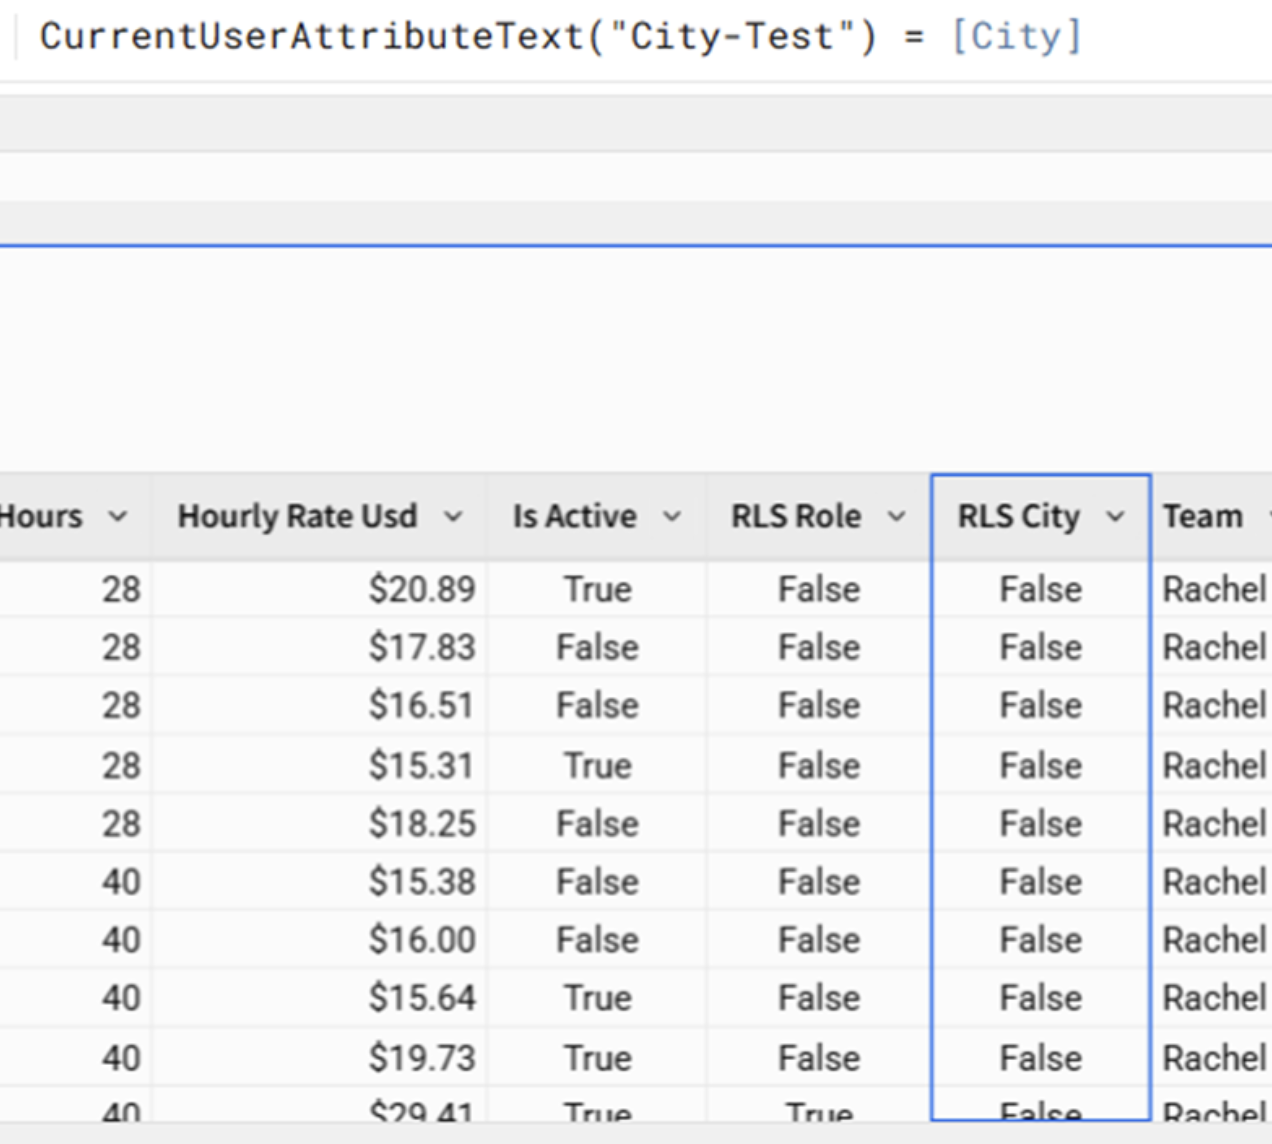
Above: Example of implementation of RLS in a table by reading user attributes and matching them against column values. Once the RLS column is set, users of the data model can filter the rows by applying a Boolean filter.
Never use a control element to implement the RLS in the data model itself because its value can be changed from a downstream workbook via a source parameter, defeating the restriction. Always filter the element directly in the target workbook. And remember that RLS filters live on a column: You can hide that column afterward so downstream users don’t see the raw rule by default.
Column-Level Security (CLS)
What is CLS?
Column-level security restricts or masks access to specific columns in a data model, independent of RLS. Where RLS decides which rows you see, CLS decides which columns you see at all.
Common use cases:
- Data privacy: Keep sensitive columns (SSNs, salaries, medical data) accessible only to authorized users
- Controlled data sharing: Share specific columns with external partners without exposing the entire dataset
- Multi-tenant confidentiality: Keep each tenant’s data isolated in shared infrastructure
Setting up a CLS rule
On a data model element’s Modeling tab, under Column security, you can add rules that enforce CLS.
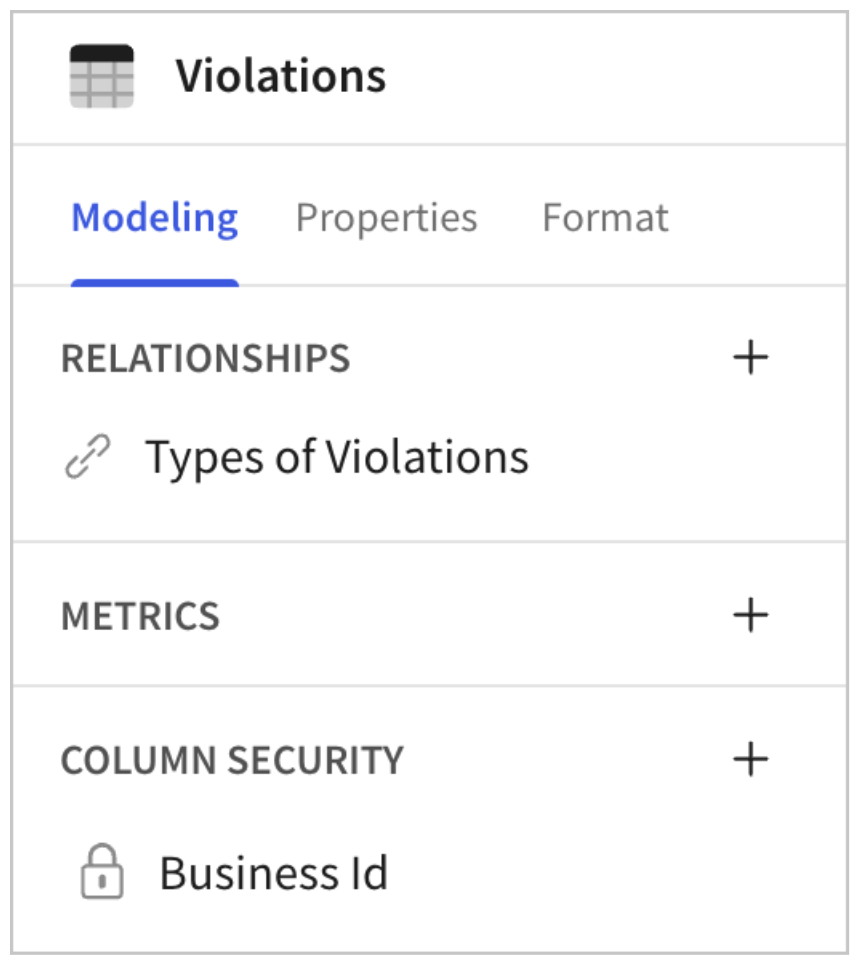
Above: Select the modeling tab in the editor panel to add column-level security rules. Source: Configure column-level security | Sigma Documentation
Each column-level security rule is composed of two elements: the restricted column names and the criteria.
- Restricted columns: The column(s) to restrict, or All columns to restrict the whole element
- Criteria: One of three options below
- No one can view: This hides the element from everyone except data model editors
- Specific users and teams: Only named users/teams can see the column
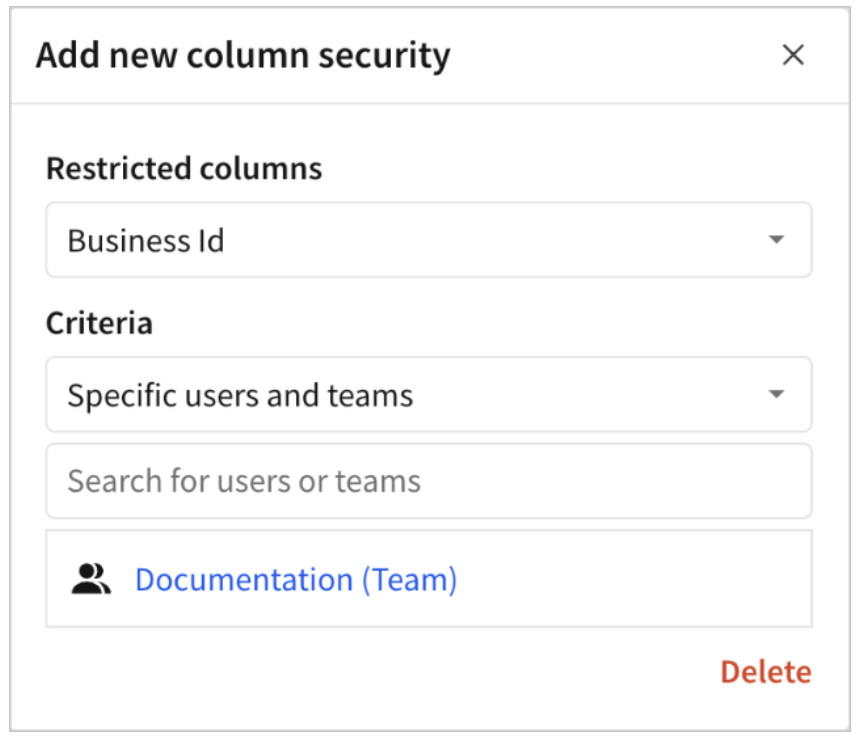
Above: You can start typing and the drop-down list displays the users and teams that match the search criteria. Several users and teams can be added. Source: Configure column-level security | Sigma Documentation
-
- Assigned user attribute value: only users/teams whose attribute matches can see it
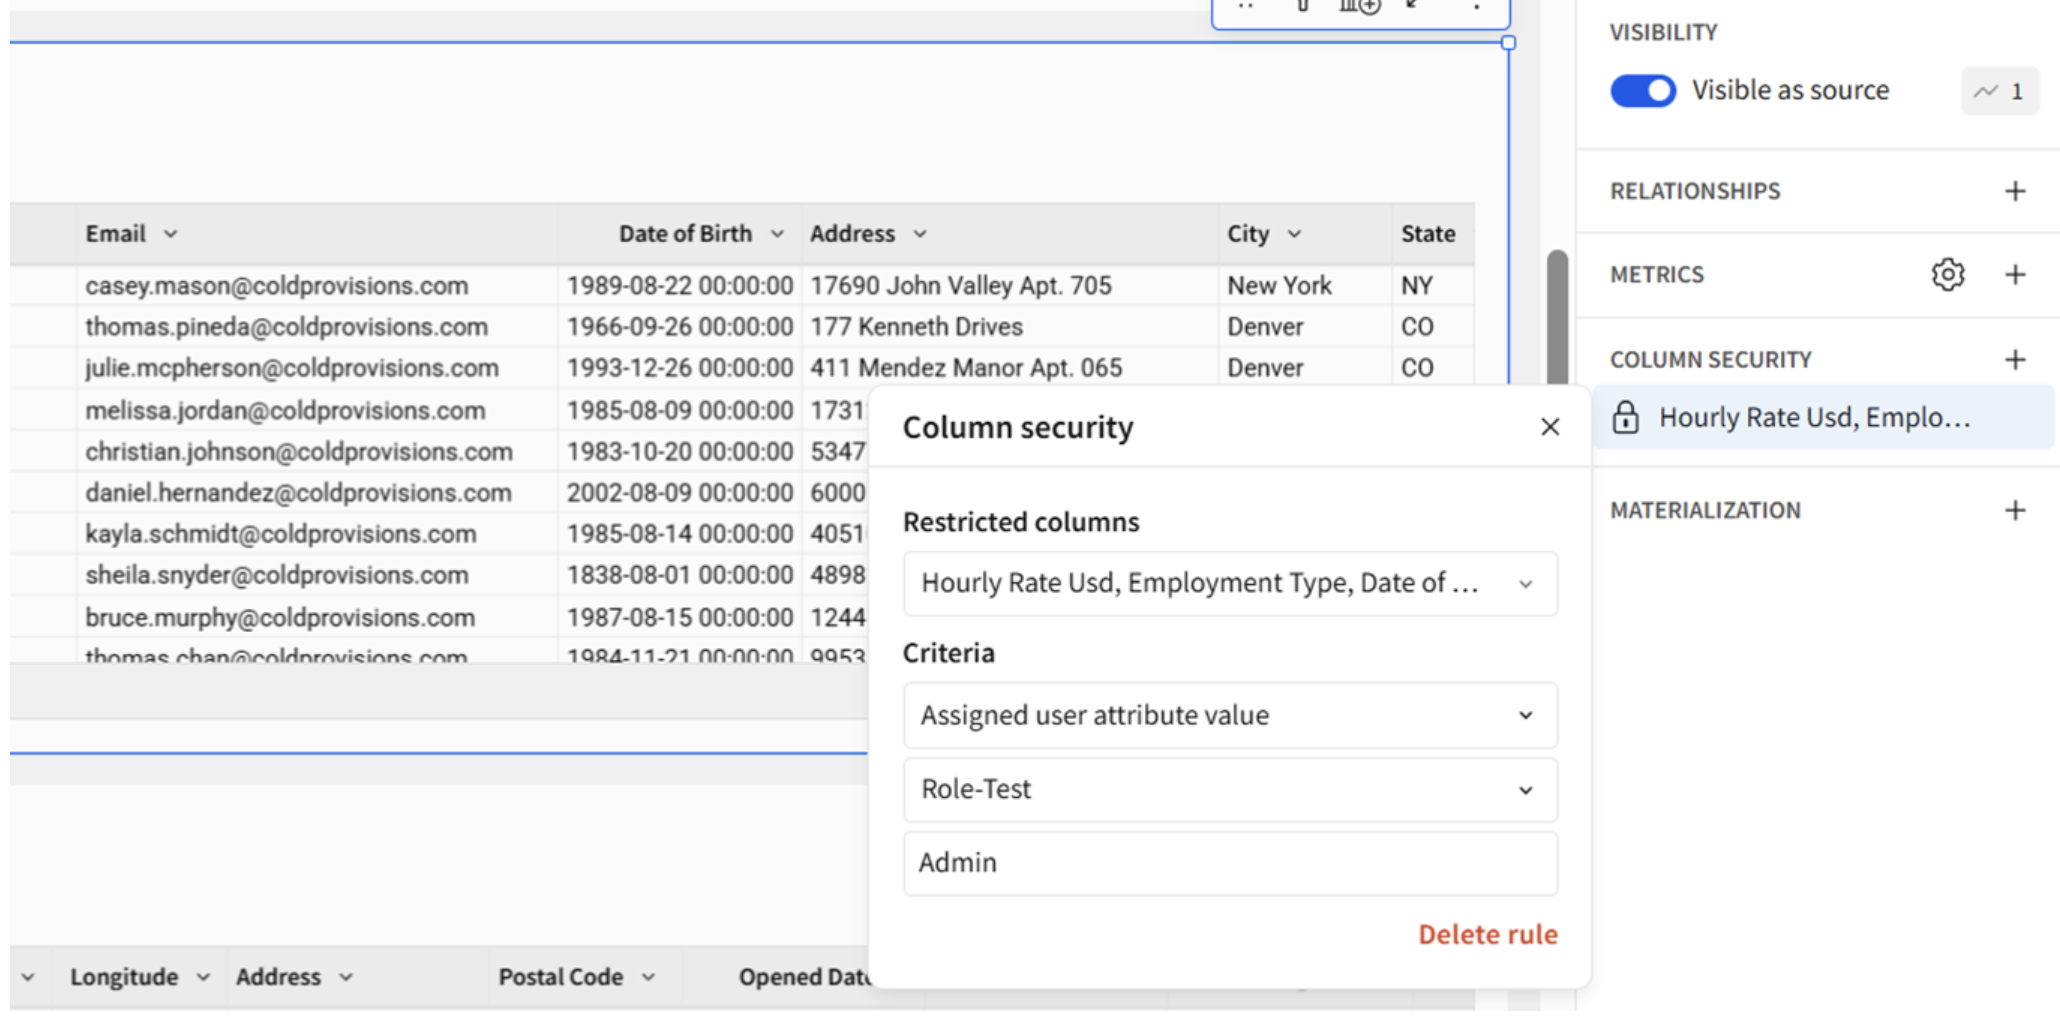
Above: The Column Security drop-down list automatically pulls all the user attributes that have been configured in Sigma’s Administration portal. However, the values the rule will match against must be written manually.
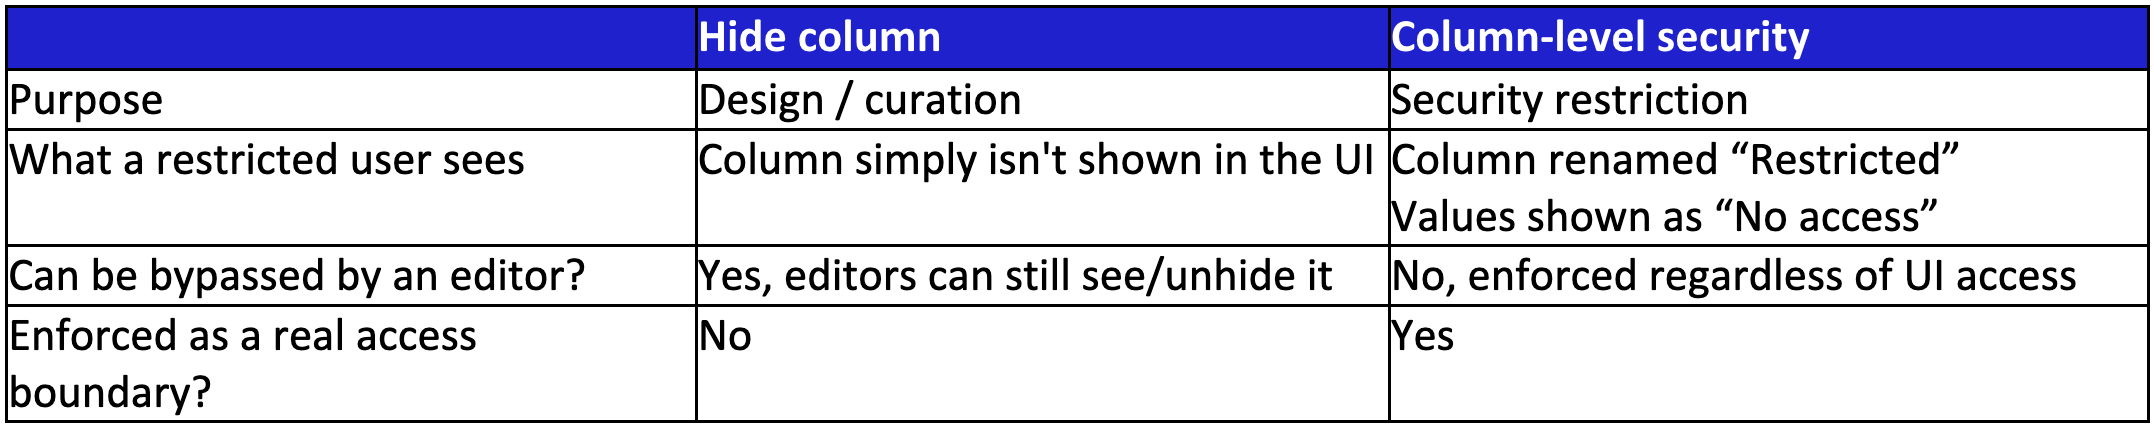
Restricted Versus Hidden: They Are Not the Same Thing
Sigma’s data modeling tools include a separate “Hide column” option, and it is easy to confuse this with CLS, but only one of the two is a security boundary.
Inheritance to Child Elements
CLS rules are inherited: If a restricted column is referenced downstream (a lookup, a formula or a derived table), the child column inherits the same restriction automatically. The one documented exception is when a restricted column is referenced via raw sigma_element() SQL syntax or sigma.get_element() in Python. In those cases, CLS is not inherited, and the rule must be added manually to the output.
Part 3: Choosing Between Teams/Users and User Attributes
RLS and CLS can both be driven by either static group membership or dynamic attribute values. Which one fits depends on how the access pattern behaves:
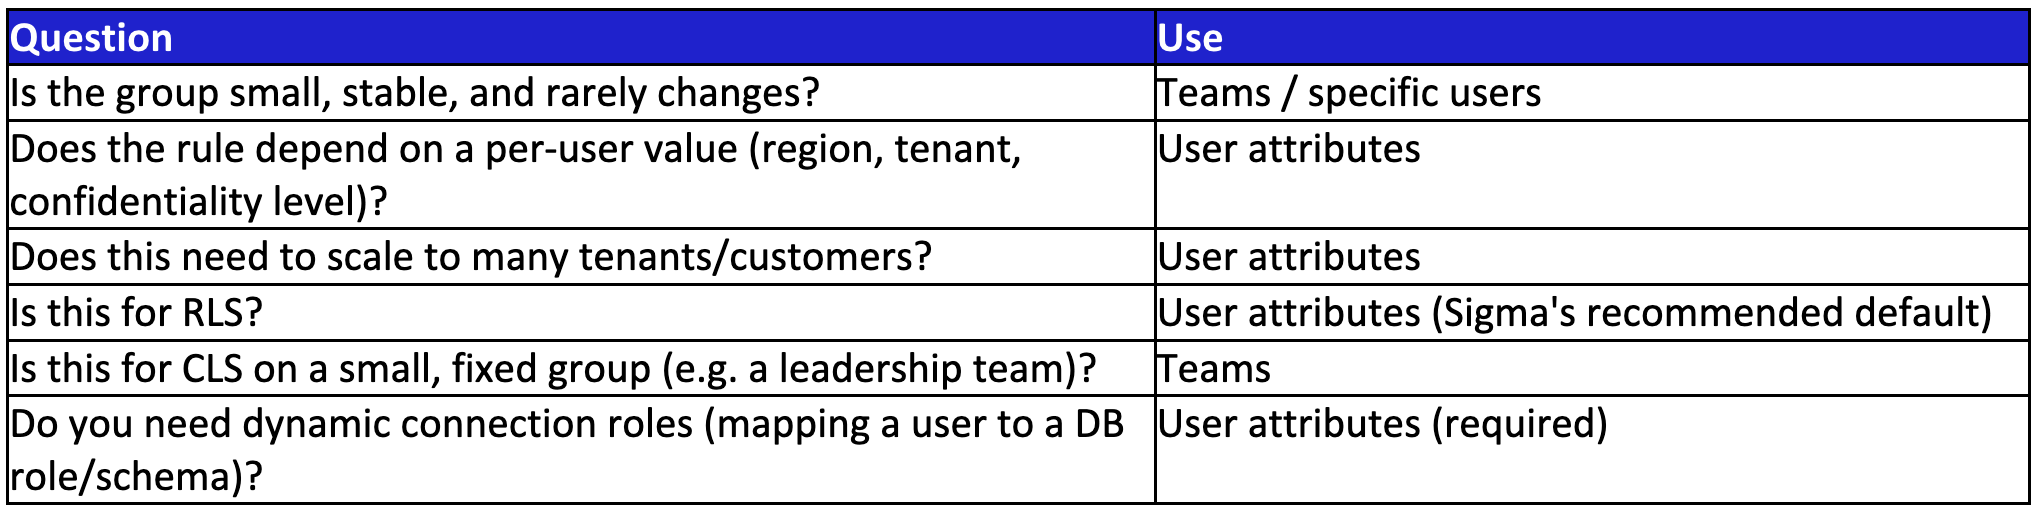
Teams tie in naturally to Security Assertion Markup Language (SAML)/Single Sign-On (SSO) group sync and are easy to reason about for a handful of static groups. Sigma explicitly recommends creating a team per access group rather than adding individuals one at a time. But teams don’t filter rows dynamically by value on their own; using them for RLS means building and maintaining a manual value-to-team mapping formula.
User attributes skip that translation step entirely: the value comparison happens natively in the formula, which is why they scale better as the number of distinct groups grows and are the recommended default for RLS.
When it comes to choosing between teams and user attributes to enforce CLS and RLS in embedded workbooks, user attributes are the only possible, and most secure implementation.
Part 4: Testing Your Configuration
Before shipping an RLS or CLS rule, the safest way to confirm it behaves as intended is to view the data model or workbook as the user would, without actually logging in as them. Sigma’s impersonation feature does exactly this.
- Only users with the Admin account type can impersonate another user; team admins cannot.
- Admins can only impersonate non-admin users.
- Every impersonation session is written to the audit log, recording both the impersonated user and the admin who initiated it.
- If a connection uses OAuth authentication, you cannot query data while impersonating.
To impersonate from the UI: go to Administration > Users, select the user, and click Impersonate user (a yellow banner confirms the active session, with a one-click way to stop it). The same action is available from the Teams tab, and programmatically via the REST API for automated testing. Full reference: Impersonate users.
Conclusion
RLS and CLS solve two different problems: Which rows, and which columns, users get access to, and Sigma lets you combine them freely within the same data model. The decision that matters most isn’t really RLS versus CLS, since most real implementations need both; it’s whether your access rule is membership-based (teams/users) or value-based (user attributes). Remember, CLS grants are additive, and test everything through impersonation before it ships.
For a deeper look at how these controls behave when enforced internally versus through an embed, including how to choose correctly between JSON Web Token (JWT) claims and embed URL parameters and which rule wins when several apply at once, see the upcoming second part of this post, “Advanced Row-Level and Column-Level Security in Sigma with User Attributes.”