
This blog post is Human-Centered Content: Written by humans for humans.
Snowflake recently released a suite of built-in functions that allow users to leverage AI functionality directly through SQL. These functions leverage powerful models (e.g. Anthropic, Meta, Arctic, etc) that are fully hosted inside Snowflake and can be used for a wide range of tasks.
In this post, I will demonstrate how to use Snowflake’s new AI SQL scalar functions using an example scenario: Extracting valuable information from images of lost items at an airport.
Why lost items at an airport? Airports are bustling environments where it’s all too common for travellers to accidentally leave behind personal belongings, especially when rushing to catch a flight. Airport staff frequently discover these lost items and face the task of cataloguing them accurately to ensure they are safely stored and can be returned to their rightful owners.
The goal of the implementation is to simplify the process for airport staff to log lost items efficiently and facilitate matching these records with lost property claims so that misplaced belongings can be returned quickly and accurately to their owners.
This is a perfect scenario to demonstrate these new AI SQL scalar functions.
While the complete code (including both the AI SQL components and the broader implementation) are available in a Git repository, this article will focus specifically on how to leverage the AI SQL functions.
Here’s a diagram of the overall architecture of our flow. This article will cover the setup for the three AI SQL functions referenced below:
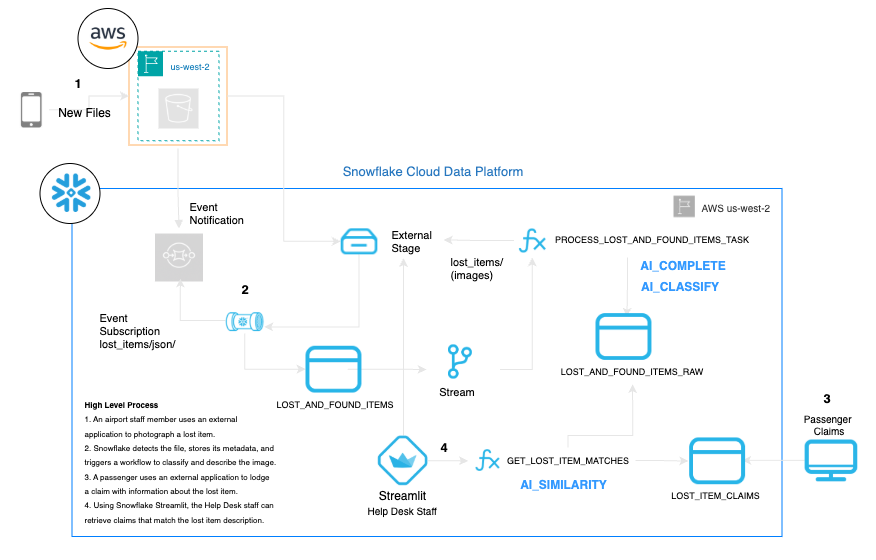
Above: The overall architecture. Highlighted in blue bold the items covered in this article. All the infrastructure required here could well be deployed leveraging solely Snowflake.
Snowflake AI Functions Used
At the core of the implementation we’ll cover here are a suite of built-in AI SQL Scalar functions that Snowflake released just a few weeks ago. Let’s first briefly introduce these before we put them into action:
AI_CLASSIFY
- What: Classifies text or images into set of pre-defined categories.
- In our solution: Analyse images of lost objects and assign a category (e.g. sunglasses).
AI_SIMILARITY
- What: Computes a semantic similarity score (0 to 1) between two inputs (text or images).
- In our solution: Compares AI-generated item descriptions with user claims to identify potential matches between the description of a user and that AI-generated.
AI_COMPLETE
- What: A flexible, general‑purpose function that can take any prompt and return a response, much like interacting with an LLM chatbot.
- In our solution: Extracts key details (colour, brand, features) from the main object of an image.
According to the official documentation, these functions cost between ~0.2 to 1.4 Snowflake credits per 1 million tokens, depending on the compute we use. We’ll talk about costing later in this article.
The Overall Architecture
The AISQL functions that we’ll use are part of a wider workflow. Just for context (feel free to skip to the next section), I am outlining below the end to end solution:
- An airport staff member uses an application to photograph a lost item. This application, external to Snowflake, stores the image and some metadata in blob storage.
- Snowflake detects these files and automatically extracts and ingests the data into the table LOST_AND_FOUND_ITEMS
- A Stream will trigger a Task (PROCESS_LOST_AND_FOUND_ITEMS_TASK) to pick up and use this data.
- The AI_ CLASSIFY and COMPLETE functions are used here
- The result of the previous step will be stored in the table
- Using an external application, the passenger can lodge a claim with information about the lost items. This data will be stored in the table LOST_ITEM_CLAIMS
- Using Snowflake Streamlit, the Help Desk staff will be able to see lost items that match the description of the claim.
- The AI_ SIMILARITY function is featured here
In this blog I will only focus on stepping you through the logic used for the AISQL Scalar functions. However, if you want to build the entire solution, fear not: you can find here a repository with all the relevant code I used. Plus I listed below several guides that explain each technology used:
- Snowflake storage integration with the S3 bucket guide.
- Snowpipe for automatic data ingestion guide .
- Snowflake Streams and Tasks to automate the workflow. Guide here.
- A soft intro to Snowflake Streamlit can be found here
Important:
AI SQL Scalar functions are only available in certain AWS regions — check the official documentation for supported locations. Also, some of these features are still in preview, so use them for testing and learning — not in production just yet.
With all that being said, we can now get started!
AI-Powered Image Description
To start with, I can assume that my workflow has automatically identified that several items have been found at the airport premises. Below the actual images I used that will act as lost items:
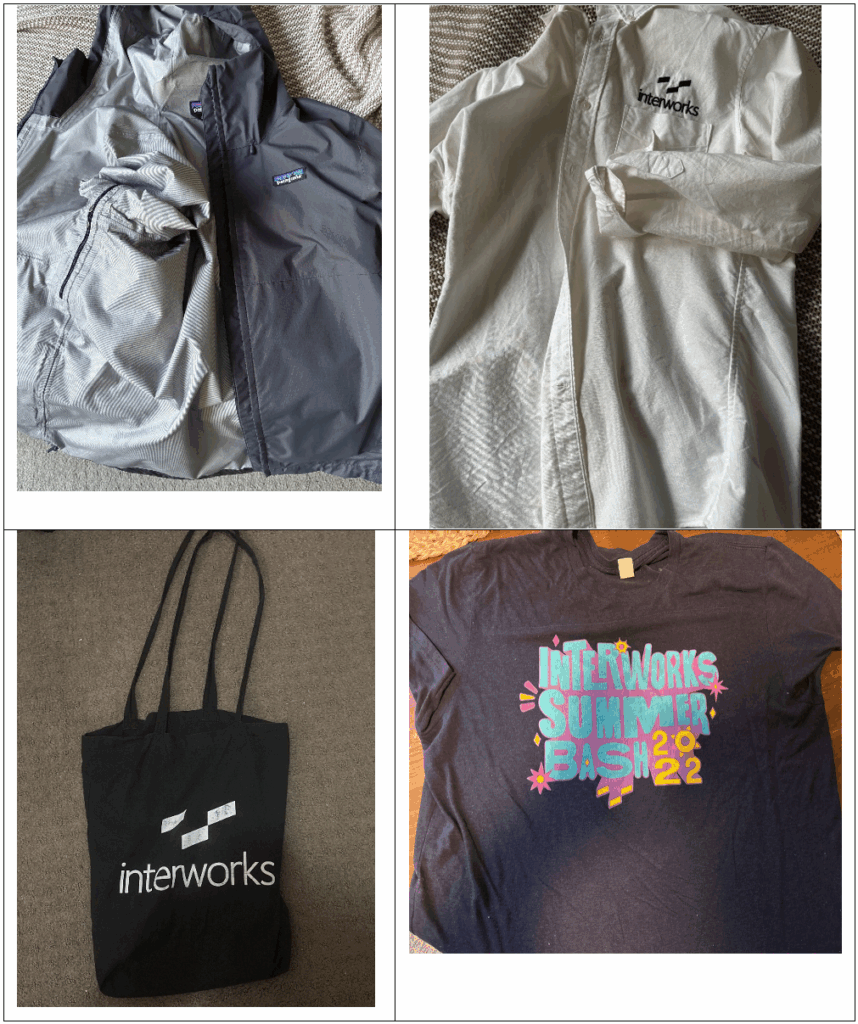
What’s the task at hand? In plain terms: to describe, catalogue and store the information of these items so future claims can be compared against this information. To achieve that goal, we’ll chain two functions:
- First, we use AI_CLASSIFY to ask an LLM to label an image with one of the categories provided.
- Second, we pass two parameters to the COMPLETE function: the image itself and a prompt that includes the category identified above – so that the LLM can be more accurate in describing the object.
See below a boiled down version of the code. Note that in the original code these functions are embedded within a larger Common Table Expression (CTE):
WITH classified_image AS (
    SELECT
        filename,
        AI_CLASSIFY(
            img, --- This is the image itself being referenced in blob storage
            ['bracelet', 'handbag',  … , 'cosmetics', 'sunglasses case']
        ):labels[0] AS classification,
        location,
        found_time,
        img
    FROM lost_item_image
),
item_description AS (
    SELECT
        filename,
        classification,
        location,
        found_time,
        PARSE_JSON(AI_COMPLETE(
            'claude-3-5-sonnet',
            'Describe the key characteristics of a lost ' || classification || ' as seen in this image. Respond in JSON with fields: item_type, color, brand (if visible), distinguishing_features, condition.',
            img
        )) AS item_details
    FROM classified_image
)
A few things about the above code:
First, as you can see the logic is quite simple and elegant: Classic Snowflake style.
Second, for AI_CLASSIFY make sure you put some thought the to the list of categories. In zero-shot classification this is particularly important, as the model will not autonomously come up with additional labels. Also, ensure you use descriptive categories, e.g. “Furniture” as opposed to “Category X.”
Third, in the case of COMPLETE we can define the model to use (in this case Anthropic’s Claude 3.5 Sonnet). There are several factors to consider when choosing a model. This is a good starting point on this subject.
Below you can see the output generated for each of the images:

The columns “classification” and “Item_details” hold the information generated by the LLMs. In the case of the latter, it’s a JSON object which, for the jacket image, looks like this:
{
  "brand": "Patagonia",
  "color": "Gray/Charcoal",
  "condition": "Good - appears clean and well-maintained with no visible tears or damage",
  "distinguishing_features": [
    "Patagonia logo patch on chest",
    "Zippered front closure",
    "Waterproof/technical material",
    "Appears to be a lightweight shell design",
    "Multiple pockets visible"
  ],
  "item_type": "Rain jacket/Shell jacket"
}
Considering the brevity of my prompt, the output is quite good: Notice how it picked up on the brand, and some of the key features of the jacket, in particular considering that I purposely placed the jacket on a clashing background. The same is true for the white shirt, which I purposely creased and folded a bit for the same reason:
{
  "brand": "Interworks",
  "color": "White",
  "condition": "Slightly wrinkled but appears clean and well-maintained",
  "distinguishing_features": "Black Interworks logo on chest pocket, button-down collar, long sleeves, appears to be a business/corporate style shirt",
  "item_type": "Button-up shirt"
}
The above data has automatically been stored to a table within Snowflake. Next, let’s see how we can handle the scenario of retrieving objects that match the description of a passenger who alleges to have lost a similar item.
AI-Powered Text Matching
When a passenger submits a lost item claim, they will be asked to provide some details of the object including some characteristic or distinctive features. There’s a commentary field alongside other fields such as category, location and contact details. Below a boiled down version of what one lodged claim looks like:
(
  'I left my white work shirt behind near Terminal 3, Gate 11. It’s an Interworks one with their logo on the chest pocket. It’s a button-up with long sleeves and a collar, pretty standard business shirt. Might be a bit creased but otherwise should be clean.',
  'Shirt',
  'Interworks',
…
  'Terminal 1, Information Desk #1102'
),
What we now want to do is to automatically match the description above with the text automatically generated in the previous step. That way, airport staff don’t need to manually compare and check each claim against the entire backlog of similar items. To achieve this we’ll use AI_SIMILARITY, embedded in a wider CTE below:
WITH found_item_details AS (
      SELECT
        filename,
        ITEM_DETAILS::STRING AS item_details_string,
        LOWER(classification) AS category_lower,
        LOWER(ITEM_DETAILS:brand::STRING) AS brand_lower,
        LOWER(TRIM(SPLIT_PART(location, ',', 1))) AS terminal_lower,
        LOWER(TRIM(SPLIT_PART(location, ',', 2))) AS gate_lower,
        found_time
      FROM LOST_AND_FOUND_ITEMS_RAW
      WHERE ITEM_DETAILS IS NOT NULL
    ),
    outstanding_claims AS (
      SELECT
        claim_id,
        commentary,
        LOWER(category) AS category_lower,
        LOWER(brand) AS brand_lower,
        LOWER(terminal) AS terminal_lower,
        LOWER(gate) AS gate_lower,
        claim_lodged_at
      FROM LOST_ITEM_CLAIMS
      WHERE status = 'Outstanding'
    )
    SELECT
      i.filename,
      i.found_time,
      i.item_details_string,
      ROUND(
        AI_SIMILARITY(
          i.brand_lower || ' ' || i.item_details_string,
          c.brand_lower || ' ' || c.commentary
        ) * 100, 2
      ) AS similarity_score_percent
    FROM found_item_details i
    JOIN outstanding_claims c
      ON i.category_lower = c.category_lower
      AND i.terminal_lower = c.terminal_lower
      AND i.gate_lower = c.gate_lower
    WHERE c.claim_id = claim_id_param --This parameter is used in the Streamlit App where this SQL is being triggered.
     AND i.found_time >= DATEADD(day, -1, CAST(c.claim_lodged_at AS DATE))
     AND i.found_time < DATEADD(day, 1, CAST(c.claim_lodged_at AS DATE))
    ORDER BY similarity_score_percent DESC
    LIMIT 3
Let’s break down this code. First, we are pulling together a) found_item_details: Where we’ve got all the details from the lost items that have been catalogued, and b) outstanding_claims, where we have all the active claims from passengers.
Now, here’s where the magic happens: The AI_SIMILARITY function takes the brand and the AI-generated description of the found item and compares it with the equivalent fields in the passenger claim. It then generates a similarity score. To keep things relevant, the code only compares items and claims that match on category, terminal, and gate, and focuses on items found within a day of the claim being lodged. We could also add an additional clause to return only records where similarity_score_percent is greater than 70% for example. Applying this logic, I can see the relevant claims have been shortlisted:

Notice that in three cases the score was greater than 70%. In the T-shirt case the system found a 44.9% similarity. Let’s see what happened there:
- Passenger Claim:
Brand: InterWorks
Commentary: 'I lost my favourite t-shirt at the airport, probably around Terminal 4, Gate 3. It’s navy or black with a bright, colourful print on the front—there’s some turquoise and pink writing, maybe a number 22, and a few little stars or flowers in the design. The brand is InterWorks. It’s a bit worn but still in good shape.'
- AI-generated description:
{
  "brand": "Not visible in image",
  "color": "Navy blue/black",
  "condition": "Used but good condition, some signs of wear visible in fabric",
  "distinguishing_features": "Colorful graphic design with text in turquoise, pink, and yellow colors, featuring decorative flower elements, appears to be related to a 2022 event or theme",
  "item_type": "T-shirt"
}
Two key factors drove down the similarity:
- Missing brand: The system could not infer the manufacturer of the t-shirt, yet the passenger assured that “The brand is InterWorks.” The assumption made here is that “InterWorks,” visible in the print, is also the manufacturer. Something that has not been defined as part of the business logic upon which this implementation was built.
- Vague user description: The print at the front of the t-shirt, the passenger claims, it includes “maybe a number 22”, something that the system captured much better, by correctly inferring that it “appears to be related to a 2022 event or theme.” This surfaces the need to ensure that any user input is always accompanied by certain guardrails.
It’s because of scenarios like the above that it becomes evident that turnkey models — and technology for that matter — may only take us so far by itself. The need to customise your workflows to handle your specific business requirements — whether it’s via Retrieval-augmented generation (RAG) processes, or by being more prescriptive about the input generated by your stakeholders — is more important than ever, as it’s what will truly make your LLM implementations go onto the next level of efficiency.
Costs Associated with Using LLMs in Snowflake
So how much did we pay from an AISQL perspective to process these four images? The query below allows us to surface this information:
SELECT
  c.QUERY_ID,
  c.FUNCTION_NAME,
  c.MODEL_NAME,
  c.TOKENS,
  c.TOKEN_CREDITS,
  c.TOKEN_CREDITS * 3 AS DOLLAR_COST, -- Calculates dollar cost per query at $3 per credit (Snowflake Enterprise Edition, AWS Oregon)
  DATEDIFF('second', q.START_TIME, q.END_TIME) AS DURATION_SECONDS,
  CONVERT_TIMEZONE('UTC', 'Australia/Sydney', q.START_TIME) AS START_TIME_SYDNEY,
  CONVERT_TIMEZONE('UTC', 'Australia/Sydney', q.END_TIME) AS END_TIME_SYDNEY
FROM SNOWFLAKE.ACCOUNT_USAGE.CORTEX_FUNCTIONS_QUERY_USAGE_HISTORY c
JOIN SNOWFLAKE.ACCOUNT_USAGE.QUERY_HISTORY q
  ON c.QUERY_ID = q.QUERY_ID
WHERE c.FUNCTION_NAME IN ('AI_CLASSIFY', 'AI_SIMILARITY', 'COMPLETE')
  AND q.START_TIME >= DATEADD('hour', -24, CURRENT_TIMESTAMP());
As you can see below, we are exposing the number of tokens which I can extrapolate to a dollar figure:

At the time of writing this article, we are literally talking about a few cents: the entire execution of LLM tasks costs less than 15 cents, with the most expensive query (AI_CLASSIFY) costing around $0.06. Why? Well, when it comes to running AI functions in Snowflake, the main thing to watch is how many tokens are counted and billed. The are four sources of tokens:
- Input tokens: The text you provide, plus any system prompts or labels, is included in the cost calculation.
- Output tokens: Any new text generated by the AI function may also be billed.
- System Prompt/Labels: Snowflake adds its own instructions or, for classification, includes your labels and examples with every input, increasing the amount processed.
- Per-Record Overhead: Any extra information, such as instructions or category labels, is counted separately for each item being processed. For example, if you classify 10 items with five labels, the labels are included in the calculation for each item, not just once.
To check the latest regarding pricing please do refer to the official documentation, which provides a good overview of the above and other considerations.
Conclusion
This implementation shows how you can use Snowflake’s built-in AI SQL functions to automate the process of cataloguing and matching lost property at airports, making it easier for staff to reunite items with their owners. By combining image classification, AI-powered description, and semantic text matching, we’ve built a workflow that’s both practical and adaptable.
If you’re interested in implementing something similar — or want to explore how Snowflake’s AI and LLM features could help with your own data challenges — feel free to reach out. It’s an exciting time for AI in data platforms, and this approach can be adapted to all sorts of use cases.