
Welcome back! Through the previous blog, we have understood why using Published Data Sources in Tableau can be beneficial, and we have set up our first Published Data Source in our Tableau Cloud or Server environment. Now, let’s take a look at some things we can do with our Published Data Sources once they are set up.
Benefit 1: Using Tableau Pulse
One of the most exciting new use cases for Published Data Sources in Tableau is using them for Tableau Pulse Metrics. If you are unfamiliar with Tableau Pulse, wondering how you can activate it within your organization or how you can leverage it for insights, please refer to the links a bit further down.
Tableau Pulse is available to Tableau Cloud customers and currently only works with Published Data Sources. Therefore, in order to use and benefit from Tableau Pulse, we need to set up Published Data Sources in our Tableau Cloud environment. If you need a refresher on how to do this, feel free to reference my first blog here.
Additional articles and references for Tableau Pulse:
- Blog: What are Tableau GPT & Tableau Pulse?
- Blog and Video: Tableau Pulse: Set Up and Use Case Demo
- Blog and Video: Find Your Path to AI: Getting Started With Tableau Pulse
Or search “Tableau Pulse” on our blog for more content.
Now that we have identified our first use case for Published Data Sources with Tableau Pulse, let’s take a look at another benefit.
Benefit 2: Single Source of Truth and Governance — Helping Users Find Trusted and Approved Data Sources
One of the best benefits of using Published Data Sources is that any updates to it will automatically be reflected in any connected workbooks or downstream assets.
In part one of my blog, I talked about how one of the main reasons we can and should use Published Data Sources is to increase trust in our data. There is nothing more detrimental to a long-term successful BI deployment than users losing trust in the data and tools that are provided to them. By establishing clear, governed processes and criteria for quality data, we can increase the trust in and reliability of our data.
As my colleague Paul put it in a recent blog, good data is:
- Governed
- Secure
- Up to date
- Performant
With a well-managed Published Data Source we can check all these boxes. We should strive to establish processes and guidelines that help us create, maintain and make available these types of data sources.
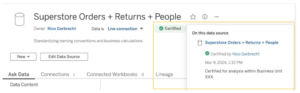
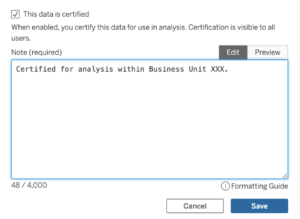
Ideally, I also want to make it easy for my end-users to find the approved Data Sources they should be using. Tableau gives us a neat feature here that let’s us add a “stamp of approval” to a Published Data Source, so to speak. This feature is called certification, and this is what it looks like to users:
Certifying Published Data Sources
Why would we do it?
By certifying a published Data Source, we can let our users know that a given data source has undergone extreme scrutiny and validation, and should be a preferred source for analysis. Often, we may have lots of similar or similarly named data sources floating around. By adding a certification, we can give our analysts the confidence of knowing which data sources are vetted, reliable and match our organization’s standards for quality.
Who can certify assets?
- Server or Site Administrators
- The owner of the asset
- The project owner of the project the asset is published in
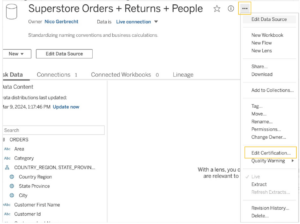
How do we add a certification?
Adding a certification to a data source is easy. All you need to do is navigate to the data source in your Tableau Server or Cloud environment and click the three dots on the top right for more actions and find the setting in the dropdown menu. In newer versions of Tableau Server or on Tableau Cloud, this setting can now be found under Data Labels > Certification.
Above: Settings on Tableau Cloud / Server to add a Certification
Above: Certification menu
One nice thing is that this certification is also displayed when users connect directly from Tableau Desktop or Tableau Server, or are searching our data sources.
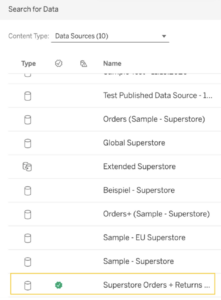
Above: Certification Label being displayed to users when browsing data sources
What can be certified?
We can certify more things than just published Data Sources, but you need Tableau’s Data Management License for this. If you have Data Management licensed in your environment, you can also certify virtual connections and virtual connection tables. If Tableau Catalog is enabled, you can also certify databases, tables and files. The step of adding a certification is the same as described above for a Published Data Source. You can find more info on Data Management in the last section.
Benefit 3: Using Published Data Sources for Better Performance
When we publish a data source to Tableau Server or Cloud, a few things happen. Calculated fields we’ve created are included in the new data source. Other objects, such as bins, groups, hierarchies and sets are included as well. When I set up parameters, those will also be included in the published data source for users to leverage as well. As you’ve probably noticed before in your everyday work, the more you add to a workbook, the more performance takes a hit, especially complex calculations and transformations. Moving as much data modeling, joining, transformation and calculating to the data source as possible is usually the way we want to go, to reduce unnecessary steps and workload in Tableau. By connecting to a single, combined and optimized data source, we can have significant performance improvements.
Evaluate whether a live connection or an extract makes the most sense for your use case. Using an extract on a schedule may help increase performance, so test out both options to find the best fit for you.
Benefit 4: Provide data for colleagues who don’t use Tableau Desktop
In some cases, some people may not use or have access to a local version of Tableau Desktop but have the ability to use Tableau on the web. In this case they can leverage Tableau Web Edit to create content and publish their own workbooks and analysis directly in their browser.
Using a Published Data Source
We’ve finally set up our Published Data Source. We have certified this data source and marked it as trusted and validated. Lots of users are eager and asking to connect, so they can build their analysis off it. This brings us to the question: How do we create content or a workbook from a Published Data Source? There are two main ways your users will interact with and connect to a Published Data Source:
1) Connecting to a Published Data Source from Tableau Desktop
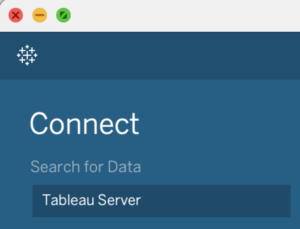
When you open a fresh Tableau Desktop Workbook, you have many different options of connecting to data. Published Data Sources are hosted on the Tableau Server (or Cloud), so we must choose the data option “Tableau Server” in our data connection pane.
Above: Choose Tableau Server to find Published Data Sources
Once we do that, and specify our Server URL, we will get a pop-up window with all available connections. Here, I can either choose the data source I want to connect to from the list or search for it in the top right. We can also see some additional info on how many workbooks are already connected to this data source, who the owner is and which project it is located in.

Above: Available data sources to connect to
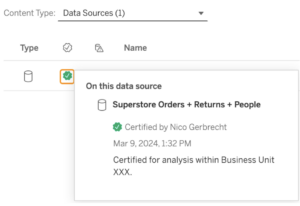
Above: Note that our certification shows up, along with the description, to give users additional context
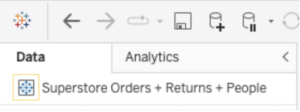
Once I click connect, I am then taken directly to Sheet 1 in my workbook. Published Data Sources have a different icon than other data sources, indicating we are working with a Published Data Source. It looks like this:
When you navigate to the Data Source Tab, you will notice a slightly different view than what you may be used to from working with other data sources. We don’t have our normal area, in which we can relate or join tables together, but rather a list of all available hosted data sources in our environment, highlighting the one we are connected to.
Important Note: Currently, there is no way to join or relate a Published Data Source to another Published Data Source, or another table within this one data source in Tableau. There are workarounds for this, such as utilizing Tableau Prep or blending for this, but it is not natively supported at the moment. Another way would be to incorporate the joins directly into the Published Data Source. How we edit a Published Data source is covered in the next section.
2) Connecting to a Published Data Source in Tableau Web Authoring.
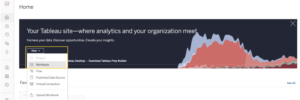
When working with Tableau on the web, there are a few different ways to connect. One way is directly from our Home screen. When we click the New button on our homepage, we get a dropdown from which we can create different types of content. When we choose Workbook i.e., we get an immediate pop-up that looks similar to the one from Tableau Desktop, in which we get an overview of all available data sources in our environment. From here we can connect to our Published Data Source.
Above: Adding new content from our Home Screen on Tableau Cloud/Server
Another way is to navigate directly to the Published Data Source we would like to use (via the Explore Menu or search, for example) and use the New button directly on the data source itself. This will not create a pop-up, as we have already specified which data source we’d like to use, and we will land straight on Sheet 1 of our new workbook. Note that we can also create a new Prep Flow, Published Data Source or Lens from these options.
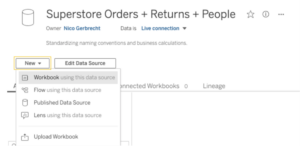
Above: Creating new content directly from a Published Data Source on the web
How to Edit a Published Data Source in Tableau
At this point, we have published our Data Source and many people are using it. We have gotten some feedback and have a few changes lined up that will improve the data source for all users.
Note that in order to edit a Published Data Source, you must have a Site Role of Creator AND be the content owner or have admin privileges. When we want to edit a Published Data Source, we have two main options.
Via Tableau Cloud or Server
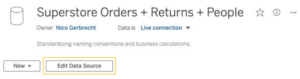
Editing a Published Data Source via Web Edit is easy. Navigate to your data source and click the Edit Data Source button.
Above: Edit a data source directly on Tableau Cloud/Server
From here, we will land in the Web Edit editing environment, where we can make any edits we choose directly in the data source. New calculations, re-naming, and other edits will take effect in this Test version immediately. Within the Scratchpad we can test and validate our changes right away before deciding whether to publish these changes or not. You can also hit Publish As and create a copy of the data source that you can then validate and test further, before applying changes to the original data source.
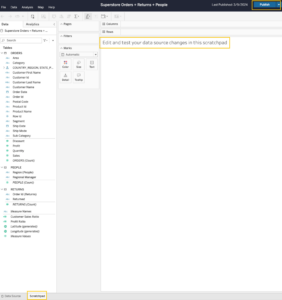
Above: Edit and test changes in the scratchpad
If you need to revert changes to the previous version, you can click File -> Revert to Published to roll back to the latest published version.
Via Tableau Desktop
There is another way of editing a Published Data Source. You can download the data source, open it in Tableau Desktop, make your edits and then re-publish the data source. This works the same way as doing it directly in Web Edit. If you need a refresher on this process, please refer to the publishing portion of my first blog on this topic.
Tableau Data Management
The Data Management offering of Tableau adds many useful features and additions to our Tableau deployment. Here I will focus specifically on some cool additions around data governance and Published Data Sources.
Data Labels – Data Quality Warnings and Data Sensitivity Labels
A very nice feature of Data Management is the ability to add Data Quality Warnings to data sources and other assets in our environment. What does that mean and what do they look like? They look like this when displayed to users:
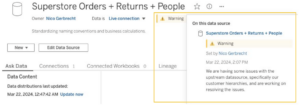
As you can see, I have indicated a warning to users that we are facing some downstream data source issues and are working on resolving them. This lets users know right away that there is an issue with the data source and it is under investigation, without me needing to answer dozens of emails individually.
How to Set Up a Data Quality Warning
Navigate to your data source and click the three dots at the top, next to the name of the data source. Depending on whether you are on Cloud or Server and which version you are on, you will find the Quality Warning option either below Edit certification (as in the screenshot further up in the certification section) or under Data Labels -> Data Quality Warning.
This is the Data Quality Warning Menu, which is fairly self-explanatory. Here we can enable or disable the label, choose the type of data label we’d like to display and add a message. It is worth noting that our data labels can be customized in newer versions of Tableau Server/Cloud (2023.3 and later), so you can create custom data labels. Tableau has a great resource article on this here.
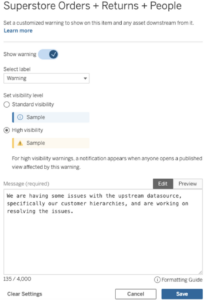
Above: Data Quality Warning Menu
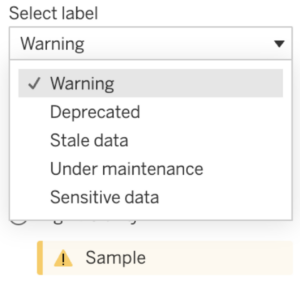
Above: Data Quality Warning default label choices
This label is also displayed when users connect to this data source from Tableau Desktop, which is nice:
Another great feature is that you can add Extract or Flow Run Monitoring and generate automatic Data Quality Warnings if they fail. Tableau’s Help article on how to do this is here.
Lineage
Another feature that comes with Data Management is Lineage. One of the biggest challenges of good data governance is understanding and evaluating potential impact of changes we make. For example, if I want to make changes to a Published Data Source, I would like to understand which Workbooks are connected to it that may be impacted. Furthermore, I would like to know the workbooks’ owners, as well as a quick overview of how many dashboards are built on this data source. I am able to see this clearly through Lineage.
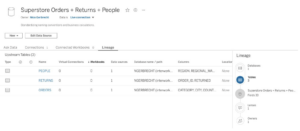
To open the Lineage view, navigate to your asset, a Published Data Source in this case, and click on the tab Lineage.
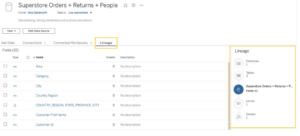
Above: Lineage tab on assets on Tableau Cloud / Server
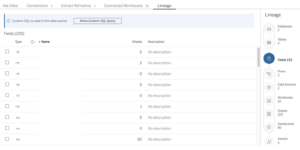
Here, I can quickly see the up- and downstream dependencies of the asset I am viewing. For example, I can see that our data source is made up of three different tables, coming all from the same database. I can see that our data source contains 33 fields, that it has one owner and that one Lense was created from it. All of these items are interactive and I can click on them to find out more information. For example, by clicking on the Tables item, I can see the name of the three tables that make up this data source, as well as the database location, along with where each column comes from.
Above: Lineage View on tables included in this data source
Here is another example with a bit more connected. As you can see, we can also see connected Flows, Sheets and Dashboards. We can also see that this data source uses Custom SQL, which I normally wouldn’t know until I opened the workbook.
Above: Lineage view on a busier data source
If you are the owner of a Published Data Source, you can quickly analyze how the data is comprised and what happens downstream of it. This is a great feature if you would like to further understand impact. On the other hand, if you are a data consumer and you would like to understand where your data is coming from, Lineage can help you find this out by viewing your upstream dependencies. You can find a more detailed overview of Lineage here.
Virtual Connections
Last but not least, let’s talk about Virtual Connections, which are also part of Data Management.
What Are Virtual Connections?
Virtual connections are not the same thing as Published Data Sources and they are their own asset type in Tableau, like Workbooks, Flows and Published Data Sources. They let us establish a centralized connection to groups of tables in a database that we can govern with additional policies and row-level security, as well as allowing us to store one central set of credentials WITHIN this virtual connection, so other users can leverage it and create their own content from it.
Why Would We Use Them?
Often times, not everyone in the organization has direct access or credentials to the underlying database. The people that do have access to the database may not be best suited or able to create and maintain shareable content, like Published Data Sources. Virtual Connections let us centrally manage and govern credentials, security and policies, making it easier on us to manage, as well as further democratizing our data within the organization.
If you’re short on time, I made a quick diagram showing the main difference between a Virtual Connection and a Published Data Source:
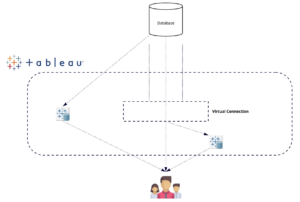
Basically, Virtual Connections allow users access to the data that otherwise have no direct credentials for the database. Tableau Cloud or Server hosts the connection and takes care of security and permissions for us. Users can build directly off Virtual Connection or create Published Data Sources from these themselves (right side). Of course we can create a Published Data Source directly from the data source (left side), as we have covered previously.
I won’t go into more detail here on how to set them up, because my colleague Paul has already written a great blog article on this, which you can find here. There is also a great blog post from Sanjeev at Tableau, announcing this feature back in 2021.
Conclusion
Published Data Sources in Tableau are powerful. Many of the features that come with Data Management, such as Virtual Connections, Data Labels and Lineage are a great addition that make Tableau governance a lot easier and take our use of Published Data Sources to the next level.
Please don’t hesitate to reach out to us for any questions you may have on the discussed topics. We are happy to assist.