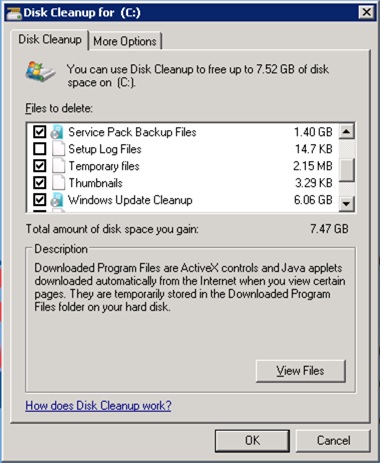
I finally found some good information for cleaning up the WinSXS folder on new instances of Windows. I found the following site extremely helpful:
Consequently, I was able to get 7GB of data cleaned up from the WinSXS folder on the first Server 2008R2 machine I followed this process on.
Here are the basic steps:
1. Make sure the server has Server 2008R2 SP1 or newer.
2. Download and install the Disk Cleanup Wizard Add-on (http://support.microsoft.com/kb/2852386) for your version of Windows 7 or Server 2008 R2. I believe it is now built into newer versions of the OS, but haven’t had a chance to verify yet. If you are using Server 2008, you will also need to add the Desktop Experience Feature and all required components (this WILL require a reboot to take effect).
3. After the add-on and features have been fully installed (and the system rebooted if necessary), search for Disk Cleanup under System Tools.
4. Open the Disk Cleanup and select the drive with the WinSXS folder (typically the C drive or system drive).
5. Let the Disk Cleanup run. I’ve seen some images where Windows Update Cleanup is right on the main Disk Cleanup tab. Others have you click on the Clean Up System Files button on the bottom-left of the Disk Cleanup window and have it re-scan.
6. Once either option is selected, you should see the options to cleanup Service Pack Backup Files and Windows Update Cleanup like listed below. These two options will “safely” remove items from the WinSXS folder and free up space. Remember that once these items have been removed, you will be unable to revert back to an older service pack state and/or possibly remove updates from the system that are causing problems. Also, make sure you have a good backup. If you are unsure how this will affect your system, skip this as a possible cleanup option.


