This is the second post in an ongoing series that compares new and improved features in Veeam 8 to those in Veeam 7. This article highlights the major new features in replication jobs. You can find all posts within this series on our Veeam 8 vs. Veeam 7 channel. To view a list of changes for Veeam 8, see this article. If you’re setting up Veeam 8 for the first time, you can check out this step-by-step install guide.
Veeam recently released Veeam Backup and Replication v8, which included over 200+ new features. For organizations that utilize the replication feature within Veeam, there are some exciting new changes that may significantly impact how the replica jobs may be structured. These include:
- Selecting a backup repository to replicate VMs
- Introduction of built-in WAN accelerator for Veeam Replicas (Veeam Enterprise Plus required)
- Larger threshold for replication time-out in the event connectivity is lost to the DR site
This article discusses some of those changes and some considerations that may need to come into play when adjusting your replication jobs or creating new replication jobs.
To view a list of changes for Veeam 8, see the following article: http://www.veeam.com/blog/v8-feature-announcements-major-replication-enhancements.html.
Configuring a Veeam 8 Replication Job
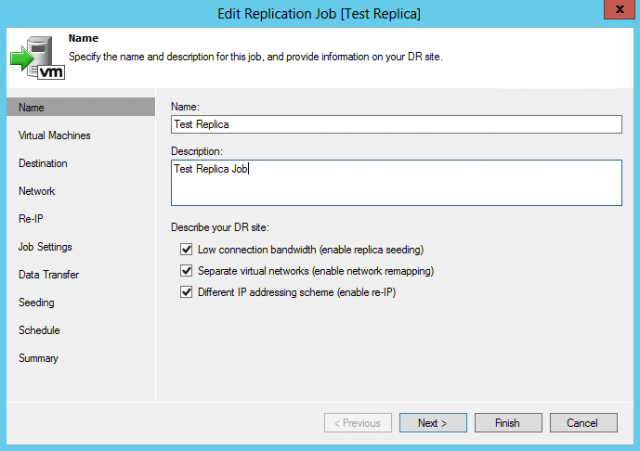
For the purposes of this article, I have checked all three DR options:
- Low connection bandwidth (enable replica seeding)
- Separate virtual networks (enable network mapping)
- Different IP addressing scheme (enable re-IP)
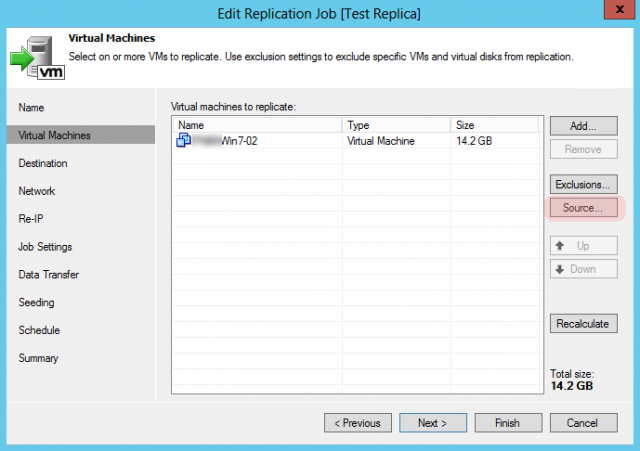
The first noticeable feature added in Veeam replication is the new Source button available in the Virtual Machine location. It is important to understand that although Veeam incorporates both backup and replication into their product, they are fundamentally two separate features. To provide a quick description of each, a Veeam backup is an actual backup file that contains a VM or multiple VMs whereas Veeam replica is an actual virtual machine that sits on a hypervisor at a DR environment.
Veeam is a snapshot-based backup technology. This means that when a backup runs, there is a snapshot of the virtual machine while it is being backed up and a second snapshot (assuming both backup and replication features are being used) while it is being replicated.
When the Veeam backup or replication is complete, a snapshot remove request occurs on the hypervisor. For businesses running high I/O processes that are running on an older SAN, if this snapshot removal occurs during business hours, this can have devastating effects to business-critical applications.
With Veeam 8, Veeam admins now have the ability to choose to utilize an existing backup file/repository versus taking a snapshot. Assuming enough bandwidth is available, this allows admins the ability to now push replication during business hours without admins impacting their virtual environment.
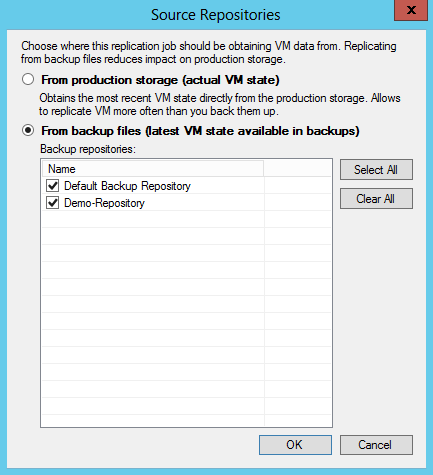
Once source has been clicked, the repositories housing the backup data can be utilized. Keep in mind that this is an all-or-nothing kind of selection for the job. If some replicas need to stay on the production storage and others from a backup file, multiple jobs will need to be created. See selection at the bottom of this article labeled Understanding Selecting Backups as a Source for additional data regarding using your backups as a source.
Note: This article is assuming that both backup and replication are being handled by a centralized Veeam server. If you are utilizing a second Veeam instance to split backups and replication, this may be the time to revisit how Veeam has been structured in your environment.
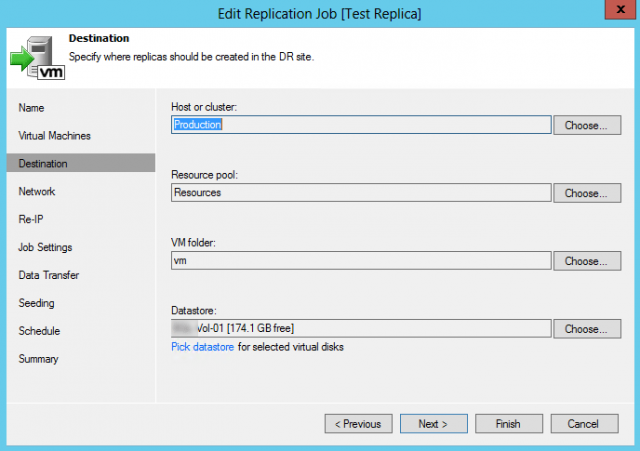
The next menu is identical to the Veeam 7 menu. Select the Host or cluster, Resource pool, VM folder, and Datastore to use at DR.
One item I am frequently asked about is what needs to happen if the landing zone datastore fills up at DR. If space on the landing zone datastore fills up and a cluster or vCenter Server is being utilized under the Host or cluster area, replica VM’s can be migrated to a new datastore as long as Veeam has the proper credentials to access those datastores. A common mistake I see is that admins try to modify the datastore within the job settings. This will break your existing replicas and cause issues.
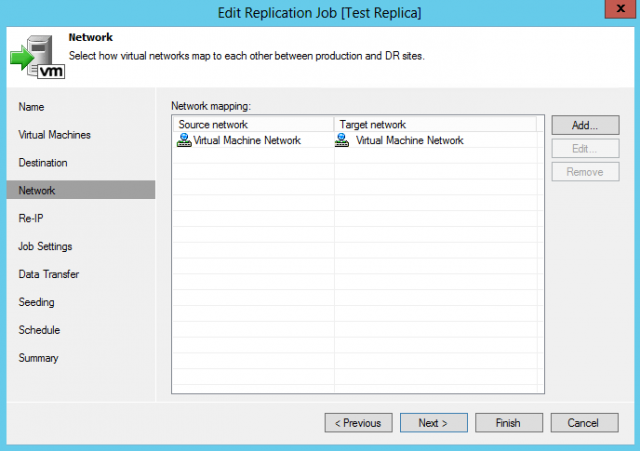
On the Network menu, you can utilize Network Mapping to automatically connect replicated virtual machines to a network at the destination side. In my example, the target network has an identical name to the source network.
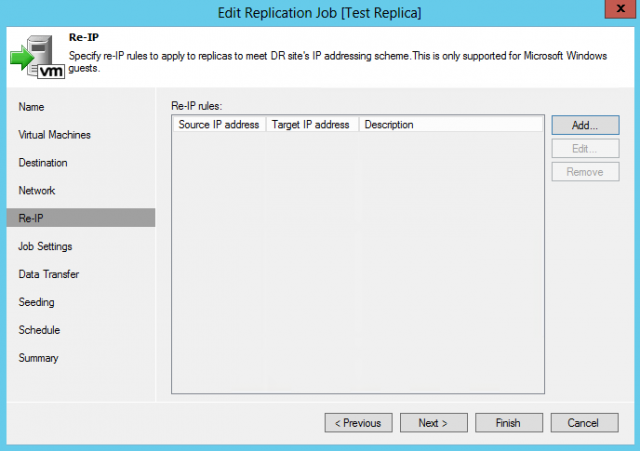
If destination servers need to be RE-IP’ed to the DR schema, that can be selected on the next menu.
It is crucial to fully understand your infrastructure setting up any sort of DR plan. As with any backup/replication program, it should not be assumed that functionality will just work by default when powering up a machine or that utilizing a pointer IP will be able to reroute all traffic. For example, many businesses point MX records directly to an external IP address that is located at their headquarters/primary building. If a failover to DR occurs, that external IP address may not be available at DR, meaning that MX records will need to be changed. Depending on where DNS is hosted, this means that it may take 48 hours for mail to come online. Although Veeam significantly simplifies how backups and DR are handled, it is imperative that an actual DR playbook and tested to fully understand the unique qualities of an environment.
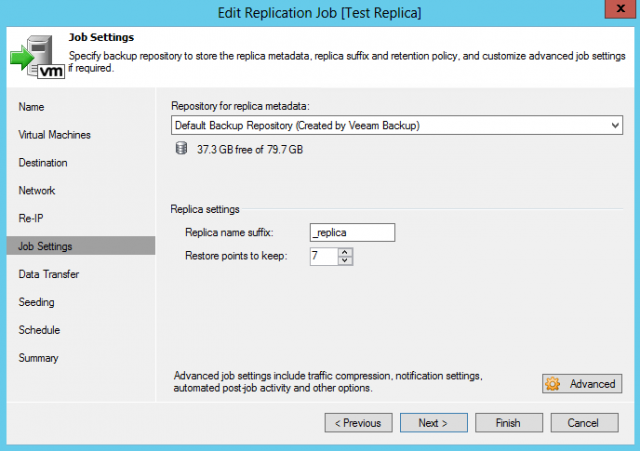
On the next screen, select the repository for the metadata for the replica. The metadata is used by Veeam for the processing of the replica job and to keep track of the info at DR such as number of restore points. Although the metadata is not required for the virtual machine to be manually powered on at DR, the metadata should be located on storage that is easily accessible for the Veeam server processing the actual replication job.
Under Job Settings, select the number of restore points to keep. Veeam’s best practice states that this value should not be set to under “3” replicas. If the number of restore points is set to “1” and a replication fails, it is possible that the entire replica may be lost and the entire VM may need to be reseeded.
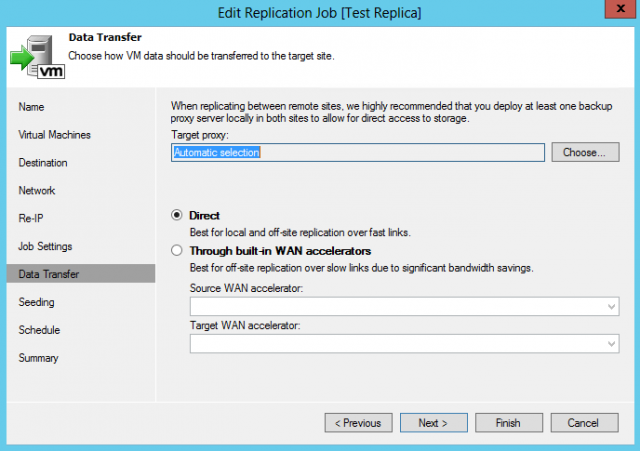
Data Transfer within the options will change depending on whether the source is using From production storage (actual VM state) or From backup files (latest VM state available in backups). However, in both cases, the newly-added WAN Acceleration feature is available for anyone that has the Veeam Enterprise Plus license. Veeam admins now have the option to select Through built-in WAN accelerators if WAN accelerators have been configured.
If From production storage (actual VM state) is selected, Veeam admins will have the ability to select both the source and target proxy. By default, Veeam does a pretty good job of detecting which proxy should be utilized and will notify admins within the console if ESXi hosts are not on the same subnet.
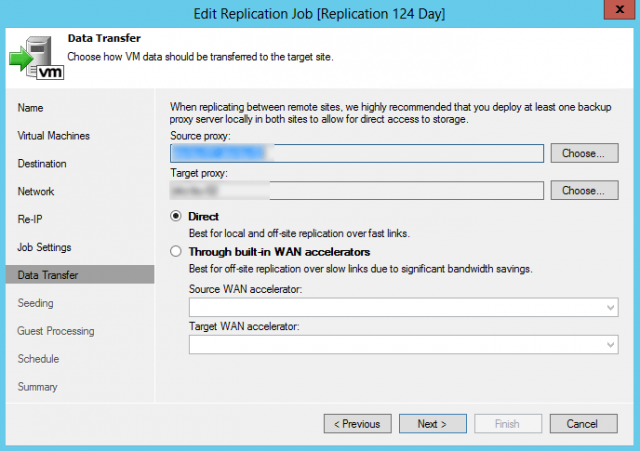
If the From backup files (latest VM state available in backups) option was selected as the source, only the target proxy will need to be selected as Veeam will be pulling directly from a backup file. Keep in mind that the compression rate configuration may impact your replication times, particularly if HIGH or EXTREME are selected as this data has to be decompressed at the DR side.
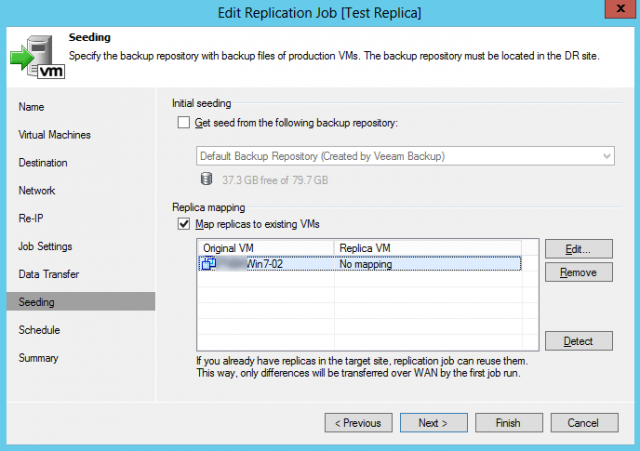
If Low Bandwidth Seeding was selected on the very first menu, a Veeam user will have the ability to either use a backup file or can map to an existing VM if the VM already exists on the DR environment.
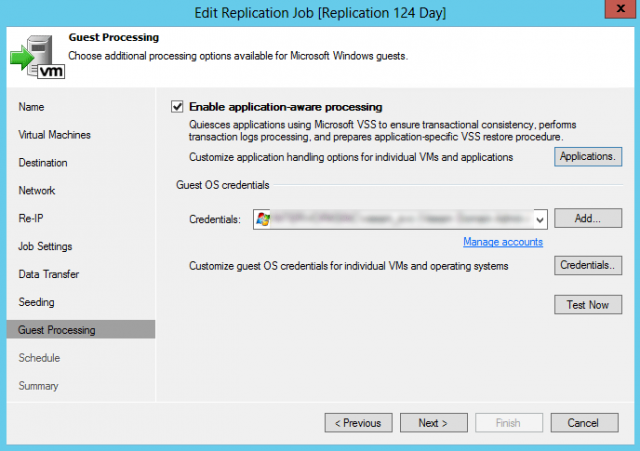
If From production storage (actual VM state) was selected for the source, Veeam admins can utilize application-aware processing on the replica VMs. However, this window will not appear if From backup files (latest VM state available in backups) was selected as all the guest processing configuration was configured in the backup job.
Under the schedule window, if the From backup files (latest VM state available in backups) is being utilized, it may now make more sense to restructure replication to run immediately after the associated backup jobs run and finish.
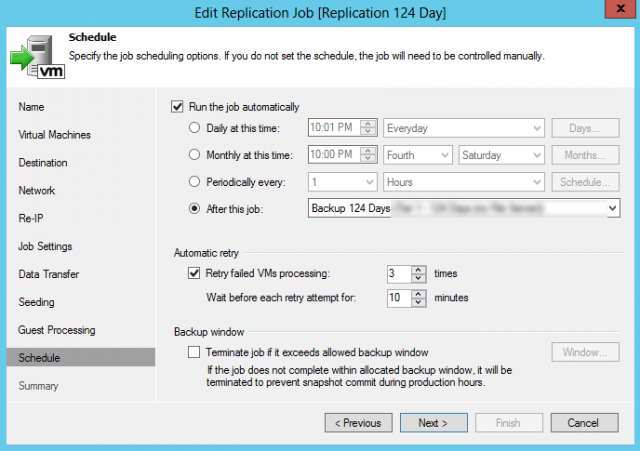
From the GUI perspective, the menu is very similar to Veeam 7. An example has been shown below for viewing purposes:
Veeam 8: Understanding Selecting Backups as a Source
With the idea that backups can now be selected as a source, a few intuitive alarms/warnings/errors have been shown below with short descriptions on why they may occur. One example that not shown in a screenshot below is that backups will always take priority over replication when utilizing the backup as a source feature. If a backup job starts while a replica job dependent on that backup is still running, the replication job will be cancelled and the backup job will run as expected. Other examples have been shown below with screenshots and a short description:
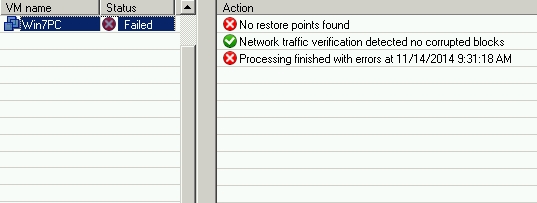
If a replica job is initiated and the virtual machine does not exist in the backup file being used, the virtual machine will display “No restore points found.“
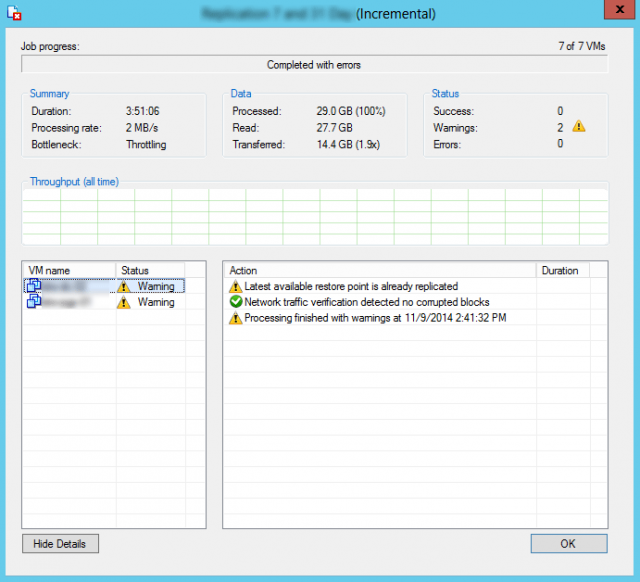
If your organization has a requirements to have a higher number of replication points than the backup jobs, it may make more sense to utilize replication from the virtual environment versus the back repository. In the screenshot below, the replica job was manually run before the backup job had run, so Veeam displayed a warning that the “Latest available restore point is already replicated.“
Additionally, if you have different disks on the backup side versus replication side, a backup jobs may need to include the disk or consider having the replica point directly to the VM environment instead of the backup file. In the screenshot below, Veeam showed the notification that “One or more disks that excluded in the source backup job are included in the replication job.“

Veeam 8: New Failover Plan Feature
In addition to the Veeam Replication modifications, Veeam has introduced a new Failover Plan feature that significantly facilitates both DR testing and executing an actual DR scenario. To learn more about the new Failover Plan feature, visit the Veeam 8 vs. Veeam 7: Failover Plan article.
This concludes the Veeam 8 vs. Veeam 7: Understanding Replication Jobs article. To learn more about Veeam, visit http://www.veeam.com.

