
In the world of data, getting near-real-time data is kind of like the holy grail for reporting. The benefits are easy to see: reporting on things as they happen opens up a world of decisions that didn’t before exist. While I could write a full series of blogs on the use cases and caveats of this approach, today on the blog, I am excited to share how you can use Snowflake’s Snowpipe tool to automatically ingest data into your Snowflake account as it is generated.
The output of our work today will create a pipeline flowing into Snowflake that is near real-time and can be used to power a larger analytics process or dashboard. In this blog, I am describing the setup for Snowflake on AWS; however, Snowpipe is also available in Snowflake on Azure (and is coming soon to Snowflake on GCP).
What Is Snowpipe?
Before we get into the weeds, here is a brief overview of what we will do in this blog:
- Brief introduction to Snowpipe
- Recycle some Python code from one of my old blogs to create a constant stream of data to an Amazon Web Services S3 bucket
- Go over the steps required to configure and create a Snowpipe object to load this data (Snowflake and AWS requirements)
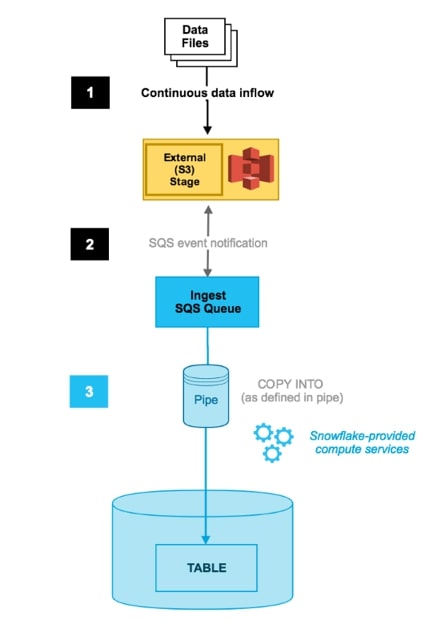
Above: Snowpipe using SQS. Image courtesy of Snowflake Docs
So, what is Snowpipe? In its most basic explanation, it is a COPY command sitting on top of a cloud storage location (managed either by yourself or by Snowflake). This COPY-command-as-a-service has a few key traits that make it worth paying attention to:
- Snowpipe’s continuous data ingestion service loads data within minutes after files are added to a stage.
- The cost associated with Snowpipe is purely the warehouse cost for how long it takes to load the data.
- Snowpipe uses a combination of filename and a file checksum to ensure only “new” data is processed.
What does Snowpipe do for you? Well, it removes a few barriers to building out near-real-time pipelines. If you look at the whole process, you have three distinct processes that need to occur to deliver real-time datasets:
- You need to be able to extract data to a location in real-time.
- You need to be able to distribute that data into a system that will not queue or wait to process it.
- You need to insert the records from that system into your warehouse.
Snowpipe completely automates the last two pieces of that equation in a way that is intuitive and easy to set up. If you’re using Snowflake and want to deliver near-real-time datasets, now all you need to do is build a process that gets that data to cloud storage. Snowpipe does the rest.
Creating a Stream of Data
To start our lab, I need a process that will continuously generate data. Luckily, we can build out something quickly by recycling some Python code I wrote a few years back and scheduling it to run every minute in AWS with a Cloud Watch Rule. This script targets the darksky.net API and uploads the response to my S3 bucket. You can download and check out the code at the bottom of this post.
Our data source is going to be a very exciting feed of the weather in my beloved Stillwater, Oklahoma, served up to us in a beautiful JSON document. Our typical API response will look like this:
Okay just kidding (kind of). Our actual API response looks like this:
{"latitude":36.115608,"longitude":-97.058365,"timezone":"America/Chicago","currently":{"time":1579292654,"summary":"Overcast","icon":"cloudy","nearestStormDistance":4,"nearestStormBearing":214,"precipIntensity":0,"precipProbability":0,"temperature":42.3,"apparentTemperature":35.35,"dewPoint":39.97,"humidity":0.91,"pressure":1018.1,"windSpeed":13.17,"windGust":26.78,"windBearing":172,"cloudCover":1,"uvIndex":2,"visibility":7.331,"ozone":302.5},"offset":-6}
To get our feed working, I will upload my code into an AWS Lambda function and create a CloudWatch rule to trigger it. After confirming the data is being created in my S3 bucket, we can start playing with the fun stuff—getting our pipe configured:
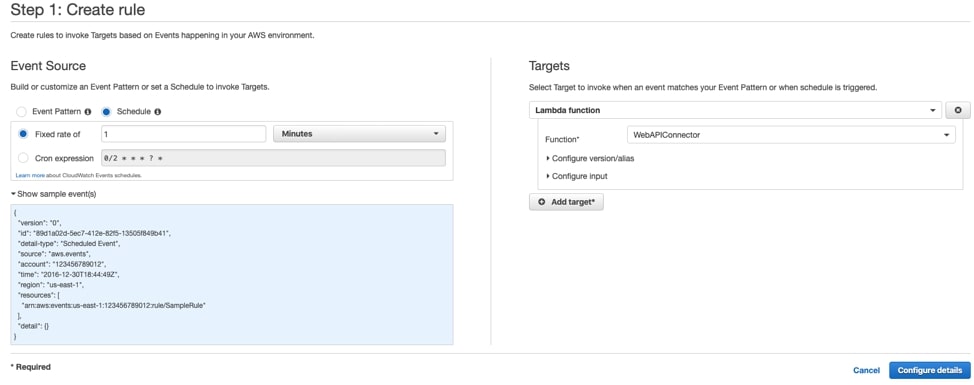
Above: Example CloudWatch rule targeting our Lambda Function
Laying the Foundation for Snowpipe
First, let’s look at a list of everything we need to build for Snowpipe to work:
- Snowflake Stage
- Table
- Snowflake Pipe
- S3 Event Trigger
Each component above creates a decoupled job that keeps data fresh. Let me tell you about each piece below as I build it. Our stage acts as Snowflake’s connection point to the S3 bucket where our data is being created:
create stage snowpipe_stage
url = 's3://iw-holt/DarkSky/Currently';
After the stage has been created, we are going to want a table to move data into. One of the things I like about this Snowpipe process is that we can pass metadata about our pipeline into the table. Because I know I will want some of that metadata, I’ll go ahead and create a hash, load time, filename and file row number column to live alongside my JSON response:
create or replace table stillwater_weather(
records variant,
_sha256 varchar,
_load_time timestamp_tz,
_file_name varchar,
_file_row_number int);
Building the Snowflake Pipe
Now that our table and stage are created, we are going to build the pipe that moves data from the stage into the table. This is going to be an object called a pipe, and it is wrapped around a COPY command. We are going to turn on the option for auto_ingest, and specify the file format of our source data: JSON. If you look at our COPY Command here, you can see the metadata columns I am generating while data is loaded. Additionally, the $1 column you see below is going to be the contents of my JSON file:
create or replace pipe darksky_snowpipe auto_ingest=true as
COPY into stillwater_weather(records, _sha256, _load_time, _file_name, _file_row_number)
from(
  select
  $1::variant
  ,sha2($1)
  ,current_timestamp::timestamp_tz
  ,metadata$filename
  ,metadata$file_row_number
  from @currently_stage
)
file_format = json
on_error= skip_file;
Now that our pipe, table and stage are ready to go, all we need to add is the last piece of the puzzle: our S3 Event Trigger. After creating your pipe, we can run the command SHOW PIPES to reveal the SQS queue our Snowpipe object is orchestrated by:

Let’s copy the value from this notification_channel column and move it into the S3 console.
Within the AWS S3 console, after navigating to the root folder of your bucket, we will create an event under the Properties menu. The event will send a message to an SQS queue for every object create event in the designated key path (this should be the path that your data is being created in). Here is what my event looks like:
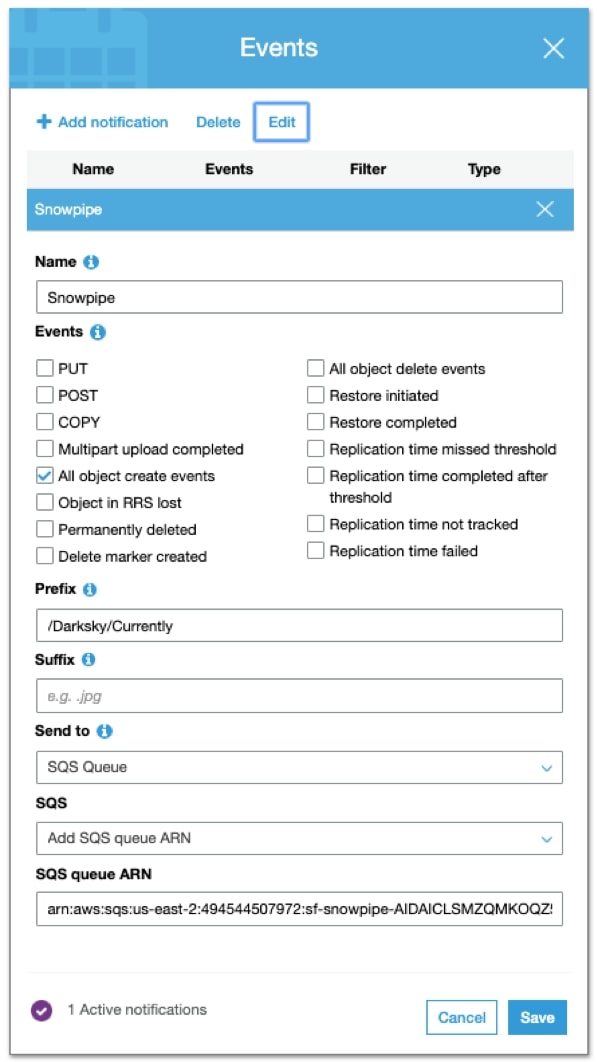
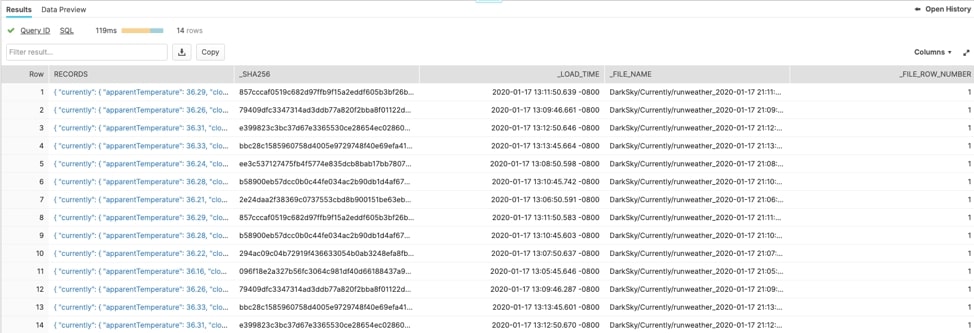
After we hit save, boom! That’s it. As our script creates new data, our S3 bucket sends a message to Snowpipe that new data is ready to load. If we pop back over to the Snowflake UI, we can select from our table and see that data is now being moved as it is generated by Snowpipe:
Now that the pipe is created, here’s a command to see what the pipe is up to. This will show you some metadata about what the pipe is doing:
select system$pipe_status('YOUR_PIPE_NAME);
Completing the Buildout
Now that our pipe is replicating data continuously, there are a few ways we can integrate it with our existing reporting layer. We can either look at flattening our data into a view or moving the data around our environment with other Snowflake gadgets (streams, tasks and stored procedures). Ultimately, the decision is up to you. Keep an eye out for a follow-up to this post about maneuvering data around the environment after it’s been landed, or feel free to message me on LinkedIn if you need any help!
Overall, Snowpipe is one of the coolest features on Snowflake, and with the growth in streaming desire, it should absolutely be at the forefront of your analytics strategy.