
This is a blog series about our new storage solution: the Discovery Series from DataGravity. It covers why we selected the solution. We'll continue through our initial journey from selection to standardization, deployment and testing.
There are a handful of pre-requisites to cover before embarking on the configuration journey. Please review my prior article in this series if you haven’t already. Then, come right back.
You now should have information on your various IP addresses, and the network should be configured. Now that those prerequisites are out of the way, the configuration will be a breeze!
1. Assign a Static IP Address
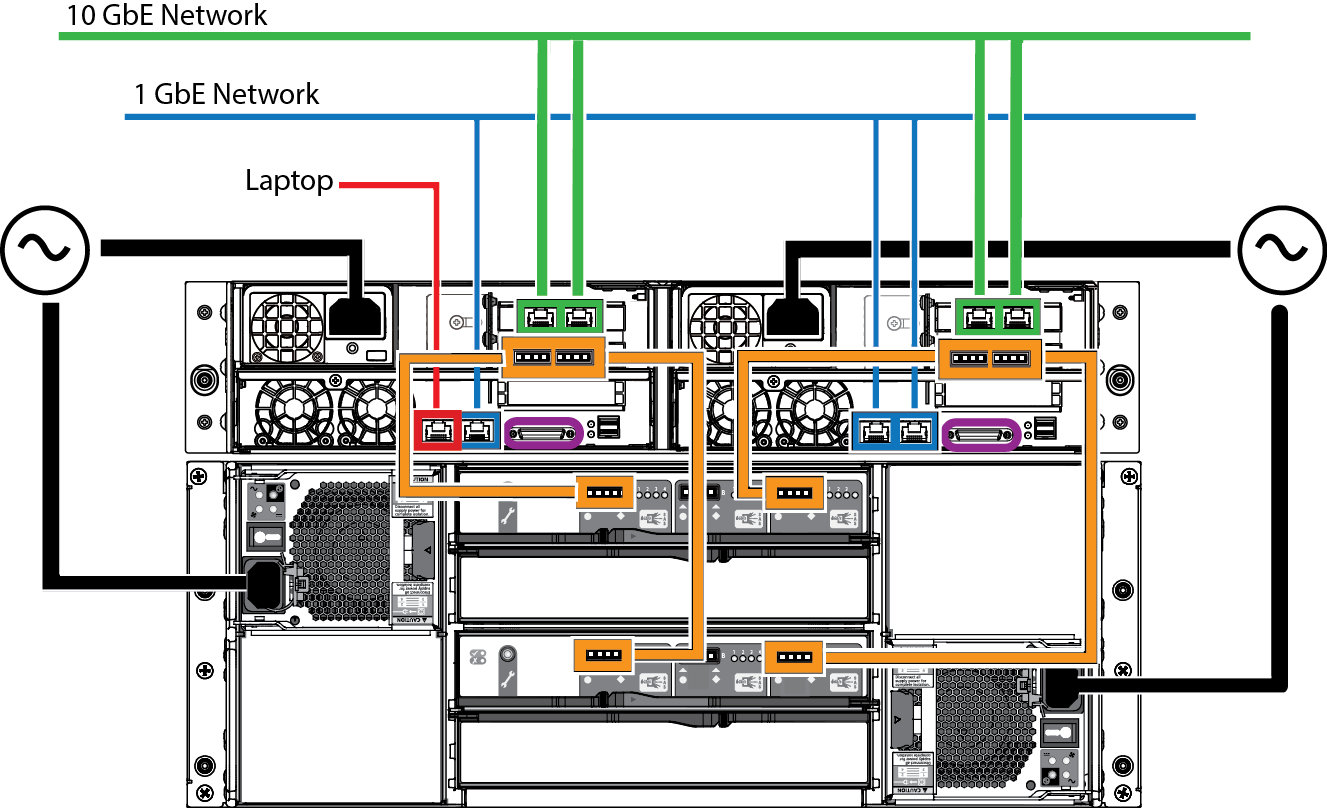
Grab a laptop and configure a static IP address on your Ethernet interface. Set the IP address to be within the network of 192.168.250.0/24, excluding 192.168.250.250. Configure yourself to be 192.168.250.1 with a subnet mask of 255.255.255.0.
2. Temporary Connection
Connect an Ethernet cable between your laptop and the eth0 port on controller 0 (far left, see image below).
3. Pull Up a Recent Web Browser
Google Chrome, Mozilla Firefox and Internet Explorer are all supported. They all work well for the configuration and management, but we have found Mozilla Firefox to be best in handling general system management.
4. Login
Navigate to https://192.168.250.250 and log in with these credentials:
Username: admin
Password: dg
We encountered an issue with a failure to log in when utilizing ESET Endpoint Antivirus where the TCP connections were being dropped. A quick workaround is to add an exception or disable protocol filtering. We are continuing to work on a more permanent solution.
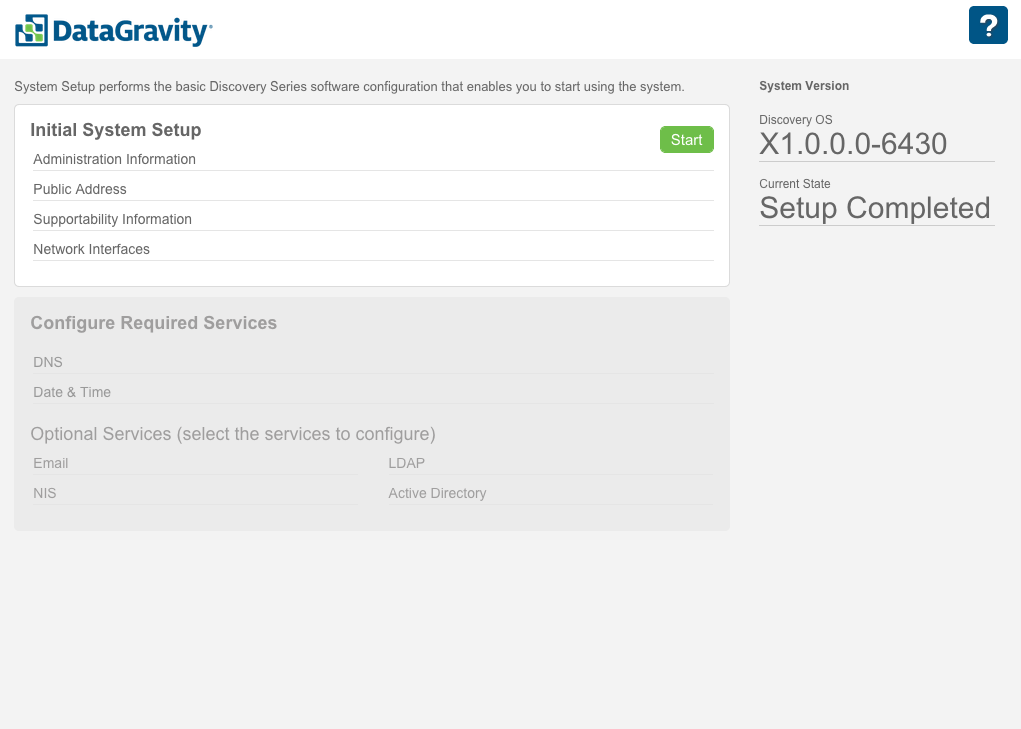
5. Launch the Initial Setup
Click the green Start button to launch the Initial System Setup.
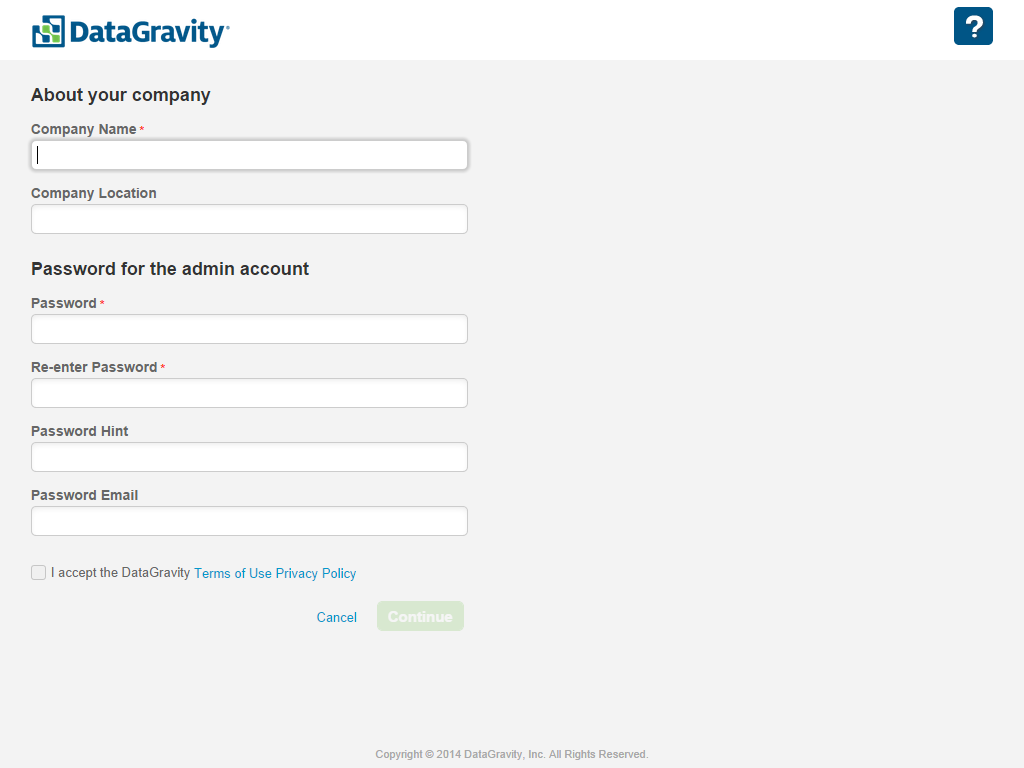
6. Provide Company/Admin Information
Fill in the form, review and accept the Terms of Use. This will update the admin password for the Discovery Series system. Be sure to document it securely! Click Continue when finished.
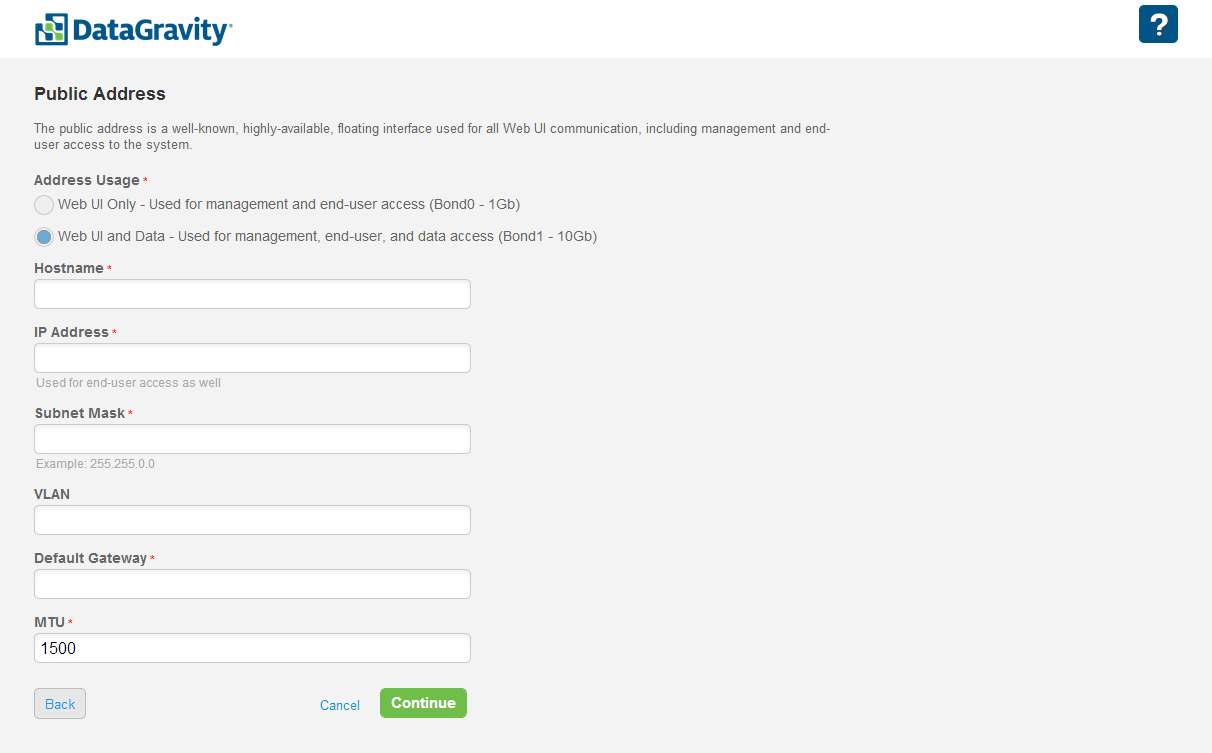
7. Configure Your Network
This is where you choose your network mode – split 1Gb / 10Gb vs. straight 10Gb. We have opted to go for straight 10Gb, so the Web UI and Data option gets selected. Provide your host name – just a simple host name (domain will be specified later). Also, configure your virtual Public IP address, subnet mask, gateway, VLAN information and MTU.
On the MTU setting, remember that you are configuring the Public Address here. This is for management and CIFS/SMB. Jumbo frames tend to be used for iSCSI and NFS, and they will be configured later since those protocols can be configured end to end to avoid mistaken fragmentation issues.
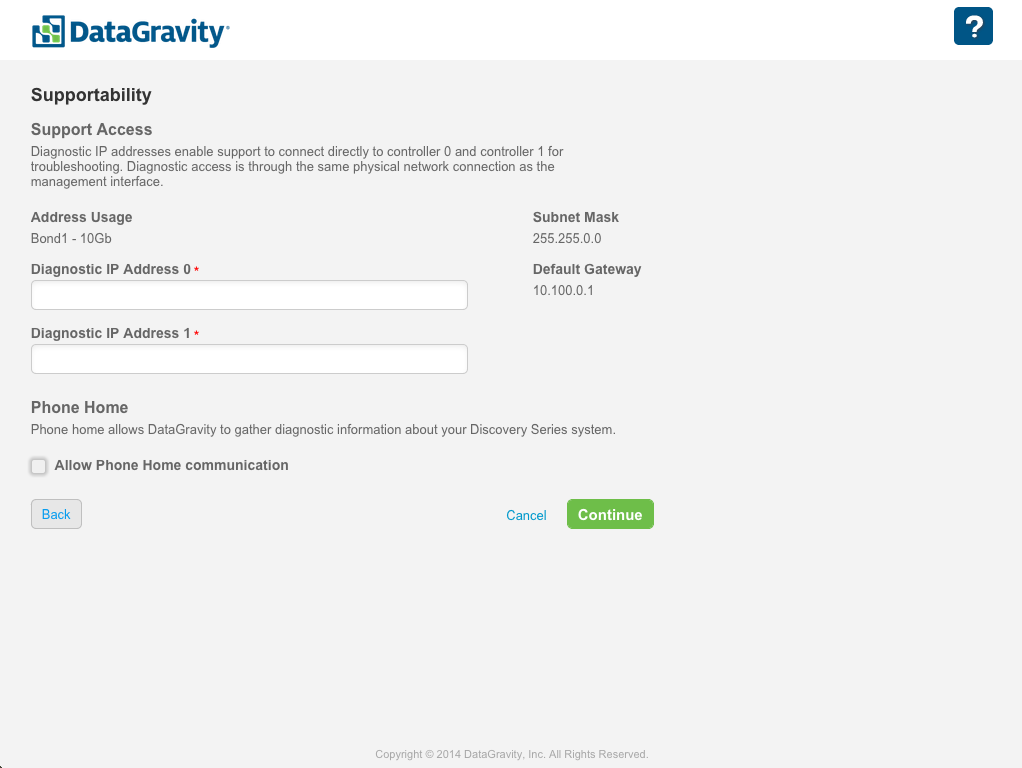
8. Configure Support Access
Remember earlier in the series, we discussed the use of the Diagnostic IP addresses. They are used for the outbound communication from each controller as well as inbound traffic to each controller for support purposes. They are integral to the successful setup and operation of the Discovery Series. If the two controllers cannot communicate with each other, the setup process will have issues in the future (especially testing and setting DNS servers).
Set the IP addresses you set aside for each controller here. They are on the same network as the Public IP Address.
We recommend enabling Phone Home. It can be skipped and enabled as needed to engage with support if that’s your preference. They have reached out as a courtesy with a request to look into some smaller internal issues with things like performance and content indexing on unknown file types. That’s a considerable value-add, so it will stay enabled for now. This feature does not permit access to any data, just diagnostic information. Click Continue when done.
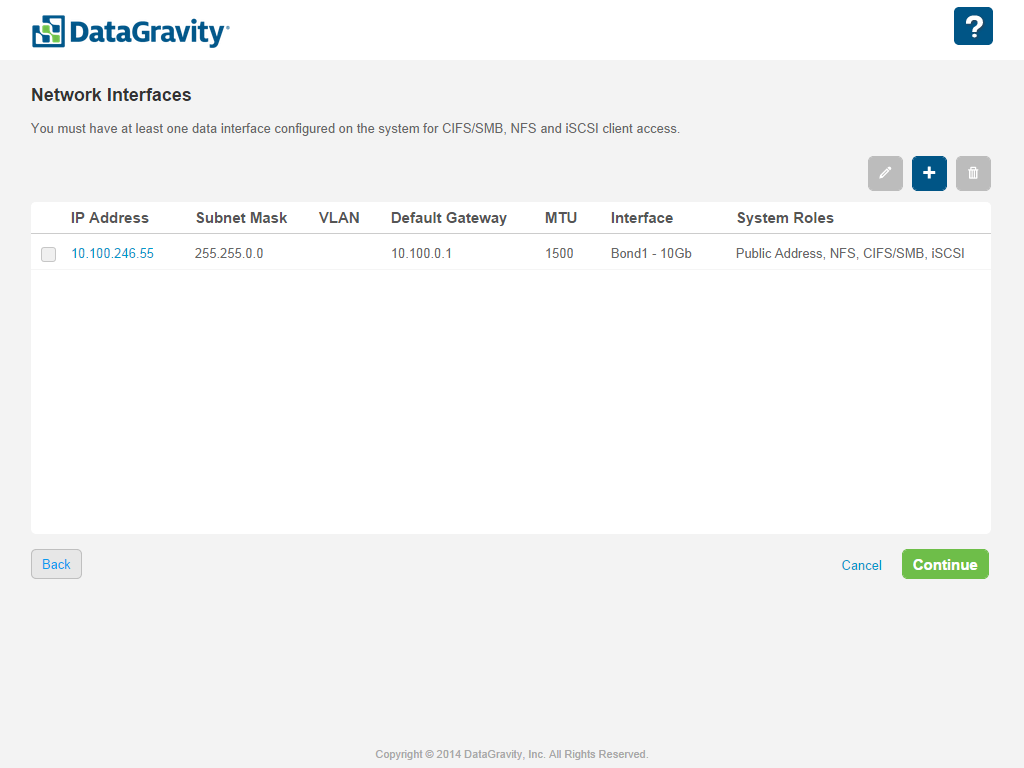
9. Configure Network Interfaces
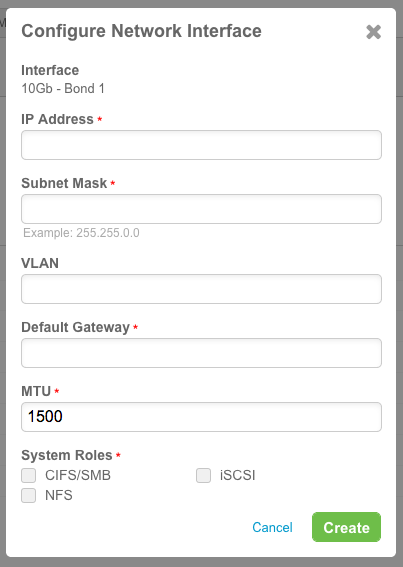
Here’s where you can tie in your storage networks (iSCSI, NFS, or split off CIFS/SMB). Click the Add button (the blue +) for each you want to add.
The popup window below will appear, and you’ll enter the IP Address, Subnet Mask, VLAN information, Default Gateway, MTU and System Roles for the storage network you’re adding. Click Create to add it to your list of Network Interfaces. Repeat for however many storage networks you’re adding.
For my network, I added one iSCSI and two NFS networks, all with an MTU of 9000. Double check your IP addresses, VLAN tags, MTU sizes and service bindings. If everything checks out, click the green Continue button on the original Network Interfaces screen.
10. Finalize
You’re done with the first part! Disconnect the laptop, and access the array using the same web browser. Go through the normal network path. The URL will be https://
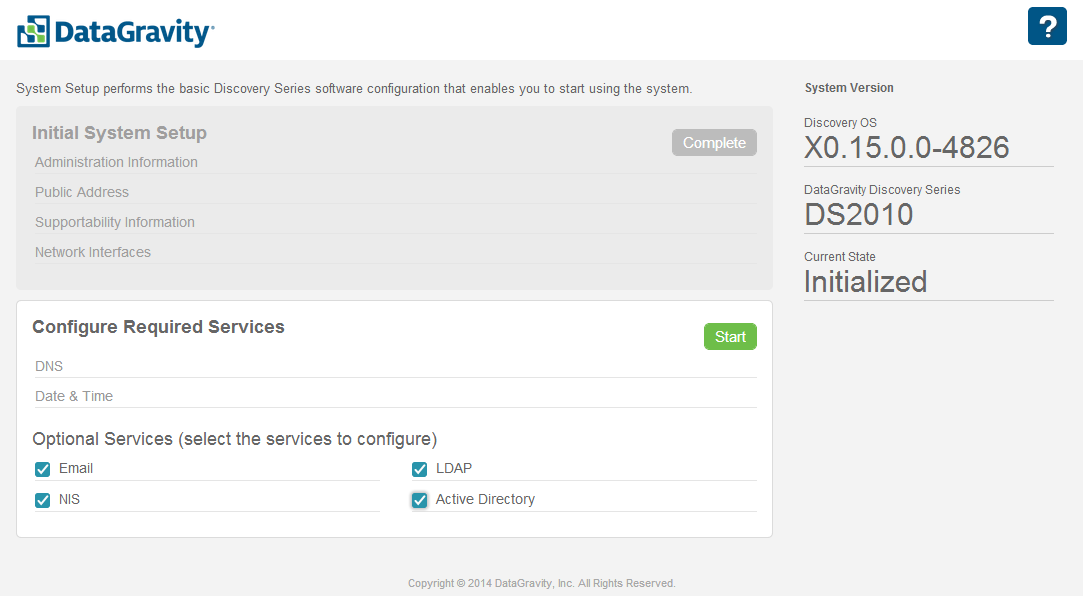
At this point, we’re onto service configuration. You need to configure DNS and time settings. You can optionally set up Email, LDAP, NIS and Active Directory. Click the green Start button.
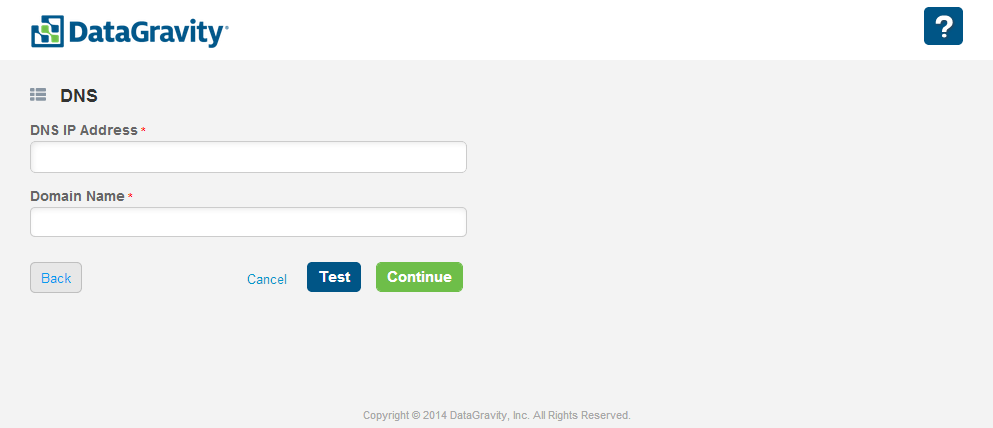
11. DNS Setup
Specify IP addresses separated by spaces or tabs. You will see each IP address break into a blue configuration item. You must have one but can have up to five.
Specify your local domain name below. Click Test to verify the servers, and then Continue to move along. It is important to have both the Diagnostic 0 and Diagnostic 1 IP addresses working perfectly for both the testing and synchronization of the settings.
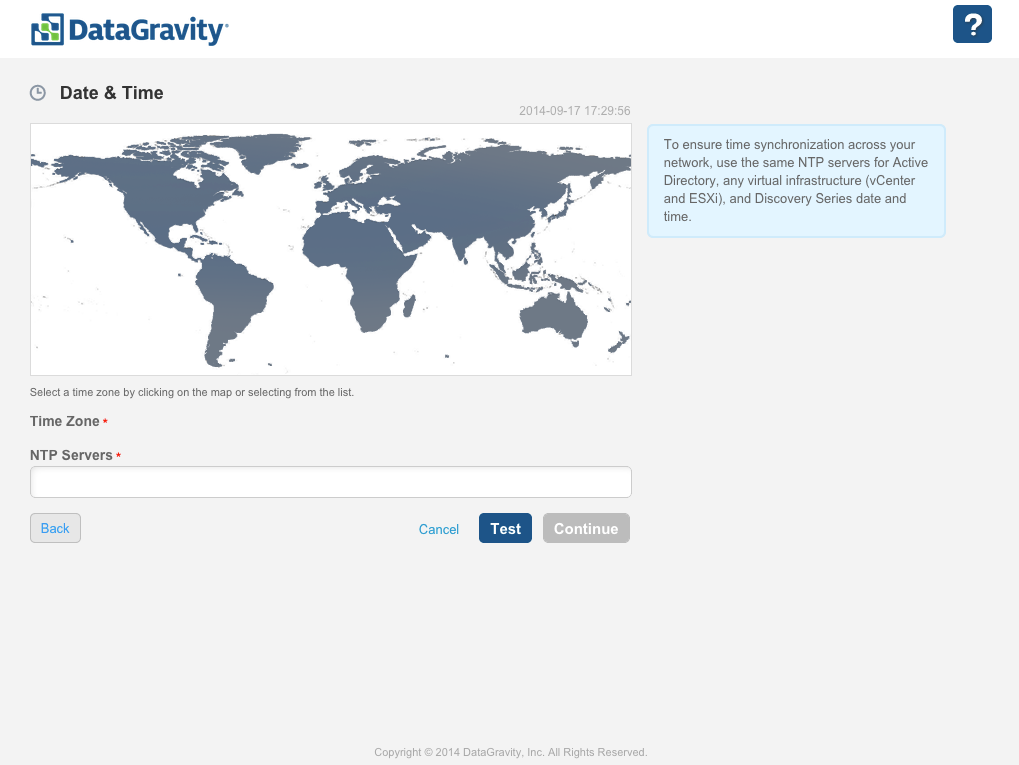
12. Date & Time Setup
Click on where you are on the map, and specify a couple of name servers. Set this to an internal or external working time server. If you would like to configure a Windows Server to do this, check this article. For external, I’m a big fan of the NTP Pool Project, so utilize 0.north-america.pool.ntp.org and 1.north-america.pool.ntp.org.
Click Test to check the servers, and then click Continue to save the settings and proceed.
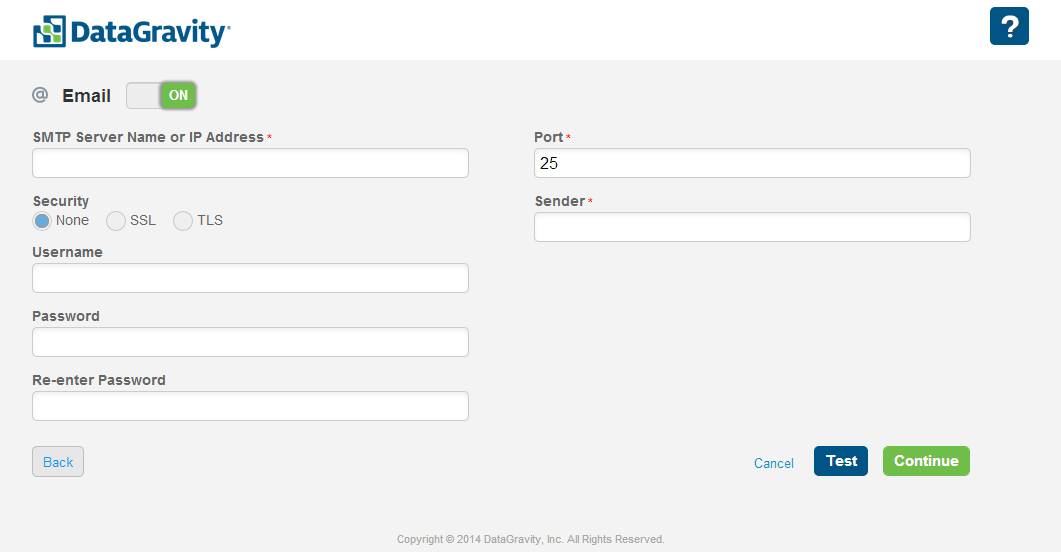
13. Email (SMTP) Setup
This is another optional but highly-recommended setup. Email is essential for real-time notifications of system health. Configure the necessary settings for your SMTP server along with encryption and authentication services. Use the Test feature to enable email sending, so you know there are no delivery restrictions in place. Approving the sender in your spam filter is a recommended action too! Click Continue to move on.
14. Active Directory Setup
This is an optional service but can help to provide logins for administration, end-user access and a useful mapping of users to file-level activities.
Turn Active Directory to On, set the AD Domain Name and click the green Initialize button. In the popup window, provide a single-use account username and password to join the Discovery Series to the domain as a domain member. The user must have rights to join computers to the domain but nothing past that. Moving forward, the array will be able to query user and group information as needed.
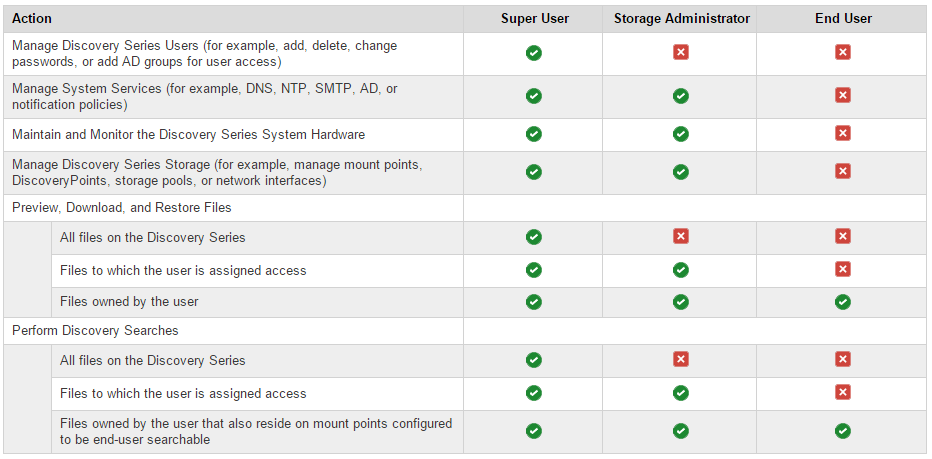
Next, specify relevant active directory groups for the Super User, Storage Administrator and End User. Please create new groups and utilize groups aside from Domain Users and Domain Administrators.
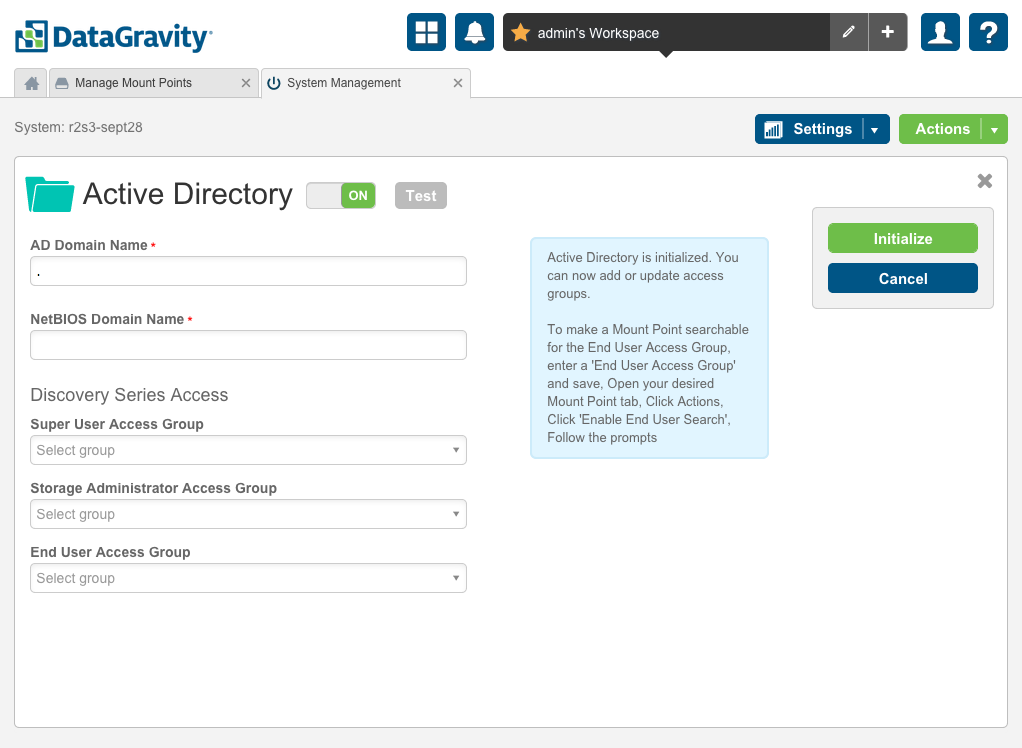
Below is a snapshot of the differences in the roles from the official documentation. Click the green Continue button to save the configuration.
At this point, open up a new browser session (InPrivate, Incognito, Private Window) to test authentication as each of the three user levels.
I won’t go into the specifics of LDAP and NIS setups. Things are fairly self-explanatory, as you’ve hopefully noticed by now. If you want to dive right in, head on over to the Storage tab and create some Mount Points.
More to Come
The next article in the blog series will cover volume planning and provisioning of storage on a Discovery Series array. If you’d like any further information on the solution, please don’t hesitate to reach out! We’d love to answer any questions you have, and it doesn’t matter where you’re located – we’re all over the place too!
If you haven’t yet, be sure to check out our other posts within this series: