Snowflake has transformed how businesses manage and interact with data, providing a powerful platform for handling large-scale data processing, analytics and integration with modern tools. One of Snowflake’s standout capabilities is its integration with Document AI, which allows for automatic extraction of data from documents.
In this article, we’ll present a basic use case and explain the key steps to start using Snowflake Document AI.
If you are thinking about using Snowflake Document AI in a production environment, it’s important that you familiarize yourself with the model capabilities and the use of Snowflake’s proprietary LLM. You can read more about this in the official documentation.
Let’s Talk About the Use Case
The Accounts team of a fictional company (named “ABC Corporation”) is looking for financial reconciliation of the invoices they received from several freelancers they have engaged for a project. The intent is to understand for each of the freelancers the services provided, the amount and tax paid and whether these invoices are being paid on time. Below is an example of one of the invoices:

This data is unstructured. The datapoints contained in it are not placed within columns or rows, and the disposition of most of the elements do not follow a table-like format. As it stands, we cannot simply build reports on this data and analyse it.
We could open each invoice and manually type this data into a system; but luckily, we have a much more accurate and efficient way of solving this: Snowflake Document AI (from now on “DocAI”).
In this article, we’ll explain the steps to create, train and deploy a model within Snowflake that will automatically capture all this data.
What Do You Need to Follow This Article?
- Access to a Snowflake account with privileges to create roles and objects
- Unstructured data in the format of files. In my case, I will use invoices in a PDF format. Make sure that your files adhere to this criteria.
- These files will need to be stored in blob storage in either Azure, AWS or Google Cloud
Let’s get started!
Checking Access and Permissions
Before diving into the Snowflake components, you’ll need to have the files you want to analyse in blob storage. Snowflake will need to have access to these files to processing its data. If you haven’t already set this up, feel free to follow one of the tutorials my colleagues created explaining this setup for Azure or AWS.
To start using DocAI, also make sure that your Snowflake access already allows you to use the DOCUMENT_INTELLIGENCE_CREATOR database role. Below a code snippet for reference:
-- Environment

use role ACCOUNTADMIN;

--------------------------------------

-- Role

create role if not exists DOCUMENT_AI;

grant database role SNOWFLAKE.DOCUMENT_INTELLIGENCE_CREATOR to role DOCUMENT_AI;

grant execute task on account to role DOCUMENT_AI;

--------------------------------------

-- Role grants

grant role DOCUMENT_AI to role SYSADMIN;
Snowflake Document AI Model Deployment
With the above configuration setup, we can now go about creating our model step by step. Conceptually, there are several phases we will follow:
- Create the model
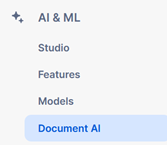
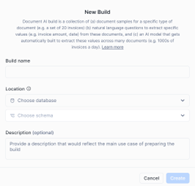
On the left-hand menu find the DocAI section. On the top right you will see a +Build button to create a new model, which we’ll need to associate to a specific database and schema.

Once created, Snowflake will prompt you to upload the documents to train the model. Important: these files will be loaded into a Snowflake internal stage, not the Azure/AWS/GCP blob storage you created.
These files should be representative of the pool of documents that you will want to process eventually. The number of files you upload will depend on several factors, but one thing is clear: The more files you upload, the more accurate your model will get.

Once you complete uploading all the files click on See all documents. This will trigger the next step of the process. - Defining and training the model

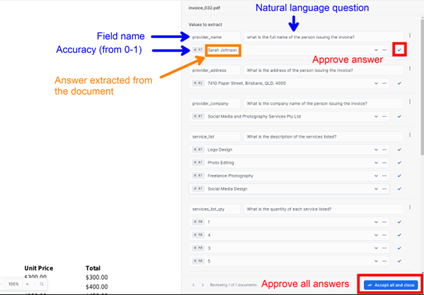
Clicking on a file will trigger a preview of your document. On the right-hand side of that screen, you can add a new value, which is essentially a field you want to capture from this document.DocAI uses a natural language interface that is very intuitive. Simply give the field a name (e.g., customer_name) and a question that the model will answer from the document (e.g., “What are the first and last names of the client?”). Upon entering this information, the model will scan the file and provide an answer that you can manually rectify or approve.Once you’ve entered your questions, the model will automatically attempt to retrieve a datapoint that answers your question. The system will not get it right at first: You will get an accuracy level score, and you will be able to modify the answer to correct it. That’s how the model will learn. See image below for key sections when training the model.

You can approve answers one at a time. Alternatively, at the bottom of the screen you will find a blue button to approve all answers and trigger the preview of the next document. You will need to repeat the process of verification once for each file you have uploaded. Once this step is completed, you can return to the model home page where you’ll be presented with some stats about your model:

Under Model Accuracy, click Publish version. - Publish and test the model
After publishing, you will notice that you are presented with two small snippets of code: One to use the model against a single file, the other to use it against all files in a given stage. The former looks like:SELECT MY_DATABASE.MY_SCHEMA.INVOICE_PROCESSING!PREDICT( GET_PRESIGNED_URL(@STAGE_NAME, 'invoice_035.pdf'), 1);
I can run this command in a SQL worksheet (it can take a few seconds), which will return a JSON response with a structure similar this:
{
  "__documentationMetadata": {
    "ocrScore": 0.968
  },
  "client_address": [
      {
          "score": ...
          "value":...
       }
    etc
Lift off! Our model has scanned the document using the questions we defined and returned the data it found. As you can see, the response is nested JSON that includes the field name, response and accuracy level of each of the questions we asked. This data would still to be transformed a little to be used. For example, we could flatten the JSON with something like:
SELECT
  prediction:client_name[0].value::STRING AS client_name,
  prediction:client_address[0].value::STRING AS client_address,
  prediction:client_postcode[0].value::STRING AS client_postcode,
  prediction:client_state[0].value::STRING AS client_state,
  prediction:service_list,
  prediction:service_list_cost,
  prediction:service_list_qty,
  CURRENT_TIMESTAMP AS load_time  -- Load time

FROM (
  SELECT MY_DATABASE.MY_SCHEMA.INVOICE_PROCESSING!PREDICT(
    GET_PRESIGNED_URL(@S3_BUCKET_INVOICES_STAGE, 'invoice_035.pdf'), 1
  ) AS prediction
) AS prediction_data;
This flattens some of the columns but other fields still return arrays, which could be handled separately. Either way, notice how DocAI returns a score for each field. This is a metric (from 0 to 1) that represents the confidence of the model in the data returned, which is very handy for future model optimisation.

The above steps set the foundation to start using DocAI. In the second part of this blog, we’ll explore how can we transform the output of this data and integrate DocAI in a production pipeline to automate and scale this process to a large number of files.

