In this blog, I will guide you through various methods to navigate the Matillion Data Productivity Cloud (DPC) Git functionality. The purpose of any Git process is to manage version control in technical/software projects. It allows for work to be contributed to by all involved, while preserving a master version to be the forefront of the project’s deployment. For further insights into this topic, I recommend consulting our detailed blog on technical Git knowledge, written by our very own Chris Hastie!
Within any DPC project, there are branches. These branches essentially represent different versions of the project. There is always a “main” branch by default, which is usually the most advanced branch and is most likely to be used for scheduled production pipelines. Beyond this, there could be any number of further branches depending on the requirements of the pipeline developer(s) at the time. For demonstration purposes in this article, we have a “dev” branch which a developer has been using to develop new pipelines.
When handling data within these branches, it’s essential to utilize the “Git” button located at the top right corner of the pipeline page:
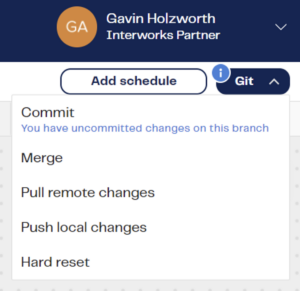
The available options include:
- Commit
- Merge
- Pull remote changes
- Push local changes
- Hard reset
- Add schedule
How Do You Transfer Progress in Your Dev Branch to Your Main Branch?
- Open Dev branch.
- Commit.
- (Optional) Be sure to test your changes to make sure they work as planned!
- Push local changes.
- Open main branch.
- Pull remote changes.
- Merge.
- Confirm that the Dev branch selected reflects most recent timestamp change:
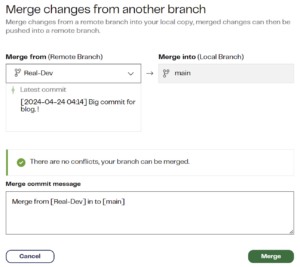
- Confirm that the Dev branch selected reflects most recent timestamp change:
- Push local changes.
- In this box, be sure to “Publish branch” as this ensures we can schedule jobs later:
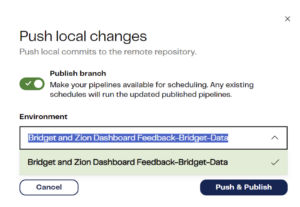
- In this box, be sure to “Publish branch” as this ensures we can schedule jobs later:
- (Optional) Now you can schedule the data flow! See the applicable section on scheduling below.
To publish progress you made in your main branch:
- Commit.
- Push local changes.
- Publish branch.
How Do You Transfer Progress in Your Main Branch to Your Dev Branch?
Sometimes you get ahead of yourself and make so many changes in your main branch that you need the entire infrastructure reflected in your Dev branch. Generally, getting yourself in this position is considered bad data practice as this much work should have been done in your Dev branch. That said: we all find ourselves here from time to time! The steps to make this happen are a bit unorthodox, but here’s the best way:
- Go to your branches menu:
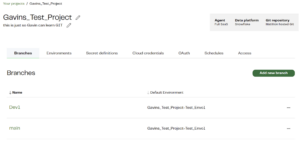
- Click Add new branch.
- Create the new profile for your branch, and make sure to select your Main branch:
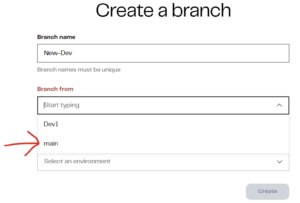
- This has effectively duplicated your main branch, but under the guise of your new dev branch.
- (Optional) You can delete your old Dev branch.
As stated initially, this blog is to help “Git you started” with the version control functionality of Matillion’s cloud offering. If you find yourself needing more detail, I suggest navigating to the attached Matillion blog on the topic. Please remember that updates to this fledgling platform could create functional navigation changes. I hope this blog helped you in your Matillion adventures!

