
Following on from the wonderful blog by Fadi Al Rayes, Getting SaaSy with Matillion’s Data Productivity Cloud, we’re going to look at the Matillion Agent deployment and why you may want to opt for this solution vs. the automatically deployed agent provided by Matillion.
Let’s first cover what is the Matillion Agent and why do we need it. The agent is a critical piece in your Matillion ETL solution acting as the engine running and scheduling the pre-defined tasks created within your pipeline and acting as the conduit between your data plane and the centralised DPC platform. It interacts with the Agent gateway using an Egress-Only method, meaning it can send requests and receive responses but cannot accept incoming communications (Ingress).
But wait, when I deployed my Designer project Matillion created a SaaS Agent for me, why do I need one hosted somewhere else? It’s a great question and one we can help answer. Dependent on your industry and internal governance, you may have strict guidelines on your data and where it can be processed. With your own deployed Agent, you have control over the Region this is launched to help conform to rules or guidelines outlined by law or your organization. Also, there’s the question of scalability and concurrency. If your Matillion Pipeline estate continues to grow, you may not want to be impeded by the Matillion hosted Agents infrastructure. Your own managed and deployed instances put the power in your hand, allowing for scaling of instances and workload based on your needs as a business.
We’re going to deploy this Agent manually and using CloudFormation templates to allow for the concept of Infrastructure as Code. Terraform will also be available to use and if you want to discuss this option and its viability reach out to us here.
Starting Deployments
Starting any deployment be it manual or via code has the same starting step. We need to create an agent and its unique values within your Matillion Hub. So, let’s head there and into your account. You should see your services page and the circle icon for Manage Agents. Click this to head into our Agent page:
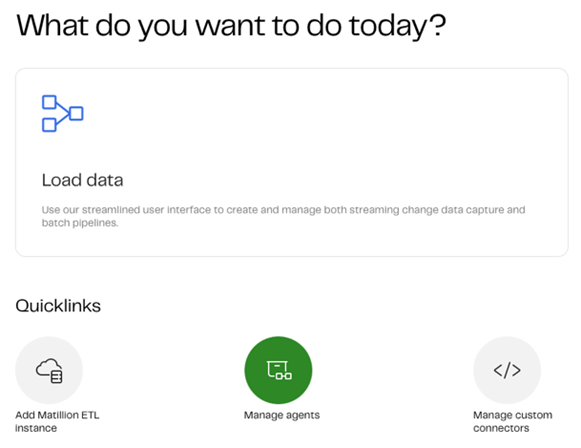
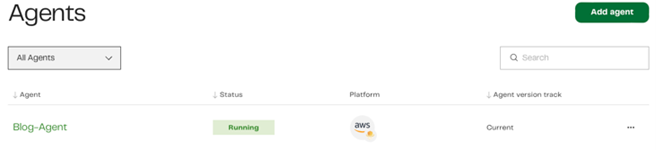
There’s just the one agent here now, this is the auto provision SaaS Agent with each account, but we don’t want this, so click Add Agent at the top right and let’s get started in our deployments:

Here we will set our agent name, the remaining options are unchangeable at this time and default to AWS, Fargate and Current. I imagine more cloud providers and deployments may become available in the future. Add your Agent name and click Create agent.
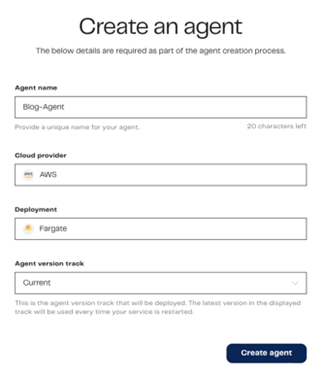
You will be redirected to your Agent details page which includes critical information, including the image repo, environment variables and credentials. There are options to launch a template in CloudFormation and to also download a template. We will visit these after we discuss a manual deployment.
Manual Deployments
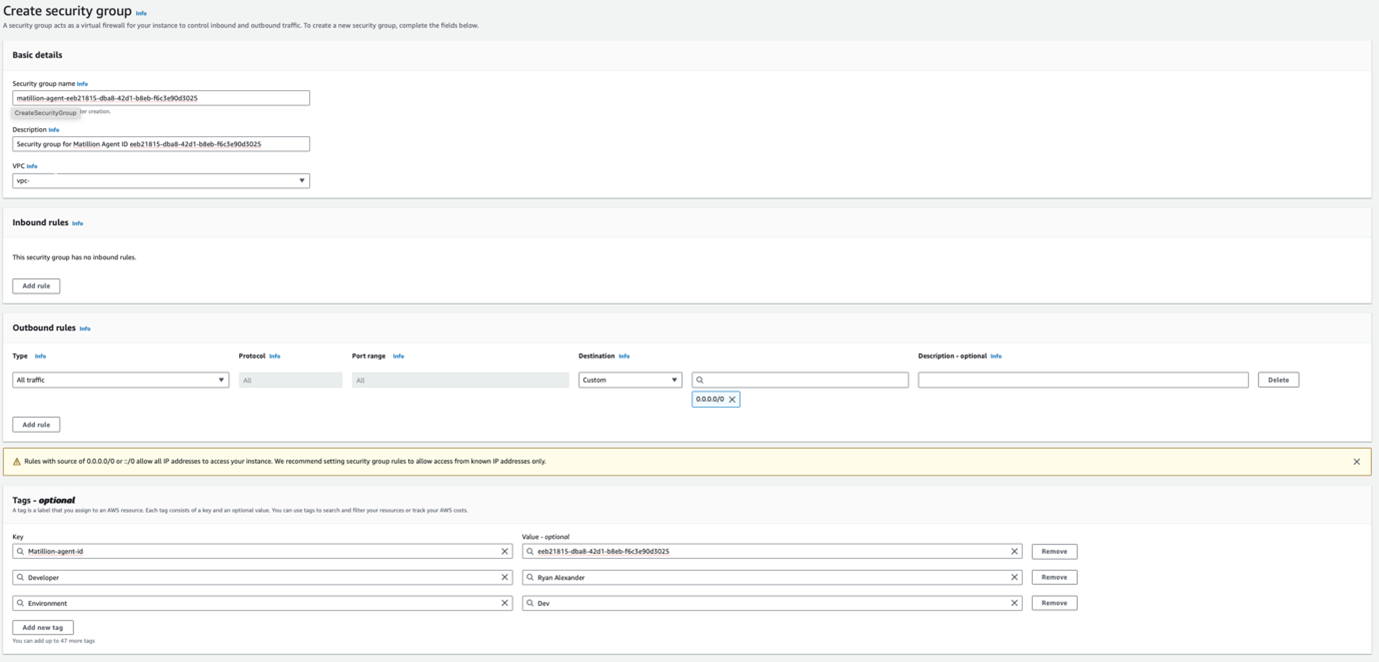
Great, we have our variables and credentials, let’s get this thing deployed! Head over to AWS Console. Log in and, in your search bar at the top, type in “Security Groups.” The base to any secure system is defining its access and security. Click the orange Create security group button in top right to start building this out.
Security Group Creation
We want to set a few key properties to ensure security and access as well as incorporating some best practices.
Give the security group a name to start for identification later by other parties. Give it a recognisable name with key elements: matillion-agent-<agentID> is a great start, replacing <agentID> with the environment variable in your Matillion Agent details page from the earlier steps.
Next, a description that allows others to understand the security groups purpose, such as Security group for Matillion Agent ID <agentID>, again replacing the <agentID>.
Select a VPC for the security group and later the Agent. For this example, we’re going to use default.
Now we need some rules. How can we communicate with the resources or how can they communicate with other resources/the internet. The general rule of thumb is the rule of Least Privilege. If the resources don’t need a specific port or destination/source, then don’t add it as they are additional areas of attack for your business. We don’t need any Inbound/Ingress rules, which is great to restrict malicious parties getting into our resources. For Outbound/Egress, we want to allow access to 0.0.0.0/0 (The Internet)
Finally, we have Tags. These aren’t needed for a functioning security group; but in the idea of best practice and traceability, it’s good to add a few Keys and Values. I personally like to have at least the following: Key = Matillion-agent-id and Value = <agentID>. Again, we replace with the correct variables, Key = Developer and Value = Ryan Alexander, Key = Environment and Value = Prod/Test/Dev, using the correct one for your use case. This way, people know who built it, what it’s for and in what sense its used. Tags are also a great way to track with resource groups for cost and management.
Logging (Optional)
This next piece can be skipped if you’re happy to use the Default logs that can be created as part of the Cluster Task Definition later.
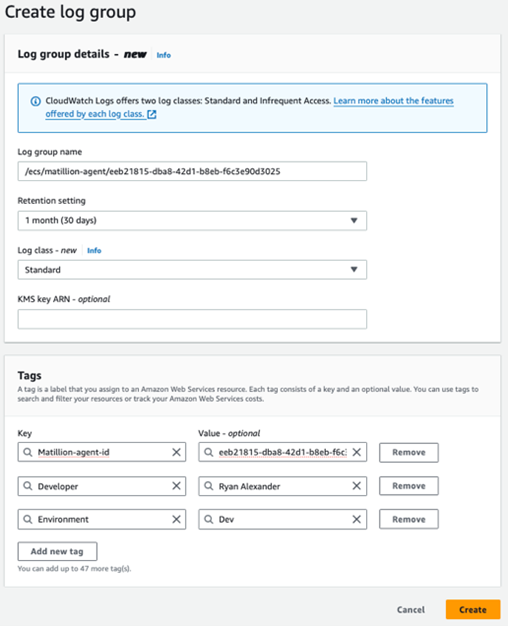
As we did with security groups head to the top left and search CloudWatch. On this page in the left navigation window, click Logs to expand and then Log groups. The orange Create log group button and top right allows us to start building this out.
Best practice would be to follow the same key properties we used for our security group. So, the name would have the same key identifiers. Let’s set it to /ecs/matillion-agent/<agentID>, replacing the <agentID> as we did before with ecs being the identifier of the resource Elastic Container Service. This gives uniformity to everything we are building for easier management of resources and identification.
With the Retention setting, we need to add how long we want to store logs for, remember that logs cost money. Work with your business to understand the sweet spot of log tracking and audit vs costs. For this, I’m setting the recommendation of 1 Month (30 days), you may want longer and different lengths for different environments.
Log class is new and allows you to save some costs if you will need infrequent access. This cannot be changed after its been set, so understand what you may need before. I’ll set this to Standard.
KMS key ARN we can leave blank. For Tags. let’s set the exact same as we did in the security group before. The great thing is these can auto populate when you start typing the first few characters now, they have been used previously. Click the orange Create button.
Cluster Creation
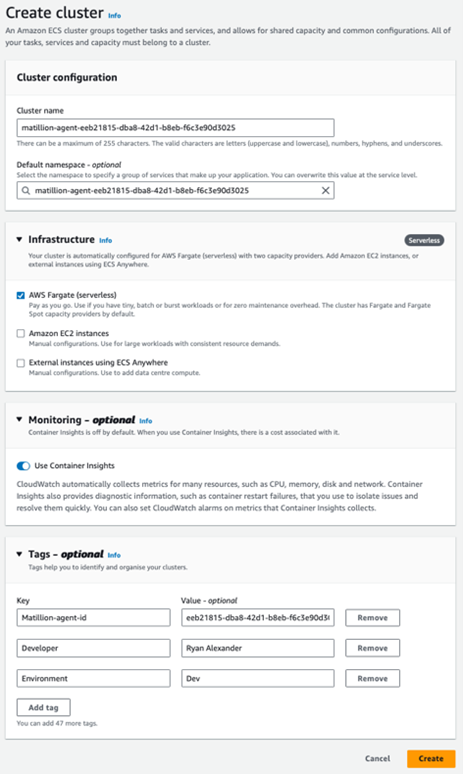
Let’s get on to building the cluster for the Agent. As before let’s search and head over to Elastic Container Service and click the orange Create Cluster button in the top right.
The Cluster name is going to match the security group and be set to Matillion-agent-<agentID>. Namespace is optional but will default to the same. This can be left as is.
In the drop-downs, Infrastructure needs to be set to Fargate as mentioned in the Matillion Agent details. In monitoring, we will toggle Use Container Insight to On.
For tags, repeat the same tags as added in both prior steps, when done click the orange Create button.
Task Definitions
Staying on this resource page, on the left, we can click Task Definitions, then the orange Create new task definition button and then the one without JSON on the drop-down.
Task definition family must be unique so again we will use Matillion-agent-<agentID> here the uniqueness comes from the <agentID> variable.
For Infrastructure requirements were going to need to set a few properties and set a Task role and Task execution role. We need to ensure that Fargate is selected. We can also use Linux/X86_64 as the Operating System/Architecture. Task size we can set to 1 vCPU and 4 GB Memory and finally for roles.
For Task role, we want to right-click the IAM Console link and open in new tab and then the orange Create role button. On the next page, we want to select the Custom trust policy option that allows us to enter the JSON below:
{
    "Version": "2012-10-17",
    "Statement": [
        {
            "Effect": "Allow",
            "Principal": {
                "Service": [
                    "ecs-tasks.amazonaws.com",
                    "ec2.amazonaws.com"
                ]
            },
            "Action": "sts:AssumeRole"
        }
    ]
}
We can then click Next and start to set permissions. You’ll need CloudWatchFullAccess for logging, SecretsManagerReadWrite for a later step for grabbing credentials securely and then a new Inline policy like below. With all permissions, limit the scope as much as possible for your use case remembering the rule of least privilege:
{
    "Version": "2012-10-17",
    "Statement": [
        {
            "Action": [
                "s3:ListAllMyBuckets",
                "s3:ListBucket",
                "s3:GetObject",
                "s3:PutObject",
                "s3:DeleteObject",
                "s3:GetBucketLocation"
            ],
            "Resource": "*",
            "Effect": "Allow",
            "Sid": "StmtMinS3"
        },
        {
            "Action": [
                "cloudwatch:PutMetricData",
                "cloudwatch:ListMetrics"
            ],
            "Resource": "*",
            "Effect": "Allow",
            "Sid": "StmtMinCloudwatch"
        },
        {
            "Action": [
                "logs:CreateLogGroup",
                "logs:CreateLogStream",
                "logs:PutLogEvents",
                "logs:DescribeLogStreams"
            ],
            "Resource": "arn:aws:logs:*:*:*",
            "Effect": "Allow",
            "Sid": "StmtMinCloudwatchLogs"
        },
        {
            "Action": [
                "kms:ListAliases",
                "kms:Encrypt",
                "kms:Decrypt"
            ],
            "Resource": "*",
            "Effect": "Allow",
            "Sid": "StmtMinKMS"
        }
    ]
}
Now, press Next button again. We can set the name, which will be slightly different than previous naming convention Matillion-agent-<agentID>-task-role, with a description of Task role for Matillion Agent ID <agentID>. Add the same tags as we have in previous steps and then orange Create role button.
We want to create another role called Matillion-agent-<agentID>-task-exec as an AWS Service, selecting Elastic Container Service as Use Case. You’ll need Permission Policy AmazonECSTaskExecutionRolePolicy and an inline policy like below, changing the * to the ARN of the secret you create in a later step to restrict access further:
{
    "Version": "2012-10-17",
    "Statement": [
        {
            "Sid": "VisualEditor0",
            "Effect": "Allow",
            "Action": [
                "secretsmanager:GetRandomPassword",
                "secretsmanager:GetResourcePolicy",
                "secretsmanager:GetSecretValue",
                "secretsmanager:DescribeSecret",
                "secretsmanager:ListSecretVersionIds"
            ],
            "Resource": "*"
        }
    ]
}
Head back to the Task Definition tab, and Under Task role, select the newly created role Matillion-agent-<agentID>-task-role in the drop-down menu. Then, for the Task execution role, select the new Matillion-agent-<agentID>-task-exec.
Now we want to edit the properties in the Container -n block. In container details, we can set name to Matillion-agent. For the Image URI, we want to use the one from the Matillion Agent details, i.e. public.ecr.aws/matillion/etl-agent:current.
We can click Remove next to any default port mappings as we won’t need these for the Agent.
In the Environment Variables drop-down, under Add individually, you want to set the below using the values from your Matillion Agent details and credentials. Credentials should be stored in Secrets Manager and accessed securely. To learn more about this process, read Add agent credentials to AWS Secrets Manager and ensure you tag as previously. Any Key marked with * are optional if required.
| Key | Value Type | Value |
| ACCOUNT_ID | Value | Your ACCOUNT_ID value |
| AGENT_ID | Value | Your AGENT_ID value |
| MATILLION_REGION | Value | Your MATILLION_REGION value |
| OAUTH_CLIENT_ID | ValueFrom | The Amazon resource number (ARN) of the AWS Secrets Manager secret appended with the key name that contains the agent client_id in this format {your-arn}:{key}::. For example: arn:aws:secretsmanager:eu-west-1:112233445566:secret:my_secret_name-9wxygh:client_id:: |
| OAUTH_CLIENT_SECRET | ValueFrom | The Amazon resource number (ARN) of the AWS Secrets Manager secret appended with the key name that contains the agent client_secret in this format {your-arn}:{key}::. For example: arn:aws:secretsmanager:eu-west-1:112233445566:secret:my_secret_name-9wxygh:client_secret:: |
| EXTENSION_LIBRARY_LOCATION* | Value | (Optional) The location for your additional Python libraries, specified without the protocol. For example: agent-python-libs or mybucket/agent-python-libs. Currently, only S3 is supported. |
| EXTENSION_LIBRARY_PROTOCOL* | Value | (Optional) Specified in conjunction with EXTENSION_LIBRARY_LOCATION. For example: S3. |
Now, under Logging, we can create a new log group if we didn’t in the previous step or we can utilise the one we created. If we used the correct naming convention, this should automatically match up, if using a different name change the awslogs-group value to the correct Log Group name. You can then remove aws-logs-group if you created one earlier or leave if you want it to be created in this step.
Ensure you tag with the same tags as previous, scroll down and click the orange Create button. A blue banner at top shows the creation is in progress. When it goes green, it’s complete.
Cluster Service
In the newly created Task Definition, click the Deploy drop-down and then Create service. On this page, you’ll want to select the Existing cluster to be the one you created earlier with the name Matillion-agent-<agentID>. In Deployment configuration, name the Service as previously as Matillion-agent-<agentID>, now set your desired tasks. A minimum of two is required to remove risk of outages during service upgrades, and increasing will benefit run time of multi-threaded pipelines.
In deployment options, set the Min and Max running tasks %. Max needs to always be greater than Min.
Under Networking, select the VPC you want to use (the one containing the security group we created earlier) and the subnets you want to use. Now use the drop-down menu to select the security group you created earlier. You’ll see the sg- ID; however, under it will be the name you gave it of Matillion-agent-<agentID>. Ensure Public IP is toggled to on unless using Network Access Translation such as a NAT Gateway.
Set your Tags as this allows you to use AWS Managed Tags rather than setting them manually. Propagate them from the Task definition and click Create to finishing deploying all necessary resources. You’ll notice the same blue banner appear at the top to show you deployment is in progress. When it goes to green, this is complete. This will take a few minutes.
After a few more minutes, head back to Matillion and you should see your agent all connected. Now you can add it to a project to handle your pipelines.
Resource Groups
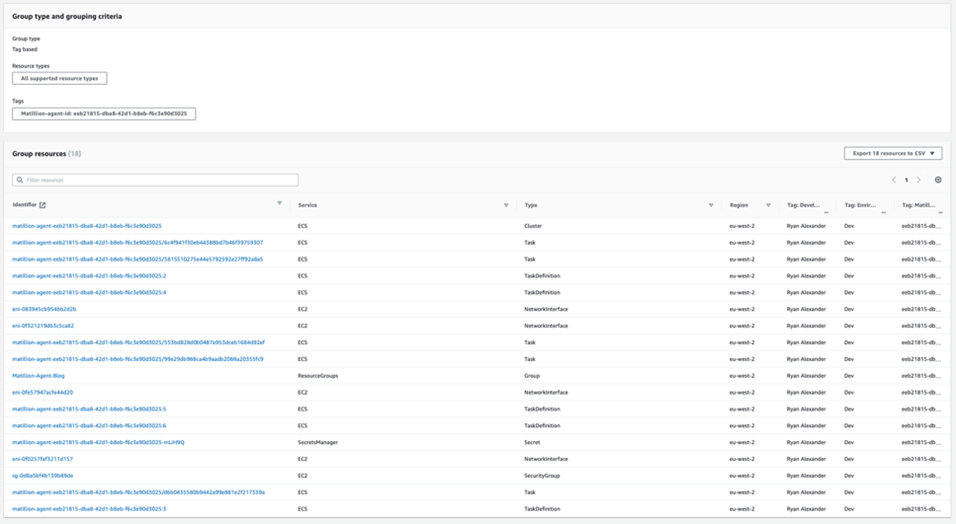
Now that we have created quite a few resources in these steps, how do we track and remember them? Introducing Resource Groups!
At the top left, search Resource Groups & Tag Editor and click the orange Create resource group button. Not every resource is supported, but let’s view what is. Select All supported resource types and then in Tags enter Matillion-agent-id, to the right choose the <agentID> in the value box and click preview group resources. After a few seconds, you should start to see resources populated below. Click the cog and hide columns you may not want to see. Scroll down, give the Resource group a nice name and description, and then add the same tags you must everything else. Click the orange Create group button. This will now allow a dynamic list of supported resources whenever you apply the tracked tag of Matillion-agent-id and the <agentID>.
We don’t want to do all these steps manually in the future if we need new agents, do we? That’s where Infrastructure as Code comes into play, removing the requirement on manual steps and improved time to deploy in a repeatable manor.
CloudFormation Deployment
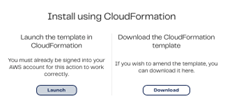
We will start with the same step as the beginning, setting up an agent in the Matillion Hub all the way through to the Matillion Agent details page. However, we’re going to select one of the CloudFormation options and select the launch template option. Make sure you’re signed into AWS already on the right account:
You’ll be redirected to CloudFormation in AWS with some pre-populated variables added into the stack. You can give your stag a nicer name if you need, and then scroll down to the Credentials section. Input the client_id and client_secret from your credentials section in Matillion Agent details, select a VPC and Subnet(s) to deploy into and select an IAM role. For this, I’ll use the ARN of my role that has admin access, as with all permissions in Production please use roles and policies with restricted access. You’ll need to have attached a trust policy to the role for CloudFormation such as below:
{
    "Version": "2012-10-17",
    "Statement": [
        {
            "Sid": "",
            "Effect": "Allow",
            "Principal": {
                "Service": "cloudformation.amazonaws.com"
            },
            "Action": "sts:AssumeRole"
        }
    ]
}
Finally, click the checkbox under capabilities and then the orange Create stack button.
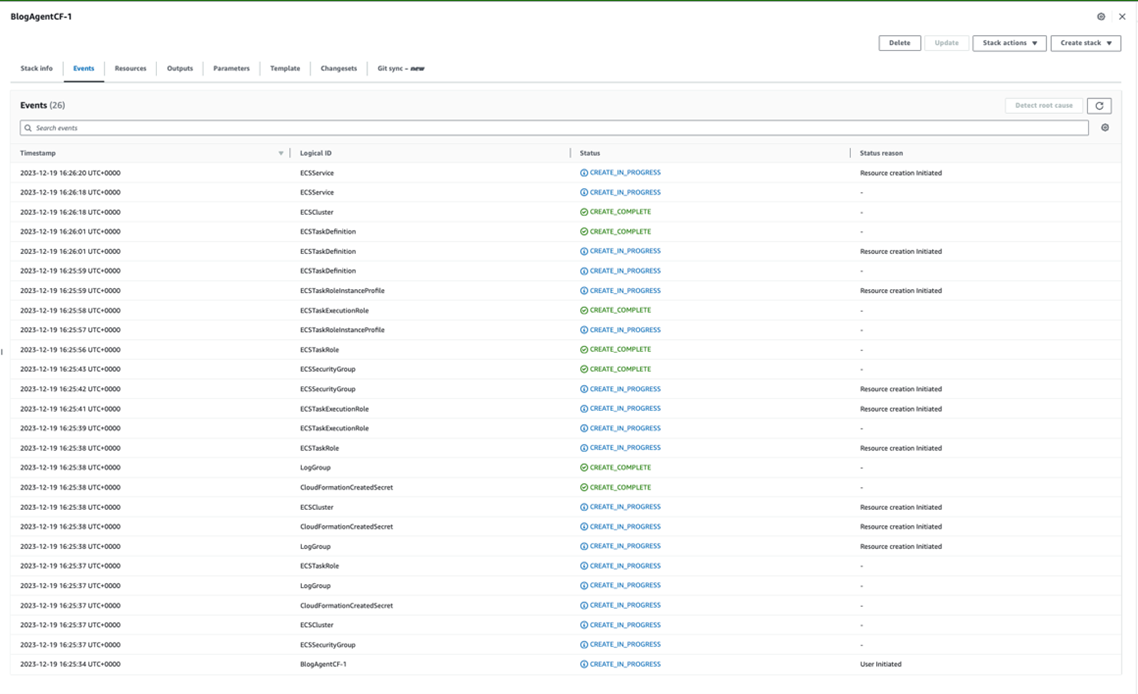
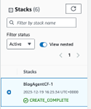
You’ll be redirected to the events page of your CloudFormation Stack. This will take a few minutes to complete, but you can watch the progress of steps in the right-hand side. You can see final completion on the left under stacks, then you see CREATE_COMPLETE under your stack name.
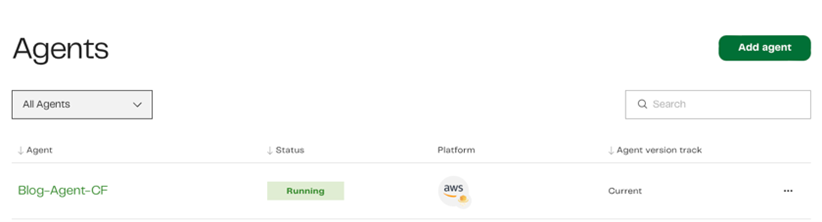
Now wasn’t that quicker and easier than the manual steps? Head over to Matillion Hub to see the status of your agent.
 One thing we lost here was the ability to add tags that matter to us for cost and management vs. the auto-generated tasks. That’s where the downloaded template comes into effect. When you’re a little more familiar with CloudFormation and IaC, look and see what you can create and change.
And that’s a wrap! You’ve successfully deployed an Matillion DPC Agent in your own AWS provider and can start to leverage your own governance, guidelines and scalability.
If you want some further guidance, questions, hosting, managed services, deployment of your Agents manually, CloudFormation or even Terraform, please reach out and contact us here.