
When following this content, I would recommend first reading through the following two posts:
- How to Access a Linux Virtual Machine (e.g. Matillion Server) via SSH from Windows
- How to Configure Remote Git Integration for Matillion Leveraging SSH Keys
These two posts have been written to support anybody setting up git integration with Matillion; however, we have not addressed any recommendations around where to store your SSH keys or how to automate the remote sync of a Matillion git repository using a Matillion orchestration job. Well, this post will discuss my personal recommendation when storing your SSH keys and passwords so that they can be leveraged by Python/Bash script components in Matillion. I wonder what my next post will be about… (hint hint)
Disclaimer
Before we dive in, I want to quickly state that this method/approach is my personal opinion for a specific set of use cases. I am a self-proclaimed Snowflake and Matillion expert; however, I am NOT a security expert. This post will cover a method of storing authentication keys and service account passwords on your Matillion server in a way that can be accessed using the Python Script and Bash Script components in a Matillion orchestration job. This means anyone with access to your Matillion instance could use these components to access these files. Obviously, it is therefore recommended that this method be leveraged only when you are comfortable with every Matillion user having access to these files.
Anti-Disclaimer
I have created a Matillion Idea to address this security issue by modifying Matillion’s capability to offer a User property for Python/Bash scripts to enable privileged scripting access. Currently, this functionality can only be enabled or disabled server-wide and thus does not solve our security concerns. If it could be enabled for specific projects, we could potentially store our passwords in Matillion’s regular password manager and/or designated backend folders that only allow access to privileged users, only granting trusted users with access to the specific project that allows this privileged scripting functionality.
Required Linux Knowledge
You don’t need any pre-existing Linux knowledge for this post beyond the two posts linked at the top of this page. All written code should work on your own Matillion Linux backend, and I will attempt to quickly explain any code as we go. If you would like some deeper background on Linux permissions to understand why I use certain values with the chmod command, please take a look at my quick intro to numerically configuring privileges in Linux for directories and files.
Matillion Backend Linux Server Users
To achieve our goal of storing files securely whilst allowing access to Matillion scripting components, we must have two users in mind on the Linux server itself:
- The user that the Matillion application uses when attempting to execute scripts
- By default, this is called tomcat
- The user that will act as the owner of these secure files, including those which we do not want Matillion to access
- You could create your own user for this, or you could use the default Linux server admin user that was created when you first built your Matillion instance. For our example, the user is called centos. This could be another user for your infrastructure; the name does not matter as long as you can access your Matillion server’s backend Linux virtual machine with it.
So our users are tomcat and centos.
Matillion Frontend Service User for API Authentication
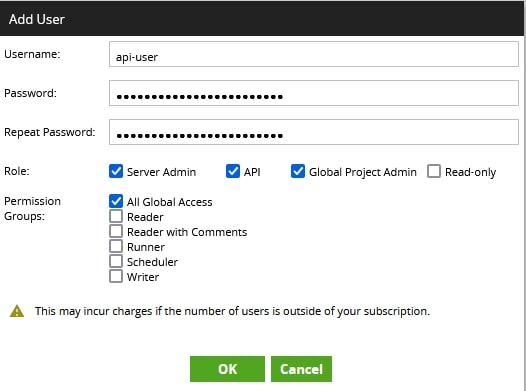
Because our end-goal is to automatically sync git repositories in Matillion, we will need to write a Python/Bash script that can leverage the Matillion API to trigger a git fetch and pull for our specific project(s). Don’t worry, you don’t need to learn how to do that yourself as both the Python and Bash methods will be covered in my next post. However, if the script is going to access the Matillion API then it must be able to authenticate to the Matillion API. This is where a bespoke service user comes in.
In our example, we’ve called this user api-user. You can see how this user was created in Matillion here:
My Recommendation for Authentication File Storage
Directory Structure Overview
The layout here is actually pretty simple; it’s the security that will be more of a challenge. I’ll first demonstrate what the final directory structure will look like in the bulleted list below, and then we can discuss how it is created and how files are moved/created there:
- ssh_keys
- matillion
- id_rsa_gitlab
- id_rsa_gitlab.pub
- snowflake
- id_rsa_snowflake_service_user_a.p8
- id_rsa_snowflake_service_user_a.pub
- id_rsa_snowflake_service_user_b.p8
- id_rsa_snowflake_service_user_b.pub
- matillion
- matillion_service_account_passwords
- api-user.txt
So we have top-level directories: ssh_keys and matillion_service_account_passwords. The ssh_keys directory contains two subdirectories: matillion and snowflake.
The matillion subdirectory will house all keys that should be accessible to the scripting components in Matillion, which for our example includes an SSH key for accessing GitLab so that we can sync our git repository with its remote counterpart.

The snowflake subdirectory will house all keys that should not be accessible to Matillion scripting components but make logical sense to store on the machine anyway as they are being used to facilitate Matillion’s access to Snowflake for various service users. Explore another post if you’re interested in how to configure key pair authentication for Snowflake.
The matillion_service_account_passwords directory simply contains a file called api-user.txt, which contains the password for our Matillion API frontend service user.
Creating the Top-Level Directories and Granting Ownership to the Desired User
1. Log in to your Matillion server backend.
2. Use the mkdir bash command to create the ssh_keys and matillion_service_account_passwords directories.
Since these are top-level directories, we will need to use the sudo command to grant our user the elevated privileges to create these folders.

sudo mkdir /ssh_keys
sudo mkdir /matillion_service_account_users
3. Grant ownership of these two new directories to the desired user with the chown command. Again we must use the sudo command as well for elevated privileges. In our case, our desired user is called centos.

sudo chown centos /ssh_keys
sudo chown centos /matillion_service_account_users
4. Before we continue, let’s use the chgrp command to change the group of these directories to also match the Matillion application user, tomcat. This should work since modern instances of Linux automatically create a group for each user, at least to my knowledge. This is certainly the case with the default admin user created for Matillion instances and the tomcat user for the Matillion application.
Again, we must use the sudo command as well for elevated privileges, this time because we are changing the group of a file/directory to a group that our owner is not a member of. By changing the group to tomcat, we give ourselves the capability to configure permissions for the tomcat user specifically.
sudo chgrp tomcat /ssh_keys
sudo chgrp tomcat /matillion_service_account_users
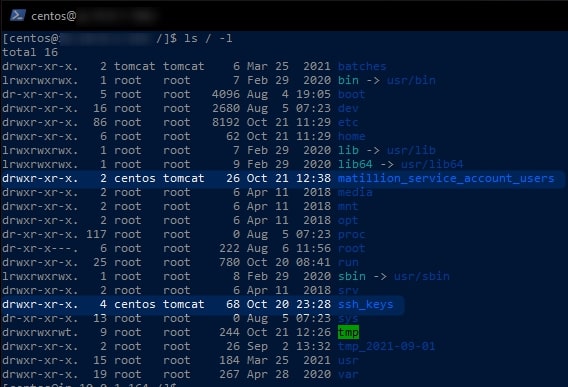
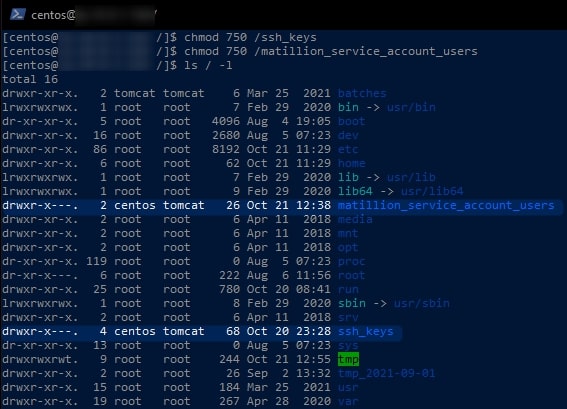
5. If you have followed each of these steps correctly, you should now be able to execute the following command to list all of your top-level directories and confirm that your desired user is both the owner and the group for the file.
This command uses the ls command to list all files, specifying / as the directory to list (which is the top level or “root” directory) and applying the -l option to list one file per line whilst displaying the owner and group for each.
ls / -l
Along with a load of other files related to the backend of the Matillion server, we can see our two new directories and our user centos listed twice next to each. The first occurrence is for the owner and the second is for the group:
Creating Subdirectories and Configuring Appropriate Owner and Group
1. Use the mkdir bash command to create the /ssh_keys/matillion and /ssh_keys/snowflake directories:
mkdir /ssh_keys/matillion
mkdir /ssh_keys/snowflake
As you are using the owner of the ssh_keys directory and creating these subdirectories without the sudo command, the same user will also be the owner and group of the subdirectories.
2. Use the chgrp command to change the group of the /ssh_keys/matillion subdirectory to the tomcat group, so that we can configure separate permissions for that user. Again, we need to use sudo as we are modifying the group of a directory and do not belong to that group:
sudo chgrp tomcat /ssh_keys/matillion
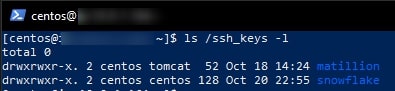
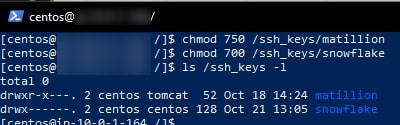
3. We can now use the ls /ssh_keys -l command to verify that we have created our two subdirectories and that tomcat is the group for the matillion subdirectory:
Moving & Creating Files in These Directories
SSH Keys
In the case of SSH keys, such as when creating a key for Matillion/git integration or to authenticate with Snowflake, you can define the destination filename as part of your ssh-keygen command. Either enter a new name when prompted by the default command or get ahead of it by specifying the output filename with the option -f <output_filename>.
If you have already created your key and just wish to move it, you can use the mv command:
mv original/file/path/name.pub destination/file/path/name.pub
Writing Raw Text Files
When creating our api-user.txt file, we can leverage the echo command with a destination > to write our password to the file. For example, let’s say that the password for api-user is:
P@55w0rd
We can write this password to a file called api-user.txt with the following command:
echo 'P@55w0rd' > /matillion_service_account_users/api-user.txt

Configuring Security for Directories & Files
We’ve done a lot of work here to create a set of directories and files. We need to make sure they are as secure as possible whilst still allowing Matillion scripting components to access the appropriate private SSH keys via the tomcat user.
This section will involve some heavy use of the chmod command, which I have covered in my post on numerically configuring privileges in Linux for directories and files.
We can use the following commands to ensure that our two new top-level directories can only be written into by the owner, but the group tomcat can still open the directories and list the objects within. Everybody else is prevented from access:
chmod 750 /ssh_keys
chmod 750 /matillion_service_account_users
We can execute a similar command to configure the correct access for our matillion subdirectory, so the tomcat group can access it. However, we have no desire for anybody other than the owner to access the snowflake subdirectory, so we set the permissions differently to ensure only the owner has access:
chmod 750 /ssh_keys/matillion
chmod 700 /ssh_keys/snowflake
We can provide similar access for the tomcat group to the api-user.txt file within the matillion_service_account_users directory, as well as to the private SSH key for GitLab called id_rsa_gitlab in the ssh_keys/matillion subdirectory. For each file that the Matillion scripting components need to access, we change the group to tomcat and set the permission level to 750:
sudo chgrp tomcat /matillion_service_account_users/api-user.txt
chmod 750 /matillion_service_account_users/api-user.txt
sudo chgrp tomcat /ssh_keys/matillion/id_rsa_gitlab
chmod 750 /ssh_keys/matillion/id_rsa_gitlab
All other files should then be fully protected with chmod 700 to ensure they are not exposed to the Matillion scripting components. It may make sense for some files to be protected with chmod 600 if there is no need to execute them:
chmod 600 /ssh_keys/matillion/id_rsa_gitlab.pub
chmod 700 /ssh_keys/snowflake/id_rsa_snowflake_service_user_a.p8
chmod 600 /ssh_keys/snowflake/id_rsa_snowflake_service_user_a.pub
chmod 700 /ssh_keys/snowflake/id_rsa_snowflake_service_user_b.p8
chmod 600 /ssh_keys/snowflake/id_rsa_snowflake_service_user_b.pub
Final File Structure: Owners, Groups & Permissions
Thank you for your attention throughout this post. I hope you found it useful. It will be especially useful when we leverage these permissions to use Python/Bash components in Matillion to automate the syncing of our Git repositories, which I’ll be covering in my next post.
Here is the final directory structure with the correct owners, groups and permissions:
