
Within your Matillion environment, you already have access to a large array of pre-built connectors (called “profiles” in Matillion parlance). However, if you need to get data from one of your applications that Matillion has yet to bring out a pre-built component for (perhaps it’s a very popular ERP system within your neck of the woods), you’ll need to get your hands dirty with some code.
Code in this context is xml-like, and if the prospect of dealing with code is daunting to you, don’t worry. This article provides a step-by-step walkthrough of what you need to do.
Creating a Unique Connection with Code
It’s a long post (though mostly picture-heavy) and worth reading if you are not sure where to click and what to do. However, if you’ve “got this,” here’s the code you probably have come for:
<api:script xmlns:api="http://apiscript.com/ns?v1" xmlns:xs="http://www.w3.org/2001/XMLSchema">
  <api:info title="JSON_DATA" desc="Generated schema file." xmlns:other="http://apiscript.com/ns?v1">
    <attr name="JSON_DATA" columnsize="16777216" xs:type="string" other:xPath="/"  other:valueformat="aggregate"  />
  </api:info>
  <api:script method="GET">
    <api:call op="jsonproviderGet" >
        <api:push/>
    </api:call>
  </api:script>
</api:script>
With this out of the way, let’s get cracking.
Preamble
One of the clients I’m working with had a request to pull exchange rate data into their Snowflake environment, so they could do currency conversion in their database. There are multiple currency conversion services available and multiple data providers as well, but we settled on using Exchange Rates API as it was free, required no registration and came from a reputable source (I’ve not checked all of them obviously, so do your research!).
You could, of course, download the historic rates in the CSV form directly from the publisher, but where’s the fun in that! Plus, I was going to reuse the API later to query the data for yesterday’s exchange rates, so a download of the full CSV was not going to work.
And yes, there are obviously lots of options available for currency conversion through API calls—most notably Fixer.IO, Currency Conversion API and Open Exchange Rates—but most I’ve seen have some sort of API free usage limitations (1k calls a month for Fixer.IO, for example). Most limitations aren’t deal-breakers, but the ExchangeRatesAPI.IO was somewhat easier to get started with. Also, shout out to my compatriot Madis Väin for his excellent work on this API.
Available Endpoints
All right, so having established the source for our Exchange Rate data, let’s look at the endpoints available to us and, later, the structure of the replies. There are three endpoints we could use:
- /yyyy-mm-dd to get daily exchange rates for a specific date
- /history to get daily exchange rates in date range and
- /latest to get … well, the latest exchange rate, which, depending on when you run your query, could be yesterday’s exchange rate (query before ~4pm CET) or today’s (after ~4pm CET)
We’re going to look at querying the second of the three endpoints: the historic rates for a date range.
Response from the API
Armed with our API endpoint (history) and wanting to get the data for the entire month of January 2020, let’s make a call. We’ll stay within the browser for now to inspect the response:
GET https://api.exchangeratesapi.io/history?start_at=2020-01-01&end_at=2020-01-31&symbols=AUD,USD,GBP
We get back something that looks like this:
{
  "rates": {
    "2020-01-07": {
      "GBP": 0.85183,
      "USD": 1.1172,
      "AUD": 1.6251
    },
    {
      ...
    }
    ,
    "2020-01-23": {
      "GBP": 0.84498,
      "USD": 1.1091,
      "AUD": 1.6149
    }
  },
  "start_at": "2020-01-01",
  "base": "EUR",
  "end_at": "2020-01-31"
}
This is a JSON reply from the API, all rates are against EUR (key “base”: “EUR”), for the period we’ve requested. Key rates is a nested dictionary where rates are arranged in a hierarchy of three levels, with rate value as the fourth:
- rates
- date
- currency symbol
- rate value
Great. The only issue is that date “column” is also a “key” for the underlying currency symbols. Ideally, the response would have been something more along these lines:
{
  "base": "EUR",
  "start_at": "2020-01-01",
  "end_at": "2020-01-31",
  "rates" : [
    {
      "date" : "2020-01-01",
      "GBP": 1.0000,
      "USD": 1.0000,
      "AUD": 1.0000
    },
    {
      "date" : "2020-01-02",
      "GBP": 1.0000,
      "USD": 1.0000,
      "AUD": 1.0000
    },
    ...
  ]
}
In this example, column “date” is stored at the same level as individual currency rates. This would have made working with the data a bit easier. Fret not though, we’ve got a solution.
Enter: Matillion API Profiles
Let’s explore the API Profile section of the Matillion UI. Navigate to Project (top-left corner) and then Manage API Profiles:
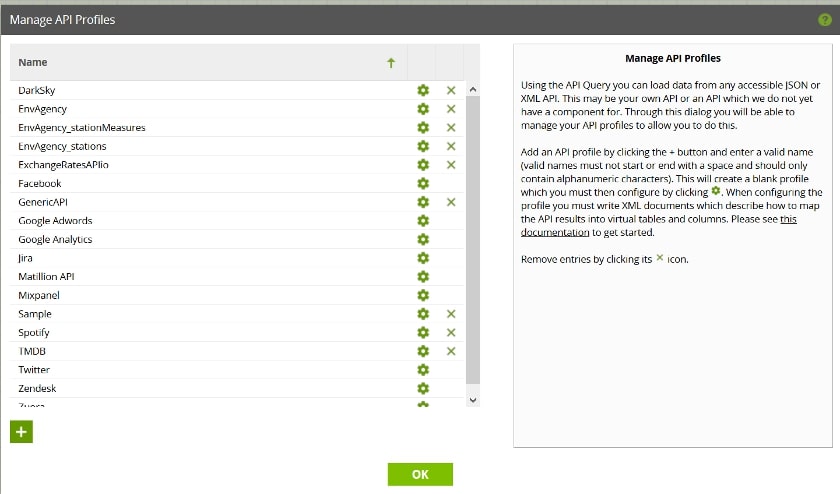
Here, you’ve got a list of all the different API profiles available on your Matillion instance. Matillion API profile language is actually a CDATA REST driver under the bonnet (as that’s what it uses to query URIs). The syntax itself is fairly expansive in what you can do with it, but the documentation can be a bit tricky to incorporate into practice sometimes. It is definitely on my list of future blogs to write: documenting the time spent figuring out RSD file syntax.
But I digress…
What Is an API Profile?
A quick primer on what an API profile is. An API profile is something that tells Matillion how to:
- query API
- process data received
More specifically, an API profile in this context is a collection of RSD files (usually an .rsd extension, hence the catchy name). However, the RSD file itself is what defines what endpoint to query and how to handle the reply from the endpoint.
The format of the RSD file is broadly HTML/XML-like, where you have tags, elements, attributes, inputs and outputs. Clicking on the cog icon in the view you’ve got open will open a list of RSD files available under a specific profile in the Configure API Profile dialogue. Here’s what happens if you click on the Matillion API profile’s cog icon:
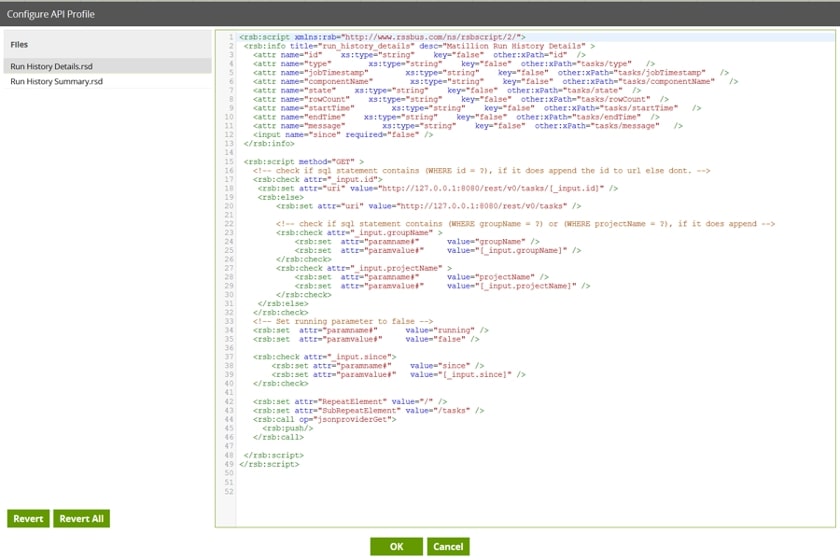
Lots of stuff here. And yes, Matillion’s got its own API endpoints you can use to interact with it (submit jobs, get job history / results for example). For now, though, let’s close that dialogue down (click Cancel), and let’s crack on with adding a new profile.
Creating a New Generic API Profile
Let’s add a new profile by clicking the add button in the lower-left corner of the dialogue prompt and give it some descriptive name (I’m a fan of descriptive naming conventions). Speaking of which, make sure you are staying within the rules overall:
- The name may only contain: alphanumerics, underscores, single spaces, parenthesis and hyphens. No leading/trailing spaces.
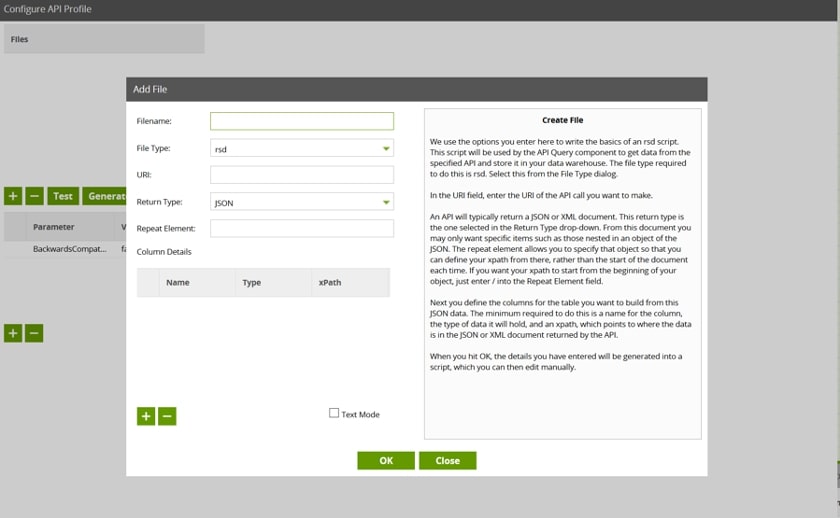
Let’s call it GenericAPI. This will do. Click OK, find that API profile name in the list, and click the cog icon next to it to go in and edit it. Once in the Configure API Profile dialogue box, let’s add a new RSD file by clicking the add button again. This should be the dialogue that pops up:
<api:script xmlns:api="http://apiscript.com/ns?v1" xmlns:xs="http://www.w3.org/2001/XMLSchema">
  <api:info title="JSON_DATA" desc="Generated schema file." xmlns:other="http://apiscript.com/ns?v1">
    <attr name="JSON_DATA" columnsize="16777216" xs:type="string" other:xPath="/"  other:valueformat="aggregate"  />
  </api:info>
  <api:script method="GET">
    <api:call op="jsonproviderGet" >
        <api:push/>
    </api:call>
  </api:script>
</api:script>
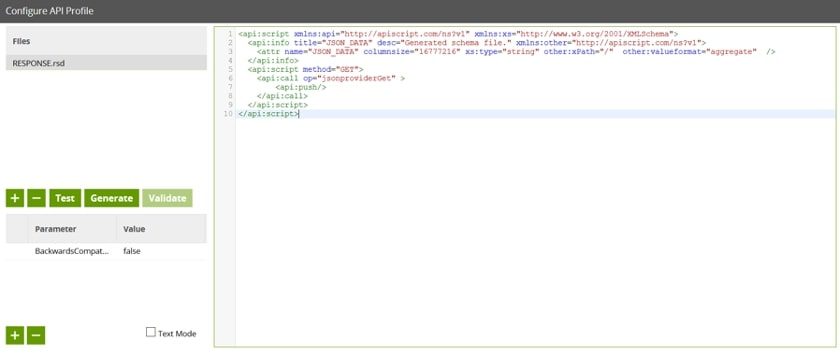
Fill in Filename as RESPONSE and leave all the other fields as they were. Now, paste the RSD definition (the xml-like blob of code above into the editor on the right), click OK and OK again to come out of the Manage API Profiles dialogue. The result should look like this:
Let’s now find the API Query component in the Components section of the UI and drag that onto the canvas:
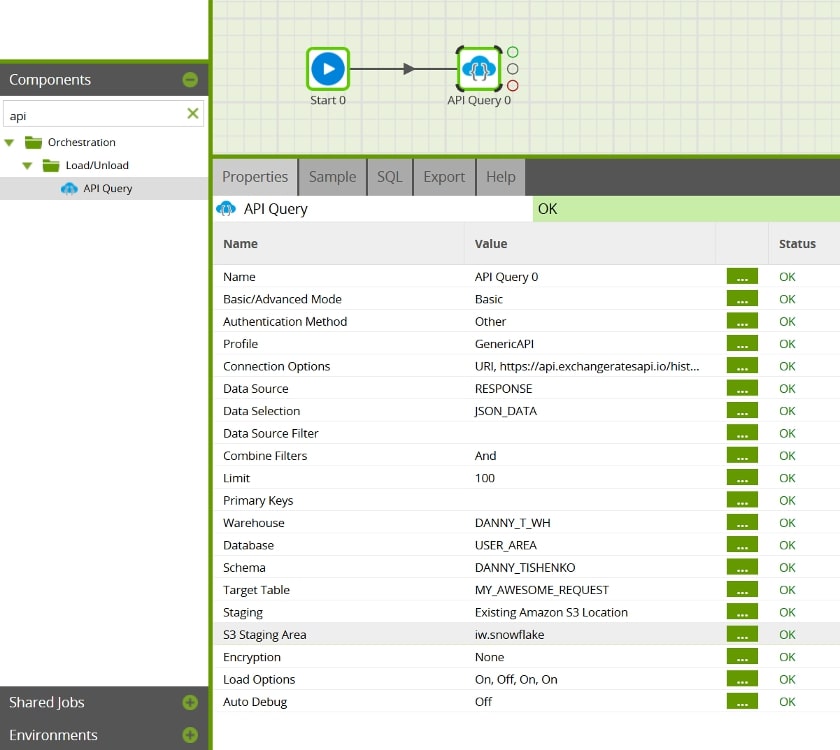
In the Properties pane, click on the ellipsis next to Profile, and select our GenericAPI from the drop-down box. Besides the standard properties you need to modify for this component, click Connection Options, click the add button to add a new parameter, select URI under parameter, and value as the endpoint URL (along with any URI parameters like /history?start_date=2010-01-01 that you need). Click OK, and continue to fill in the rest of the component parameters like you normally would.
And We’re Finished (Kind of)
You can test that everything works by going to the Sample tab and clicking the refresh Data button to sample the data. If you followed the tutorial up to this point, this should be your output:
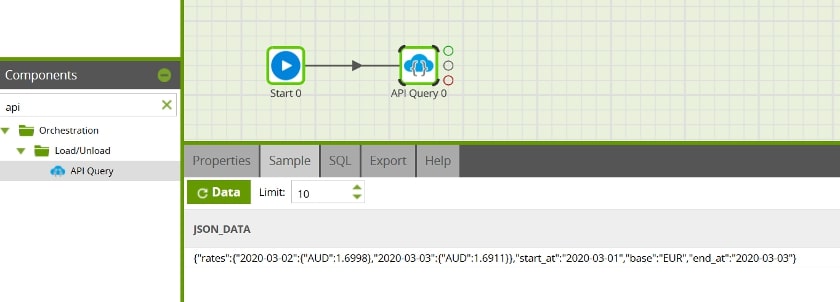
So that’s it! You now have an API profile that you can reuse across multiple jobs, environments or what have you, and you only need to modify the URI connection property to get a different reply. As long as the response is expected to be JSON format, you’ll be good.
Extra Credit: Recruit the Power of Snowflake
If you’ve been using Matillion for a bit, or even if not, you might imagine a central table that contains list of all the URIs you want to hit during your ELT execution, which means you can use an iterator component to call the API query component for each of the URIs dynamically. Pretty neat.
Though more likely right now, you might be thinking, “Well, that’s all well and good, Danny, but what am I going to do with this JSON string?”. If you run this component you should end up with a table (in Snowflake) that contains a row with your JSON response as text (this is important—the datatype will be VARCHAR rather than VARIANT). You’ll need to:
- Parse the data into VARIANT data type, using Snowflake’s PARSE_JSON( ) function
- Parse the variant datatype to extract the parts of JSON you’re interested in, likely using FLATTEN( ) function
Snowflake will do the heavylifting here and, of course, you can orchestrate the whole thing in Matillion by creating a transformation job to do that, chaining the parsing job at the end of the query.
If you’re not sure how, thankfully, one of my colleagues has written a blog post covering just those topics: an introduction to semi-structured data formats and, more specifically, querying JSON data in Snowflake.
I will leave you with a piece of Snowflake SQL code that I’ve used to extract the data that I needed from this request:
select
    parse_JSON(JSON_DATA)::variant as raw_json
    , flat.key::date as date
    , flat.value:"AUD"::float as AUD
    , flat.value:"GBP"::float as GBP
    , flat.value:"USD"::float as USD
    , 1 as EUR
    , flat.*
from "USER_AREA"."DANNY_TISHENKO"."MY_AWESOME_REQUEST"
, lateral flatten(input=> parse_JSON(JSON_DATA):rates, mode=>'OBJECT') as flat;
It’s pretty simple if you’re familiar with the concepts, but I do encourage you to read Chris‘ posts above or reach out to the InterWorks team if you’re not sure about anything below. Good luck!