This blog post is AI-Assisted Content: Written by humans with a helping hand.
If you’ve tried connecting Claude Teams or Claude Enterprise to Databricks using the official Databricks connector in the Claude marketplace, you’ve probably hit a wall. The connector appears in the directory, you click Connect, and it fails. Depending on where in the flow you are, you’ll see one of a few cryptic errors.
This post walks through why the built-in connector doesn’t work, and the three-step setup that does.
The Errors You Might be Googling
If you landed here from a search, you’re probably staring at one of these:
- “Automatic client registration isn’t supported by Databricks. Edit the connector and add an OAuth Client ID.” Often followed by a reference like
ofid_0c240d5b49d7e386.
- “Authorization with the MCP server failed. You can check your credentials and permissions.” Followed by a reference like
ofid_9d9a445de13ff09f.
The first error is the core problem: The marketplace Databricks connector relies on automatic (dynamic) client registration, which Databricks does not support. There’s no field in that connector to supply an OAuth Client ID, so it can’t be fixed from inside the marketplace connector. In practice, that connector is broken for this purpose.
The second error is more generic — it’s what you get once you’ve moved to a custom connector but something in the OAuth handshake or the target URL isn’t right.
The fix for both is the same: don’t use the marketplace connector. Set up your own OAuth app and add Databricks as a custom connector instead.
The Three Steps
- Create a Databricks OAuth app and grab the Client ID.
- Determine the URL of the specific managed MCP server you want to use.
- Add it in Claude via a custom connector, pasting the Client ID into Advanced settings.
Step 1: Create a Databricks OAuth app
An account admin creates an OAuth application in the Databricks account console. A couple of things that tripped us up:
- A client secret was not required. We connected successfully with the Client ID alone (a public client). If you’ve been adding a secret and it keeps failing, try without one.
- The redirect URLs must include both of Claude’s callback URLs:
Databricks’ documentation on connecting external clients, including the redirect URL setup, is here.
Save the Client ID — you’ll need it in step 3.
Step 2: Find the specific managed MCP server URL
This is the second big gotcha. Your base Databricks workspace URL is not an MCP endpoint. You can’t just paste https://<workspace-hostname> and expect it to work.
Databricks exposes several managed MCP servers, each at its own path, and each one is a separate connector in Claude with its own URL and OAuth scope. The full list of available servers and their URL patterns is documented here.
The main ones:
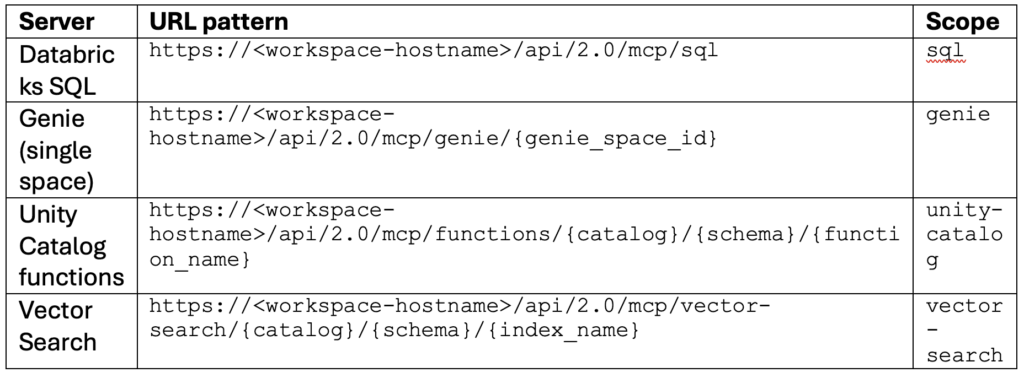
For Genie, the space ID is the segment after /rooms/ in the Genie space’s URL. For example, in https://<workspace-hostname>/genie/rooms/01f15ece98351a19af7349ebf9966d50, the space ID is 01f15ece98351a19af7349ebf9966d50.
Step 3: Add it in Claude as a custom connector
Do not use the built-in Databricks connector. Instead:
- Go to Customizations > Connectors > Add custom connector.
- Enter the managed MCP server URL from step 2.
- Under the connector’s Advanced settings, paste the OAuth Client ID from step 1.
- Add the connector and authenticate.
Claude’s reference for setting up custom connectors with remote MCP servers is here.
A note on Genie and “Authorization failed”
If SQL connects but Genie (or another server) still throws the “Authorization with the MCP server failed” error, the connection plumbing is almost certainly fine — the problem is more likely permissions on the underlying resource. The authenticating user needs access to the specific Genie space and the SQL warehouse behind it. A successful connection to one server doesn’t guarantee access to the resource behind another.
Summary
The short version, if you remember nothing else: