
Well, this turned out to be longer than anticipated. You know your blog’s too wordy when your TL;DR needs some abridgment (exaggerating!). If you are here just to get a quick glance at what Gitpod is, I suggest you stop reading right now and head on over to the quick start section of Gitpod’s docs and focus your attention span on the three-step program:
- Find the repository you would like to open in Github.
- Add the gitpod.io/# prefix to that repo’s URL.
- There’s no step 3! You just need to wait for the workspace to start, and maybe sign in/up.
You can also check out the dbt Gitpod example repository if you just want to see what’s up and play around a little bit with the working version of what’s in this blog.
If you are here for a guide, strap in.
Introduction
If you’re working with dbt, then today more than ever, there are several options available if you want to set up your project and start writing and executing models.
The two main ones are plain ol’ dbt Core and dbt Cloud. There are other options and variations along these themes, especially when looking at where to deploy production dbt runs, but we’ll focus on development environments and these two main options in particular.
If you have an IDE you like, you’re happy with your current development environment in general, use CLI and crack on, dbt Core will be your best bet.
dbt Cloud is proprietary web-based IDE by maintainers of dbt Core itself. dbt Cloud allows you not only to develop your models in the integrated editor, but also schedule and execute jobs, manage documentation and generally provide a one-stop-shop portal for your team to interact with your data warehouse.
Why Not Just Use dbt Core or Cloud?
Besides all the good stuff both of these options above offer, there are of course drawbacks, too. For example, if you choose the dbt Core route, you’ll have to fiddle with the installation of the dbt Core, Python, Python connector for Snowflake, etc. on your own machine, and like anyone who’s ever used Python libraries would tell you, there is a non-zero chance you’ll be stuck in dependency hell, trying to make sure you have compatible versions of each of the libraries dbt depends on.
You could use virtualenv or even local Docker (especially with VSCode remote containers, licence permitting) to encapsulate and abstract your dbt installation and to a large extent avoid some of this. That doesn’t, however, prevent issues if you are on an M1 Mac, say. To be fair, those specific issues (arm64 architecture compatibilities with dbt) have been resolved, but for a good while, you had to downgrade your dbt all the way to v0.16 just to get something working.
dbt Cloud abstracts a lot of that pain, but it comes at a price. There is a generous free tier, but that is limited on collaboration (obviously), and also doesn’t remove the need to “set up” the environment for each new user (something that is a drawback to local development environments as well).
In this blog, we’ll be discussing yet another option—one that I think best incorporates aspects of each of those other options, while minimising or eliminating some of those drawbacks. It also applies to any code project you have, not just dbt, so that’s another win.
Enter Disposable Containers
As mentioned above, one of the approaches to setting up local development environment is to use containers, specifically Docker, perhaps with VSCode remote development containers. This setup was the one I was rocking for the last year and a bit; it was by no means simple or quick to set up, not to mention it being somewhat overkill for the task.
Extending this further: What if you could spin up containers, within which your code compiles and runs, and those containers are around only when you need them, and when you don’t, they disappear?
Adhering to the principle of disposable, code-defined infrastructure of Infrastructure-as-code Fame (IaaC), can we also create a development environment that is harmonious, contains all the necessary libraries and dependencies for our project, Git-versioned, and crucially shareable across everyone and anyone using the project?
After a bit of brief weekend reading on the subject, it turns out there are a few options in this space. GitHub (if that’s what you’re using for your remote backend) has launched a service called codespaces. It’s a little pricey, with no free tier, and works only with GitHub (so far as I can tell).
Another option that I think does this better (and cheaper!), as well as one that beat GitHub to the punch, is Gitpod. Gitpod offers all the benefits of codespaces but also adds:
- Much faster start-up because of prebuilt containers
- Free tier / cheaper
- Open source
- Can be self-hosted on AWS EKS, GCP GKE, Azure AKS, Kubernetes
- Multiple editor support (not just VSCode)
- One(ish)-click development environment spin-up
For a quick side-by-side overview of Gitpod vs. GitHub codespaces, check out this blog, as well as this article from the Gitpod team (keep bias in mind).
Vagrant is another option I’ve yet to explore. It’s by well-known HashiCorp of Terraform and Vault fame, so it definitely warrants a look, but that’s for a future post.
TL;DR Steps
- Add environment variables to Gitpod.
- Add Gitpod config files (.gitpod.yml and .gitpod.dbt.dockerfile) to dbt project repo and push to remote.
- Modify profiles.yml to reference environment variables.
- Link your remote with Gitpod.
- Launch new workspace.
Configuring Gitpod
I’ll leave it to you to sign up to their services on their website. You can use your GitHub account to sign up securely, which is what I did.
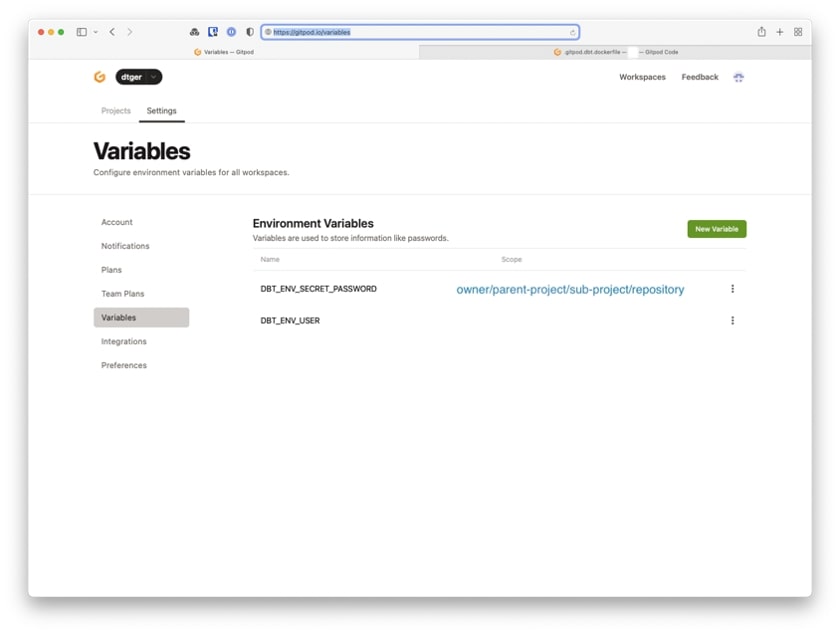
Add Environment Variables to Gitpod
We’re going to be using a few parameters in this project. Specifically, we’ll parameterise our profiles.yml file with username and password, values for which dbt would pull from environment variables. You can set environment variables in many different ways, but I’ve put those in Gitpod, such that those variables are available automatically to all new workspaces. So your variables are set in Gitpod, get replicated into your container once it’s up and used by dbt when connecting to your target.
Head over to the user-specific environment variable section of settings and add two new variables:
- DBT_ENV_USER which is the user you’d like to use when connecting to Snowflake via dbt
- DBT_ENV_SECRET_PASSWORD – password for the user above
Conventionally, environment variables for dbt are prefixed with DBT_ENV_, and any variable that is prefixed with DBT_ENV_SECRET_ will also have its value scrubbed from logs and error messages, so it’s ideal for storing … ahem … secrets. For more details and differences between secret and non-secret variables, check out this docs page:
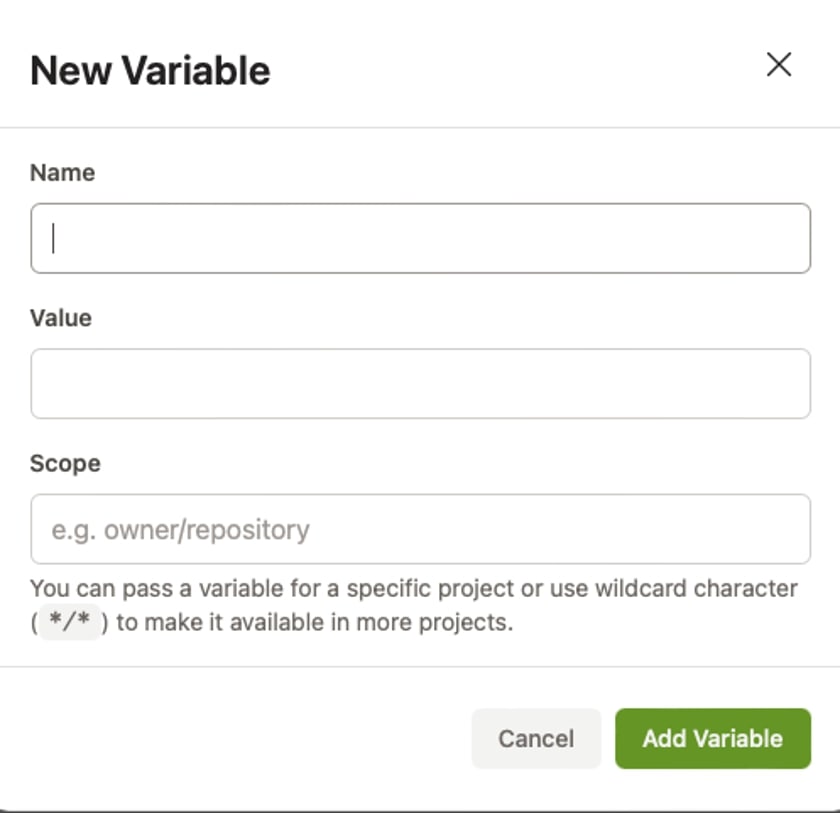
As you can see from the prompt, you can leave scope at */* . This would make these variables available across all the projects in your account. If you prefer, you can instead specify variable’s scope, such that the variable would only apply to particular project or path. So if my repository is located at https://gitlab.mydomain.com/foo/bar/baz/quux.git, my full scope would be foo/bar/baz/quux. A sister project with path foo/bar/baz/thud would be out of scope for these environment variables.
Side note: I had to look up the next bit after baz. Cue a brief(ish) detour down the Wikipedia rabbit hole for the curious.
Note on point: I could never get Gitpod to pull those into environment variables in my terminal automatically, hence the reason why I included explicit command eval $(gp env -e) in my configuration file below. It works flawlessly with scope */*, which leads me to believe that the subproject hierarchy in our internal GitLab instance has something to do with it:
Gitpod Configuration Files
From here, you need to add two files to the root of your dbt project (alongside dbt_project.yml):
- .gitpod.yml: this is the file that contains Gitpod configuration specific for your project.
- .gitpod.dbt.dockerfile: this is the Dockerfile that describes the environment you want your project to run.
.gitpod.yml
tasks:
  - name: verify
    command: |
      # pull user-specific environment variable into remote terminal
      eval $(gp env -e)
      # set directory where profiles.yml is stored
      export DBT_PROFILES_DIR="${GITPOD_REPO_ROOT}/profiles"
      # check dbt can connect to target
      dbt debug
      # update dbt dependencies
      dbt deps

image:
  file: .gitpod.dbt.dockerfile
The special mention here goes to the image key, which will reference the Dockerfile we’ll be using as basis for our environment.
.gitpod.dbt.dockerfile
Strictly speaking, using a custom Docker image isn’t necessary. You could get away with just using .gitpod.yml file and adding installation steps for dbt through start tasks. Beyond the fact that I had Dockerfile handy, the reason I’m using this Dockerfile particularly is to do with the base image gitpod/workspace-python being lighter in bit-weight than the default gitpod/workspace-full. The latter comes with a lot of tools pre-installed, tools that we didn’t really need to run dbt.
The full list of images pre-built for Gitpod can be found here, and you can also roll your own if you wish:
# base image + lang-python
FROM gitpod/workspace-python

# run update -- likely redundant, but worth making sure
RUN sudo apt-get update -y && \
  sudo apt-get dist-upgrade -y && \
  sudo apt-get clean

# install dependencies, dbt, check installed correctly
RUN sudo pip install --upgrade pip dbt-snowflake  && \
  dbt --version

# install sqlfluff (optional, but recommended)
RUN sudo pip install sqlfluff
Gitpod will be building this image for us by pulling base image gitpod/workspace-python (currently, Python version 3.8) and run the steps defined in our Dockerfile. Part of the script above is verification of the successful dbt installation (dbt –version), which would check dbt is installed successfully.
You absolutely should add these two new configuration files into Git index, so you can start version-controlling your development environments the same way you do (you do that, right?) the rest of your code. Bear in mind here that RUN commands should execute as sudo, otherwise the build will fail. I found that out the hard way.
Modify Your profiles.yml
Because dbt needs to connect to your target data warehouse, you’ll need to tell it how to do that. Normally, you’ll have dbt’s profiles.yml stored in your dotfiles on your system or, in the case of dbt cloud, configured through the cloud UI.
With Gitpod, you’ll need to modify the former, as well as check that file into your repository. As an example, here’s what my profiles.yml looks like:
default:
  target: dev
  outputs:
    dev:
      type: snowflake
      account: interworks.eu-central-2
      user: "{{ env_var('DBT_ENV_USER') }}"
      password: "{{ env_var('DBT_ENV_SECRET_PASSWORD') }}"
      role: DATA_ENGINEER

      database: DBT
      warehouse: TRANSFORMATION_WH
      schema: DANNY_TISHENKO
      threads: 4
      client_session_keep_alive: False
      query_tag: 'Gitpod DBT'
A couple of notes:
- Here, I’ve only parameterised user and password entries with values from environment variables DBT_ENV_USER and DBT_ENV_SECRET_PASSWORD respectively, while leaving others hard-coded. Realistically, though, you will want to adjust values within this file to your specific setup, perhaps adding more parameters/variables for database, warehouse, role and other entries.
- Also, because of the ephemeral and disposable nature of the containers, we will check the profiles.yml into our repository, so make sure you don’t check in anything sensitive on accident, and before hard-coding certain values, bear in mind that your teammates using this repository may want to configure their own values in future. Don’t stress too much about the latter point as this can always be parameterised later.
- Lastly, I’ve added profiles.yml to its own folder within my project, so that the location of the file is now ./profiles/profiles.yml, where . is the root of my dbt project. You may have noticed the command entry in the .gitpod.yml:
export DBT_PROFILES_DIR=”${GITPOD_REPO_ROOT}/profiles”
This environment variable will change dbt’s default behavior to instead look for profiles.yml under the specified directory (without this setting, it would default to user’s ~/.dbt/profile.yml).
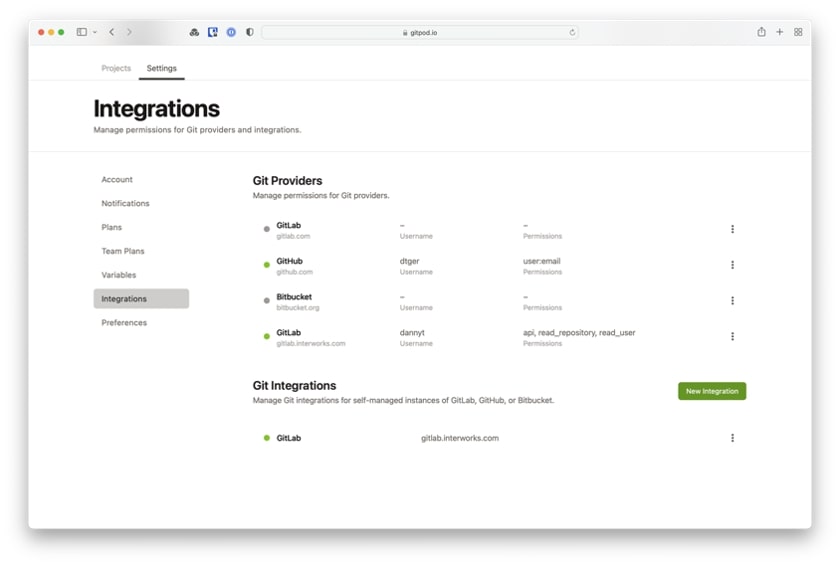
Linking Gitpod to Your Remote
You’re now ready to link your remote to your Gitpod account. If you haven’t already during signup process, head over to Gitpod Integrations settings and connect to your preferred remote. GitHub, GitLab or BitBucket (both cloud- and self-hosted options) are supported.
Here, I’ve connected our internal, self-hosted GitLab instance, whilst using my GitHub account to sign up to Gitpod service:
Click, Click, Boom (Tap, Tap, Tap)
If you haven’t already, push the changes you’ve made to your repository (.gitpod config files, as well as profiles.yml). If you’ve enabled pre-builds, Gitpod should have detected changes in master branch and its configuration and proactively initiated the container build:
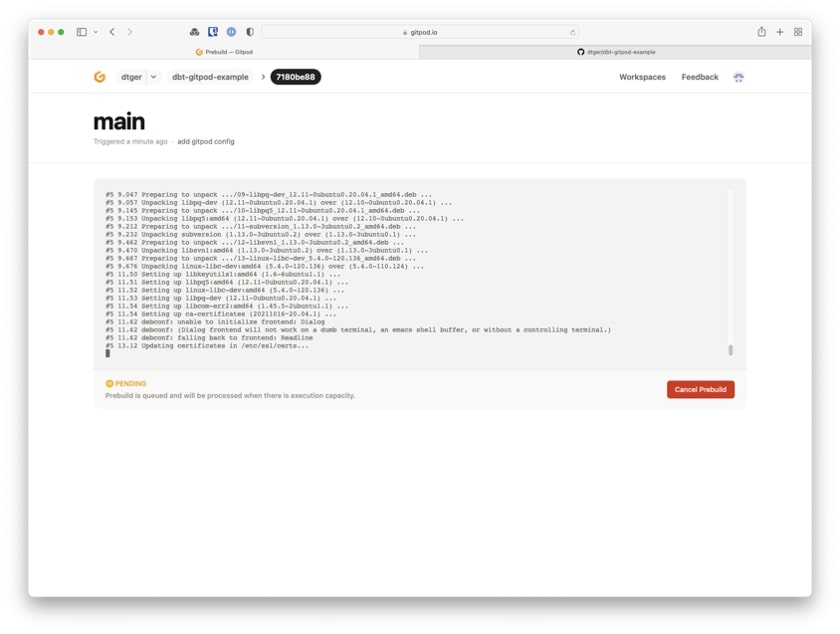
If not, you can trigger a new build yourself:
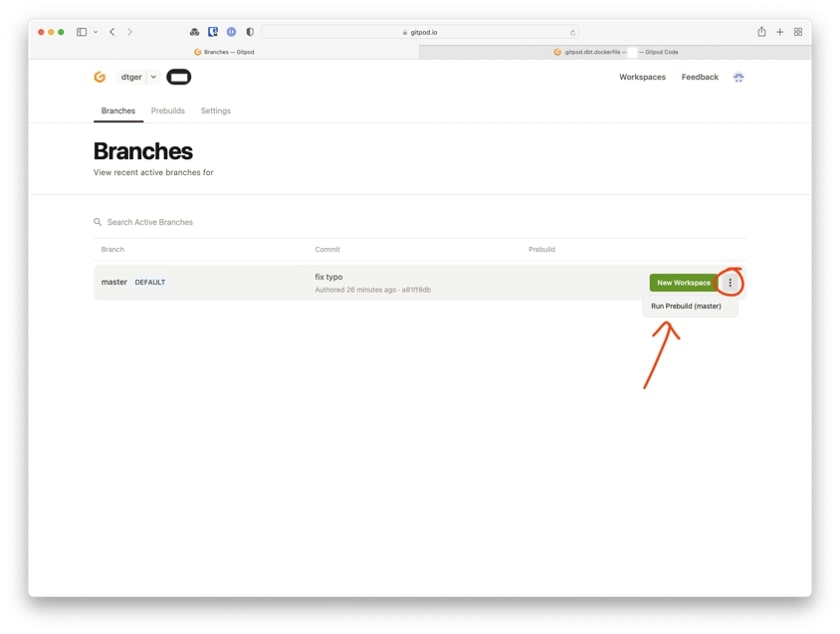
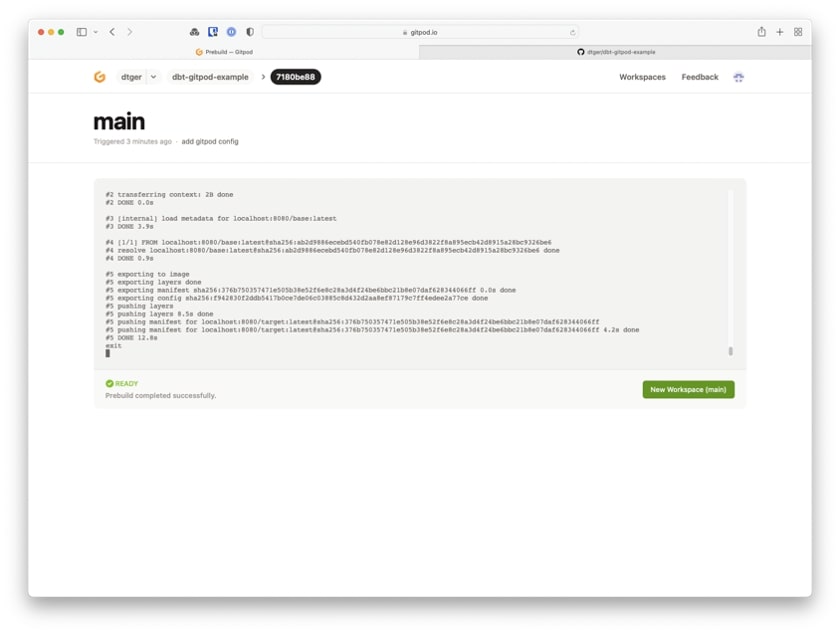
Once this build finishes, you’ll have an option to click on the New Workspace button:

Gitpod will start initialising your new development environment:
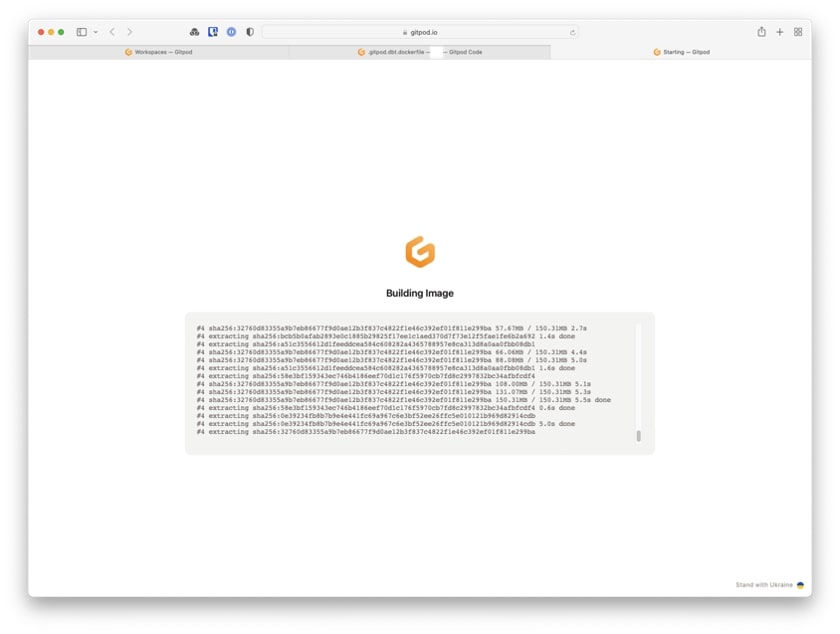
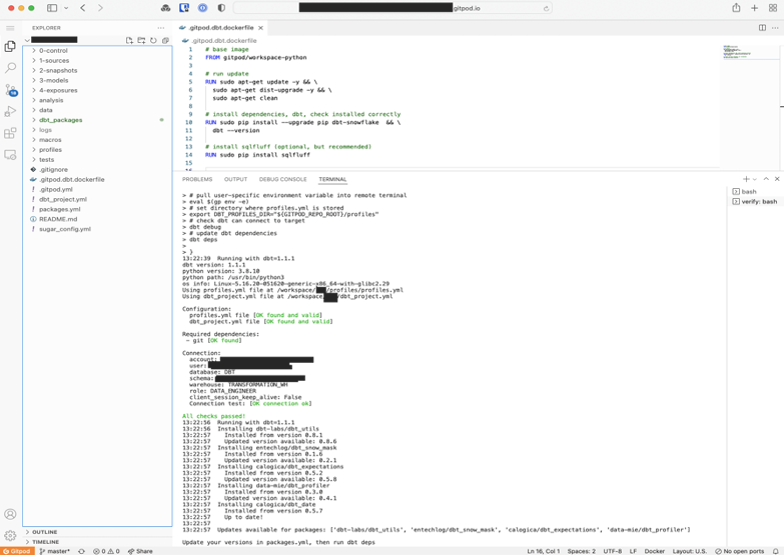
After a few seconds, you’ll be dropped into your preferred editor. I’ve selected VSCode (Browser), where you can also see all the tasks we specified in the command: run successfully:
And there you have it. All this hard work only to tell your manager that you actually haven’t done much of anything useful today.
Resources for Further Reading
- Check out this excellent blog post by the Gitpod team on further “gitpodifying” your environments.
- Also, this post about dev environments as code is 🔥.
- Base image for Gitpod is ubuntu, but if you need to run arch (or another distro) check this blog.
The Latest
-

Snowflake Cortex: Time Series Forecasting Introduction
30 April, 2024 -
PYD129 – Tableau Conference History with Dan Murray
23 April, 2024